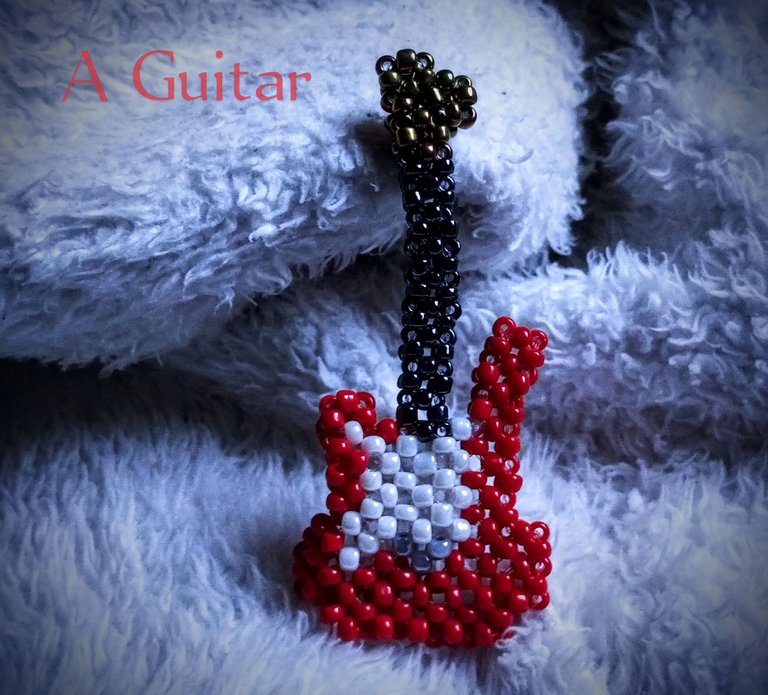
A Beautiful Beaded Guitar 🎸 His Get Well Soon Present
Hello, Hive World! 😊 There have been a few days of no blog from me. Life can sometimes have a way of sneaking up on someone when one is least expected, you will agree.
I had to pause some bead projects I was working on to bead this guitar. The past week has been tough for my family. My son fell sick, and it took a toll on me and the father.
The chances of these little beings catching one disease or another are just too high no matter how much we try as parents; one minute, they might be jumping over you, and the next minute, they might be running a high temperature as a sign of something underneath. When this happens, the best thing we can do is be there for them, comfort them, and take care of them as much as we can.
Thankfully, he is recovering pretty well now, so I decided to bead for him a guitar as a get-well-soon present. It turned out to not just be a get-well-soon for my son, as the whole process of beading the guitar is so soul-soothing for me, and the result is very satisfying and pleasing to the eyes. Somehow, it's helped me recover from all the stress of the past few days. I guess that is what you get for doing something you are passionate about.
 I hereby invite you to join me and see the beading of the guitar 🎸, and I hope that you enjoy and love it as much as I do making it.
Materials used:
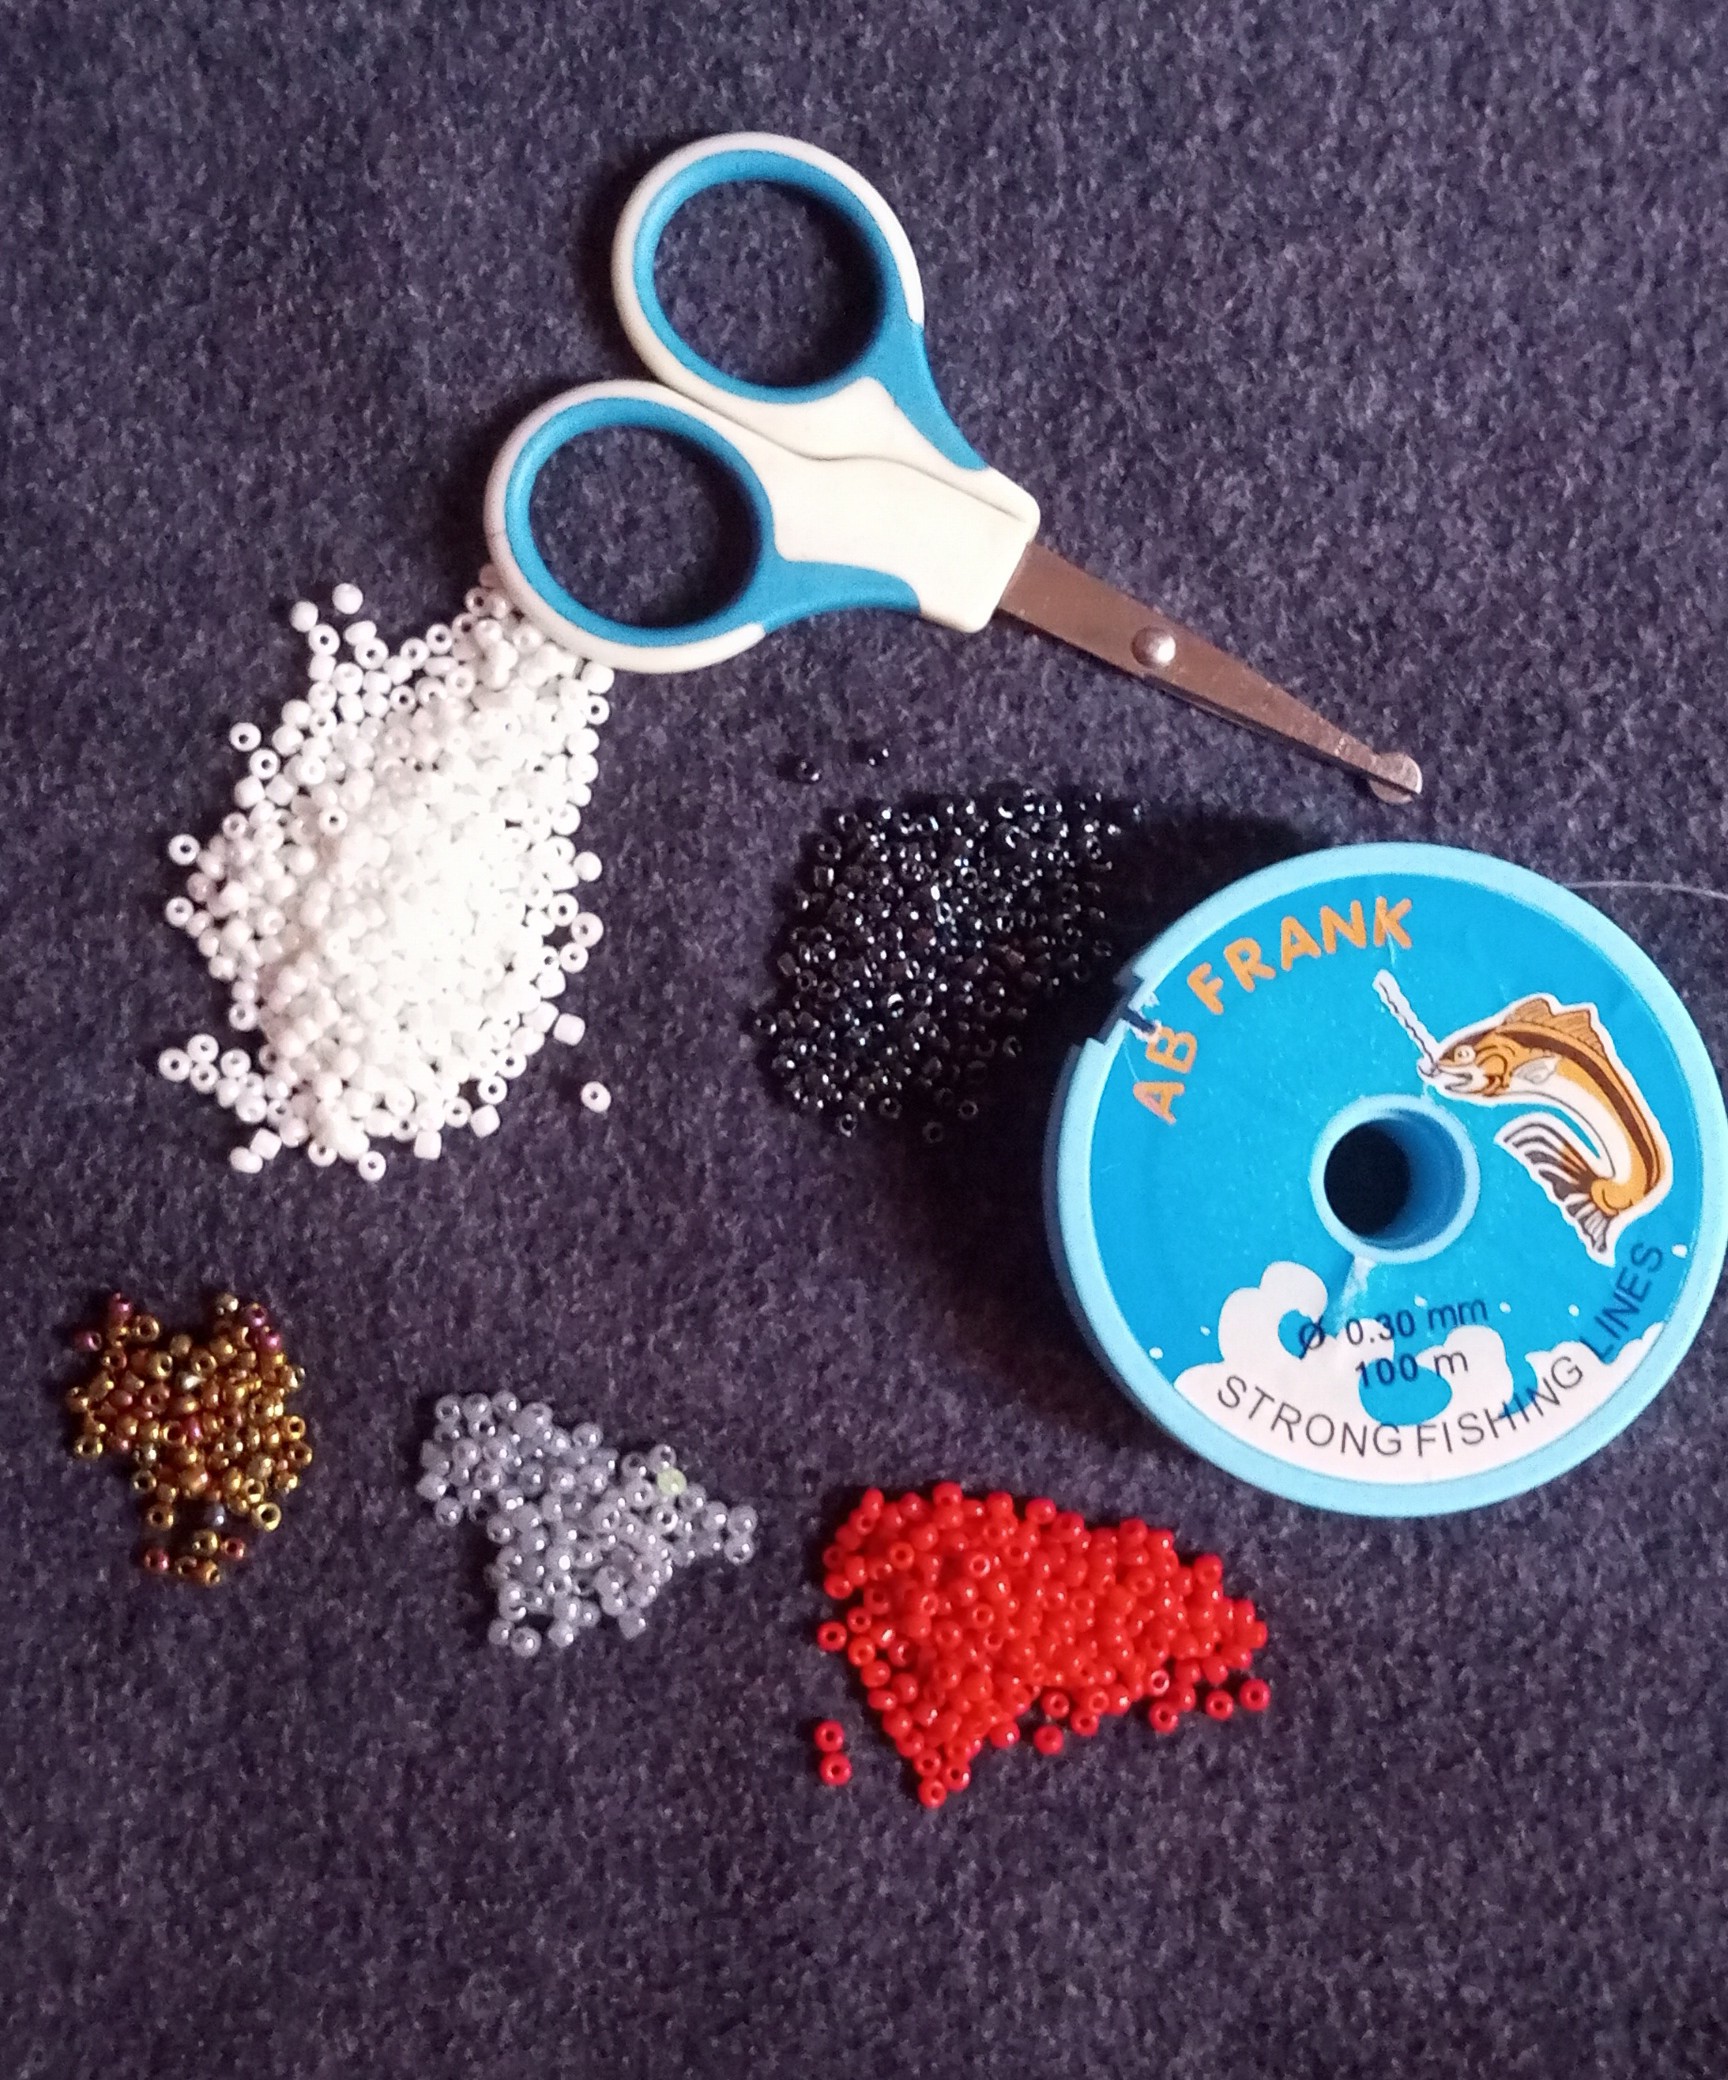
✓ Metal color, black, white, red, and ash color seed beads.
✓ Scissors
✓0.3 fishline
Step-by-step process:
The steps are a bit long, but I try to simplify them as much as possible for your easy understanding; enjoy!
Step 1: I started to make the tip of the guitar by cutting a 90 cm fishline, putting four metal color beads on it, and crossing both fishlines with the fourth bead. 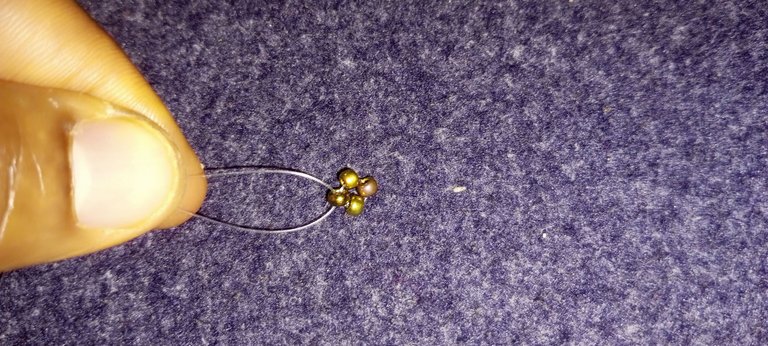 Step 2: I put four beads on the right fishline and then passed the same fishline back through the first bead.
 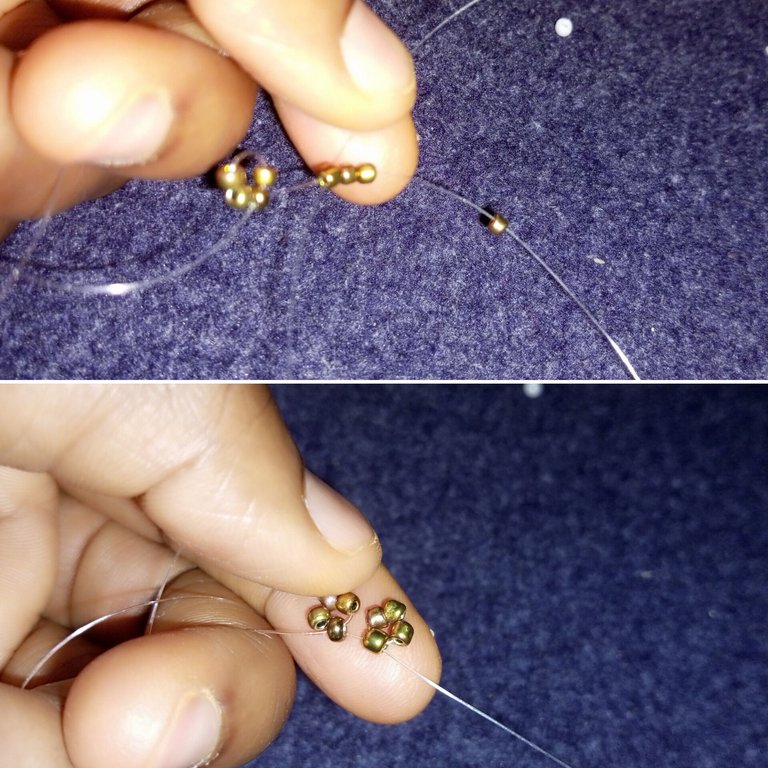 Step 3: I put one bead on the right fishline and then crossed both lines with one bead.
  Step 4: I put one bead on the left fishline and one bead on the right fishline and then crossed both lines with one bead.
 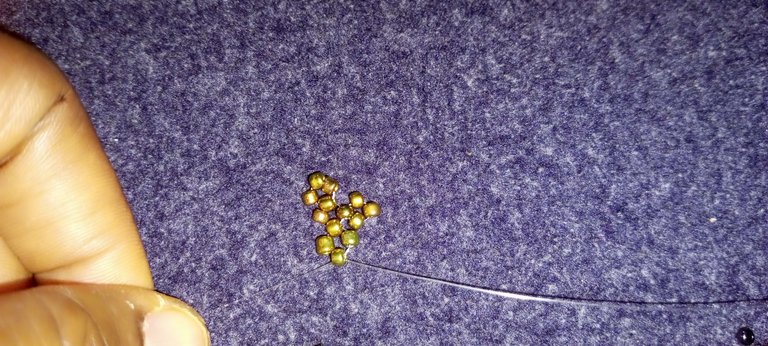 Step 5: Here I introduce the black beads to form the middle of the guitar. I put one bead on the left fishline and one bead on the right fishline and then crossed both lines with one bead.
 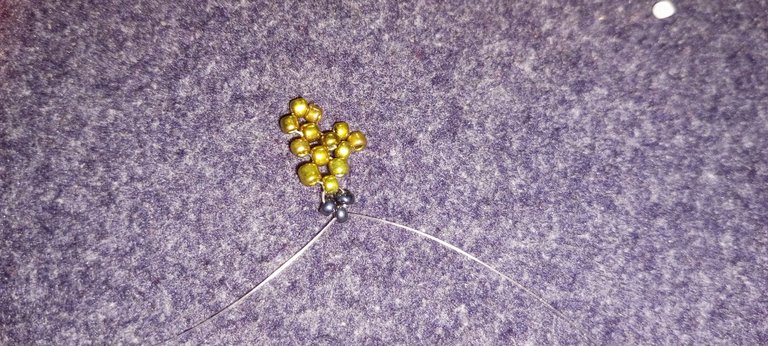 Step 6: I continued to add black beads until I made nine rings of black beads.
 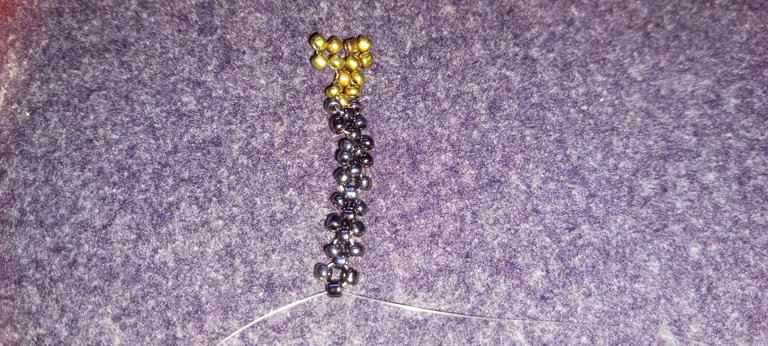 Step 7: Here I started to make the bottom of the guitar by introducing the white beads. I put two beads on the left fishline and then crossed both lines with one bead.
 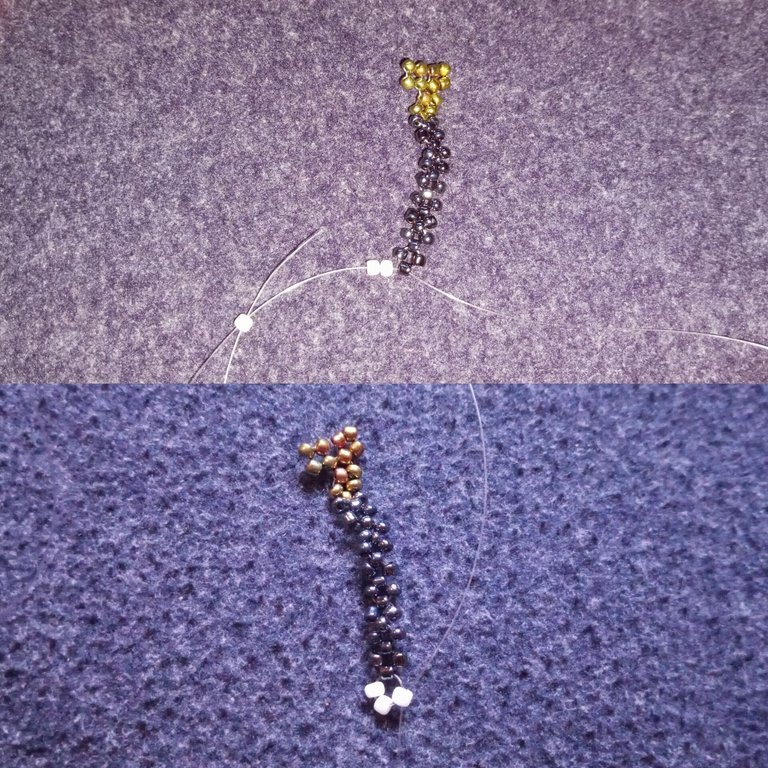 Step 8: Two things were done in step 8. First, I put two white beads on the left fishline and then crossed both lines with one red bead. Second, I put one white bead and three red beads on the right fishline and then passed the same right fishline back through the first white bead.
 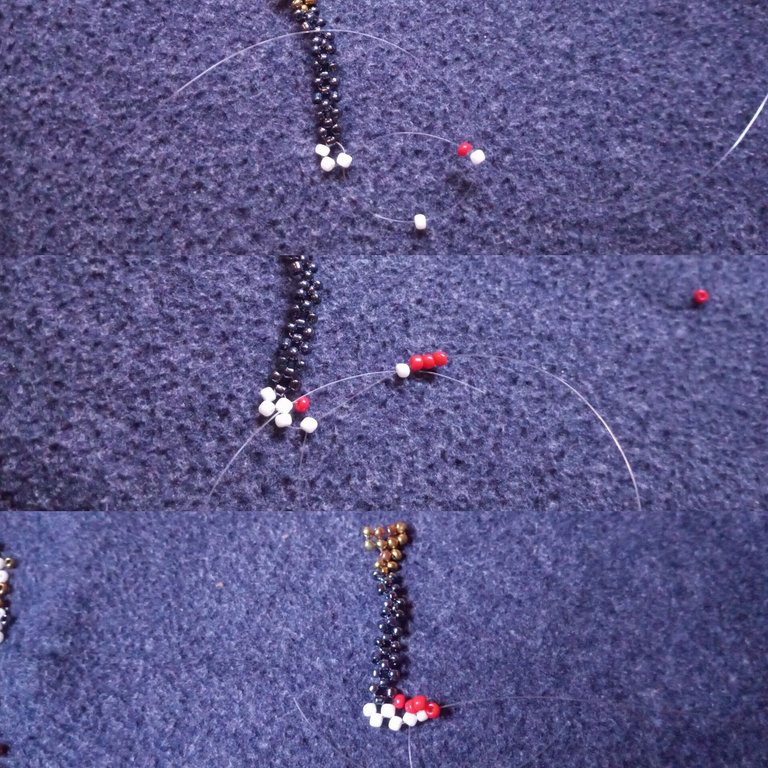 Step 9: In this step, I simply crossed both fishlines with one red bead.
 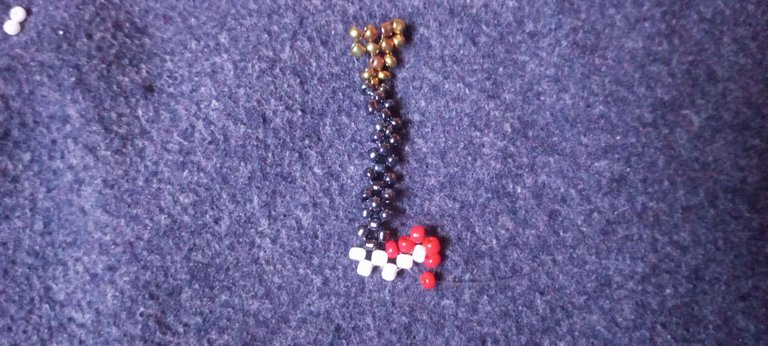 Step 10: I put two red beads on the right fishline and then crossed both lines with one white bead.
 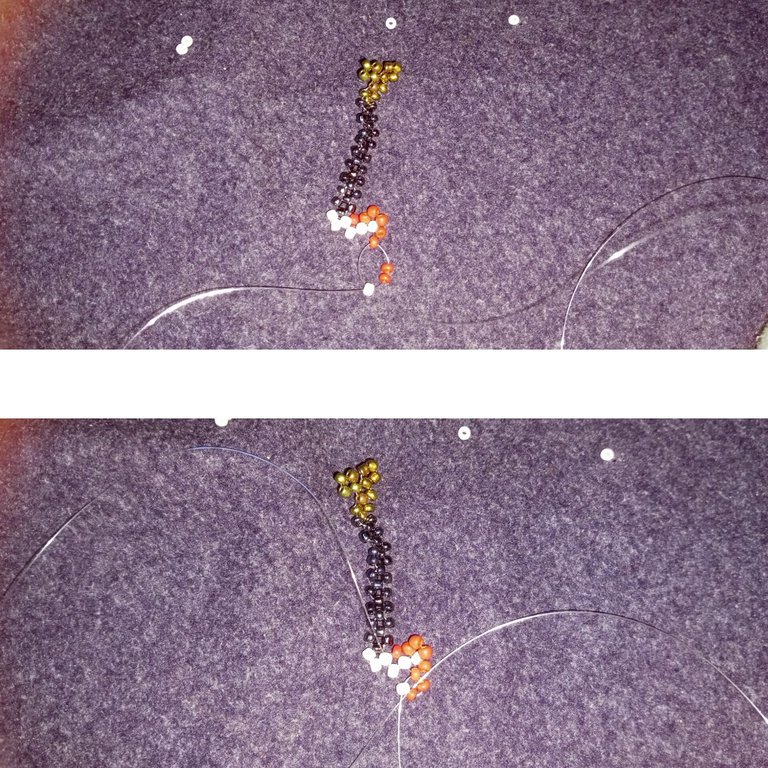 Step 11: I passed the left fishline through the next white bead; I put one white bead on the right fishline and then crossed both lines with one white bead.
 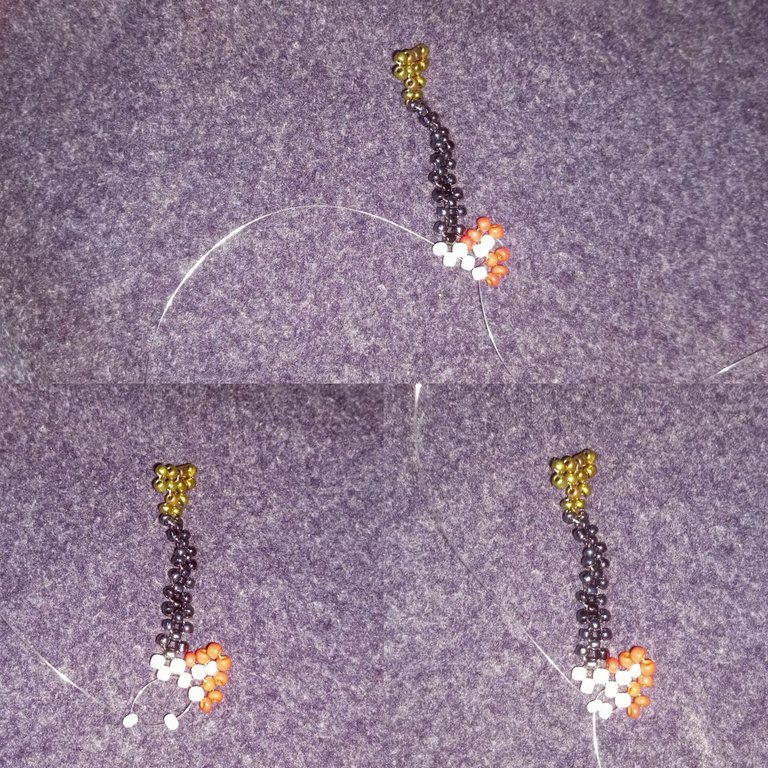 Step 12: I passed the left fishline through the next white bead; I put one white bead on the left fishline and then crossed both lines with one white bead.
  Step 13: I put two white beads on the left fishline and then crossed both lines with one white bead.
 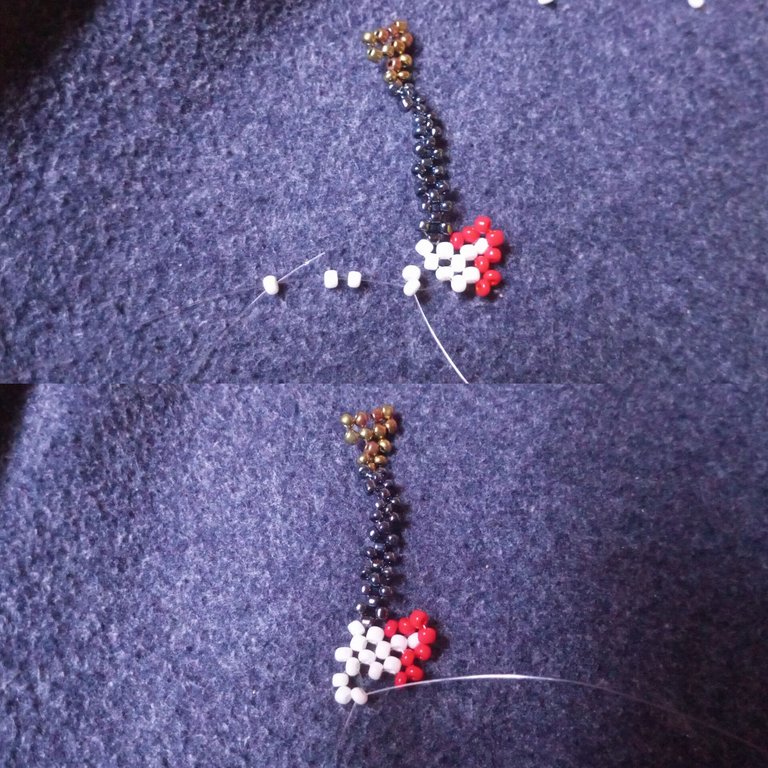 Step 14: Here, I passed my right fishline through the next white bead, put one white bead on the left fishline, and then crossed both lines with one white bead.
 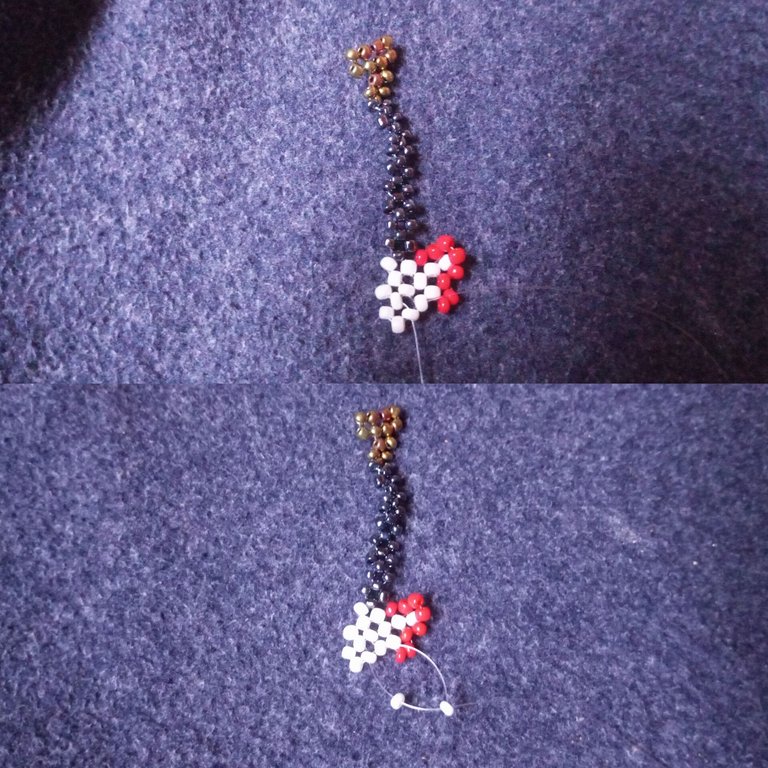 Step 15: I passed my right fishline through the next red beads, put one white bead on the left fishline, and then crossed both lines with one red bead.
  Step 16: Here I put four red beads on my right fishline and then passed the same fishline back through the first red bead.
 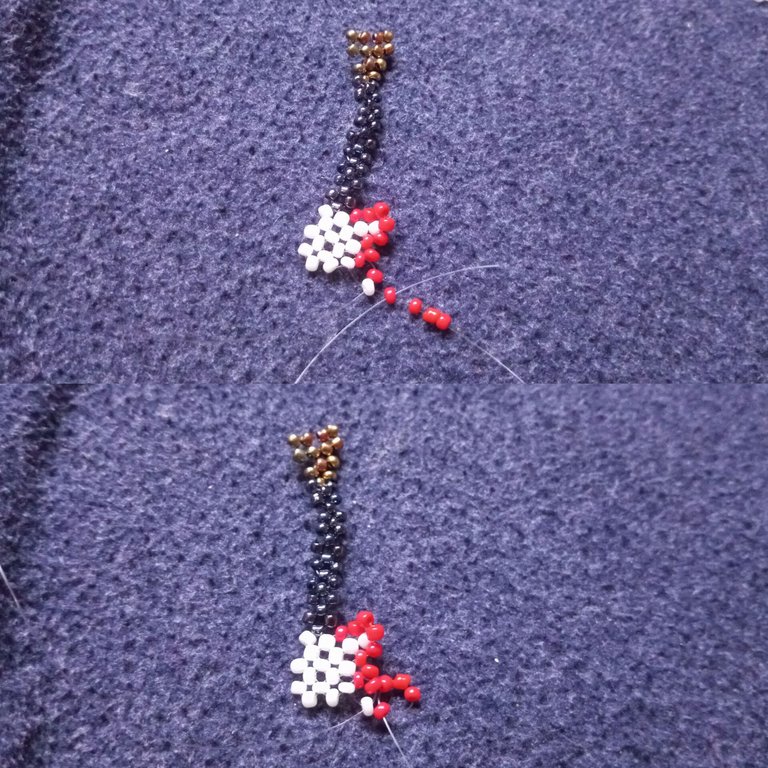 Step 17: I put one white bead on the right fishline, crossed both lines with one white bead, and then passed my left fishline through the next white bead.
 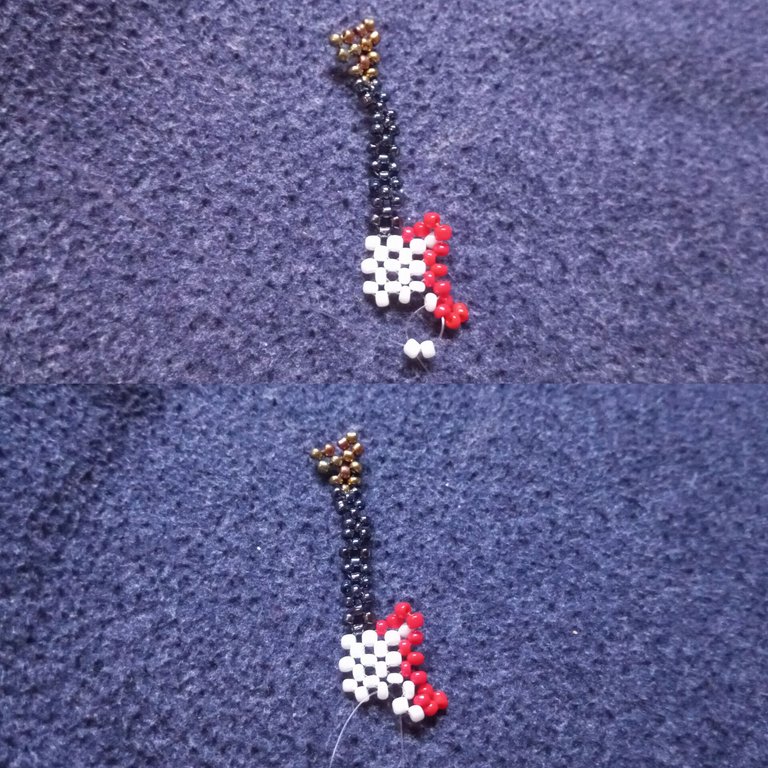 Step 18: I put one red bead on the right fishline and then crossed both lines with one ash color bead.
 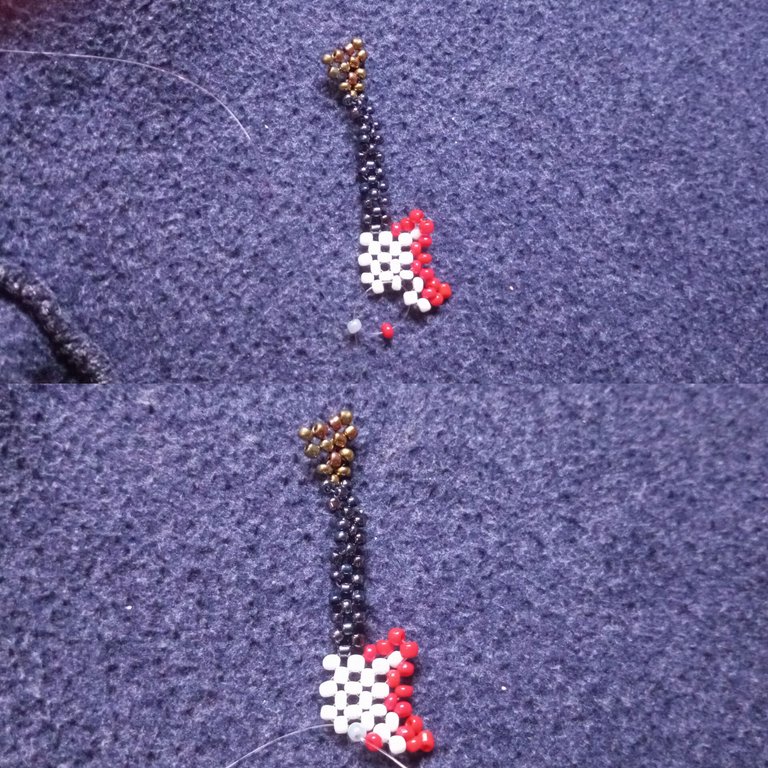 Step 19: I put one ash color bead on the left fishline and crossed both lines with one ash color bead.
 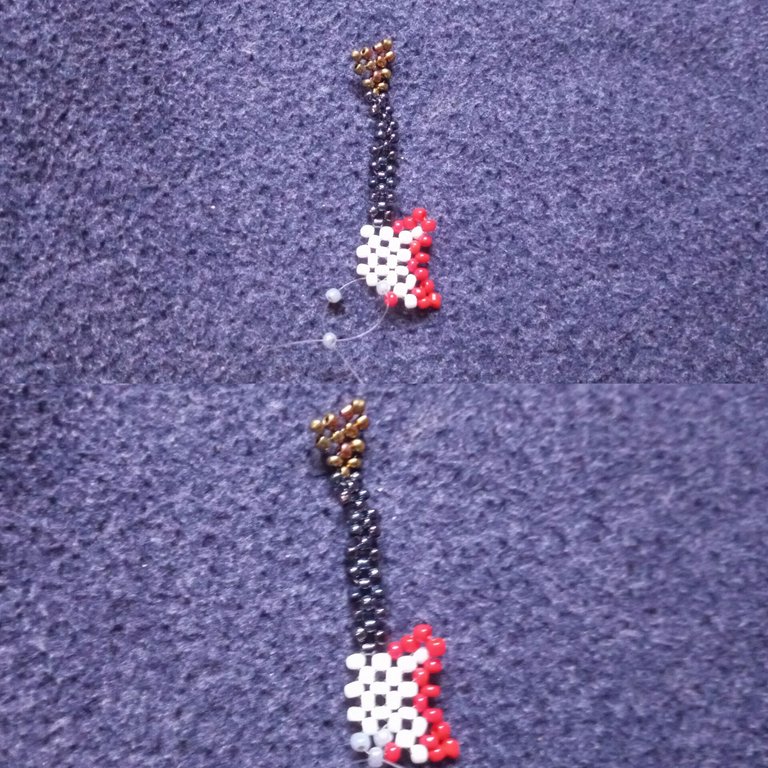 Step 20: I put two red beads on the left fishline and crossed both lines with one red bead.
 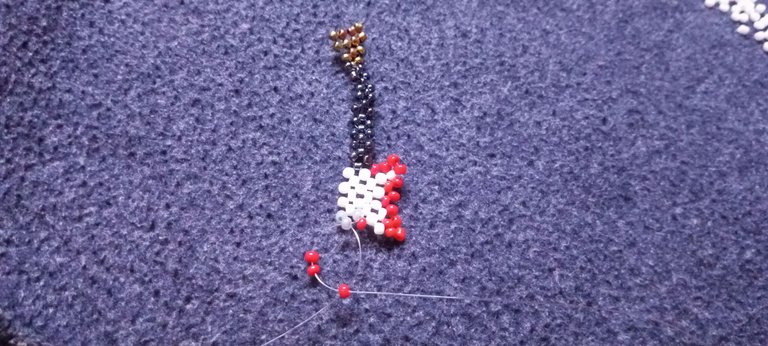 Step 21: I passed the left fishline through the next red bead, put one red bead on my left fishline, and crossed both lines with one red bead.
 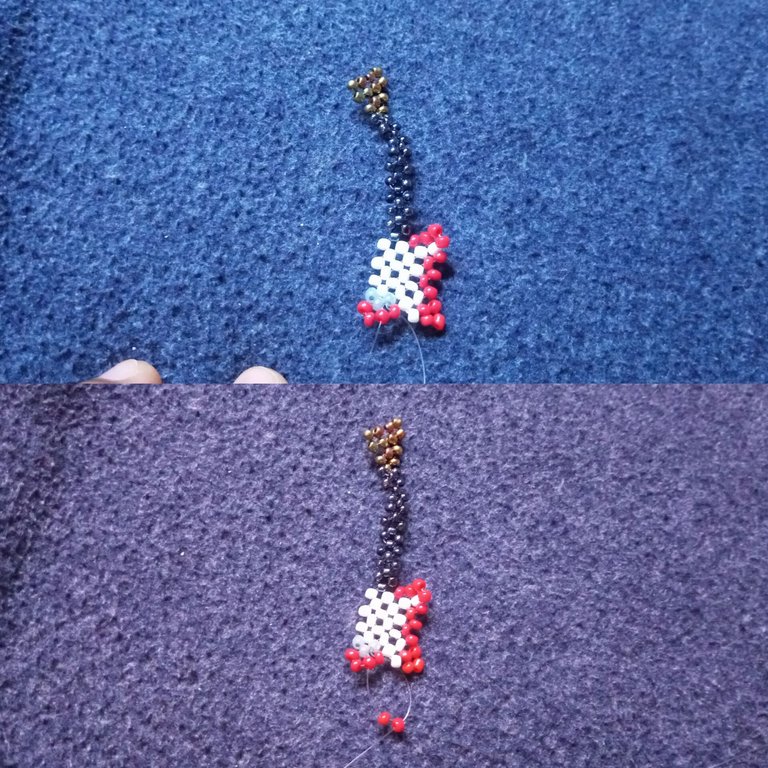 Step 22: I put three red beads on the right fishline and passed the same fishline back through the last red bead, then passed the same fishline through the first red bead; this brought the two fishlines close to each other. I just crossed both fishlines with one red bead.
  Step 23: I put the left fishline through the next red bead, put one red bead on the right fishline, and crossed both fishlines with one red bead.
 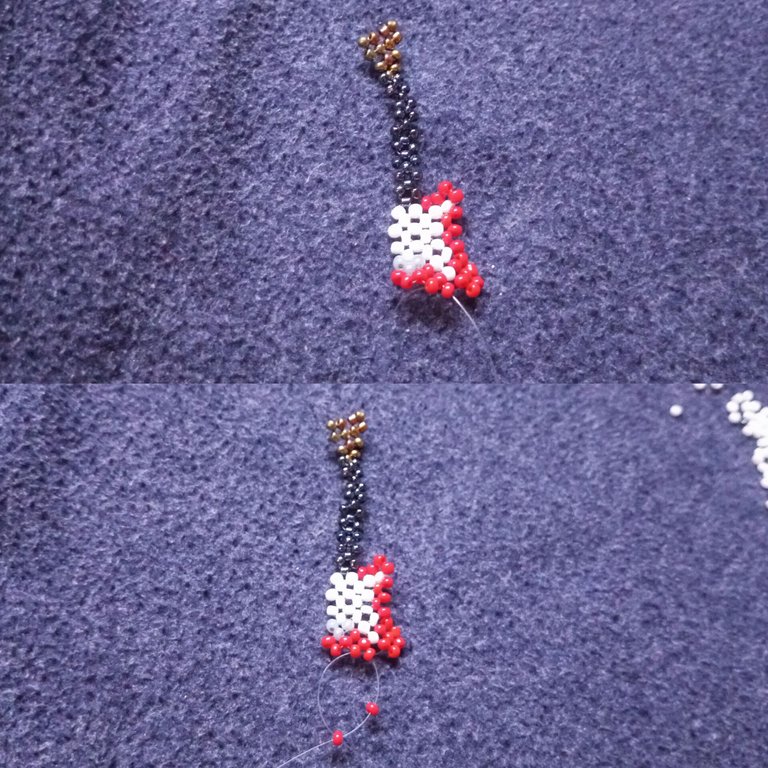 Step 24: I put one red bead on the right fishline and crossed both fishlines with one red bead.
 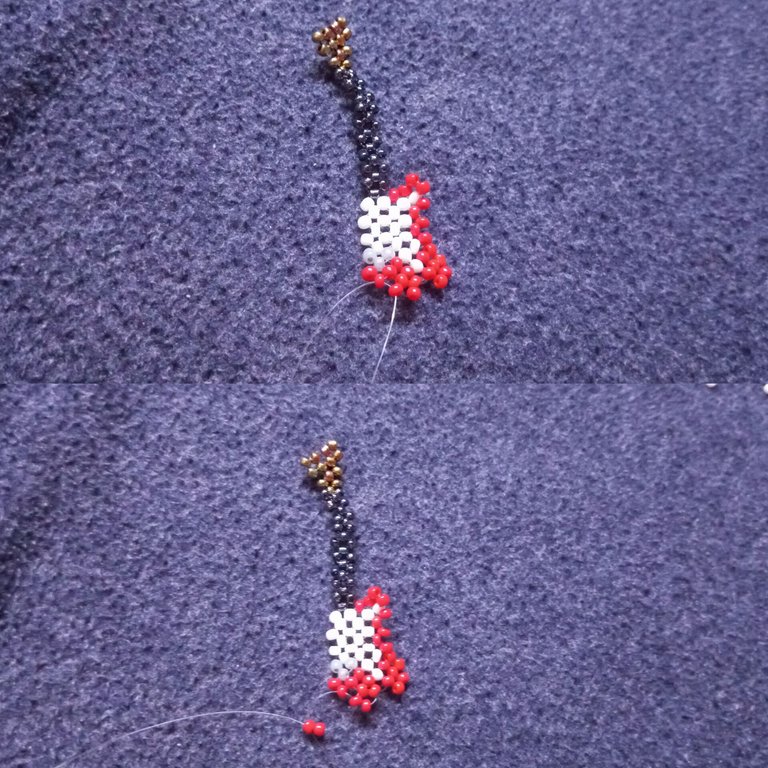 Step 25: I put two red beads on the right fishline and crossed both fishlines with one red bead.
 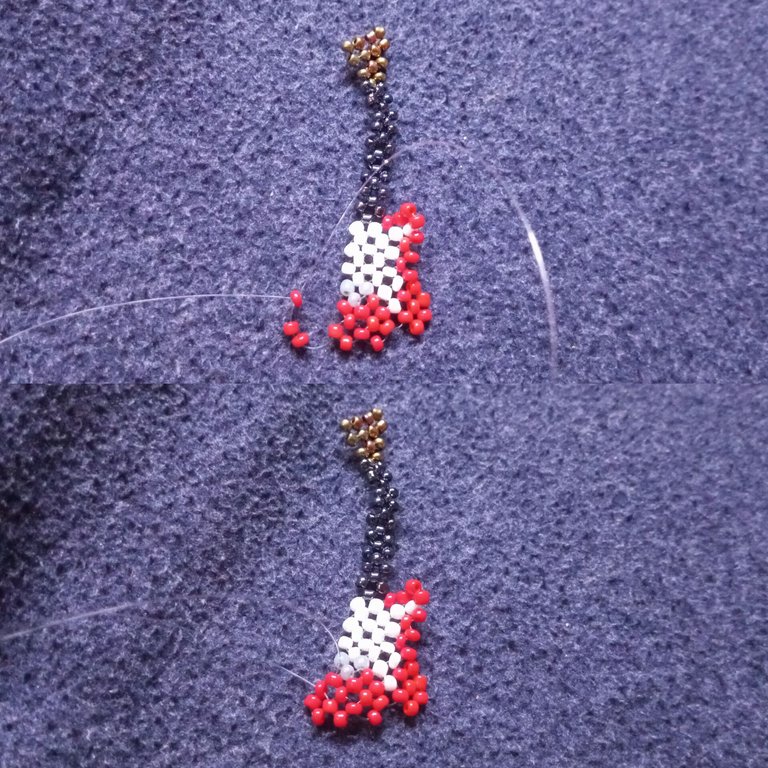 Step 26: I put the right fishline through the next red bead, put one red bead on the right fishline, and crossed both fishlines with one red bead.
 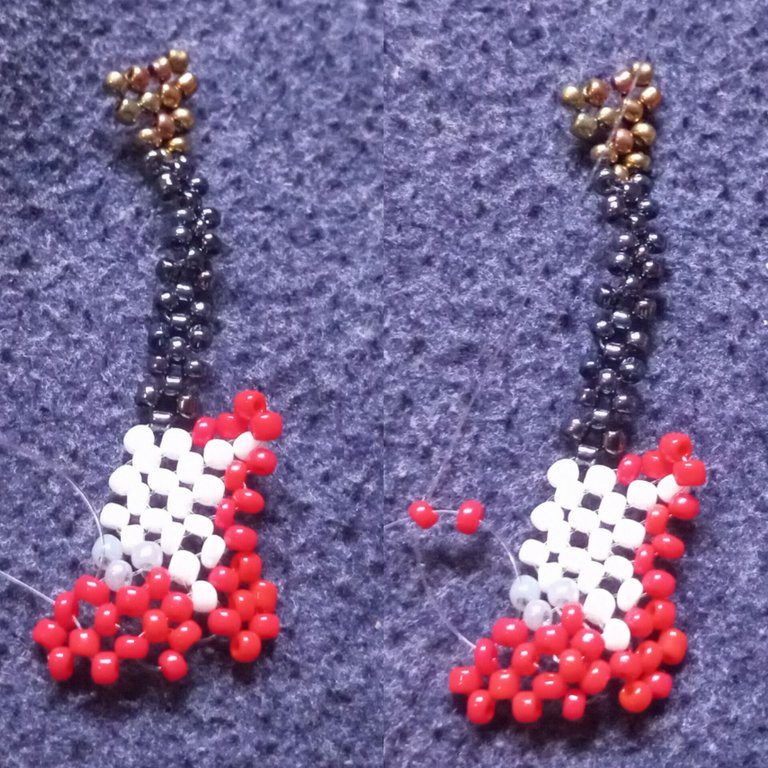 Step 27: I put three red beads on the left fishline and crossed both fishlines with the third red bead. From there, I put three red beads on the left fishline and then passed the same fishline through the first red bead.
 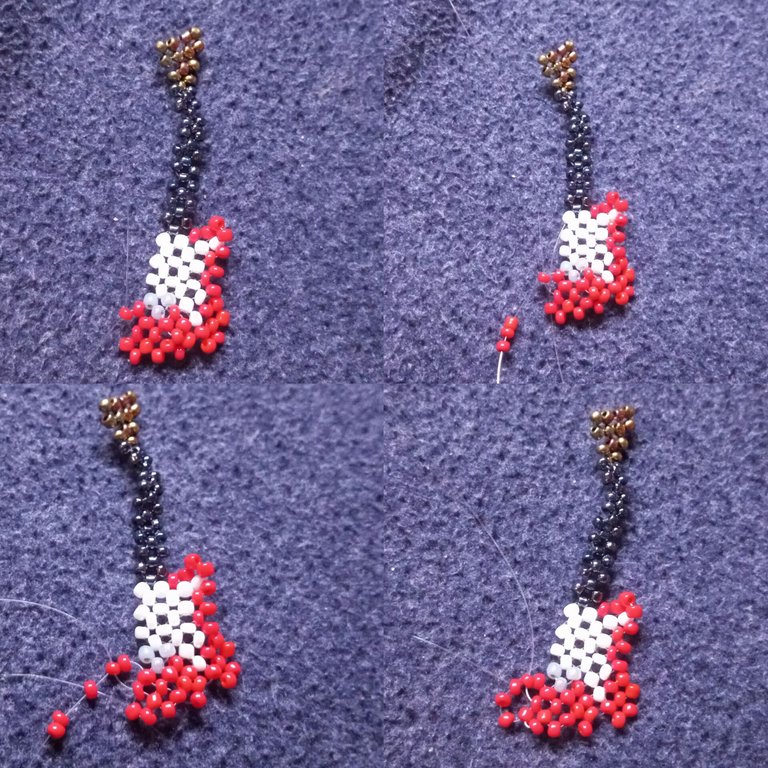 Step 28: I put one red bead on the right fishline and crossed both fishlines with one red bead.
 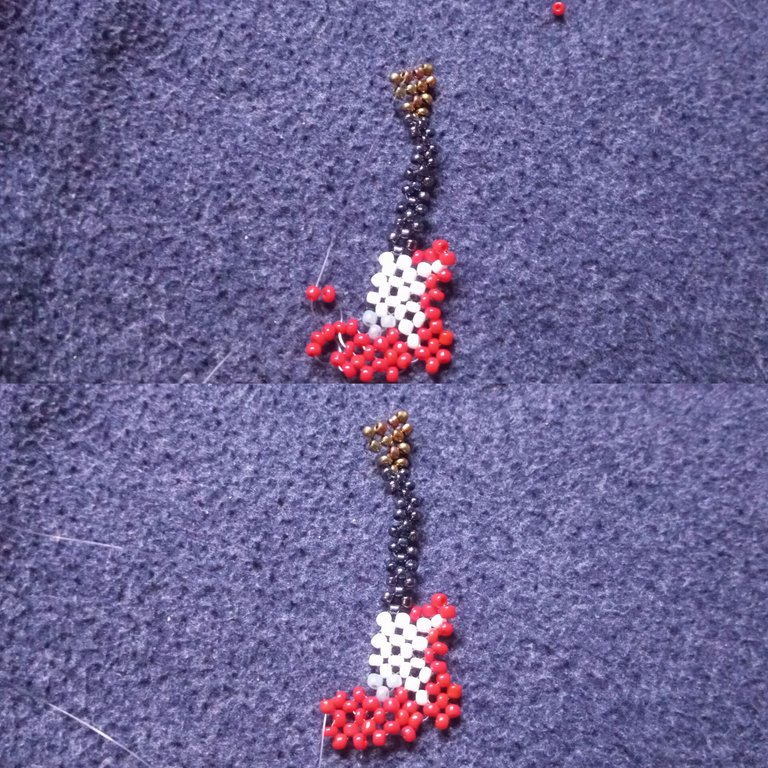 Step 29: I put two red beads on the left fishline and crossed both fishlines with one red bead.
 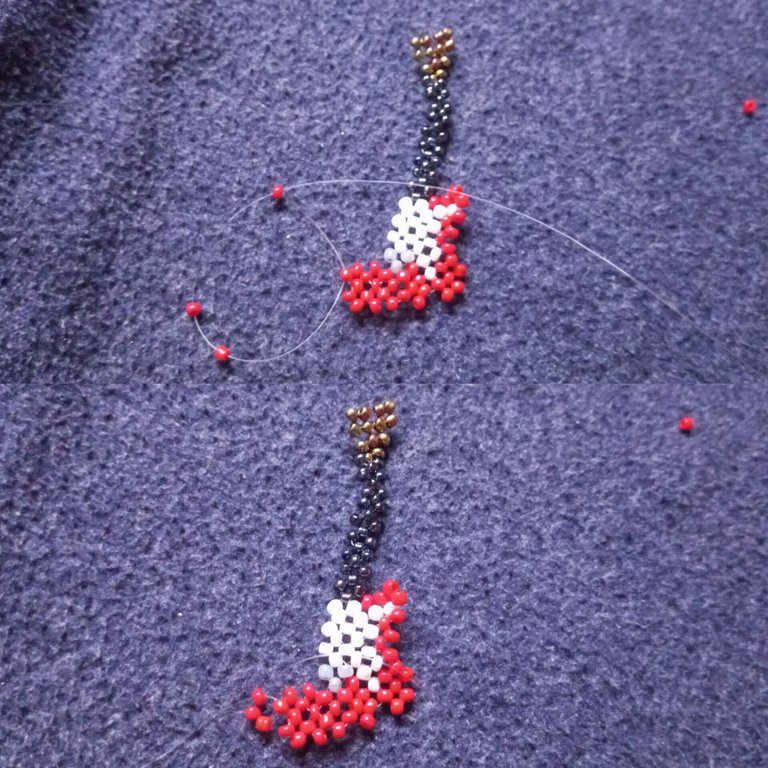 Step 30: I put two red beads on the left fishline and crossed both fishlines with one red bead. From there I passed the right fishline through the next red bead and crossed both fishlines with one red bead.
 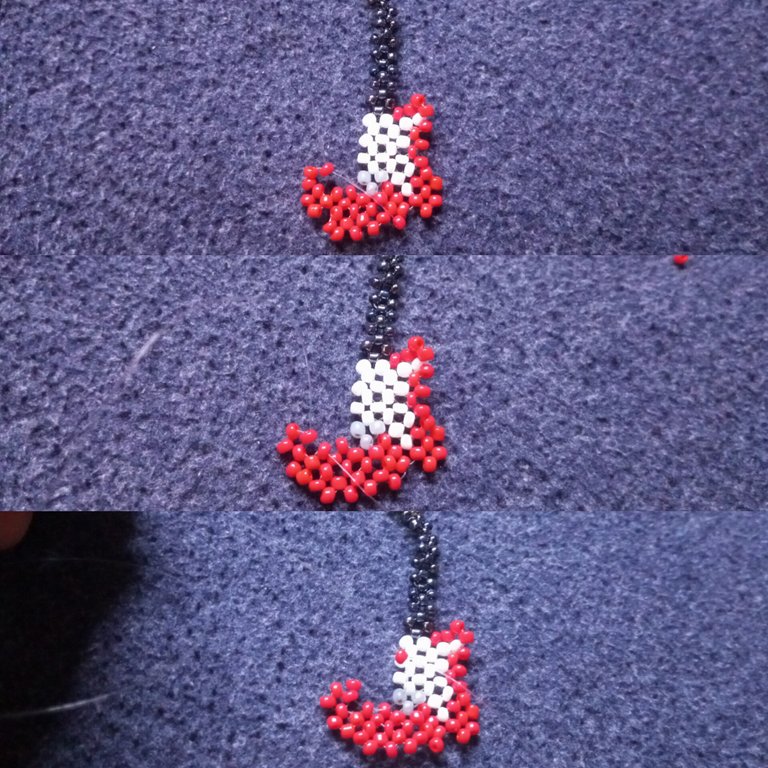 Step 31: I passed the right fishline through the next white bead, put a white bead on the right fishline, and crossed both fishlines with one red bead.
 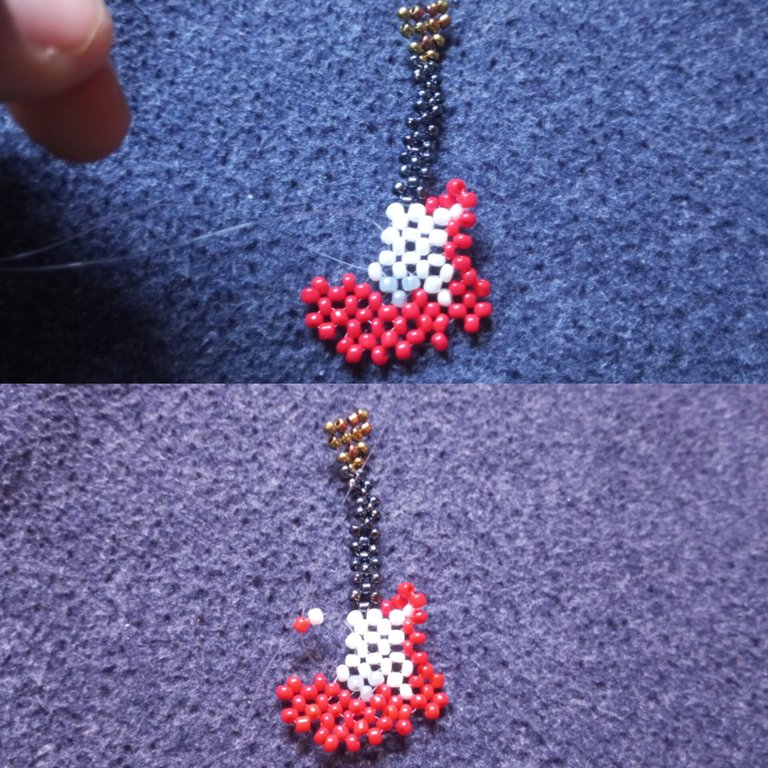 Step 32: I put one red bead on the left fishline and crossed both fishlines with one red bead.
 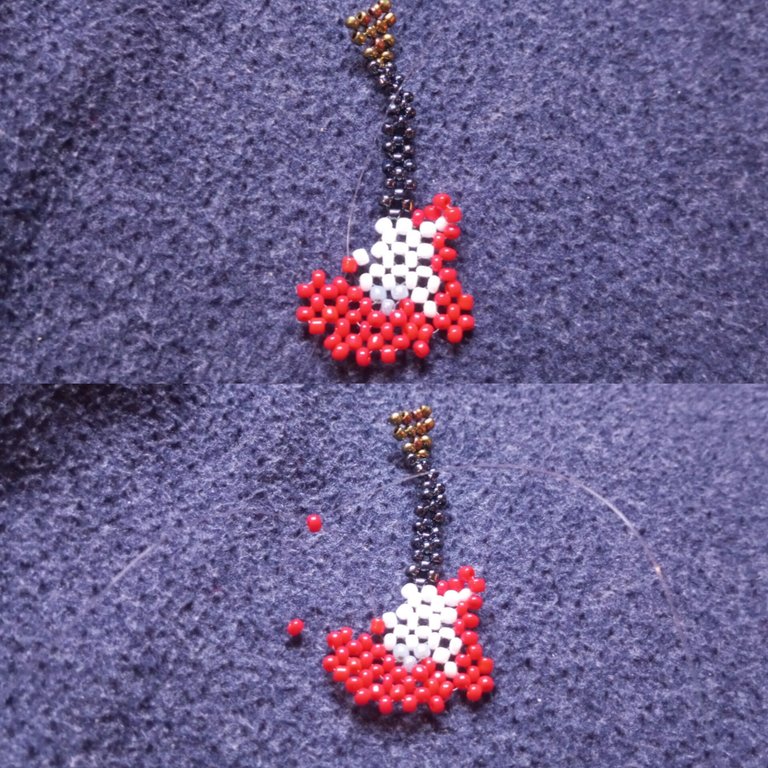 Step 33: I put two red beads on the left fishline and crossed both fishlines with one red bead.
 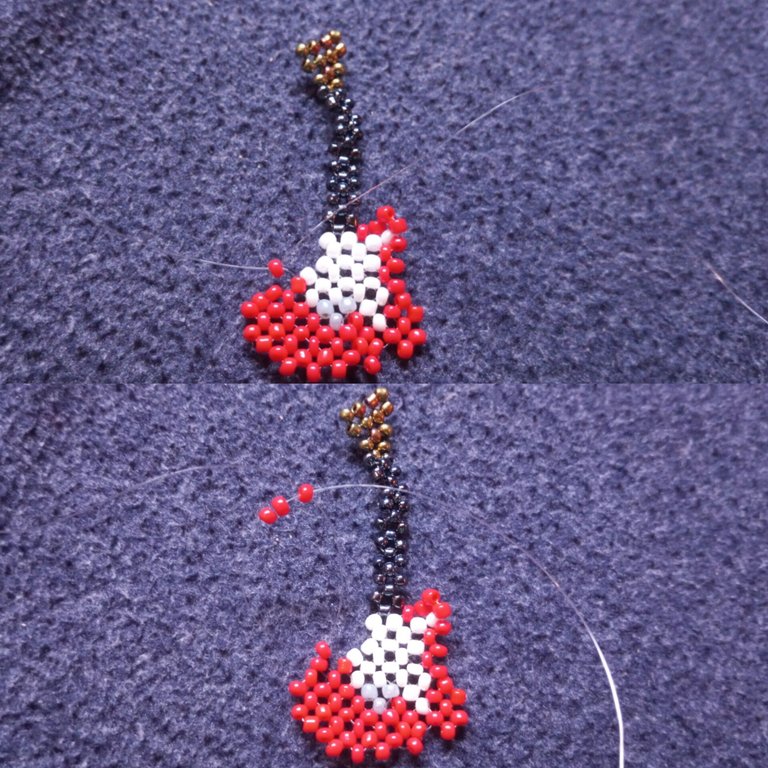 Step 34: I passed the right fishline through the next white bead and crossed both fishlines with one white bead.
 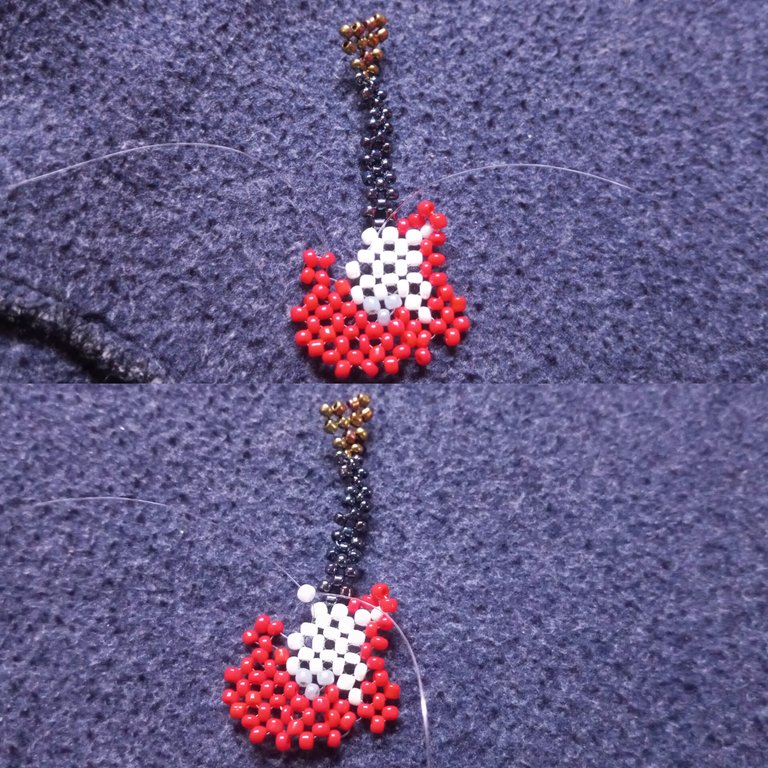 Step 35: I passed the right fishline through the next white bead, put one red bed on the left fishline, and crossed both fishlines with one white bead.
  Step 36: I passed the left fishline through the next red bead, put one red bead on the left fishline, and crossed both fishlines with one red bead.
 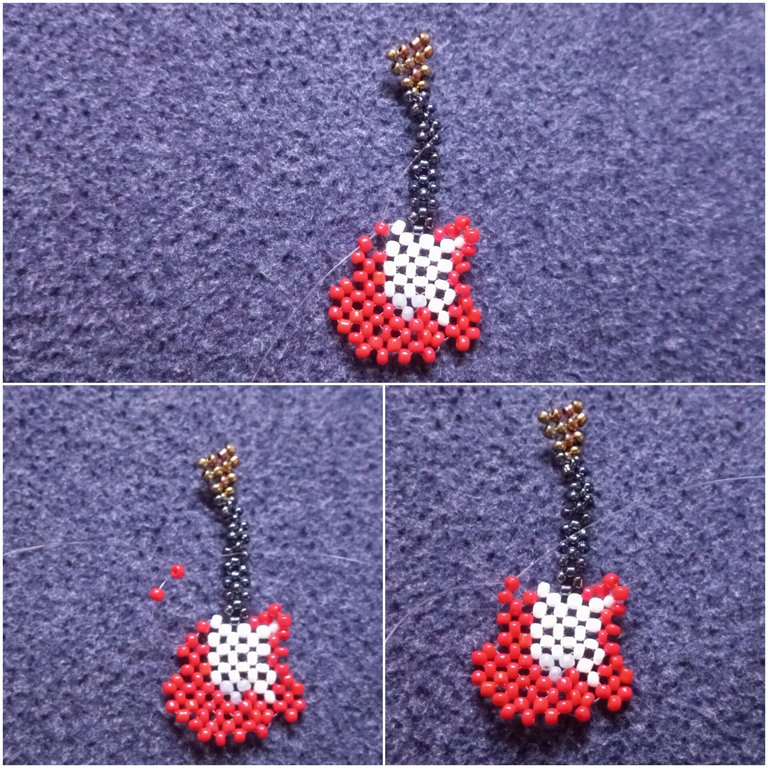 Step 37: I put one red bead on the left fishline and one bead on the right fishline and crossed both fishlines with one red bead. I repeated this three more times to complete the arm of the guitar. This gives me half of the guitar.
 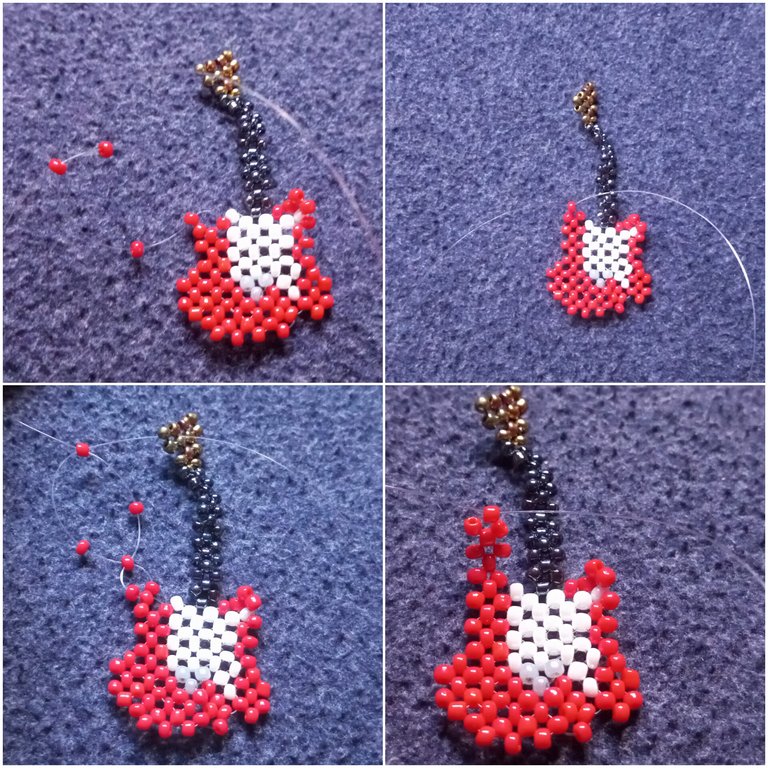 Step 38: I simply repeated all the steps above to make the other half of the guitar and went ahead to join the two with a single bead round.
 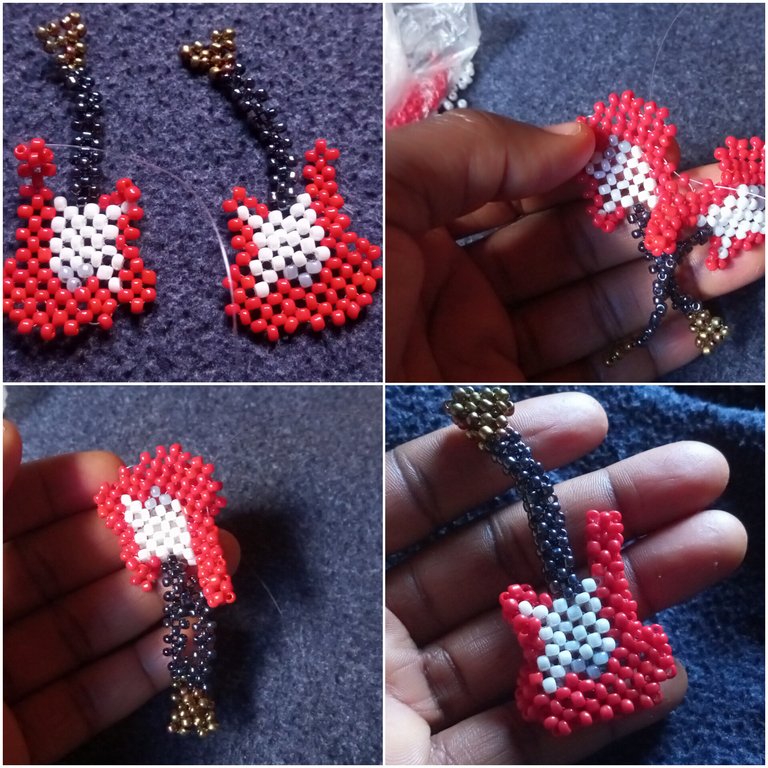 Here is the final look, what do you think? I am curious to read your thoughts in the comments section.
 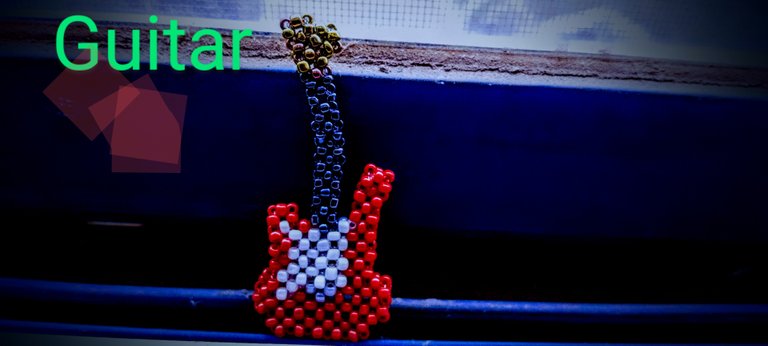 Made with Love
 Thank you so much for your attention and support. I wish you a great day ahead. All images are mine @funshee🙏❣️
This is incredibly beautiful. I love it
Thank you very much Sis❣️ !LUV
@lecia89, @funshee(1/5) sent you LUV. | tools | discord | community | HiveWiki | <>< daily
I have been looking forward to your next masterpiece, few days ago I had to check your timeline to be sure I had no missed any of your post.
Please I need this, it's so beautiful 😍
Thank you very much Ozd❣️ I'm glad to post again after days of absence.
I will just add this to the list of items I want to give you when I get the chance. !LUV
@ozd, @funshee(2/5) sent you LUV. | tools | discord | community | HiveWiki | <>< daily
Hope your son is much better now
Yes, he is in great state now.
Thank you❣️
Thank God 🙏
What a lovely craft and the way you express the process 💞. Very well done 👍✅
I'm happy you love it, thank you very much 🙏🥰
Hey God oo
See another banger nah
This is so lovely and amazing dear.
Ahhhh
You did great.
Thank Sis❣️ na God o😊
Abi oo
You are welcome dear
The color blend together in perfect harmony,creating a stunning visual effect. Good to know he's getting better
Thank you very much; I'm grateful to God that he is recovering well.
We are so glad to know that your son is a lot better now, your get well soon present is so lovely, the design and colour combination is great as well. Well done and thanks for sharing.
Yeah, we are glad he is coming out of it stronger. Thank you so much for your encouragement.😊🙏
What a beautiful job, it looks a bit complicated
Thank you very much; the process can be a bit long but not that complicated.
You really outdid yourself @funshee, I can't imagine the number of hours it took you to make that guitar.
You were very careful in form and detail.
I congratulate you.
Thank you so much dear @neblomax
!LUV
It actually took me about four hours; the real work was putting those images together and carefully explaining the process.
All in all it's great I get to put my idle time to good use while I was watching over my sick child.
@neblomax, @funshee(1/5) sent you LUV. | tools | discord | community | HiveWiki | <>< daily
oh, god, I hope your son recovers as soon as possible.
Thank you🙏, he is much better now.
So beautifully made guitar present
I love your explanation @funshee
I'm glad you love it, thank you so much. !LUV
@harhess, @funshee(2/5) sent you LUV. | tools | discord | community | HiveWiki | <>< daily
Thanks friend
Your beaded guitar is truly outstanding and impressive. Your skill is outstanding and I love it, well done and keep it up
Thank you very Eberechi.
I keep learning on this craft and I like that I'm getting better with it.
Oh my! I think I'm late to even check up on you. I was just scrolling through Hive this morning and my mind went to you. I was like, "let me read this post and comment, then search for Funshee if she's still posting" but I didn't know how it skipped my mind and I forgot. So sorry please.
Now, I'm glad I looked up to your blog because I have planned to come to WhatsApp if you didn't post recently and voila, you did.
So sorry about Adeiza..I'm glad he is recovering so well and I could understand how the whole thing had kept you away from posting for such long days. God is his strength and will heal him completely 🙏
I love the guitar and that, I believe would hasten his recovery process after seeing such amazing "Get-well-soon" gift for him. So beautiful 😍 you really did a great job here.
Thank you so very much our sweet Princess ❣️ your words of encouragement means a lot to me.
I'm truly grateful to God for taking control; he is recovering speedily.
And yes, he loves his guitar a lot.
That's so nice. You're always welcome 🙏 🤗
Congratulations @funshee! You received a personal badge!
Wait until the end of Power Up Day to find out the size of your Power-Bee.
May the Hive Power be with you!
You can view your badges on your board and compare yourself to others in the Ranking
Check out our last posts:
Congratulations @funshee! You received a personal badge!
Participate in the next Power Up Day and try to power-up more HIVE to get a bigger Power-Bee.
May the Hive Power be with you!
You can view your badges on your board and compare yourself to others in the Ranking
Check out our last posts:
@funshee, I paid out 0.230 HIVE and 0.067 HBD to reward 11 comments in this discussion thread.