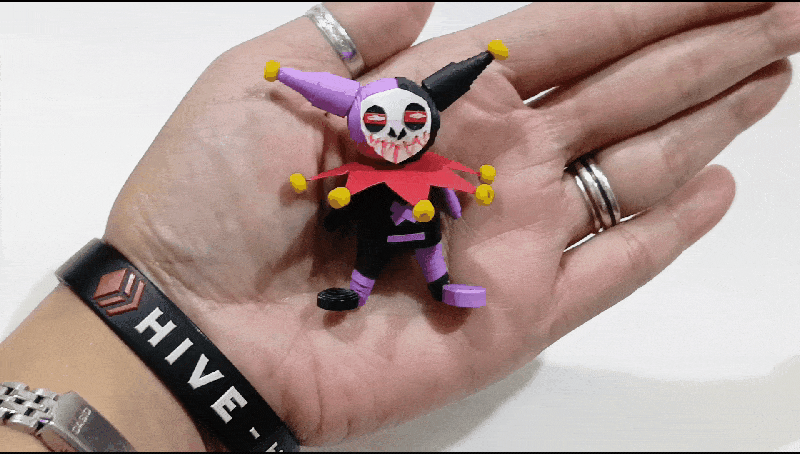
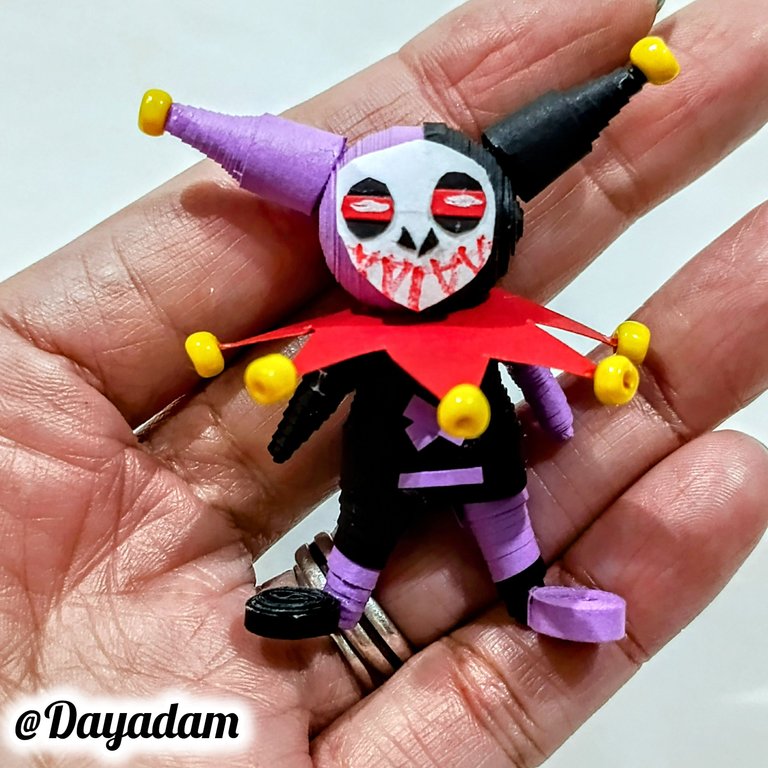
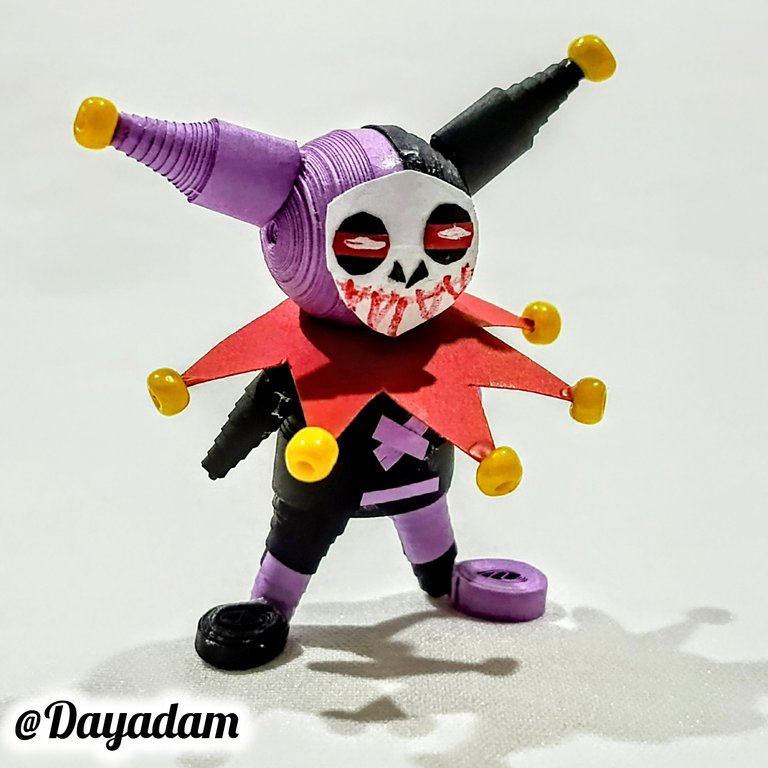
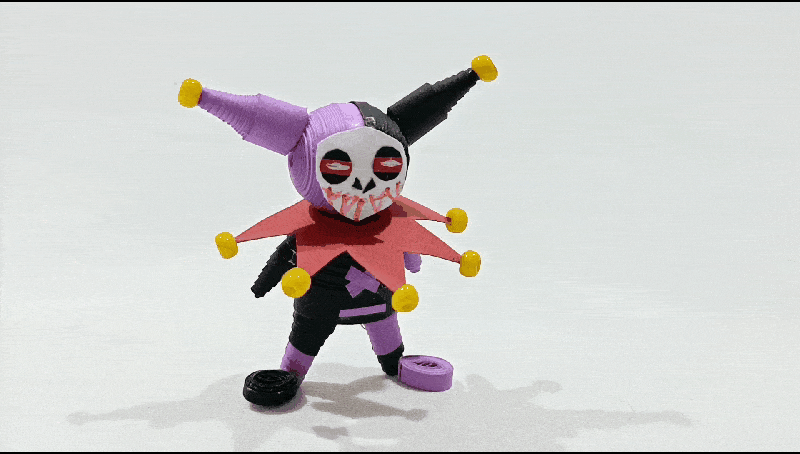
Twisted Jester in 3D Decorative Figure Quilling Technique [Eng-Esp]

Hello to all my Hive friends... 🐱
Today I am with you again to show you my art, I love every week to go through this wonderful world of magic, color, and lots of Splinterlands characters to look for new elements or characters to build different crafts such as jewelry, accessories, 3D figures and other things that motivate me, inspire me and activate my creativity and thus be able to create for you.
Today I'm joining the Splinterlands Art Contest. I'm bringing you a new piece of art. I wanted to create a decorative 3D character inspired by the card Twisted Jester using the quilling technique.
If you want to know more about the game, I leave you my reference link to enter it and navigate through this wonderful world: https://splinterlands.com?ref=dayadam
Hoping you like my work, without further ado, I leave you with my creative process.
Let's start:😃

Hola a toda mi gente de Hive... 🐱
Hoy estoy con ustedes nuevamente para mostrarles mi arte, me encanta semana a semana pasar por ese maravilloso mundo de magia, color, y muchísimos personajes de Splinterlands para buscar nuevos elementos o personajes para construir diversas manualidades bien sean bisutería, accesorios, figuras en 3D entre otras cosas que me motiven, inspiren y activen mi creatividad y de esa manera poder crear para ustedes.
Para hoy me uno al Splinterlands Art Contest. les traigo un nuevo trabajo de arte, quise realizar un personaje decorativo en 3D inspirado en la carta, Twisted Jester en la técnica de quilling.
Si quieren saber más con respecto al juego les dejo mi enlace de referencia para que ingresen en él, y naveguen por este maravilloso mundo: https://splinterlands.com?ref=dayadam
Esperando les guste mi trabajo, sin más preámbulos, les dejo mi proceso creativo.
Comencemos:😃
 |
 |
 |

• Cintas para quilling.
• Aguja para quilling.
• Cartulinas.
• Guillotina de cortar papel.
• Plantilla para moldear círculos.
• Cuentas de bisutería color amarillos.
• Pintura metalizada color perla.
• Hoja blanca.
• Lápiz de Grafito,
• Lápiz de color rojo.
• Pega blanca extra fuerte (de carpintería).
• Pincel.
• Tijera.
- Ribbons for quilling.
- Needle for quilling.
- Template for molding circles.
- Cardboards.
- Paper cutting guillotine.
- Yellow costume jewelry beads.
- Pearl-colored metallic paint.
• White sheet of paper.
• Graphite pencil.
• Red pencil. - Extra strong white glue (carpentry glue).
- Brush.
- Scissors.

• Start by taking a 3mm wide quilling strip. Using the needle, roll it up until you reach the end of the strip. Seal it with extra-strong white glue and remove it from the needle to obtain a closed circle.
• Using the same method as before, make another closed circle of the same size as the previous one, this time with a 3mm wide purple strip.
• We mold both circles using a 17mm circle mold, remove them from the mold, apply extra-strong white glue to the inside to prevent them from deforming or moving, and then join both circles together with extra-strong white glue. This will be the character's head.
• To make the body, we will make a closed black circle with 5 mm wide ribbon. We will mold it into a cone shape, apply extra-strong white glue to the inside, and let it dry thoroughly.
• We will join the head and body together.

• Comenzamos tomando cinta para quilling de 3mm de ancho, con la aguja vamos a enrollar hasta llegar al final de la cinta, sellamos con pega blanca extra fuerte, sacamos de la aguja para obtener un círculo cerrado.
• Bajo los mismos parámetros anteriores realizaremos otro círculo cerrado del mismo tamaño que el anterior, esta vez con cinta de color morado de 3mm de ancho.
• Moldearemos ambos círculos en una plantilla para moldear círculos en la medida número 17 mm, sacamos del molde, aplicamos pega blanca extra fuerte por su parte interna para evitar que los mismos se deformen o se muevan, luego procedemos a unir ambos círculos con pega blanca extra fuerte. Esta será la cabeza del personaje.
• Para realizar el cuerpo, realizaremos un círculo cerrado de color negro con cinta de 5 mm de ancho, este lo moldearemos en forma de cono, aplicaremos pega blanca extra fuerte por su parte interna, dejamos secar muy bien.
• Uniremos la cabeza y el cuerpo.
 |  |  |
• To make the character's legs, we will join 4 mm wide black and purple tape to form a single strip. We will make two closed circles, one starting to roll from the purple end and finishing at the black end, and the other in reverse.
• We will shape them into elongated cones. I did this with the tip of a paintbrush, applying glue to the inside.
• With 2 mm wide black and purple ribbon, we will make two closed circles which we will shape into drops. These will be the character's feet.
• We glue the legs and feet, then attach them to the character's body.
• To make the arms and the details on the head, make two cones, one purple and one black, and glue them in the appropriate places.
• Para realizar las piernas del personaje, uniremos cinta de 4 mm de ancho de color negro y morada para formar una sola cinta, haremos dos círculos cerrados, uno comenzando a enrollar por la parte morada finalizando por la parte negra, el otro lo haremos de manera inversa.
• Moldearemos en forma de cono alargados yo lo hice con la punta de un pincel, apliqué pega por la parte interna.
• Con cinta de 2 mm de ancho de color negro y morado, realizaremos dos círculos cerrados los cuales moldearemos en forma de gotas, estos serán los pies del personaje.
• Pegamos las piernas y los pies, luego los unimos al cuerpo del personaje.
• Para realizar los brazos y los detalles que van en la cabeza, realizaremos dos conos uno de color morado y otro de color negro, pegamos en los sitios correspondientes.
 |  |  |
• Using a piece of red cardstock, I cut out a star-shaped piece to go on the character's neck. To decorate it, I added some yellow beads and also placed one on each of the cones that go on the head.
• I proceeded to make the face by cutting out a piece of white paper, the eyes and nose with black and red cardboard, and finally the mouth, which I painted with a red pencil.
• I glued the character's face on and used pearl-colored paint to make a small line of light in the eyes.
And that's how we finished this decorative 3D character, inspired by the character from the card “Twisted Jester.”.
• Con un trozo de cartulina de color rojo recorté una pieza con forma de una especie de estrella, esto ira en el cuello del personaje, para decorar coloque algunas cuentas de bisutería de color amarillo, también coloque una en cada uno de los conos que van en la cabeza .
• Procedí a realizar cara recortando un trozo de papel blanco, ojos y nariz con cartulina de color negro y rojo, por último la boca que pinte con un lápiz de color rojo.
• Pegué de la cara del personaje y con pintura color perlada realicé una pequeña linea de luz en los ojos.
De esta manera tenemos listo este personaje decorativo en 3D que elabore, inspirado en el personaje de la carta "Twisted Jester".
 |  |  |

 |
 |
|
 |  |
 |

What did you think, did you like it?
I hope you did, I hope you liked my explanation, procedure and photos, I made them with love for you.
"Let out that muse that inspires you, and let your imagination fly".
Thank you all, see you next time.
¿Que les pareció, les gustó?
Espero que sí, que les haya gustado mi explicación, procedimiento y fotos, los hice con mucho cariño por y para ustedes.
"Deja salir esa musa que te inspira, y deja volar tu imaginación".
Gracias a todos, nos vemos en la próxima.
Banner y separador hecho por mí en Canva
Thanks for the support @splinterboost 🌟
En serio eres excelente con estos personajes más grandes y estructurados, es increible como logras el cuerpo completo con la técnica Quilling.
Bueno este no lo replique con mucha exactitud, es más lo quería hacer con carita cute, pero después que pinte la cara y quedó chévere la pegué así para que fuera más semejante a la del personaje.
Gracias por siempre apreciar mi trabajo.
It's so nice to see you make this beautiful creativity, you have done a great job.
Thank you so much, sweetheart. I'm glad you liked it. Best regards 💞
Waooo!! @dayadam te quedo espectacular el bufón de Splinterlands, sabes yo lo hice una vez en foami clay, me fue un poco complicado pero salió el resultado jjjj.
Lindo trabajo en quilling como siempre, saludos y excelente comienzo de semana !! 😊🤗🙏🏻
Muchísimas gracias por tu apreciación. Había visto el tuyo te quedó muy bonito.
Que tengas bendecida semana.
Muchas gracia amiga !! 😊🙏🏻
Woah, this is creativity at its best, you nailed every detail. Nice work.
Thank you so much. It's so nice to read these kinds of comments. Greetings and blessings 💞
Que hermoso arlequín, logras hacer diseños swnsacionales, tan pequeño y tan lindo.
Gracias mi linda por tu bonito comentario 💞
It turned out great, very nice, I love the process
Thank you, my dear. Glad you liked it.
This is very nice
Thank you 🌟
Thanks for sharing! - @cieliss

Thanks for the support