Monstercross Build (Final): Complete project & parts
Heeeyho Readers! It's the end of a journey.
Episode finale of our journey to build a bicycle is here. It's relieving to complete any project. At the same time, finishing leaves a creative void. Picking parts, modifying, planning. These are incredibly engaging and exciting. Makes me want to build another one {laughs}.
The plan was to create a fully detailed post, like a step-by-step in how to assemble a bicycle. At least... err... until I ran into problems with the headset bearings right at the beginning, which tested my anxiety and made me totally forget to record the process. Without being able to fit the headset, the entire assembly would stay on hold, so fixing the issue was on top of the list. Other than that, teaching how to assemble a bike feels pointless because of the individualities of each project.
All that said, let's jump straight into pure cycling pornography. I'll talk about the thinking behind the monstercross project as we go through the photos and give advice to those seeking to build their own two-wheeler.
I haven't coined the term monstercross. The concept derives from someone's crazy idea of combining road-cycling and mountain-biking. A monstercross is not a cyclocross either, since those tend to have narrower tires compared to knobby all-terain tires used on a monstercross. Anyyway. Search the internet and a bazillion origins will show up.
John Tomac is perhaps the most well-known cyclist credited to the idea. The more contemporaty trend puts a monstercross as nothing but a mountain-bike with drop bars. Ideas go from super modern rigs all the way down to Frankenstein builds who combine vintage frames and whatever parts that fit. There's no rules!
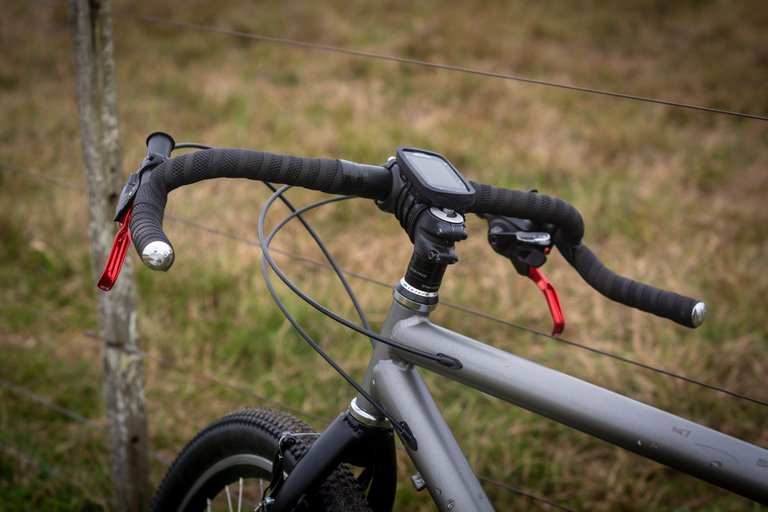
My project started off as a way to repurpose a handful of parts I had laying around (11 speed drivetrain, 26" wheels, vintage brakes, and cranks). An all-rigid mountain-bike would be cool, but then came the idea of fitting drop bars, except I'd need road cycling STIs that are super expensive. The cornerbar option came out much later. With the cornerbar, I'd be able to fit regular mountain-bike gear shifter and brakes to a quasi drop bar.
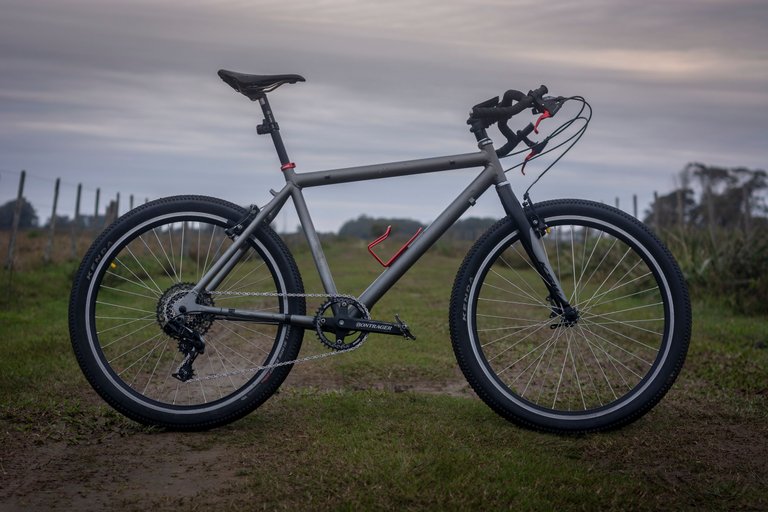
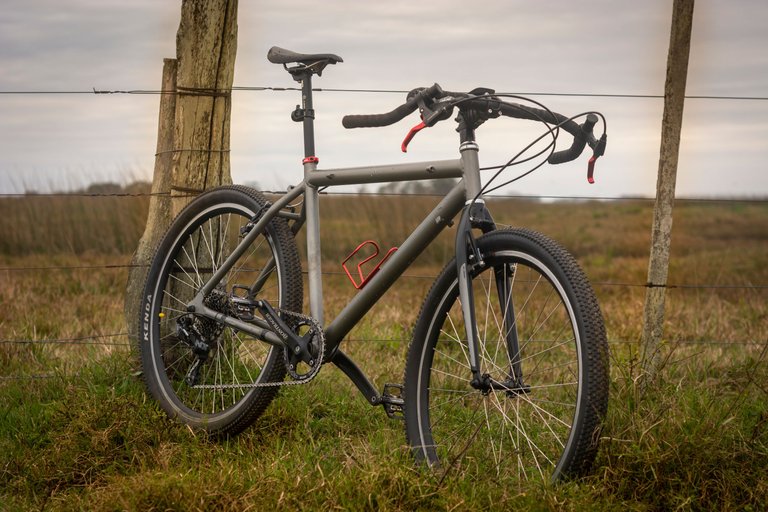
The initial concept is defined: a 26" monstercross, featuring mountain-biking components fitted into a specially designed handlebar. The rest unfolds naturally afterwards — frame choice guides everything.
General tip for anyone seeking to build a bicycle from scratch: define what bicycle style you wanna build and start with the frame. A frame is the epicenter that will define every part used on the project. The geometry and correct size for your body is important, but, beyond that hides a bunch of standardized dimensions, such as steering tube diameter, bottom bracket type, frame O.L.D (Over-Lock-nut Dimension), seat tube diameter, etc.
Let's avoid discouraging readers with too much info, shall we? Grab a frame that you like and the rest will unfold (picking parts is the fun, after all).
I searched for the cheapest 90's 19" (size) frame money could buy. Why? Because 90's mountain-bikes are (in some cases) the closest in geometry to modern gravel/road bicycles. Here's the checklist.
- cheap
- with v-brake mounting posts
- size 19"
- cheap
- and also cheap
The fork and entire steering system followed my frame's dimension (1" steerer). As well as 130mm O.L.D chainstay spacing that required a road-cycling rear hub. Seat tube on this bicycle was also odd (26,4mm) that was solved with a 25,4mm seatpost wrapped on a 1mm sleeve (see here).
It's a lot easier to find rigid forks and headsets for 28,6mm (1-1/8") frames, though I was fortunate enough to find a Brazilian-made 1" aheadset fork. Pure luck, I must say. Weren't that available, I would've picked a 28,6mm frame.
I mentioned earlier having issues with the steering assembly. The fork steering tube was a bit out of spec and wouldn't go through the bearings, which required fine adjustments. Altogether, the crown race provided with the headset was also off (JIS standard 27mm) whereas the fork crown race seat was standard (STD 26,4mm) — 6 decimals is enough to creak. All issues fixable.
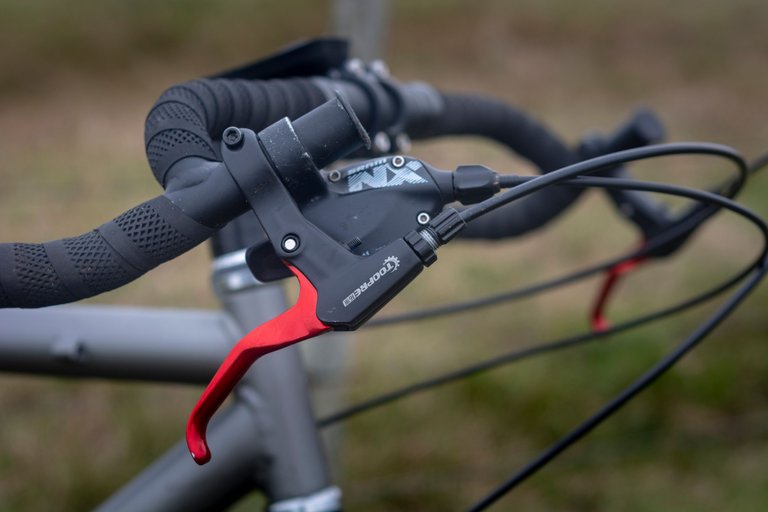
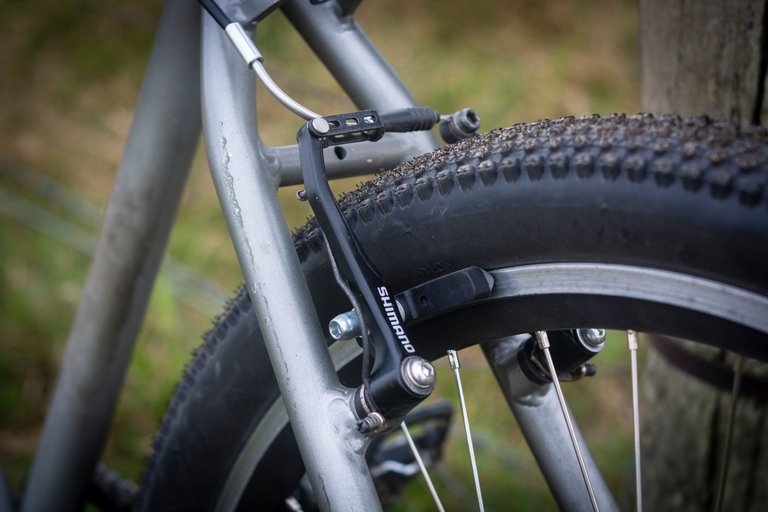
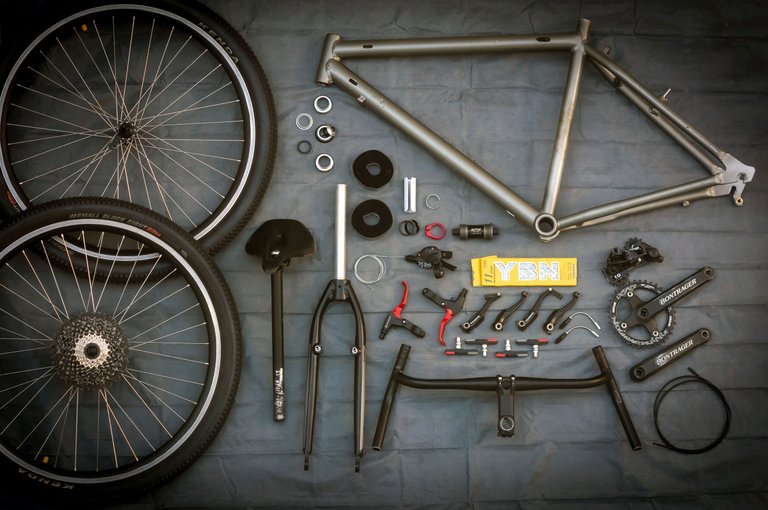
With those issues out of the way, the rest is smooth sailing. I kick in some music and begin to assemble those parts presented in the previous posts. Brakes, brake pads, brake levers, cable housings, cables. I used synthetic grease on this bicycle to see how it goes over time.
One awesome feature on the braking system are the titanium v-brake mounting posts (featured here). Nobody will ever see them, but it's the kind of quality I go for. They'll most likely outlast the bicycle {laughs}. On top of that, all the steel bolts have been replaced for stainless steel. Sexy-as-fuck!
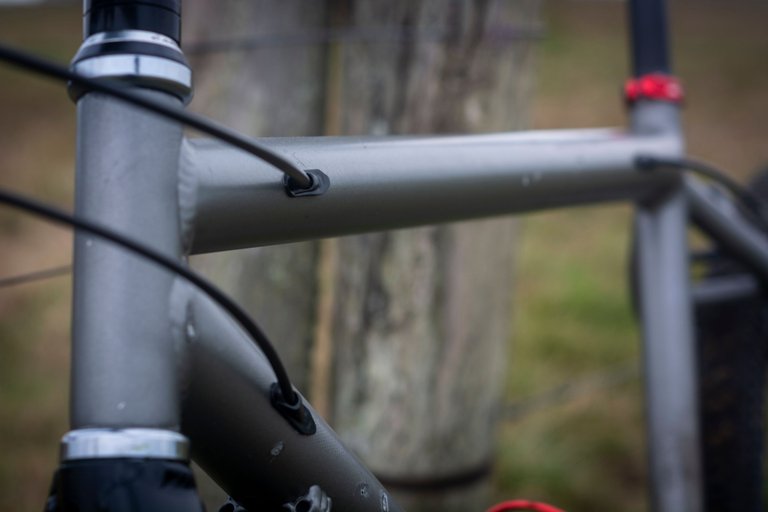
Speaking of features, I added internal cabling to this bicycle totally for aesthetics. It had exposed cables originally; now protected.
The transmission was always a giganormous bet. I simply couldn't preview if the bits and bobs would fit and speak to each other. Sure, there were measurements to account for, but fitting a modern 11 speed groupset to a vintade frame is always challenging. No one could've previewed how smooth the gear shifts are.
Here's an early 2000's Bontrager square-tapered crankset driving a 38-teeth chainring up front. Cassette, derailleur and shifter are Sram NX-11. Linking everything is a 11-speed YBN chain.
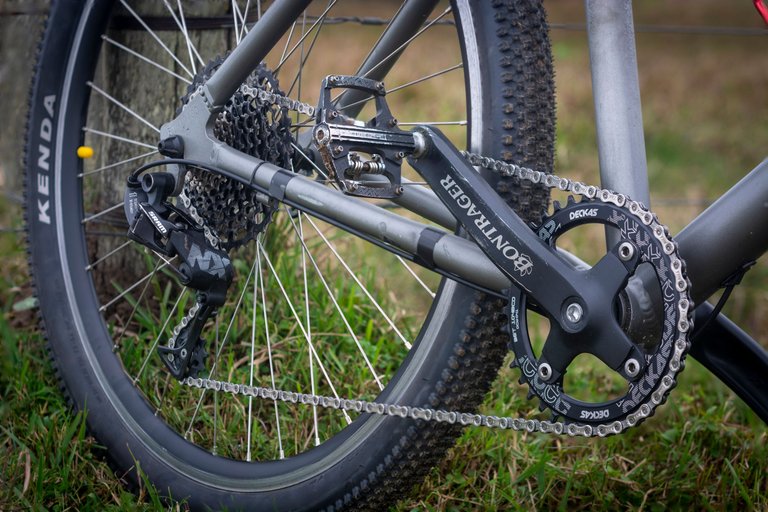
Gear ratio is good enough for flats; gotta test and see on the mountains. Lowest gear is 38x42t, which may be a tad heavy for my spaghetti legs. (Just for comparison, my 29" mtb uses 36x50t).
Tires are Kenda Small Block Eight, foldable, light-weight, fast. Couldn't be more happy with the tire choice. Another option were Maxxis Ikons, but those doubled in price.
I guess that's the overall picture of the project. Some tiny details have been added after taking the photos. One is the head badge; the other, a new stem dust cover and titanium bolt (never shown).
Full Bicycle Specs
- 1993 Two Hard (Brazilian brand) aluminum frame in size 19"
- Senqi cornerbar handlebar
- 11 speed Sram NX groupset
- 38-teeth chainring and 11-42t cassette
- Early 2000's Bontrager crank arms
- Early 2000's 26" inch rims fitted with stainless steel spokes
- Fastace sealed bearing hubs r/f
- Early 2000's Shimano Alivio v-brakes; Toopre brake levers; titanium v-brake pivots; stainless steel cables; internal cabling
- Kenda Small Block Eight 26x2.1 foldable tires
- All around stainless steel bolts and titanium stem bolt
- KSW threadless 1" fork and Chinhauer 1" threadless headset
- 1" seatpost converted into 26,4mm
Costs
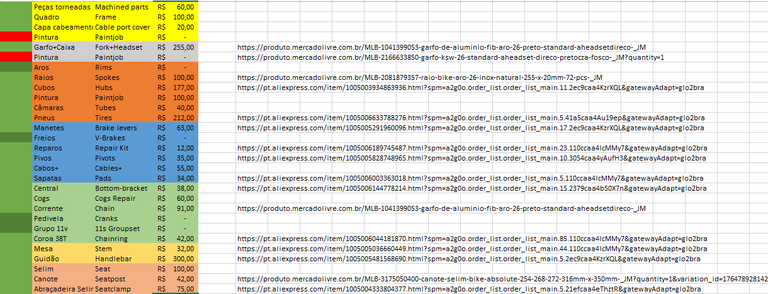
It's difficult to talk about costs because exchange rates are always changing as well as market prices. Here's the complete spreadsheet. Total cost is R$ 2.043,00 (Brazilian Reals) that divided by 5,20 (~ USD/BRL) gives us a grand total of 392 USD — let's round to 400.
Expensive? I don't know... tell me what you can buy for 400 in your country. In Brazil, for 2000 Reals you won't go intermediate level, not even on second-hand markets. For the quality employed in the project that price doesn't seem bad.
What about the paint? Everyone asks me that. Let's say I ended up loving the minimalist look of gray on black with red details. For now, it's gonna stay like that... at least until I'm confident enough to paint an entire frame.
Conclusion
Can you build your own bicycle?
Of course! Readers may feel overwhelmed with the amount of information required to chose parts and what not. It indeed is confusing. But... I was not born knowing all of this. We've got the internet on our favor with infinite information, tutorials, forums, etc. Most of what I learned comes from endless hours trying to solve the monstercross puzzle.
The biggest legacy of this endeavor is the knowledge acquired along the way, more so than actually finishing the bicycle. And now it's done. It works.
I hope that you've enjoyed this series as much as I did researching, writing and bringing forward the information for future weirdos like myself.
One special thank you for everyone who supported my posts — each like was converted into parts or tools for this (and future) projects.
I guess that's it. Don't forget to keep on pedaling. Enjoy life, make mistakes, fix, try again.
Peace.
If you enjoyed this post consider leaving your upvote for a hot coffee.
Find me on Twitter: https://twitter.com/mrprofessor_
~Love ya all,
Disclaimer: The author of this post is a convict broke backpacker, who has travelled more than 10.000 km hitchhiking and more than 5.000 km cycling. Following him may cause severe problems of wanderlust and inquietud. You've been warned.

Damn! I don't think I could do that! That's a lot of parts to work with. I think that cost is definitely reasonable, you'd probably pay 3 times that here in Japan.
It's a bit overwhelming, but we get used to the nomenclature, different standards, etc. The fun is in discovering all of that xD
Is it that expensive to build a bike in Japan? How's the import tax over there if you wanted to buy parts from Aliepress, for example. In Brazil we pay 20% federal + 19% state tax to import below 50 USD.
You know, you always make me tempted to get back into this hobby but the accident I often had haunted me. That being said, I still have a united bike I could modify and this is my reference!
Go for it! How difficult is it to get parts from China over there? There's some great deals in quality parts to build pretty much anything.
It's not that hard, we pretty much have the things you mentioned too. Soooo pretty doable
Great job, I'm glad you finished this project. The result is beautiful, the bike is very nice and I'm sure you will drive it for many miles with pleasure. Now comes the fun part - driving, but also one more: the process is never finished. I'm sure in a couple of weeks you'll think about upgrading something :) At least that's how it was for me when I was assembling my bike. A story that never ends :) I wish you many nice rides!
Duuuude, that's true! There's always that tiny detail that we can modify to make it better. I'm already thinking about a pair of 29 or 27,5" wheels for this bike hahaha I mean, 26 is great and unique, but mine are 36 spoke, which make the wheels kinda slow at high speeds. Either a good pair of 28 spoke 26" rims or upgrading to 29/27,5/700c
Haha, yes, it's the eternal cycling story, never enough parts and improvements. I would definitely consider 29" wheels. Just because the bike seems to be intended for an off road environment will help it get over obstacles easier and add some comfort. The downside is that it loses a bit of agility. If you have somewhere to borrow a pair wheels - try it if it suits you.
Yup, I'll possibly have to cut off the chainstay reinforcement to fit bigger tires -- won't be an issue because this frame is so over-dimensioned that it's unlikely it'll bend. Perhaps 27,5 with 2.1 tires or 700x42s
Wow! The result is amazing. And for that amount of money! And it's custom made!
I wish you many safe kilometers with your bicycle!
Thank you! I like it so much that it only goes out on sunny, super dry days hahahaha Gonna take it to a race next month for fun
How crazy to be able to put something like this together. What great pictures, how do you take them so well?
Hey! Thank you. I take them using a Nikon d7100, 50mm lens on a tripod. Preferably on cloudy days xD
I've been considering upgrading my old Specialized with newer gearing instead of the 3x8 set it had when I got it in 2006 or so. What else can you say about that kind of a change?
Great question! Newer gearing, do you consider 1 chainring at the front?
I like not having gears at the front for many reasons: one less derailleur to worry about, easier to use, one less shifter, etc etc.
Gear ratio might be an issue though.. if you cycle mostly on flats, hilly, or a bit of both you might need a larger range of gears like your current 3x8 or 1x12 (more modern/balanced for mixed terrain).
That said, it depends on your bike. We'd need to see what fits and if you have to upgrade your rear hub too. Depending on the parts already on the bike you could possibly run 1x8 for flats without spending much.