Handmade Air Dry Clay Mini Cute Calendar!

Hello, I've been thinking about what craft I am going to do with the air-dry clay, which is still unused. So I've been planning for a long time that I wanted to make a mini calendar made by air-dry clay.
I've been experimenting with air-dry clay since last year, and one time I tried to do some complicated craft using it and I failed to finish it because I lost inspiration for it, so this year I promised myself to encourage myself to try again I and I almost feel like I won't do it again.
But I guess from the previous craft I made, I realize I think I am the problem LOL. I think I had no patience before, so that is why. If you want to try air-dry clay, this is my reminder to you that you need to be patient, and you should work as fast as you can, and a spray bottle is the key, LOL.
Materials I Used:
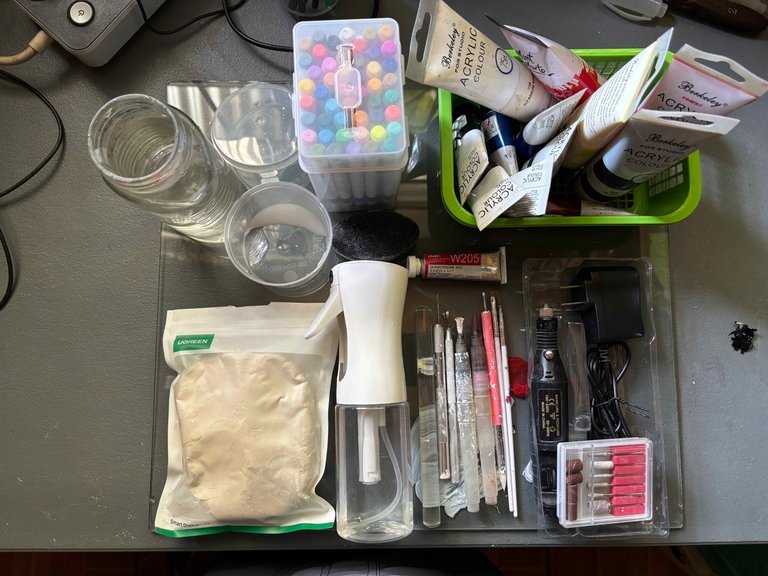
- Air-Dry Clay
- Glass Sheet
- Spray Water Bottle
- Clay Tools
- Air Dry Clay Paste
- Rotary Detail Carver
- Portable Weighing Scale
- Paper Towel
- Acrylic Paints
- Paint Brush
- Water Glass Bottle
- Sponge
Craft Time!


First thing I do is to condition the air-dry clay. What I do is I wet my hand using a water spray bottle and then knead the clay until smooth and This is my reference I drew for the mini calendar I am going to make. My inspiration for this is Bamby from Plave. This is his mascot character.


And then what I do is I shape and weigh them equally, each part of the character to make it more life easier LOL.


After that, I am going to connect each part I shaped earlier using this air-dry clay paste I made, just combined water and air-dry clay and melted it into like lotion-like texture. I add the paste and then scrape it using the feather wire texture tool.


And I do the same step to the other part, and then I connect them, and this is how it looks. It is pretty flat in the moment, so just trust the process.


Using this loop tool, I scrape out the middle part of the clay, the area where I will add the date for my calendar. Make sure not to scrape too deeply.


This is what it looks like, and then I fill out some parts too.


I and then after I added more shape to the character, and then I almost forgot the peach part.


And then I shape the part for the date.


And then let it dry for about 2 days.


Now that the clay is completely dry, I am going to use a rotary detail carver to smooth out the uneven parts.


Make sure to put a paper towel on my desk to catch the clay dust.


The clay is smooth now. I am going to color it using acrylic paint. Do not forget to have a glass of water to wash the brush.


I painted the clay with titanium white first. I did 3 layers of paint.


Then, after that, I painted the peach.


Then, the ears, make sure to dry the paint first before adding a layer of paint again.


Then, after that, I did the leaves from the peach, and then let them dry before proceeding to paint the other part.


Then I drew the eye on this part, I realized that the acrylic marker is not waterproof when it dried, so I messed it up LOL, but I fixed it.


I painted the failed face I drew, so I painted it again with acrylic paint, and I decided to add clothes.


While the character is still drying, I will add the numbers and the month using this black acrylic marker.


Just let them dry, and we're done.


I did a little photoshoot, so cute!

Today is October 10!
Thank you for visiting, see you on my next blog. :D
Please take care of your mental health as well.
I hope you are okay today :))
Please take care of your mental health as well.
I hope you are okay today :))

Awesome!!
Thank you 😁
Congratulations @leannwithdoublen! You have completed the following achievement on the Hive blockchain And have been rewarded with New badge(s)
Your next target is to reach 350 posts.
You can view your badges on your board and compare yourself to others in the Ranking
If you no longer want to receive notifications, reply to this comment with the word
STOPhttps://www.reddit.com/r/crafting/comments/1o3qz6f/cute_airdry_clay_calendar/
This post has been shared on Reddit by @gaboamc2393 through the HivePosh initiative.
Te quedó hermoso, es tierno y perfecto para decorar la mesa, un calendario cuchi ♥️