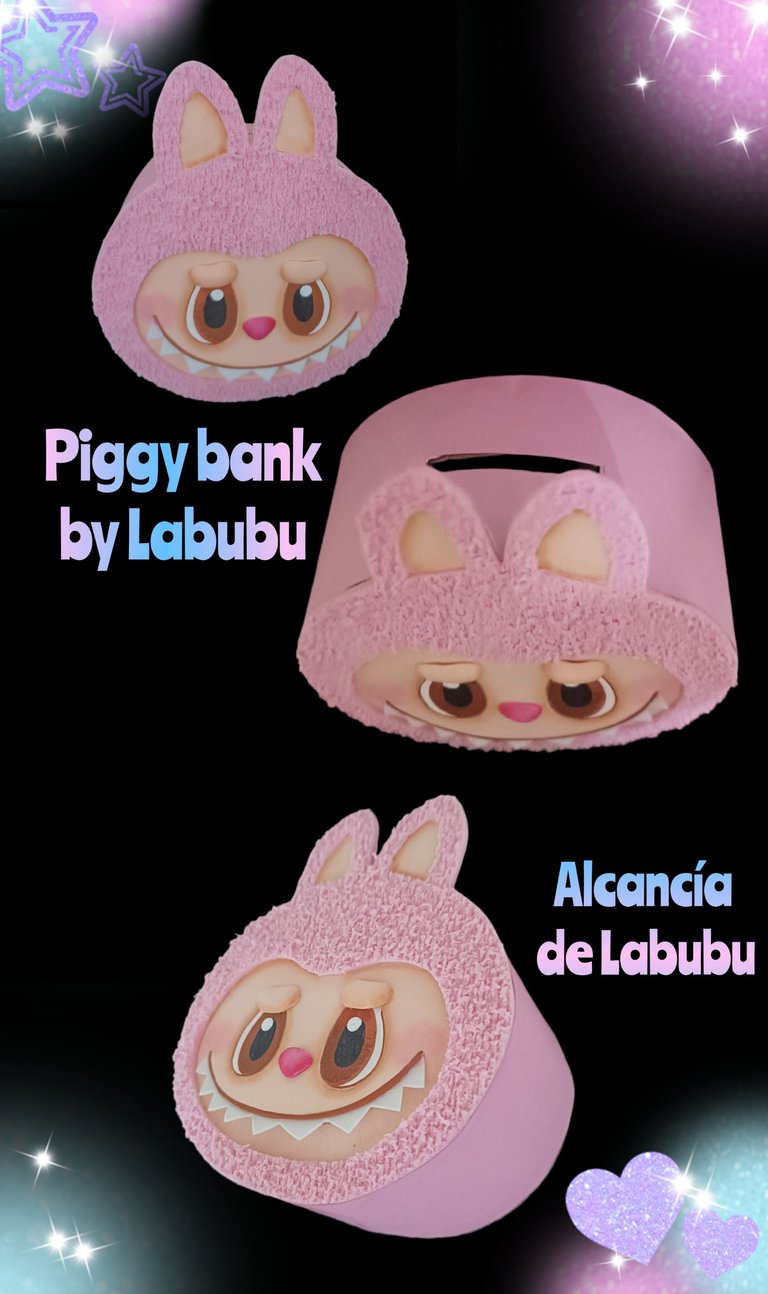
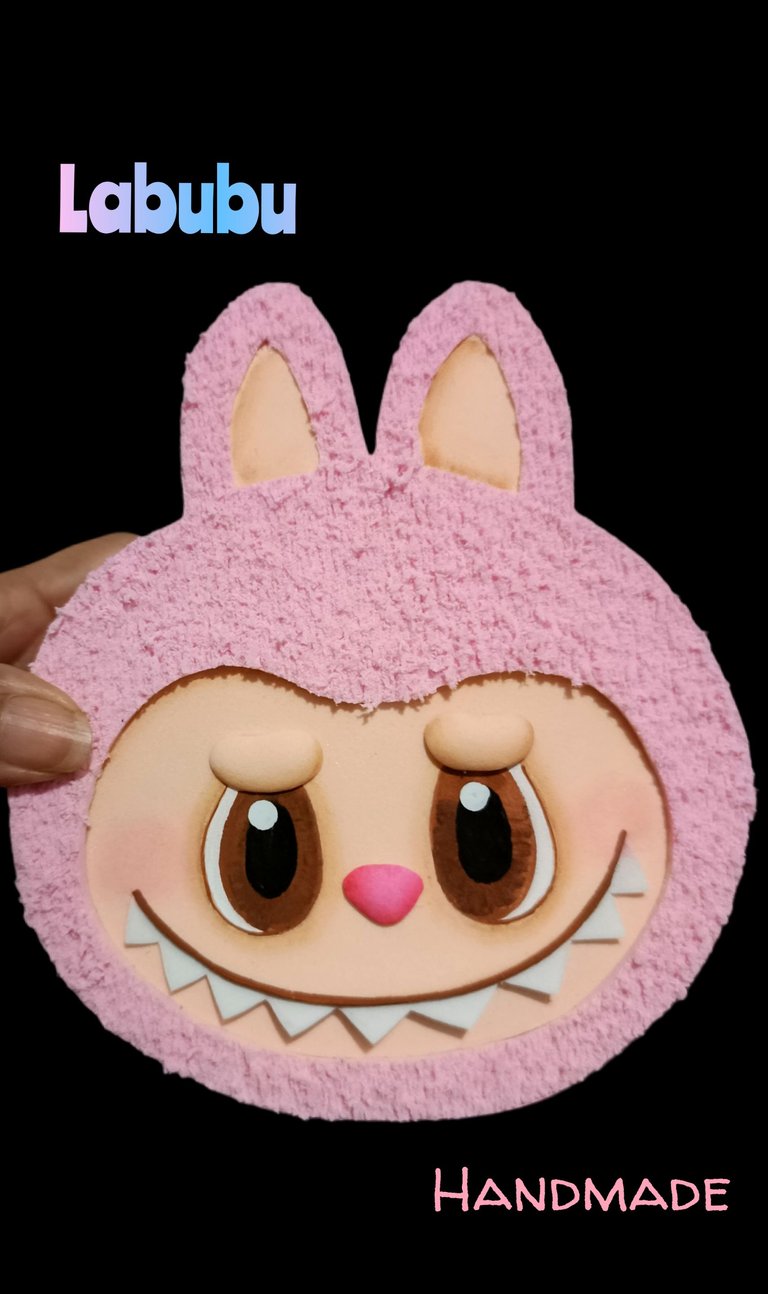
Hagamos una útil y Linda alcancía de Labubu para los pequeños de la casa. ESP/ENGMachen wir ein nützliches und hübsches Sparschwein von Labubu für die Kleinen im Haus.
Feliz noche y bienvenidos sean todos a mi blog.
Saludos y bendiciones para todos.
Entonces no se diga más y manos a la obra.
Para realizarla vas a necesitar:
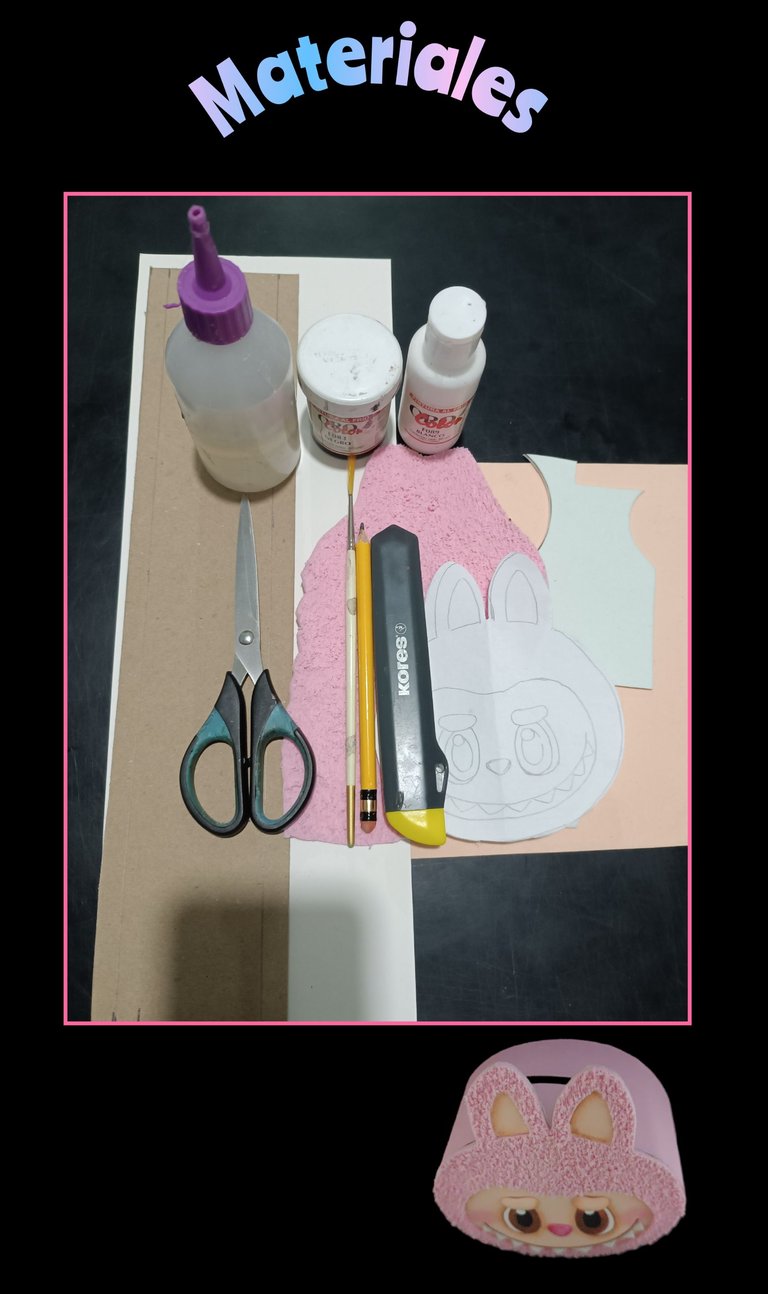
| Cartón de caja o de piñata | cartulinas |
|---|---|
| Foami tipo paño o mate | Pinturas y pinceles |
| Tijera y cuchilla | Silicón |
| Dibujo o impresión | Plancha eléctrica |
Paso 1:
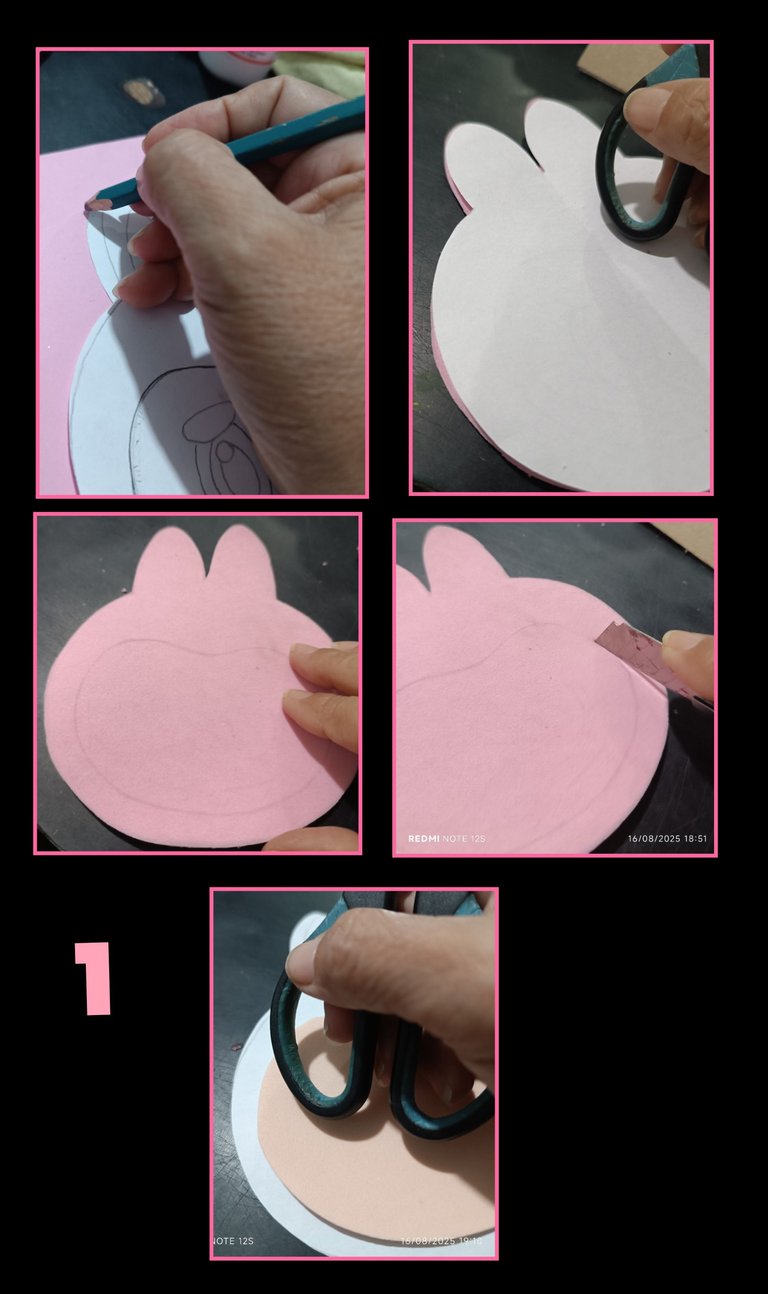
- Coloca el dibujo sobre el foami, marca todo el borde de la figura y recorta, luego coloca el dibujo sobre el foami y frota con la tijera para transferir el borde de la cara de Labubu.
- Luego con una cuchilla recorta por toda la línea y después recorta la carita en foami color piel y puedes colocar el dibujo debajo y frotar con la tijera, sujetando bien la pieza de foami.
Paso 2:
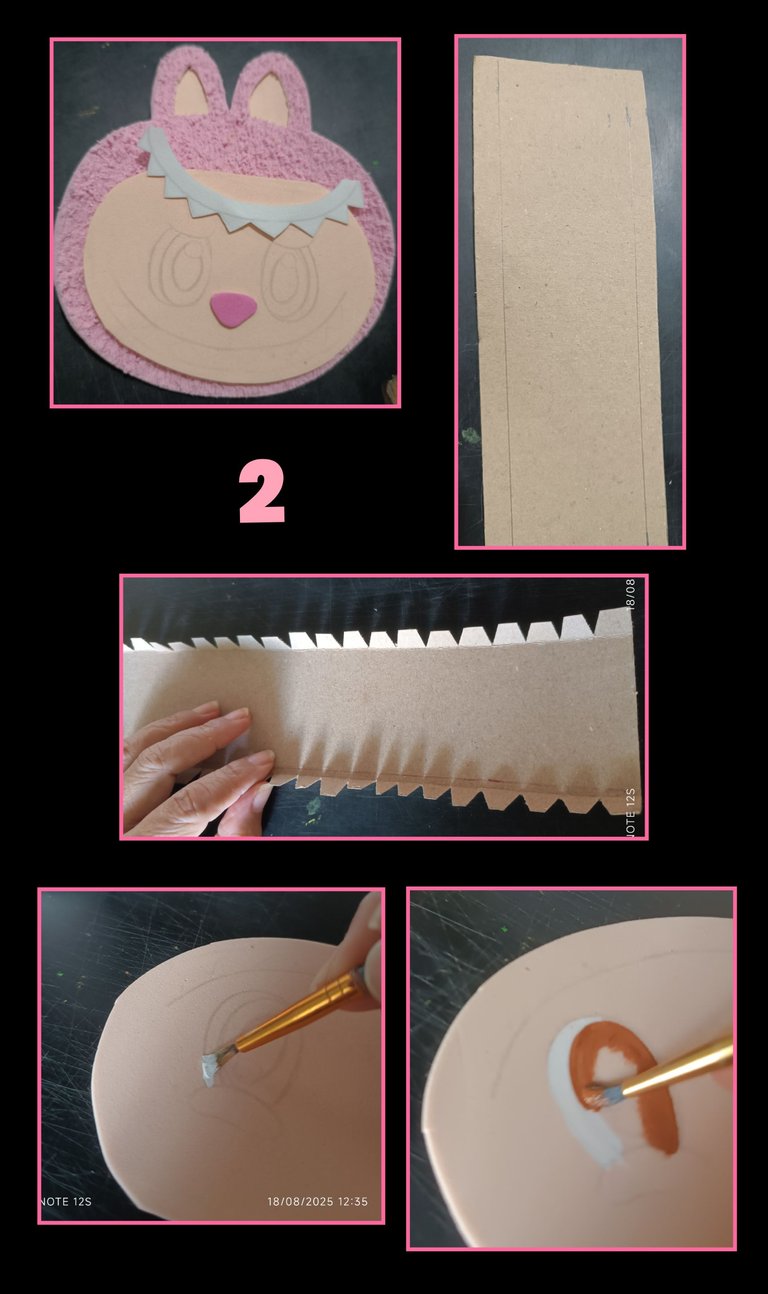
- Recorta las piezas faltantes, dientes, nariz y orejas.
- Ahora mide todo el contorno de la cabecita y marca en cartón una tira del ancho deseado y del largo que mediste aumentando 2cms más para cerrar y pegar.
- Marca a cada lado 1cm y remarca la línea con la tijera para doblar los bordes, luego recorta triángulos por la orilla como te muestro en la foto.
Paso 3:
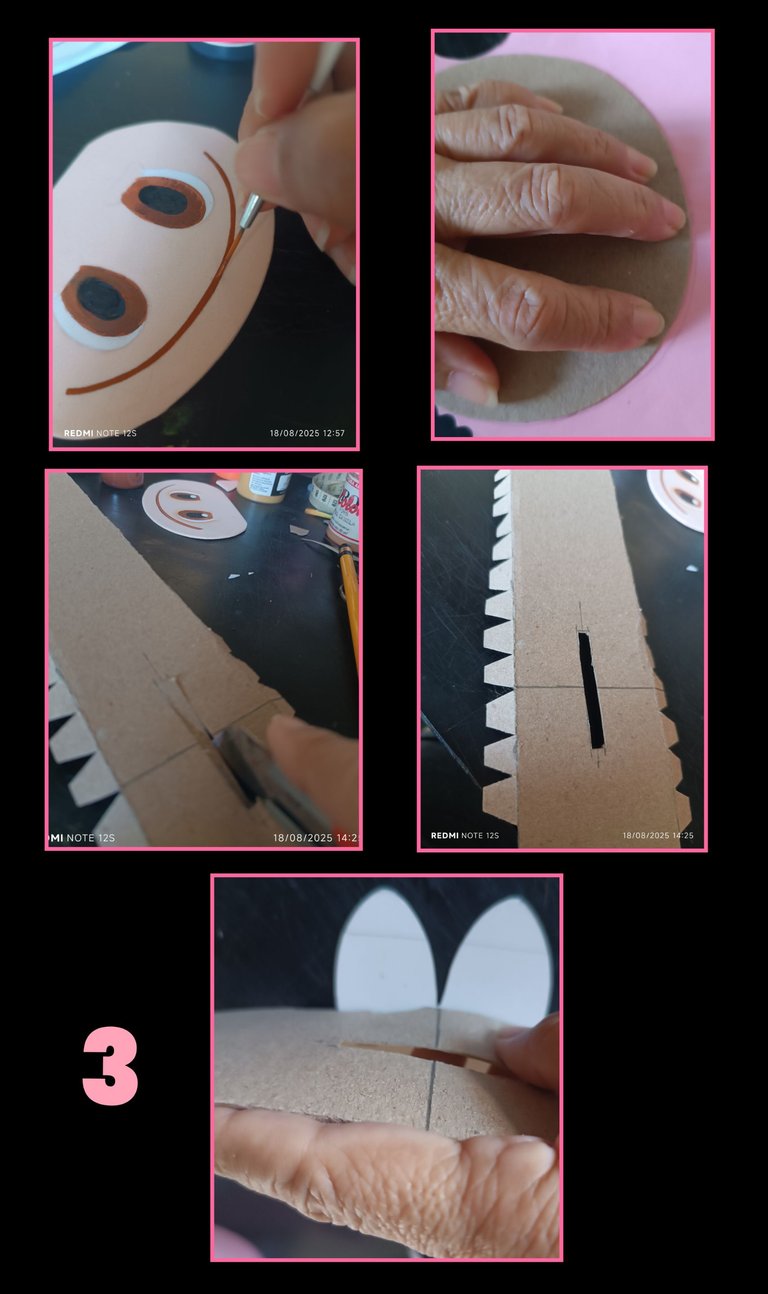
- Pinta ojos y boquita, deja secar.
- Luego marca en cartón y cartulina la silueta de la figura recorta, después a la tira de cartón haz una abertura de 0,5 milímetros y de 4 cms de largo, marca el centro para que te sirva de guía, aplica silicón y comienza a pegar en el centro de las orejas como se muestra en la foto, así pegarás ambas caras.
Paso 4:

- Ahora aplica silicón en la tapa y pega el foami o cartulina rosada.
- Con la cuchilla, Haz una abertura por la línea inferior de la boca e inserta los dientes y pega por la parte trasera, luego monta la pieza de foami tipo paño para asegurar que quede bien.
- Luego recorta una tira de foami o cartulina y pega por todo el contorno, cierra y pega en la parte de abajo. (Ver foto)
- Luego aplica silicón y pega la pieza de paño haciendo un poco de presión.
- Aparte coloca a calentar la plancha y coloca la naríz y luego las cejas hasta que tomen volumen.
Paso 5:
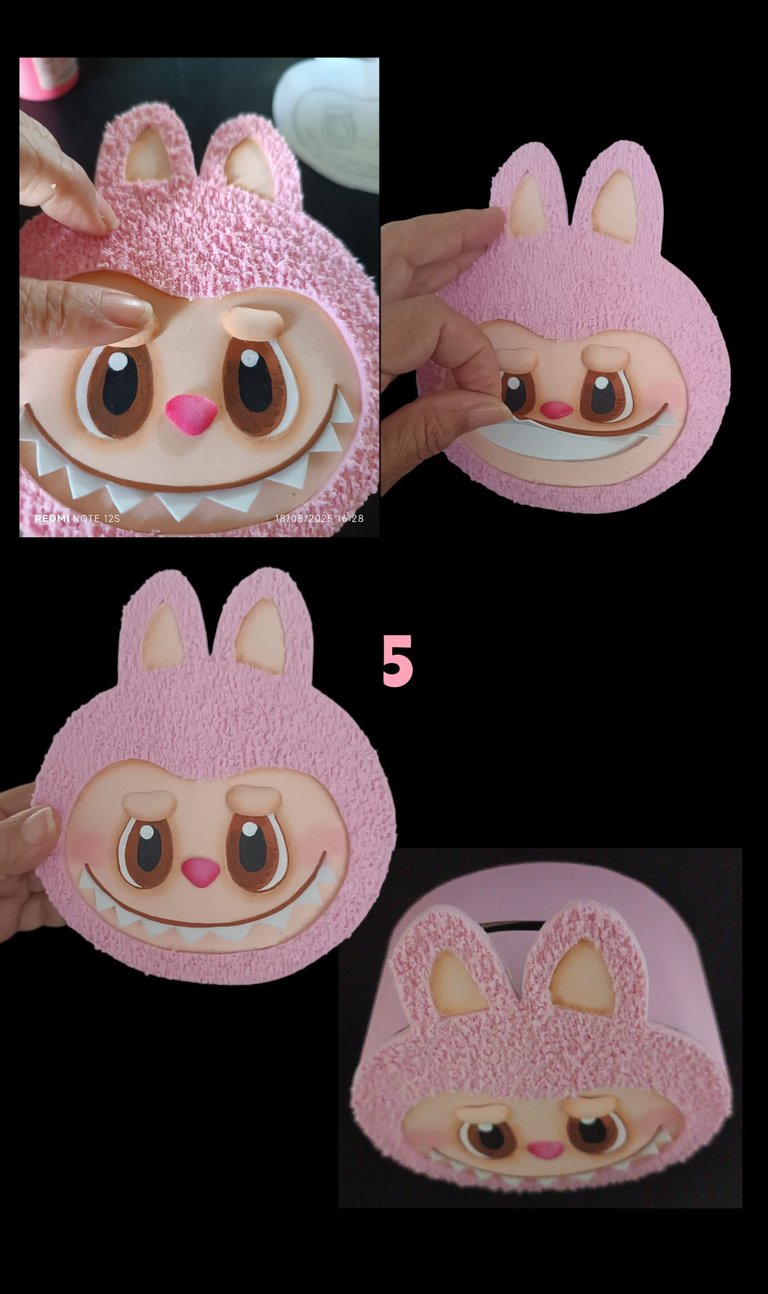
Ya para terminar, solo queda pegar cejas y nariz.
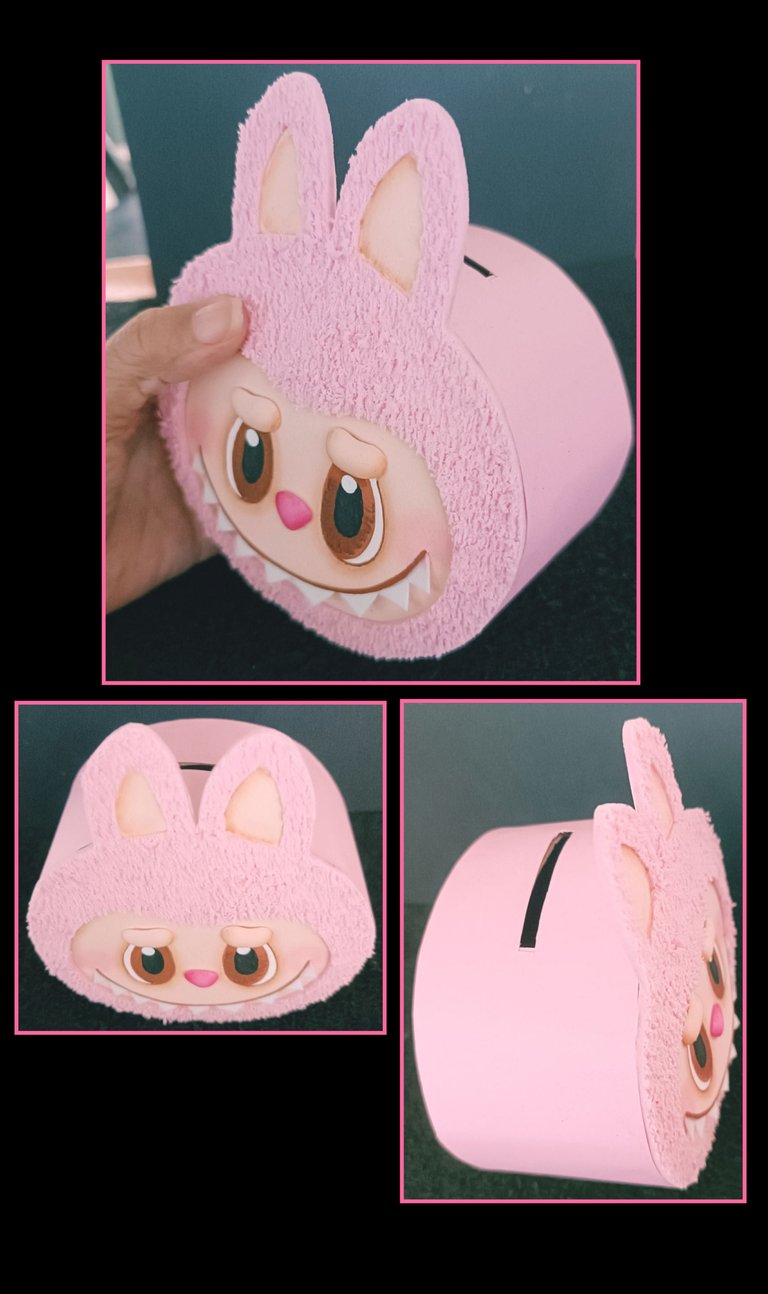
( Se me pasó decirles que no peguen la boca y dientes, dejen ese espacio abierto que cuando esté llena la alcancía, puedes abrir con una cuchilla y sacar el dinero sin dañarla), otra cosa también puedes hacer este procedimiento y hacerla como centro de mesa, cotillones y mini piñatas, estas te las enseñaré en un próximo tutorial.
Y así quedó terminada esta fácil y útil alcancía.
Traducida con DeepL.
Las fotos capturadas con mi Redmi Note 12s
Ahora me despido no sin antes agradecer su apoyo y comentarios.
Saludos y bendiciones para todos.
English:
Good evening and welcome to my blog.
Greetings and blessings to all.
I think it would be very beneficial during these holidays, and at the same time, if you decide to make it, you can involve them in the process, which would be a very nice and fun way to spend time with them.
So,let's get started.
To make it, you will need:
| Cardboard box or piñata | Cardstock |
|---|---|
| Cloth-like or matte foam | Paints and brushes |
| Scissors and utility knife | Silicone |
| Drawing or printout | Electric iron |
Step 1:
- Place the drawing on the foam, mark the entire edge of the figure and cut it out, then place the drawing on the foam and rub with scissors to transfer the edge of Labubu's face.
- Then use a knife to cut along the entire line and then cut out the face in skin-colored foam. You can place the drawing underneath and rub with scissors, holding the foam piece firmly.
Step 2:
- Cut out the missing pieces: teeth, nose, and ears.
- Now measure the entire circumference of the head and mark a strip of cardboard with the desired width and the length you measured, adding 2 cm more to close and glue.
- Mark 1 cm on each side and trace the line with scissors to fold the edges, then cut out triangles along the edge as shown in the photo.
Step 3:
- Paint the eyes and mouth, then let dry.
- Then trace the outline of the figure onto cardboard and cardstock, cut it out, then make a 0.5-millimeter, 4-centimeter-long opening in the cardboard strip, mark the center to use as a guide, apply silicone, and begin gluing in the center of the ears as shown in the photo, thus gluing both sides.
Step 4:
- Now apply silicone to the lid and glue the foam or pink cardboard.
- With the knife, make an opening along the bottom line of the mouth and insert the teeth and glue them to the back, then attach the foam piece to ensure that it stays in place.
- Then cut out a strip of foam or cardboard and glue it around the entire outline, close it, and glue it at the bottom. (See photo)
- Then apply silicone and glue the cloth piece, applying a little pressure.
- Separately, heat up the iron and place the nose and then the eyebrows on it until they take on volume.
Step 5:
To finish, all that's left is to glue on the eyebrows and nose.
(I forgot to mention that you shouldn't glue on the mouth and teeth. Leave that space open so that when the piggy bank is full, you can open it with a knife and take out the money without damaging it.) You can also use this method to make centerpieces, party favors, and mini piñatas. I'll show you how to do that in an upcoming tutorial.
And that's how this easy and useful piggy bank was finished.
Translated with DeepL.
Photos taken with my Redmi Note 12s
Now I bid you farewell, but not before thanking you for your support and comments.
Greetings and blessings to all.
Quedó bonita, está muy de moda el Labubu 🤭 muy útil para enseñar ahorrar desde pequeños
Muchas gracias amiga por tu visita y comentario.
Encantadora, una muy bonita alcancía, con un diseño bastante genial.
!discovery 30
Hola Gabo, gracias por pasar por aquí y comentar mi trabajo.
Me alegra que te guste.
Saludos
This post was shared and voted inside the discord by the curators team of discovery-it
Join our Community and follow our Curation Trail
Discovery-it is also a Witness, vote for us here
Delegate to us for passive income. Check our 80% fee-back Program
Muchas Gracias por apoyarme @discovery-it
Saludos @elmundodebetty, que linda alcancia se ve cuchi, una gran idea que motiva a ahorrar.
Gracias amiga por comentar.... si, muy buena idea.
¡Hola, Betty! La alcancía de Labubu es simplemente encantadora. Es una forma divertida de enseñar a los niños sobre el ahorro. Me encanta la idea de hacerla en familia, es una excelente manera de pasar tiempo de calidad. Gracias por compartir este proyecto tan útil y creativo.
Hi, Betty! The Labubu piggy bank is simply adorable. It's a fun way to teach children about saving money. I love the idea of making it as a family; it's a great way to spend quality time together. Thank you for sharing this useful and creative project.
Hola Esperanza, muchas gracias por comentar y siempre lo hago con mucho amor para ustedes.