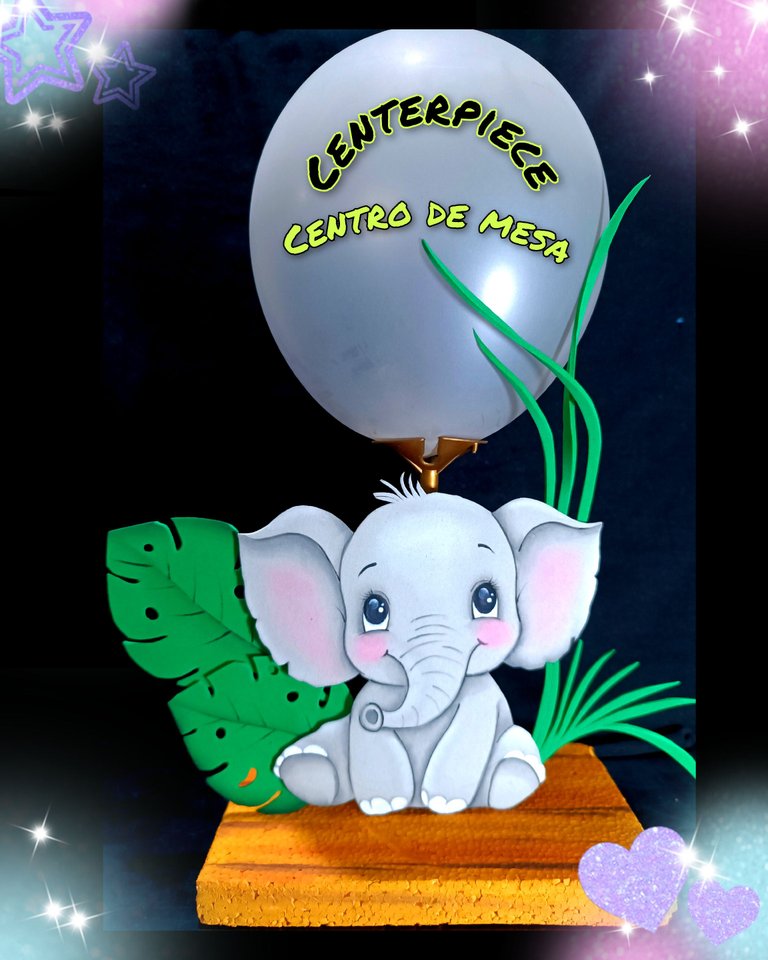
Centro de mesa, hazlo tu mismo fácil y sencillo. ESP/ENG. Do-it-yourself centerpiece, easy and simple.
Saludos amigos.
¿Cómo están?
Hoy quiero compartir con ustedes una linda y sencilla idea de crear un hermoso centro de mesa, ya que siempre en la familia se presentan ocasiones especiales como lo son los cumpleaños, bautizos, baby shower y a veces nos es costosos comprar o mandar a realizar los centros de mesa, por eso aquí te enseñaré como hacer uno muy económico y fácil de realizar.
Así que te invito a que veas y aprendas conmigo.
Necesitas estos materiales:
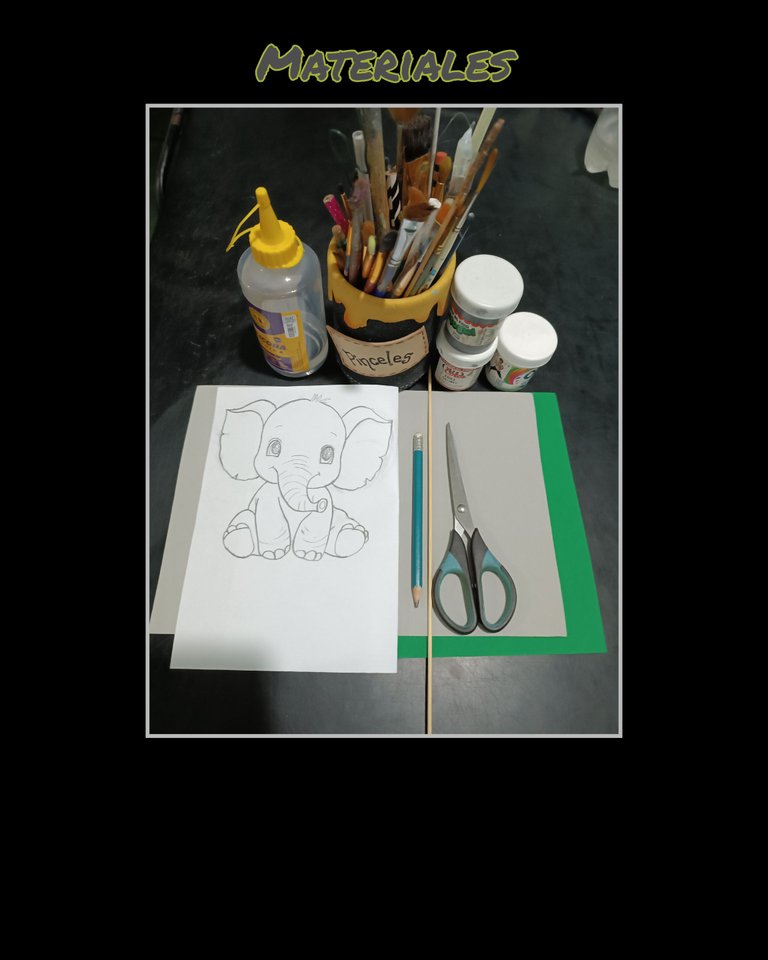
| Foami gris y verde | Dibujo o impresión |
|---|---|
| Anime | Globo con Palito |
| Pinturas y pinceles | Tijera |
| Lápiz | Silicón |
| Tiza | Palito de madera |
Comencemos:
Paso 1:
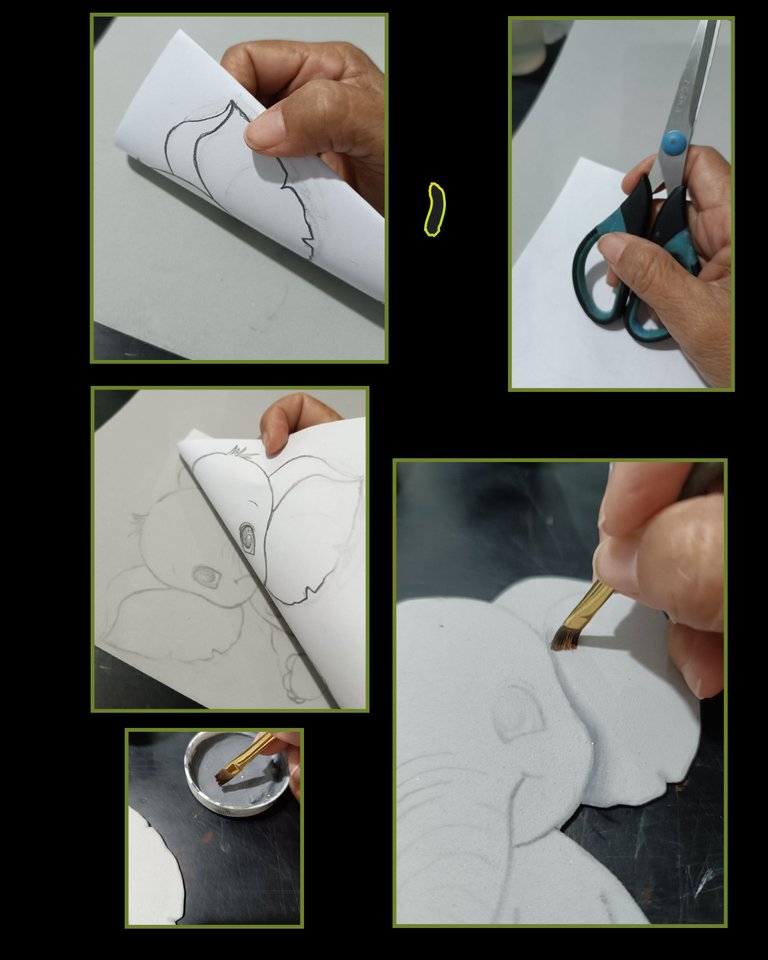
- Remarca el dibujo con el lápiz, luego coloca frente al foami y con la ayuda de la tijera, frota por sobre el papel para que se transfiera todo el dibujo.
- Luego, moja el pincel en agua y retira el exceso pasando por un pañito seco y moja la punta del pincel en la pintura gris.
- Comienza a pintar todas las líneas que tiene el dibujo en el caso de que quieras pintar un elefante.
Paso 2:
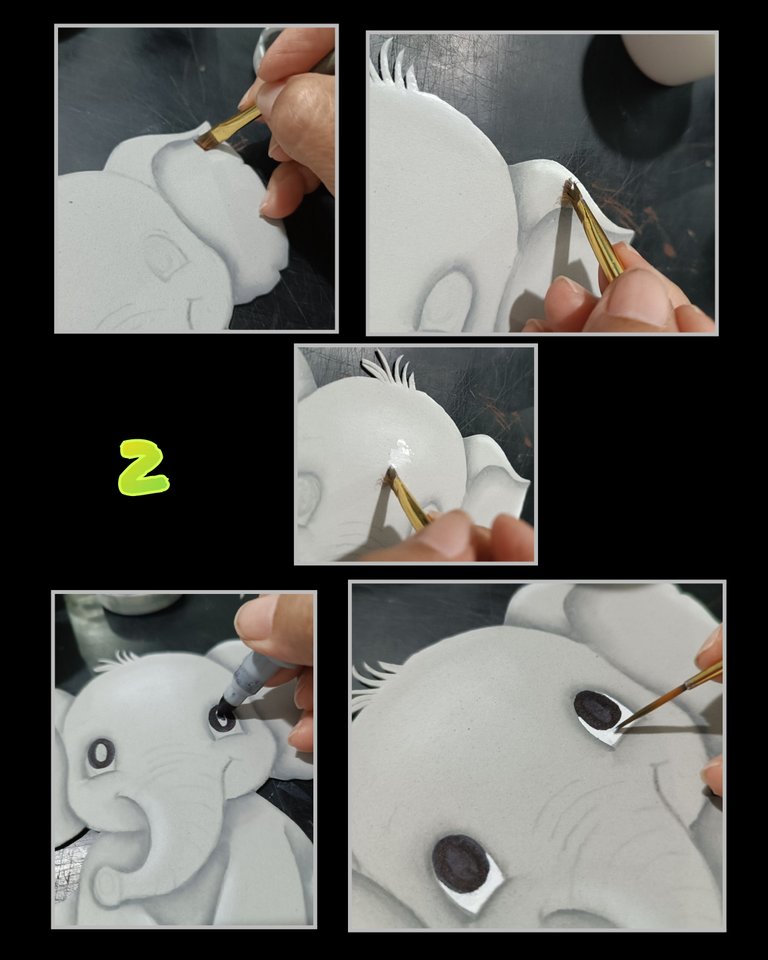
- Continúa pintando y sombreando con la pintura gris. Luego limpia el pincel y repite mojando ahora en pintura blanca para darle luz a la figura, pasa por la parte de arriba de las orejas y en el centro de la frente, tratando de que no se vea como mancha.
- Luego marca el centro de los ojos con marcador negro y luego pinta con un pincel punta fina el contorno del ojo con pintura blanca.
Paso 3:
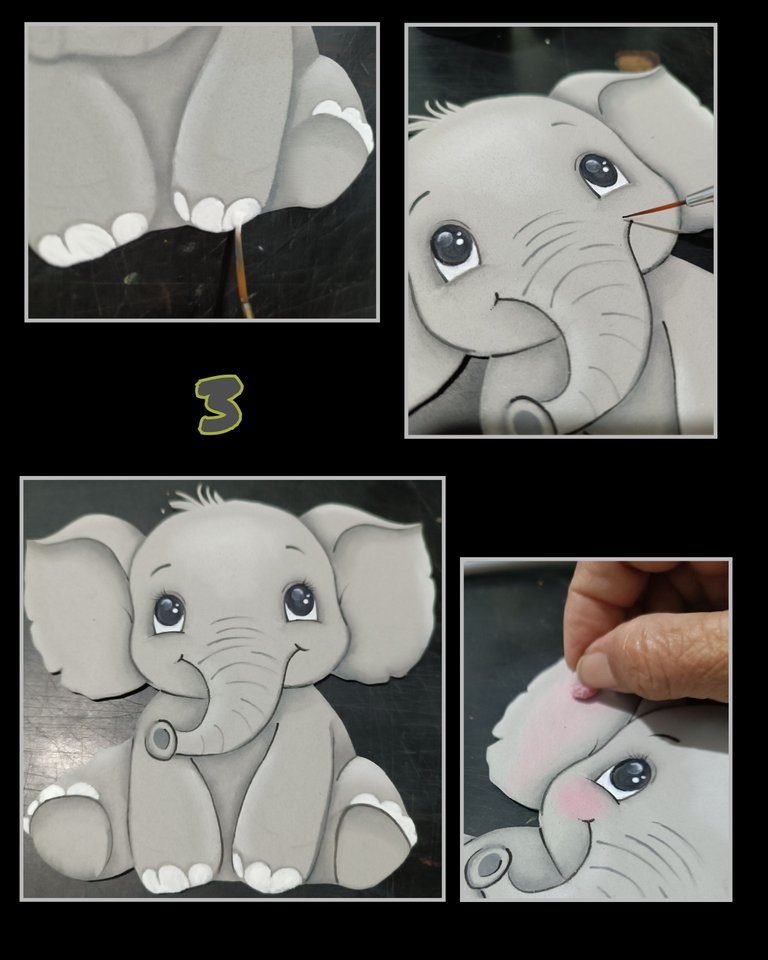
- Ahora con un pincel fino, pinta las uñas y deja secar, seguidamente, delinea ojos, cejas, boca y las partes que quieras definir con pintura negra.
- Luego con tiza y un poquito de algodón, pinta las orejas y mejillas.
Paso 4:
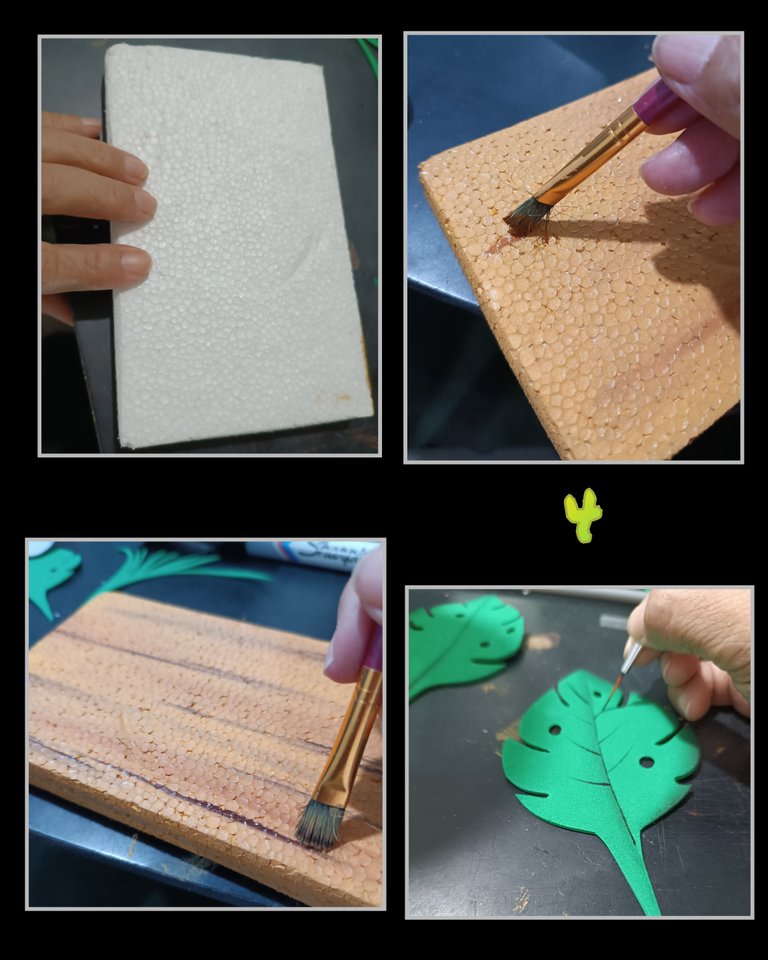
- Ahora recorta un rectángulo en anime y pinta de color ocre, luego sin dejar secar la pintura, pasa el pincel con pintura marrón para pintar unas líneas o betas y deja secar.
- Luego recorta y pinta unas hojas, delinea las nervaduras y deja secar.
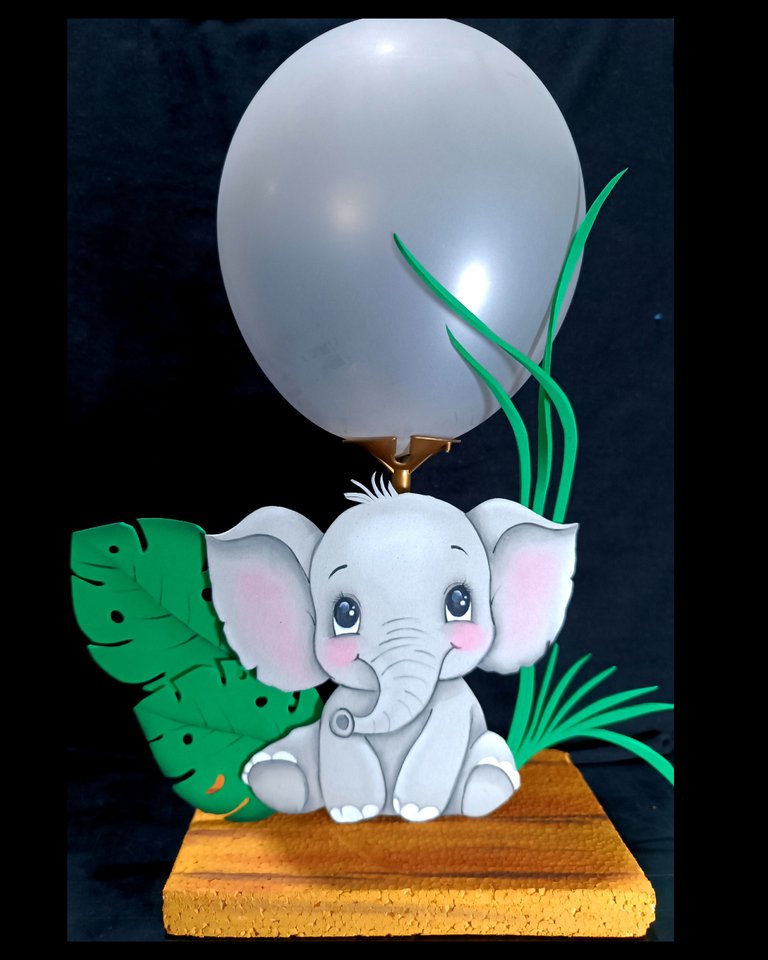
Así podría ser la forma como armar las piezas del centro de mesa.
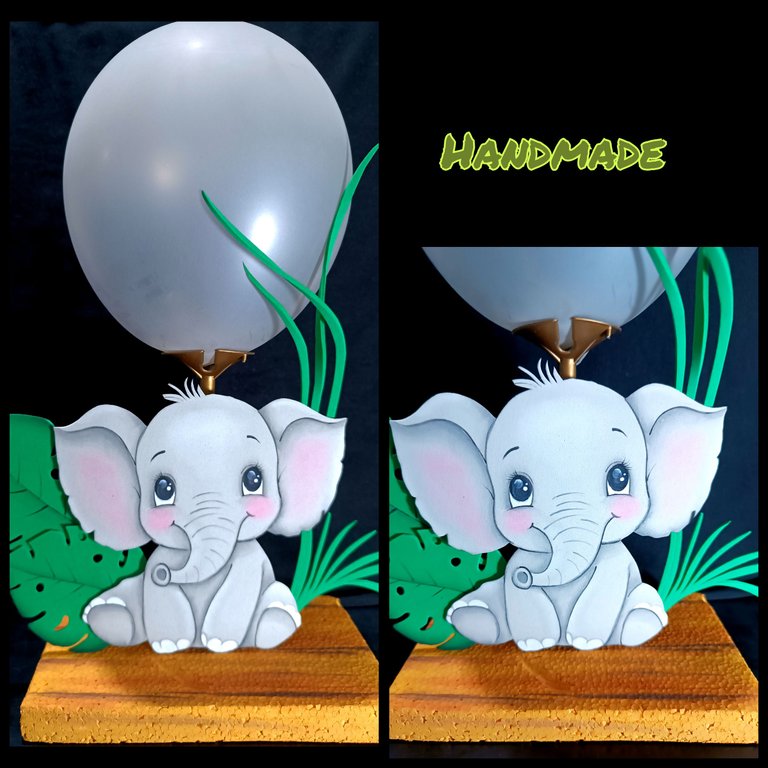
Paso 5:

- Ahora infla el globo y arma con el palito, luego aplica un poquito de silicón en el palito e inserta en el centro del anime o base, luego aplica un poco de silicón en el palito y pega el elefante en todo el centro y deja secar.
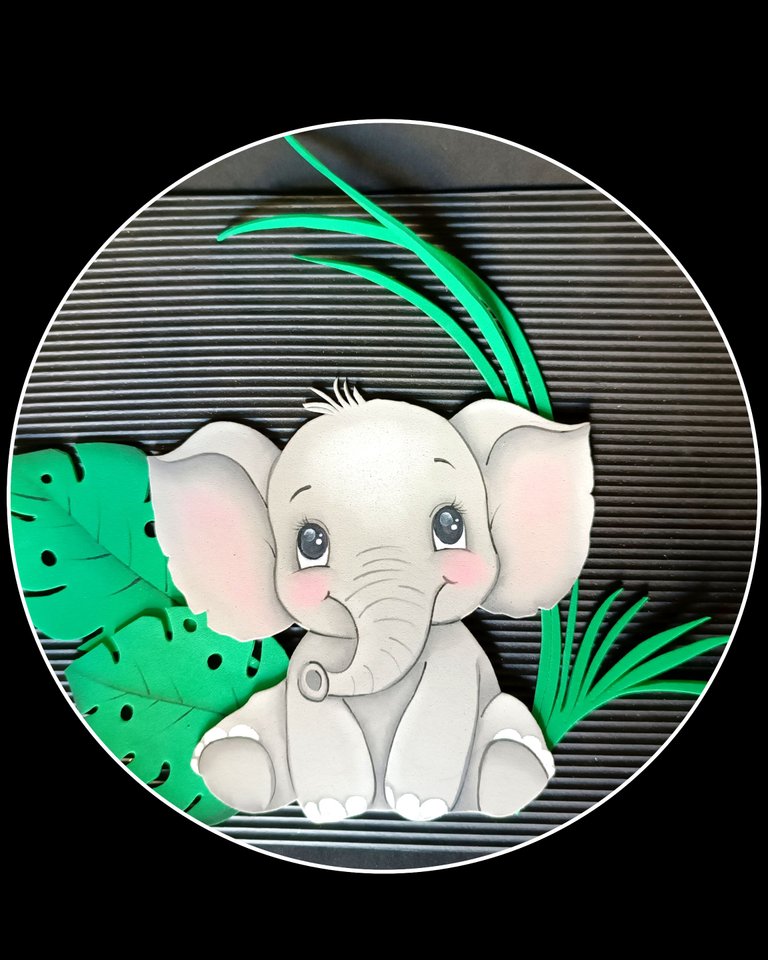
- Luego pega las dos (2)hojas y recorta una palma y pega del otro lado.
Así queda terminado este lindo centro de mesa hecho totalmente a mano, como puedes ver es algo muy sencillo y hermoso a la vez.
Las fotos capturadas con mi Redmi Note 12
Editadas con GridArt.
Fuente: https://es.pinterest.com/pin/476255729364369186/
Ahora llegó la hora de la despedida y deseo y espero que haya sido de tu agrado mi paso a paso y te sirva de guía para cuando te animes a realizar uno, con el motivo que quieras, de igual manera, podrías también usar una impresión y decorar como te acabo de mostrar.
Saludos y espero verte nuevamente por aquí.
Muchas gracias por tu apoyo.
English:
Greetings friends.
How are you?
Today I want to share with you a nice and simple idea to create a beautiful centerpiece, as always in the family there are special occasions such as birthdays, baptisms, baby shower and sometimes it is expensive to buy or send us to make the centerpieces, so here I will teach you how to make a very economical and easy to make.
So I invite you to watch and learn with me.
You need these materials:
| Grey and green Foami | Drawing or print |
|---|---|
| Anime | Balloon with Popsicle stick |
| Paints and brushes | Scissors |
| Pencil | Silicone |
| Chalk | Wooden stick |
Let's begin:
Step 1:
- Outline the drawing with the pencil, then place it in front of the foami and with the help of the scissors, rub over the paper so that the whole drawing is transferred.
- Then, dip the brush in water and remove the excess by wiping it with a dry cloth and dip the tip of the brush in the gray paint.
- Start painting all the lines of the drawing in case you want to paint an elephant.
Step 2:
- Continue painting and shading with the gray paint. Then clean the brush and repeat dipping now in white paint to give light to the figure, go over the top of the ears and in the center of the forehead, trying not to make it look like a stain.
- Then mark the center of the eyes with black marker and then paint with a fine tip brush the outline of the eye with white paint.
Step 3:
- Now with a fine brush, paint the nails and let dry, then outline the eyes, eyebrows, mouth and the parts you want to define with black paint.
- Then with chalk and a little bit of cotton, paint the ears and cheeks.
Step 5:
- Now inflate the balloon and assemble with the stick, then apply a little silicone on the stick and insert in the center of the anime or base, then apply a little silicone on the stick and glue the elephant all over the center and let it dry.
- Then glue the two (2) leaves and cut out one palm and glue the other side.
As you can see, it is very simple and beautiful at the same time.
The photos captured with my Redmi Note 12.
Edited with GridArt.
Source: https://es.pinterest.com/pin/476255729364369186/
Now it's time to say goodbye and I wish and hope that my step by step has been to your liking and will serve as a guide for when you dare to make one, with the motif you want, in the same way, you could also use a print and decorate as I just showed you.
Greetings and I hope to see you here again.
Thank you very much for your support.
Saludos. Cuídate.👋
Hola, muchas gracias amiga. me alegra mucho que te haya gustado mi idea.
This is a beautiful center piece with a nice outcome, you have done so well with the step by step process. Thanks so much for sharing with us.
Que bueno que le haya gustado.
Muchas gracias por comentar.
Aw! Quiero aprender hacer todo esto, las hojitas, todo es tan perfecto, amiga me encantan tus creaciones. Un abrazo
Hola querida amiga, segura estoy que no será nada difícil.
Muchas gracias por tu apoyo.
Igual para ti.
Cómo siempre bella, un hermoso trabajo. Dios te bendiga 💖
!discovery 35
Gracias amiga por siempre apoyarme y que bueno que te gustó mi trabajo.
This post was shared and voted inside the discord by the curators team of discovery-it
Join our Community and follow our Curation Trail
Discovery-it is also a Witness, vote for us here
Delegate to us for passive income. Check our 80% fee-back Program
Muchas gracias @discovery-it por el apoyo.
Saludos.
A lovely piece of work, like yours, that's always your custom. This centerpiece turned out beautifully. God bless your ability to create beautiful things.
selected by @dayadam
Uy, que palabras tan hermosas, muchas gracias por su apoyo.
Gracias por sus bendiciones. Amén
@innerblocks muchas gracias por su apoyo y selección.
¡Felicidades! Esta publicación obtuvo upvote y fue compartido por @la-colmena, un proyecto de Curación Manual para la comunidad hispana de Hive que cuenta con el respaldo de @curie.
Si te gusta el trabajo que hacemos, te invitamos a darle tu voto a este comentario y a votar como testigo por La Colmena.
Si quieres saber más sobre nuestro proyecto, te invitamos a acompañarnos en nuestro servidor de Discord.
Muchas gracias @la-colmena por su apoyo, saludos.