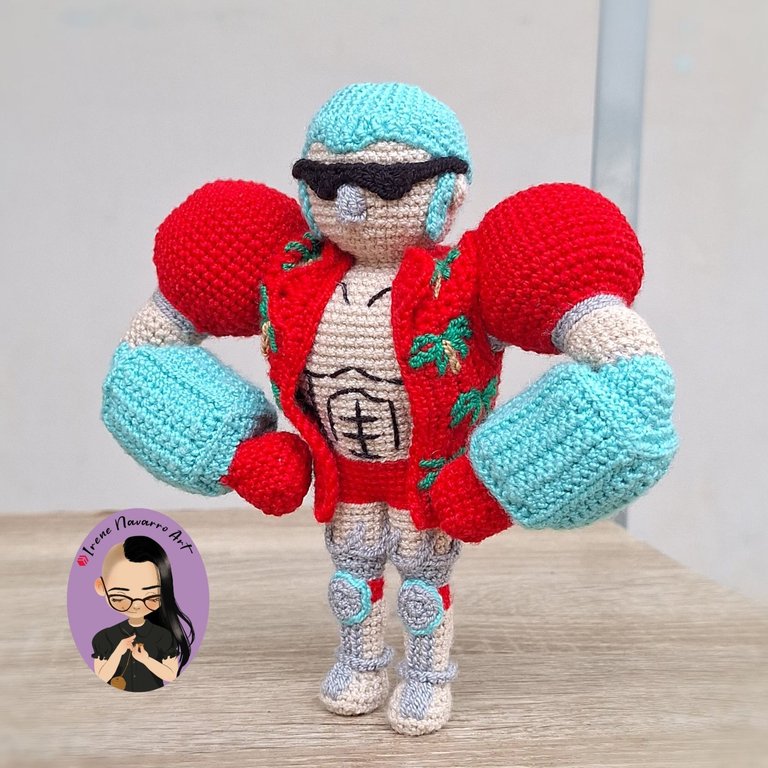
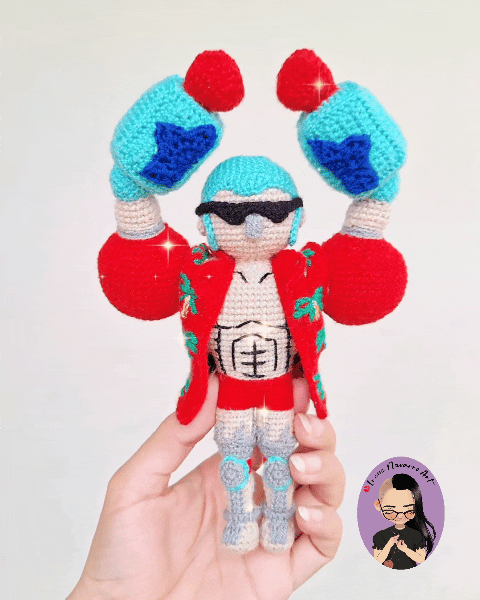
Amigurumi Franky (One Piece)
Saludos querida comunidad, últimamente he tenido varios asuntos importante que atender, sin embargo, trato de que no pase mucho tiempo sin retomar mis labores con la aguja, por supuesto que mi proyecto de hacer a todos los tripulantes sombrero de paja de One Piece continúa, aunque tuve que hacer una pausa mientras compraba hilos de colores necesarios para estos, pero hoy finalmente luego de mucho batallar les comparto el amigurumi de Franky, sin duda uno de los más desafiantes en cuanto la elaboración, pero también el mas satisfactorio hasta ahora debido precisamente a su complejidad, pues este personaje quien es el carpintero naval de la tripulación, debido a un encuentro previo con la marina que lo dejó muy mal herido, reconstruyó partes de su cuerpo con piezas mecánicas y chatarra, por lo que podría decirse que es una especie ciborg, esos detalle son precisamente los que lo hacen tan especial a la hora de hacer un amigurumi con su forma. Espero les guste 😊
Greetings dear community, lately I have had several important matters to attend to, however, I try not to let too much time go by without resuming my work with the needle, of course my project of making all the straw hat crew members of One Piece continues, although I had to take a break while I bought the necessary colored threads for these, but today finally after much struggle I share with you Franky's amigurumi, without a doubt one of the most challenging in terms of elaboration, but also the most satisfying so far due precisely to its complexity, because this character who is the naval carpenter of the crew, due to a previous encounter with the navy that left him very badly injured, rebuilt parts of his body with mechanical parts and scrap, so you could say that he is a cyborg species, those details are precisely what make him so special when making an amigurumi with his shape. I hope you like it 😊


Proceso / Process
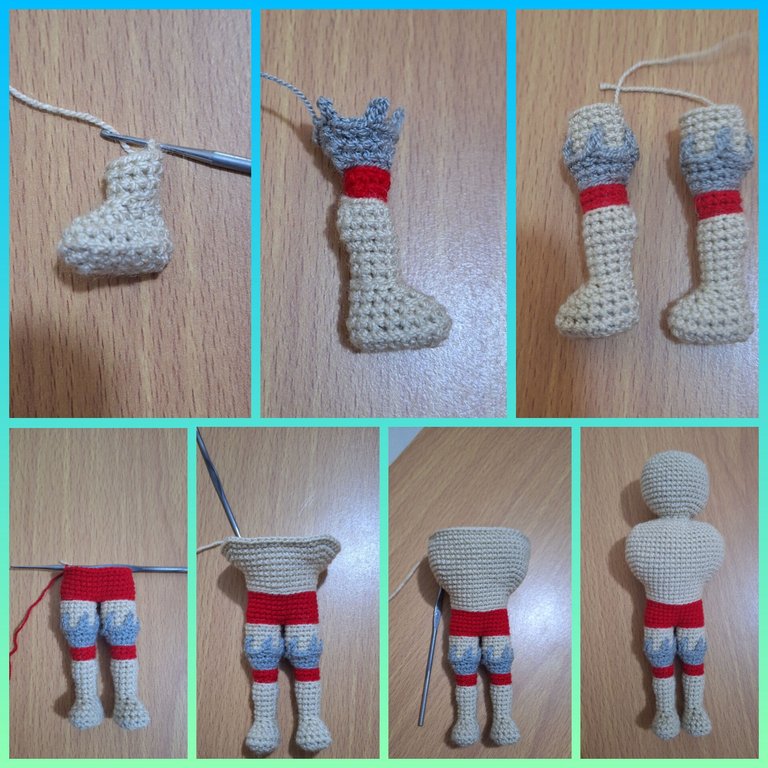
Con hilo beige y ganchillo de 1.25mm comencé el pie con 4 cadenas de base, hice 2 aumentos por dos hileras hasta obtener un ovalo de 16 puntadas, subí con dos hileras, luego hice una hilera con 4 disminuciones y otra con 3 para obtener el tobillo de 9 puntadas, luego hice tres hileras, hice 2 aumentos por dos hileras para la pantorrilla, seguí recto, hice disminuciones para la parte de la rodilla, cambia a hilo rojo solo solo por dos hileras y luego a hilo gris, hice aumentos para hacer la parte inicial del muslo hasta obtener un ancho de 15 puntadas, levanté las puntadas del lado de atrás con hile beige e hice cinco hileras. Hice las dos piernas iguales.
Cambié a hilo rojo y uní las piernas por una cadena, hice seis hileras de 32 puntos bajos, cambié a hilo beige e hice tres hileras más, luego hice 4 aumentos a los lados por seis hileras parea alcanzar el ancho de la espalda, hice ocho hileras sin aumentos, luego en las siguientes hileras hice disminuciones para obtener el cuello de 12 puntadas. Para la cabeza hice seis aumentos por 5 hileras para obtener 12 puntadas, luego ocho hileras sin aumentos, para luego hacer 6 disminuciones por seis hileras y cerrar la cabeza.
Using beige yarn and a 1.25mm crochet hook, I started the foot with 4 foundation chains. I made 2 increases for two rows until I had a 16-stitch oval. I went up with two rows, then made one row with 4 decreases and another with 3 to get the 9-stitch ankle. Then I made three rows. I made 2 increases for two rows for the calf. I continued straight ahead. I made decreases for the knee. I switched to red yarn for only two rows and then to gray yarn. I made increases for the initial part of the thigh until I had a width of 15 stitches. I picked up the stitches on the back side with beige yarn and made five rows. I made both legs the same.
I switched to red yarn and chain stitched the legs together. I made six rows of 32 single crochet stitches, then switched to beige yarn and chain stitched three more rows. Then I increased 4 times on the sides for six rows to match the width of the back. I made eight rows without increasing, then decreased 6 times on the following rows to make the neck with 12 stitches. For the head, I increased 6 times for 5 rows to make 12 stitches, then did eight rows without increasing, then decreased 6 times for six rows to close the head.
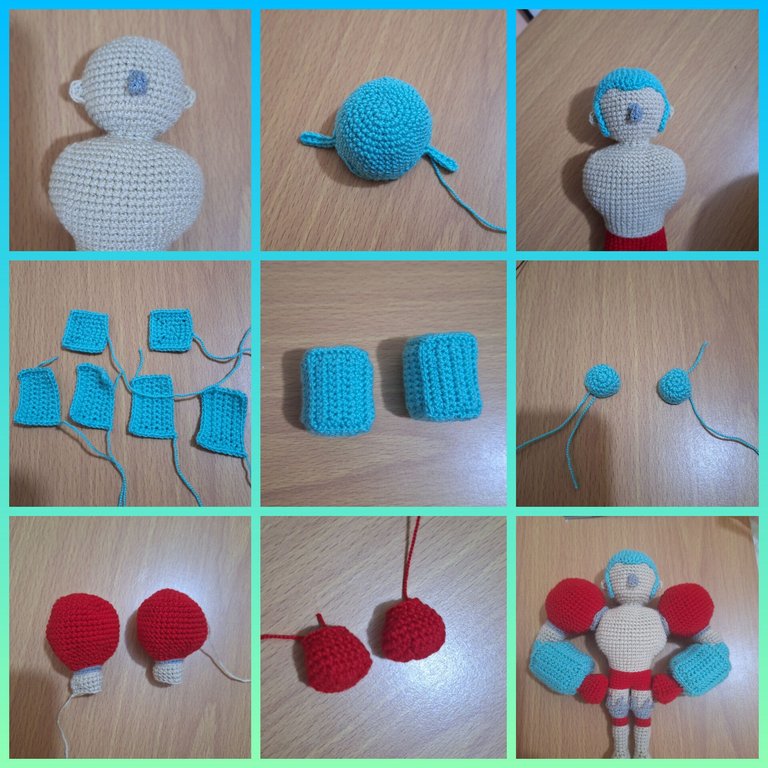
Con hilo gris bordé la nariz y con beige las orejas. Para el cabello con hilo azul hice 6 puntos bajos en un anillo, hice 6 aumentos por seis hileras, luego hice una hilera mas agregando el borde del cabello y las patillas.
Para los brazos hice 4 piezas rectangulares y dos cuadradas, luego de coserlas tuve la forma del antebrazo, para los codos hice un anillo de 6 puntos bajos, 6 aumentos por dos hileras y luego dos hileras sin aumentos, para los hombros con hilo rojo hice 6 puntos bajos en un anillo, luego seis aumentos por seis hileras, ocho hileras sin aumentos, luego 6 disminuciones por cuatro hileras, cambié a hilo gris por una hilera, luego a hilo beige e hice dos hileras, luego hice 4 disminuciones en un hilera. Para los puños hice una base cuadrada de 24 puntadas, hice tres hileras sin aumentos, luego hice 4 disminuciones por tres hileras, cosí todas las partes de los brazos y las uní al cuerpo atravesando un alambre por dentro de cada brazo para que se pudieran mover.
I embroidered the nose with gray yarn and the ears with beige. For the hair, I made 6 single crochet stitches in a ring with blue yarn, 6 increases for six rows, then made one more row, adding the hairline and sideburns.
For the arms, I made four rectangular pieces and two square pieces. After sewing them together, I had the shape of the forearm. For the elbows, I made a ring of 6 single crochet stitches, 6 increases for two rows, and then two rows without increases. For the shoulders, I made 6 single crochet stitches in a ring with red yarn, then six increases for six rows, eight rows without increases, then 6 decreases for four rows. I switched to gray yarn for one row, then to beige yarn and made two rows, then made 4 decreases in one row. For the cuffs I made a 24-stitch square base, made three rows without increases, then made 4 decreases for three rows, sewed all the arm parts and joined them to the body by passing a wire through the inside of each arm so they could move.
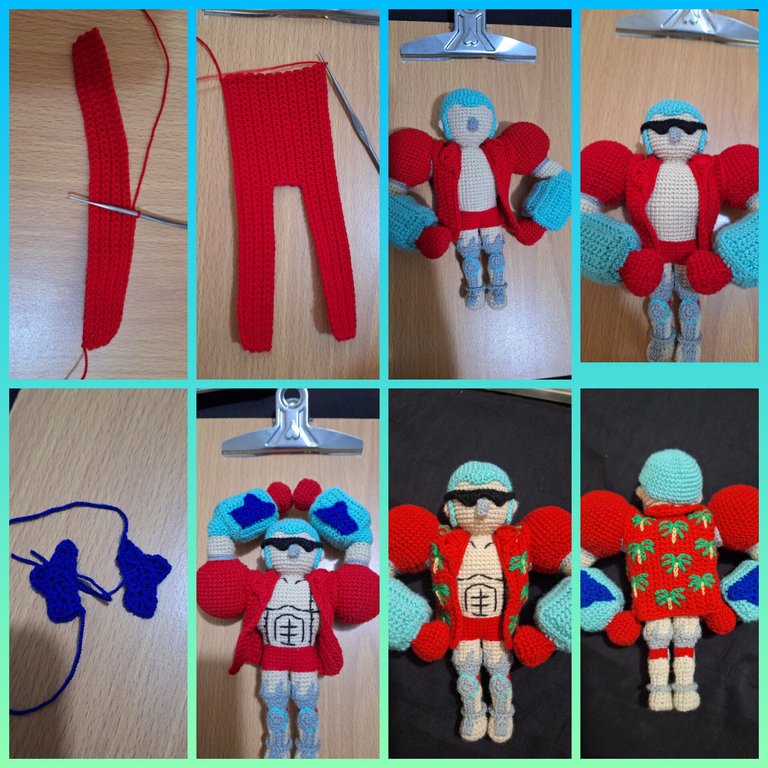
Para la camisa con hilo rojo hice 46 cadenas de base, hice 7 hileras de puntos bajos, luego solo 20 puntos bajos por 7 hileras, hice 26 cadenas y luego 7 hileras de 46 puntos bajos, cosí ambos lados de la camisa e hice el cuello de la camisa.
Con hilo azul rey hice las estrellas que cosí en los antebrazos, con hilo negro hice los lentes y además bordé los músculos y cicatrices del torso, para finalizar hice mi parte favorita de todo el proyecto, lo cual consistió el bordar las preciosas palmeras de la camisa de Franky 😊
For the shirt, I made 46 chain stitches using red yarn, 7 rows of single crochet stitches, then only 20 single crochet stitches for 7 rows, 26 chain stitches, then 7 rows of 46 single crochet stitches. I sewed both sides of the shirt and made the collar.
With royal blue yarn, I made the stars that I sewed on the forearms. With black yarn, I made the glasses, and I also embroidered the muscles and scars on his torso. Finally, I did my favorite part of the whole project, which was embroidering the beautiful palm trees on Franky's shirt. 😊
Resultado / Result
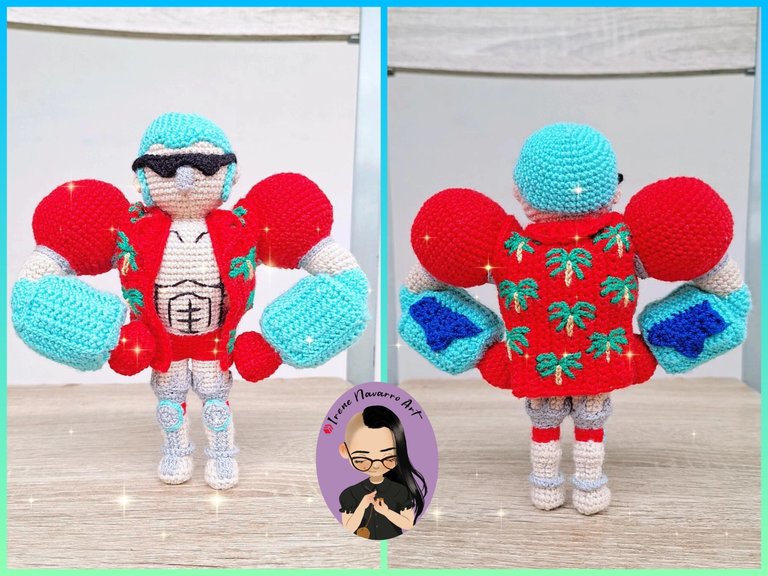


Imágenes tomadas con dispositivo Samsung A54. Portada editada en Inshot
Pictures taken with Samsung A54 device. Cover edited in Inshot

Espero les haya gustado. Les invito a leer mis próximas publicaciones y siempre estaré dispuesta a responder sus preguntas y comentarios, también pueden seguirme y contactarme en cualquiera de mis redes sociales. ¡Muchas gracias!
I hope you liked it. I invite you to read my next publications and I will always be willing to answer your questions and comments, you can also follow me and contact me on any of my social networks. Thank you!
Facebook
Twitter
Instagram
Ko-Fi
Discord: irenenavarroart#0361
Me encanta ver tu dedicación y creatividad en este proyecto de amigurumi. Franky es un personaje tan icónico de One Piece, y trabajo es realmente impresionante
I love seeing your dedication and creativity in this amigurumi project. Franky is such an iconic character from One Piece, and your work is truly impressive.
Muchísimas gracias 🥰 Siempre pongo todo de mi parte en cada proyecto. Un abrazo
Wow! que hermoso trabajo, tienes creatividad y talento para tejer, me encantó el resultado ♥️😍
Muchas gracias 🥰
Wow, the detailing and amount of work that went into this piece is incredible and evident in the result. Well done
selected by @stevenson7
Thank you very much ☺️
Dios de verdad que tienes un dom sensacional, de verdad que te esmera para realizar cada Amigurumi, no creo que un amante de One Piece dudará en encargarlo, ame cada detalle de Franklin, hasta los chocolatitos tiene 😅 lo espere con ansias, gracias por presentar tan excelente trabajo. Dios siga bendiciendo tu talento. 🙏🙏🙏
Ay amiga muchas gracias, ahora solo me falta un tripulante que ya lo llevo adelantado, espero terminarlo pronto. Un abrazo!