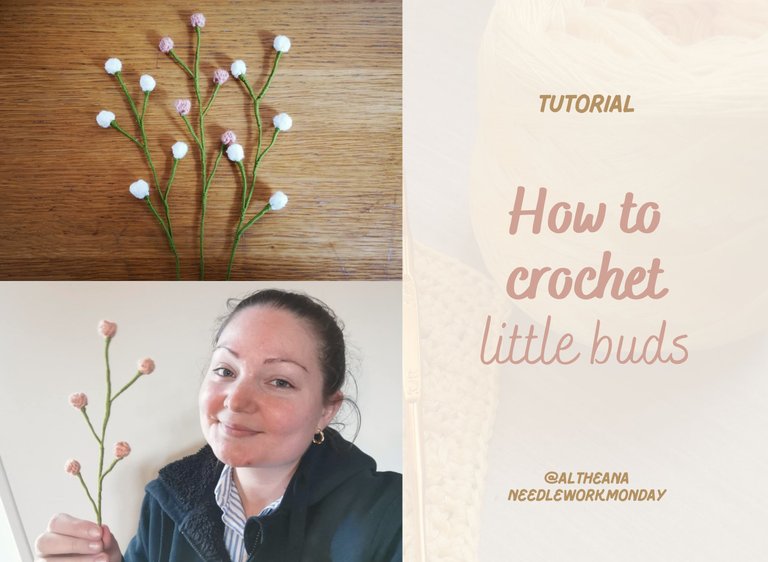
Tutorial: Little crochet buds // Tutoriel : Petits bourgeons au crochet [EN/FR]
Hello friends and crochet lovers! I hope you're all doing well 😁
I'm continuing my crochet flower project, but for the moment, my bouquet is a bit on hold. Quite simply, because I'm in the process of making another one! 💐
For my mom's twin sister's birthday, my mom wanted to give her a crocheted bouquet, so she commissioned me to make it!
I've chosen the colors: white, yellow, and pink. And I'm thinking about the composition 🤔
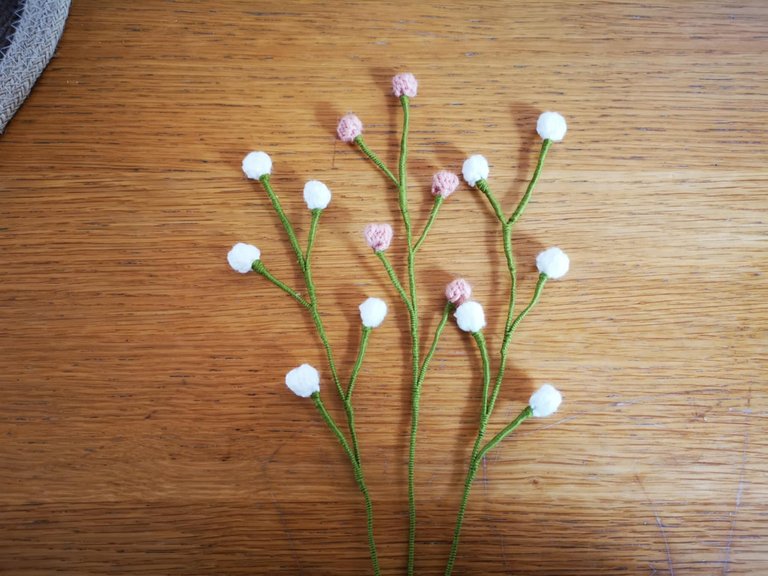
For this bouquet, I've already made a carnation, two daisies, and four sprigs of buds (the tutorial for which I'll share with you later in this post). I want to add leaves, mini roses, and a larger flower, but I'm still undecided between a dahlia and a gerbera.
Anyway, I'll share the progress of the bouquet with you! But today, I'm here to share with you the tutorial for the little buds. 😁
You'll see, it's super quick to make and can really dress up a pretty bouquet!
Materials
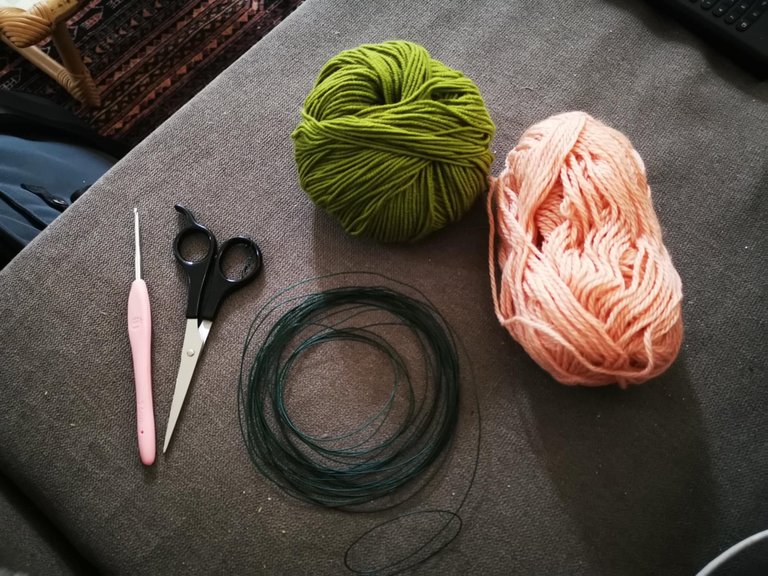
- Wire for the bud,
- Wire for the branch,
- A 2.5mm crochet hook,
- Wire,
- Scissors.
Steps
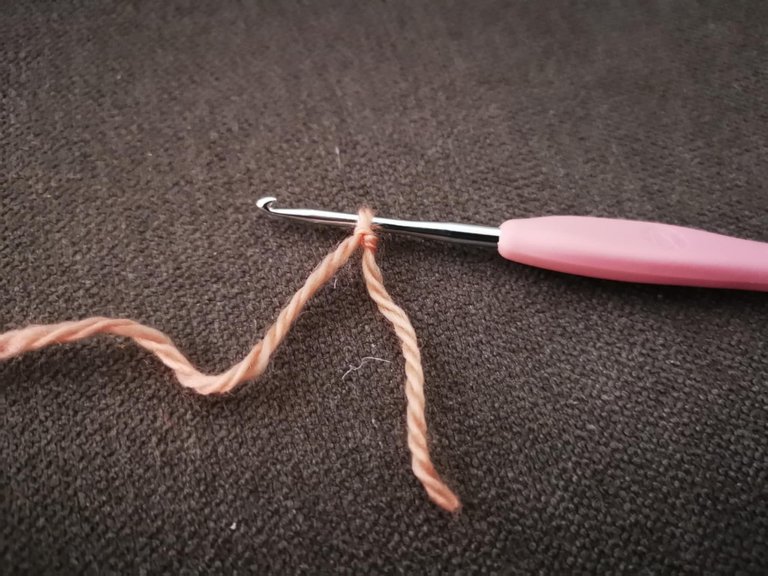
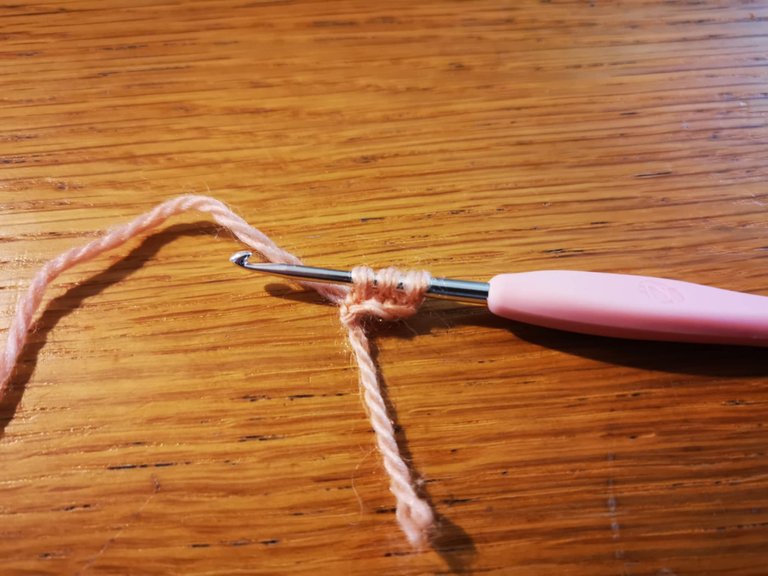
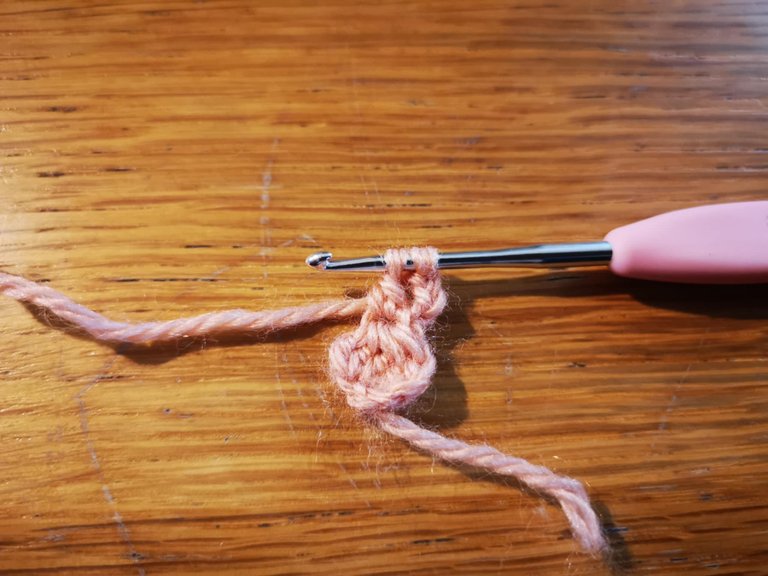
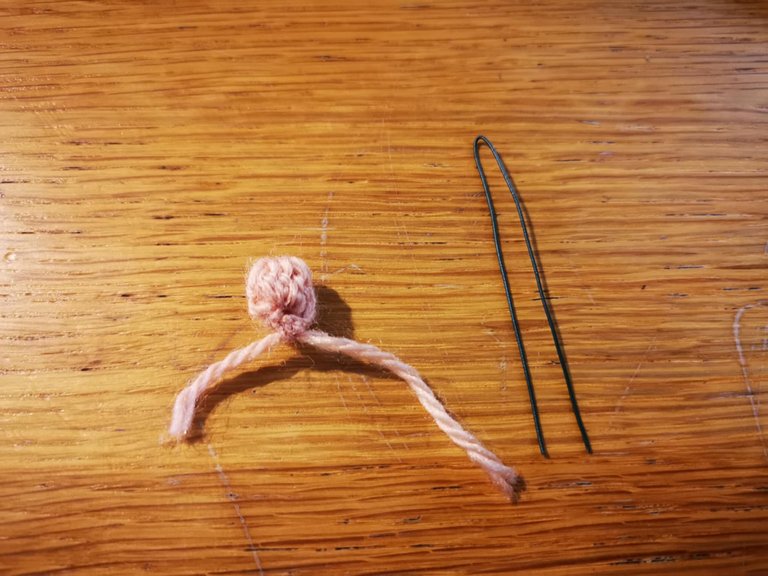
Start by making a slip knot with the yarn for the bud:
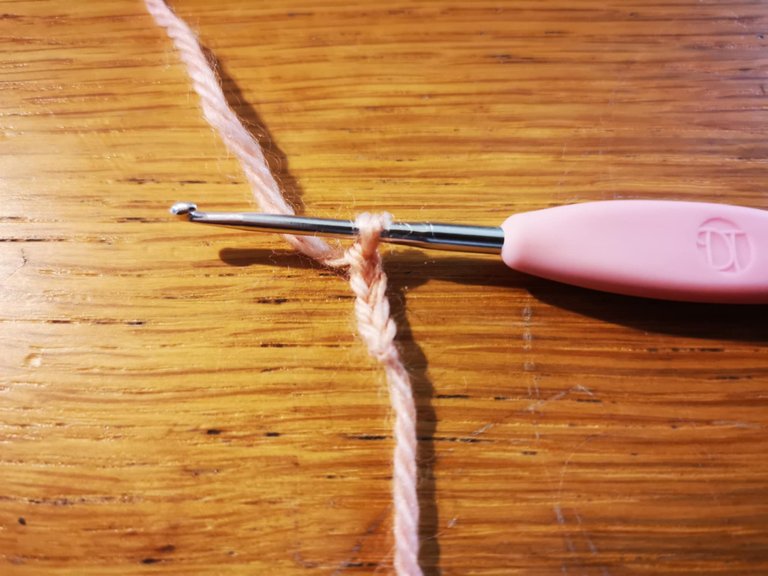
Next, cast on 4 chain stitches:
Next, make 4 unfinished half double crochets in the first chain stitch. That is, you must begin a half double crochet, so do:
Yarn over,
insert the hook into the stitch,
pass the yarn through the first two loops only,

Then repeat 4 times without completing the stitch:
The first time, you should have 2 loops on your hook,
The second time, you should have 3 loops on your hook,
The third time, you should have 4 loops on your hook,
The fourth time, you should have 5 loops on your hook.
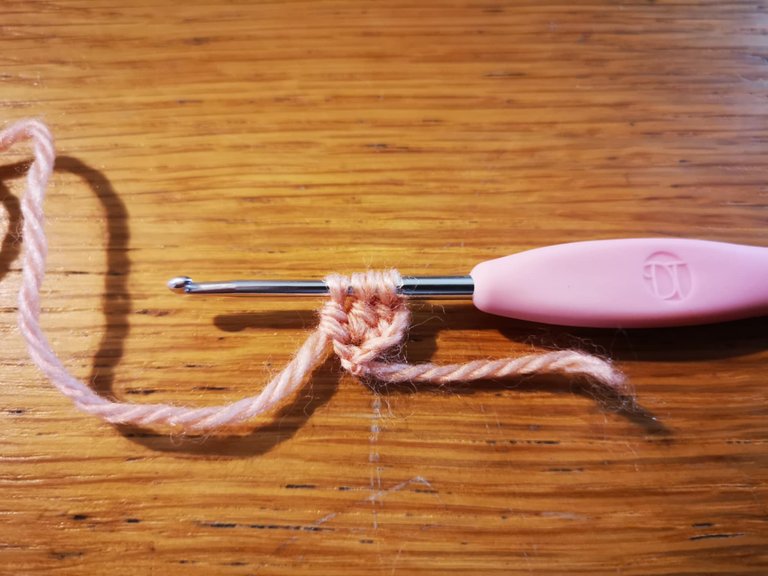

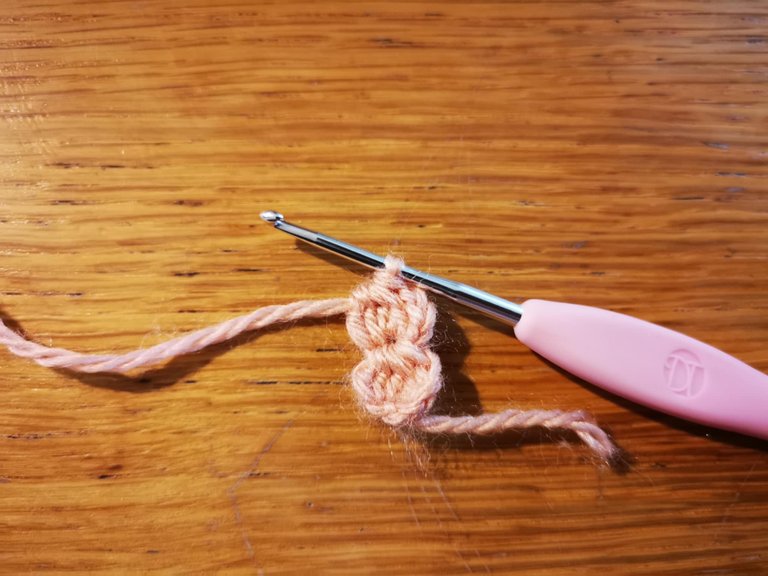
After the fourth unfinished half double crochet, you will complete the stitch. To do this, you must pass the hook through all 5 loops on your hook. This forms a sort of ball.
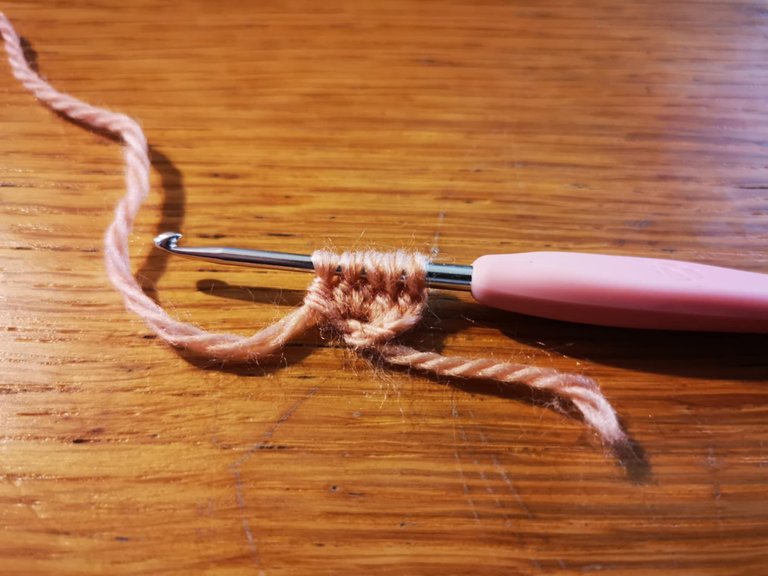
Next, cast on 4 chain stitches:

Then, repeat the same process: 4 unfinished half double crochets in the center.
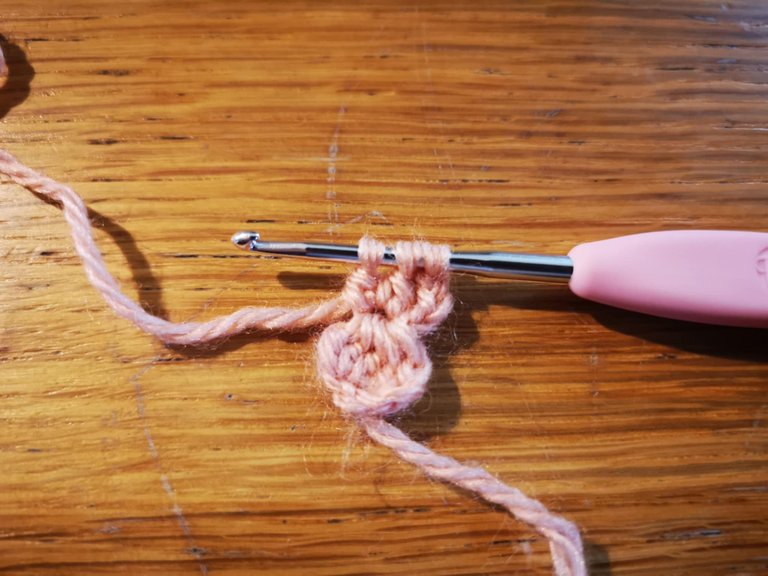
And once again, after the 4th unfinished half double crochet, you can finish the stitch by passing the hook through the 5 loops on your hook.
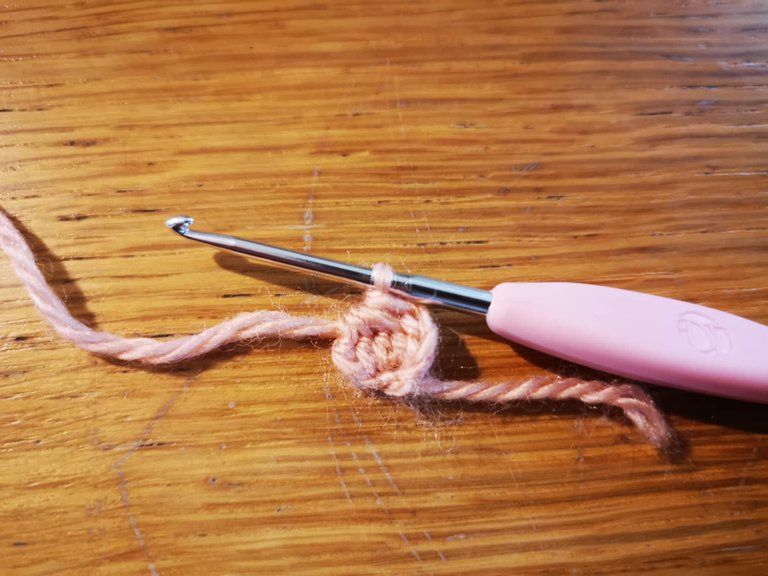
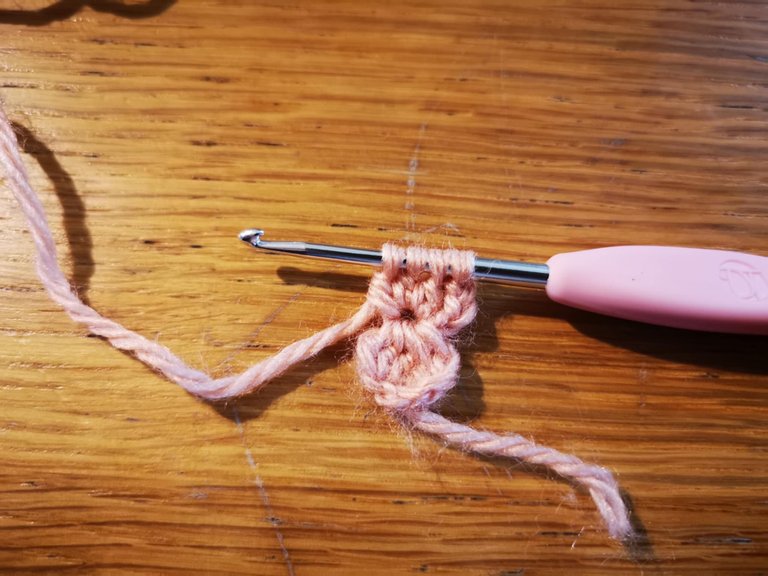
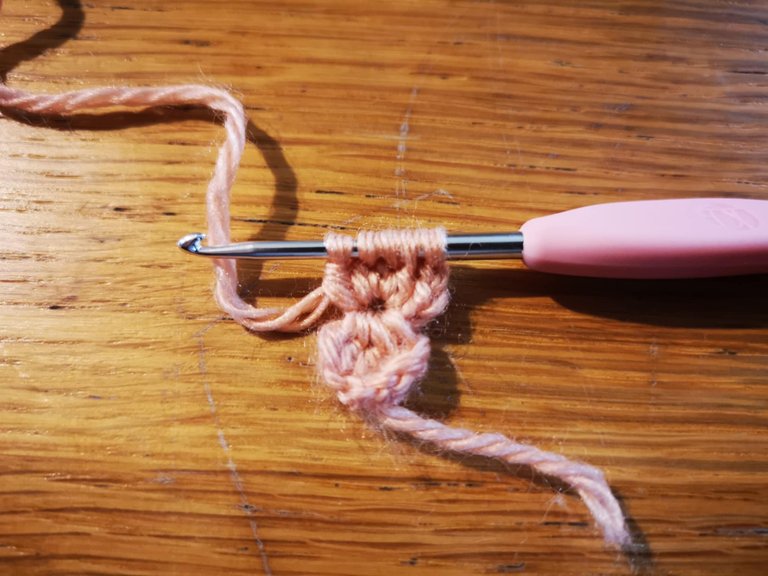
And finally, finish with a slip stich, then a chain stitch and cut the yarn.
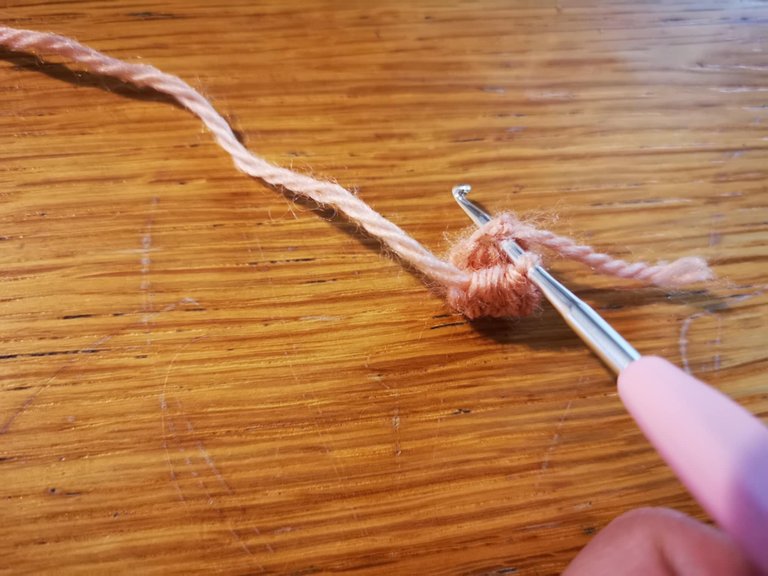
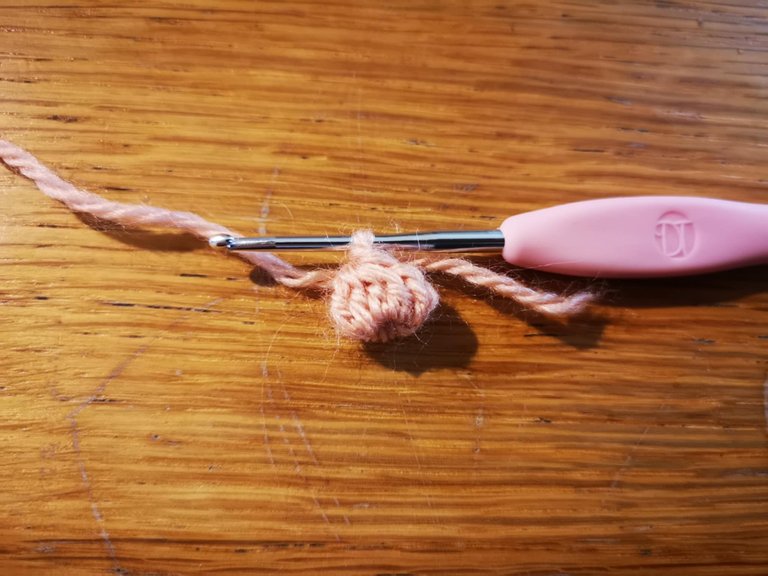
I made 5 buds.
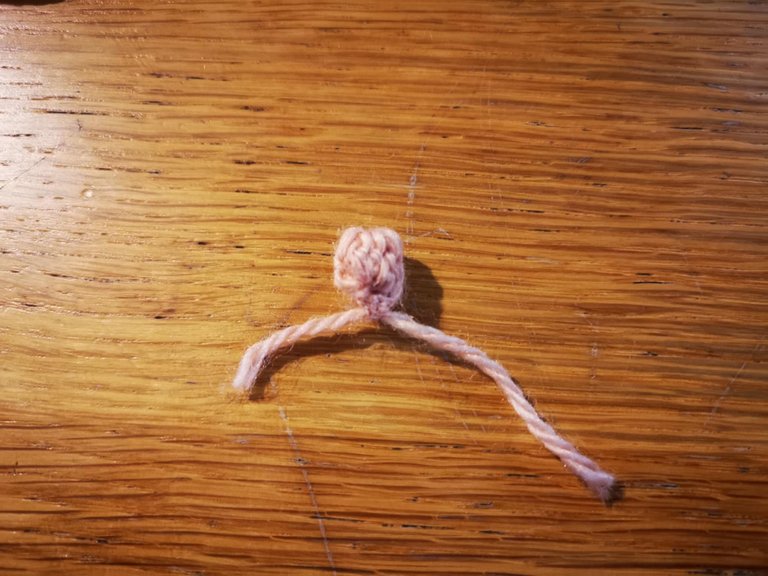
Next, take a 8 cm piece of wire and fold it in half:

Place it in the center of the bud, like this:
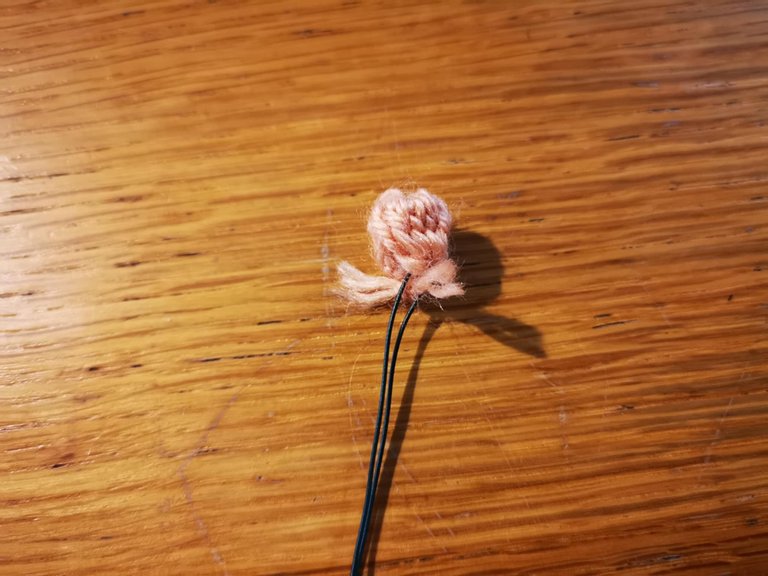
Next, take the wire for the branch. I chose light green wire. Wrap it around the wire and secure it in place:

Then do the same for the other 4 buds.
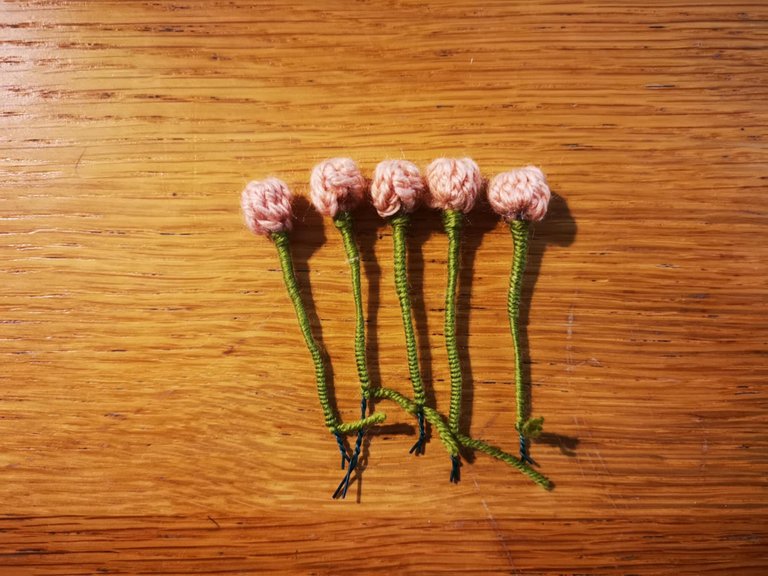
To assemble the branch of buds, I took a piece of wire about 40 cm long, which I folded in half for a little more rigidity.
I then placed the first bud at the top and wrapped the green wire around it to hold it in place.
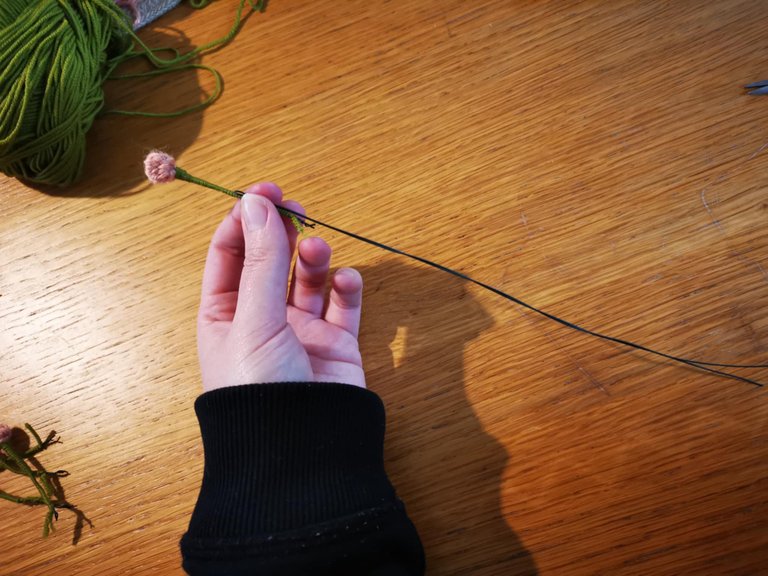
Then I placed the other buds, somewhat randomly, wherever I thought would be most suitable. I continued wrapping the green wire all the way to the end of the wire and tucked it in place.
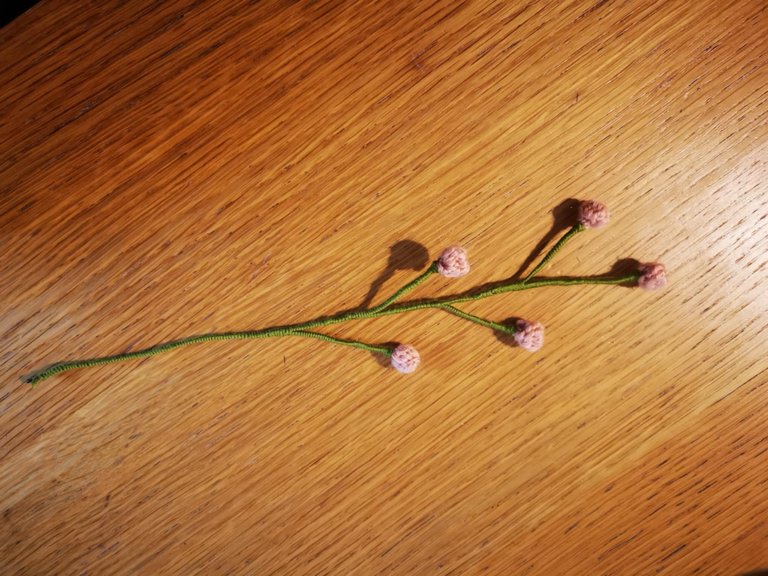
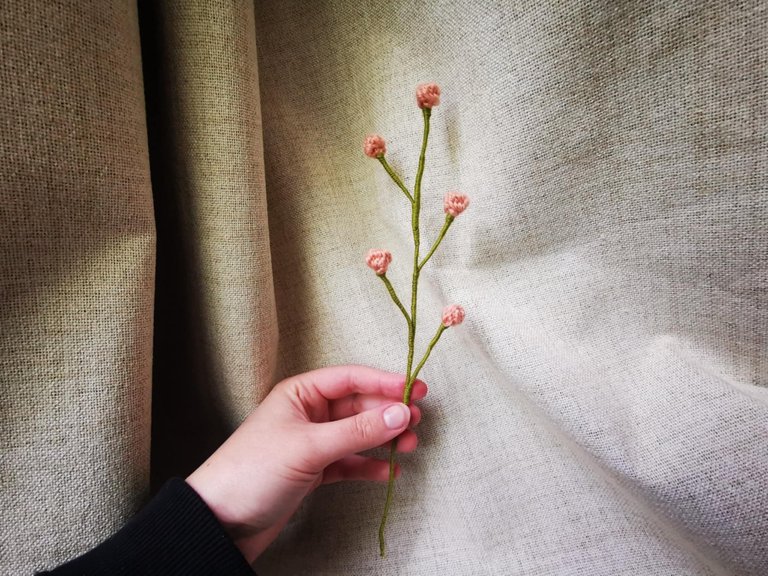
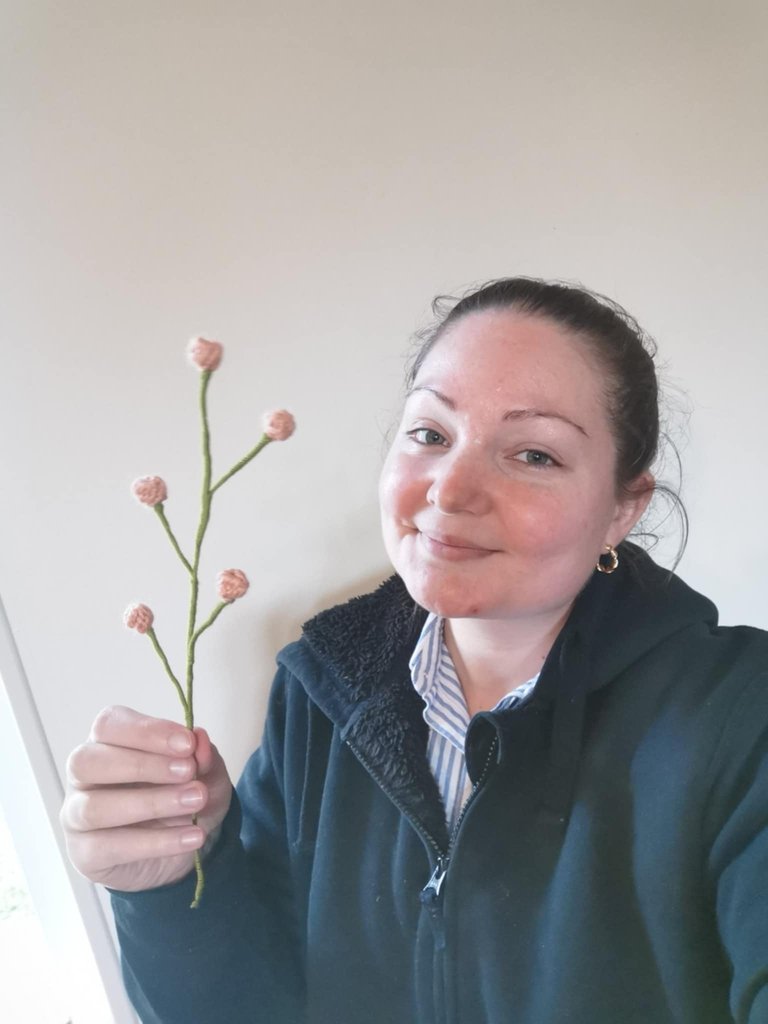
And there you have it, the first branch of buds is finished!
I think it takes about 15 or 20 minutes. It's super quick and super cute, don't you think? 😁
I hope you enjoyed this tutorial! If my explanations aren't clear enough, don't hesitate to ask me any questions in the comments 😘
See you soon,
Johanna
PS: I used Google Translate to translate the English part.

Hello les amis et les crochet lovers ! J’espère que vous allez tous très bien 😁
Je continue dans ma lancée des fleurs au crochet, mais pour le moment, mon bouquet est un peu en stand by. Tout simplement, car je suis en train d’en réaliser un autre ! 💐
En effet, pour l’anniversaire de la sœur jumelle de ma maman, ma mère souhaite lui offrir un bouquet de fleurs au crochet et elle m’a donc missionné de le réaliser !
J’ai choisi les couleurs : blanc, jaune et rose. Et je suis en pleine réflexion sur la composition 🤔
Pour ce bouquet, j’ai déjà réalisé un œillet, 2 marguerites et 4 brins de bourgeons (dont je vais vous partager le tutoriel dans la suite de ce post). Je souhaite ajouter des feuilles, des minis roses et une plus grosse fleur, mais j’hésite encore entre un dahlia et un gerbera.
Bref, je vous partagerai l’avancée du bouquet ! Mais aujourd’hui, je suis là pour vous partager le tutoriel des petits bourgeons. 😁
Vous allez voir, c’est ultra rapide à réaliser et ça peut vraiment habiller un joli bouquet !
Le matériel
- du fil pour le bourgeon,
- du fil pour la branche,
- un crochet 2.5mm,
- du fil de fer,
- des ciseaux.
Les étapes
Il faut commencer par faire un nœud coulant avec le fil pour le bourgeon :
Ensuite, il faut monter 4 mailles en l’air :
Puis, il faut faire 4 demi-brides non terminées dans la première maille en l’air. C’est-à-dire qu’il faut commencer une demi-bride, donc faire :
un jeté,
insérer le crochet dans la maille,
passer le fil dans les deux premiers brins seulement,
Puis recommencer 4 fois sans terminer le point :
La première fois, vous devez avoir 2 brins sur votre crochet,
La deuxième fois, vous devez avoir 3 brins sur votre crochet,
La troisième fois, vous devez avoir 4 brins sur votre crochet,
La quatrième fois, vous devez avoir 5 brins sur votre crochet.
Après la quatrième demi bride non terminée, vous allez finir le point. Pour cela, vous devez passer le crochet dans les 5 brins présents sur votre crochet. Cela forme une sorte de boule.
Ensuite, il faut monter 4 mailles en l’air :
Puis, recommencer la même chose : 4 demi-brides non terminées dans le centre.
Et encore une fois, après la 4 ème demi-bride non terminée, vous allez pouvoir finir le point en passant le crochet dans les 5 brins présents sur votre crochet.
Et enfin, vous terminez par une maille coulée puis, une maille en l’air et par couper le fil.
J’ai réalisé 5 bourgeons.
Ensuite, il faut prendre un morceau de 7 cm de fil de fer et le plier en deux :
Il faut le placer dans le centre du bourgeon, comme ceci :
Puis, il faut prendre le fil pour la branche, moi, j’ai choisi du fil vert clair et il faut l’enrouler autour du fil de fer et le coincer pour qu’il tienne en place :
Il faut ensuite faire la même chose pour les 4 autres bourgeons.
Pour assembler la branche de bourgeons, j’ai pris un morceau de fil de fer d’environ 40 cm, que j’ai plié en deux pour un peu plus de rigidité.
J’ai ensuite placé un premier bourgeon au sommet et j’ai enroulé le fil vert autour pour le faire tenir.
Puis j’ai placé les autres bourgeons, un peu au hasard, à l’endroit qui me paraît le plus adapté. J’ai continué d’enrouler le fil vert jusqu’au bout du fil de fer et je l’ai coincé pour le fixer.
Et voilà une première branche de bourgeons de terminée !
Je pense que cela prend environ 15 ou 20 minutes, c’est ultra rapide et super mignon, vous ne trouvez pas ? 😁
J’espère que ce tutoriel vous a plu ! Si jamais mes explications ne sont pas assez claires, n’hésitez pas à me poser vos questions en commentaire 😘
À bientôt,
Johanna
PS : J’ai utilisé Google Traduction pour traduire la partie en anglais.
Hola, amiga crochetera, que trabajo tan delicado, el crochet es tendencia, también tejo pero aún no comparto nada por acá, estoy enfocada en aprender más de costura. El capullo bien hecho, delicado, con el crochet podemos llevar a cabo proyectos hermosos, gusto en conocerte.
¡Hola amiga! Muchas gracias por tu dulce comentario. Estoy encantada de conocer a otras personas apasionadas por las manualidades. Llevo algo más de año y medio haciendo ganchillo y cada vez me encanta hacer más proyectos. Espero ver tus creaciones cuando te apetezca compartirlas en esta comunidad.
PS : He usado Google Translate para traducir, espero que el español sea correcto.
😃👍💕
the buds look very beautiful, neat and also aesthetic. you are very creative👍
I really thank you, your comment goes straight to my heart 🙏
Yes you're welcome dear♥️
Aw, this bouquet is going to be beautiful if it started this way :)
On the other hand, it must be crazy that your mom has a twin sister. Do they look alike? My dad has a twin sister, but they don't look alike. In fact, I don't physically resemble my dad, but I do look a lot like my aunt. The genes crossed 😅.
That's very kind, thank you very much! I'll share more tutorials and the final result here 😁
There was a time when they didn't look that much alike, but now, indeed, they do look a lot alike! It's kind of funny that you look more like your aunt than your dad, genetics is a real mystery 🤣
The final result is awesome. The design and color combination of the bouquet are outstanding. Good to see how you made this. Good luck with your crochet flower project!
selected by @rezoanulvibes
Thank you so much for your sweet comment! 🙏 I hope the flower bouquet will be wonderful! 😁
A very different post from your usual ones haha. It looks great!
Yes indeed, sometimes I cook and sometimes I crochet hahaha! Thank you so much 🙏
!ALIVE
!LOLZ
lolztoken.com
... sky diving is not for you!
Credit: reddit
@altheana, I sent you an $LOLZ on behalf of gestion.alive
(5/10)
Farm LOLZ tokens when you Delegate Hive or Hive Tokens.
Click to delegate: 10 - 20 - 50 - 100 HP
!ALIVE
Your post has been manually reviewed for curation by the Principality of Bastion.
Check the Trail of posts we voted
Principality of Bastion - Our Leit Motiv? Let's Grow Together.
Principality's site | Minava NFT Market | Discord | Our Twitch Channel
You may TRAIL this account if you like the curation we do, or join our discord to know more about what we do.

🙏🙏🙏
!BBH
I love those buds, the tutorial is very good, it looks easy to make, one day I will practice to see how I get them.
Yes it's very easy to make and it takes very little time. Thank you so much 😁
Thank you for sharing 🤗