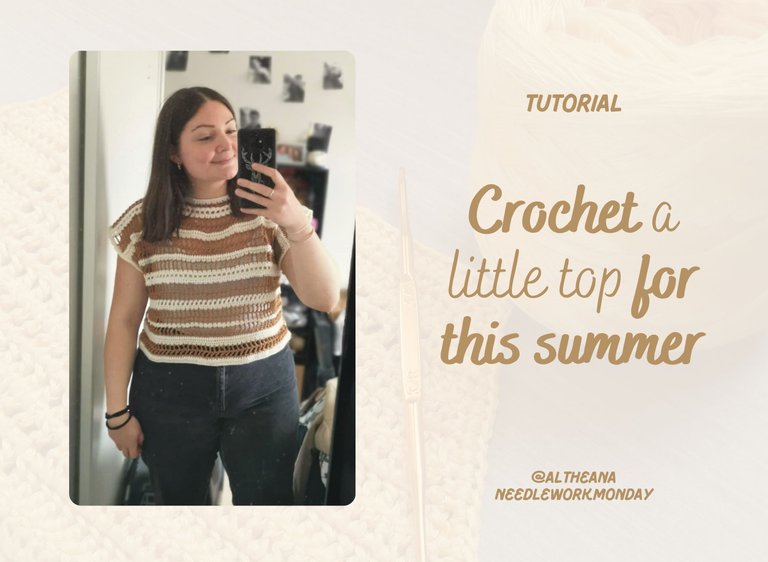
Crochet a little top for summer // Petit top au crochet pour l'été [EN/FR]
Hello friends and crochet lovers! I hope you're all doing well and making good progress with your projects. 😁
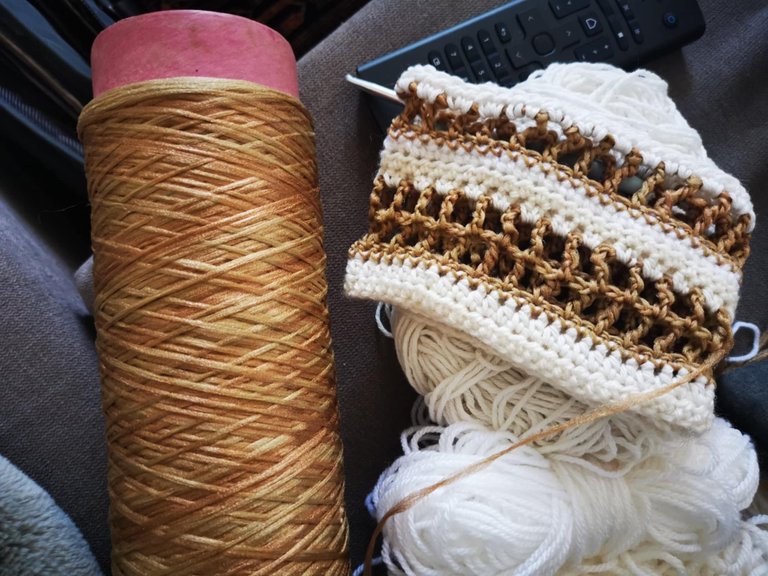
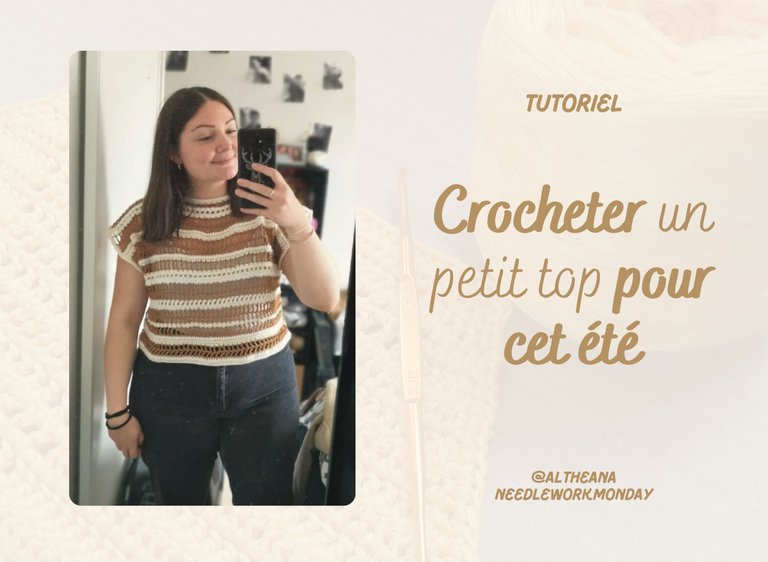
A few weeks ago, I set myself a challenge: to crochet to me a top for my niece's birthday. She's having a big 18th birthday party. The theme for the party is white and gold, so I went to a thrift store to look for gold or white yarn, and luckily, I found some! 👍
I found some gold yarn for 50 cents. The rest was leftover yarn or yarn that someone had given me a while ago.
I chose to make an openwork top to use less yarn and also for the design. 😊
This top is really simple and accessible to beginners. All you need is to know the basic stitches: single crochet, half double crochet, double crochet, treble crochet, double treble crochet. You also need to know how to make color changes.
It's very enjoyable to make, and the top comes together quite quickly. I think it can be made in just a few days. Personally, I worked a few rows every evening and completed it in a week and a half.
It's infinitely customizable; you can use any color and any number of colors you like. The different stitches used can also be adapted to your taste. You can add sleeves if you like.
To make it, I followed videos on TikTok, so I'll transcribe the different steps here! 😁
In short, here's the tutorial for this little crochet summer top 👇
Materials

- 1 thin thread (gold for me);
- 1 to 2 colors of acrylic yarn (I used several ends of white and off-white balls);
- 1 5mm crochet hook;
- scissors;
- a yarn needle.
Steps to make the yarn
For this tutorial, I will use US terms.
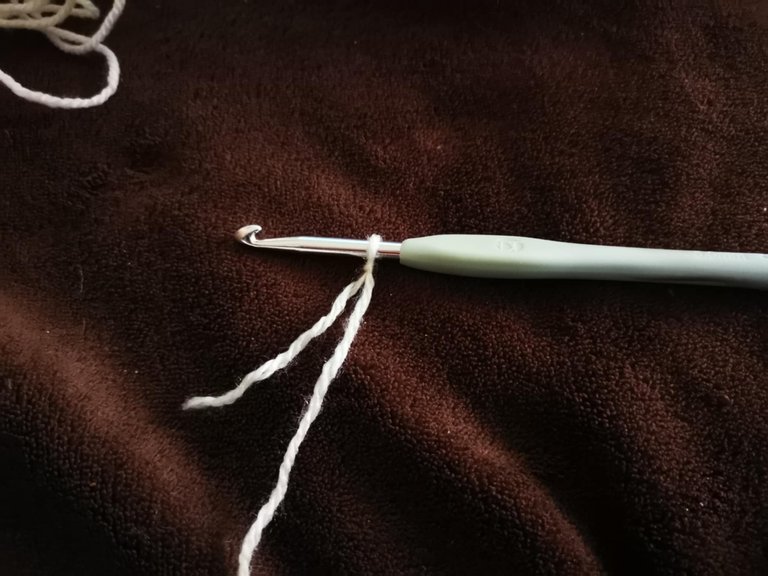
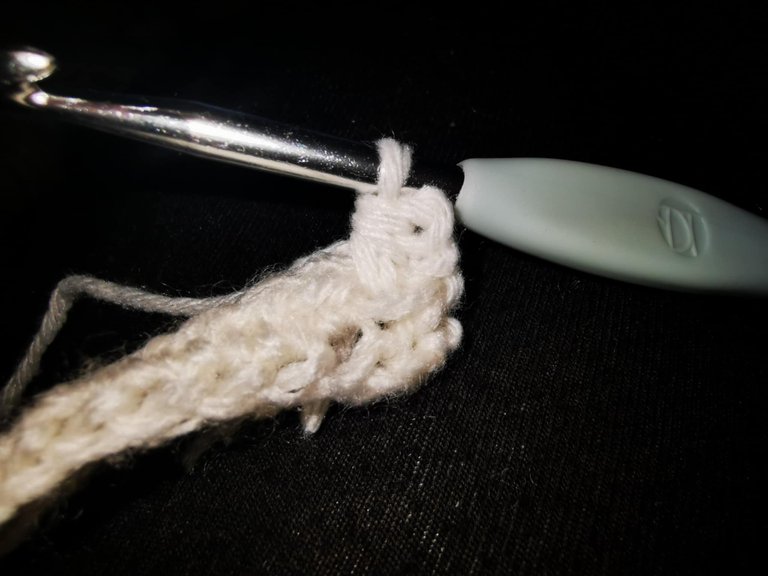
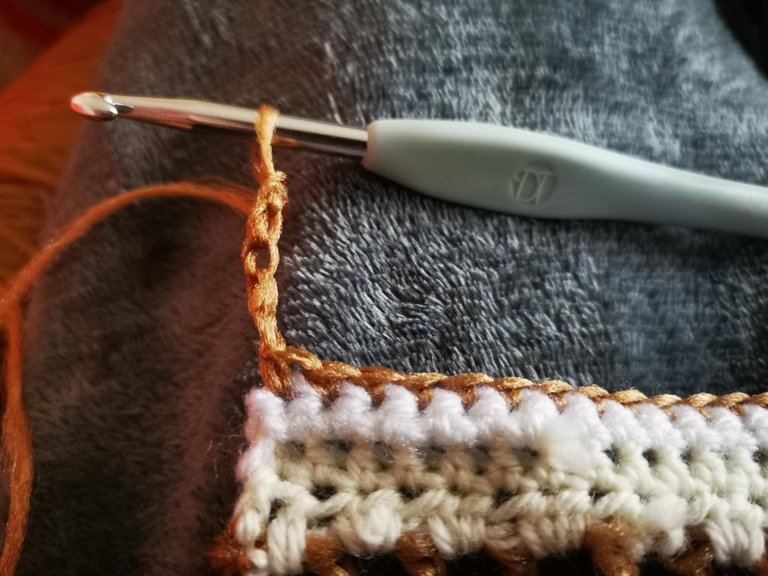
To begin, I made a slip knot with a first ball of white acrylic yarn:
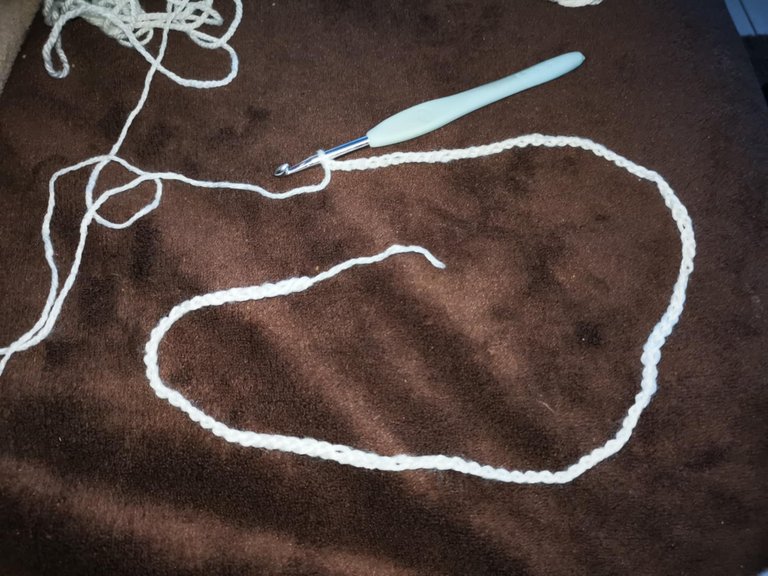
Then, I chained 100 stitches so that the starting chain would extend roughly from one shoulder to the other. You can chain as many stitches as you like, just make sure it's a multiple of 2.
For the first row, we'll be making half double crochets. So, to begin, I first chained one stitch, then made a half double crochet in the third stitch.
And then I made half double crochets throughout the row.

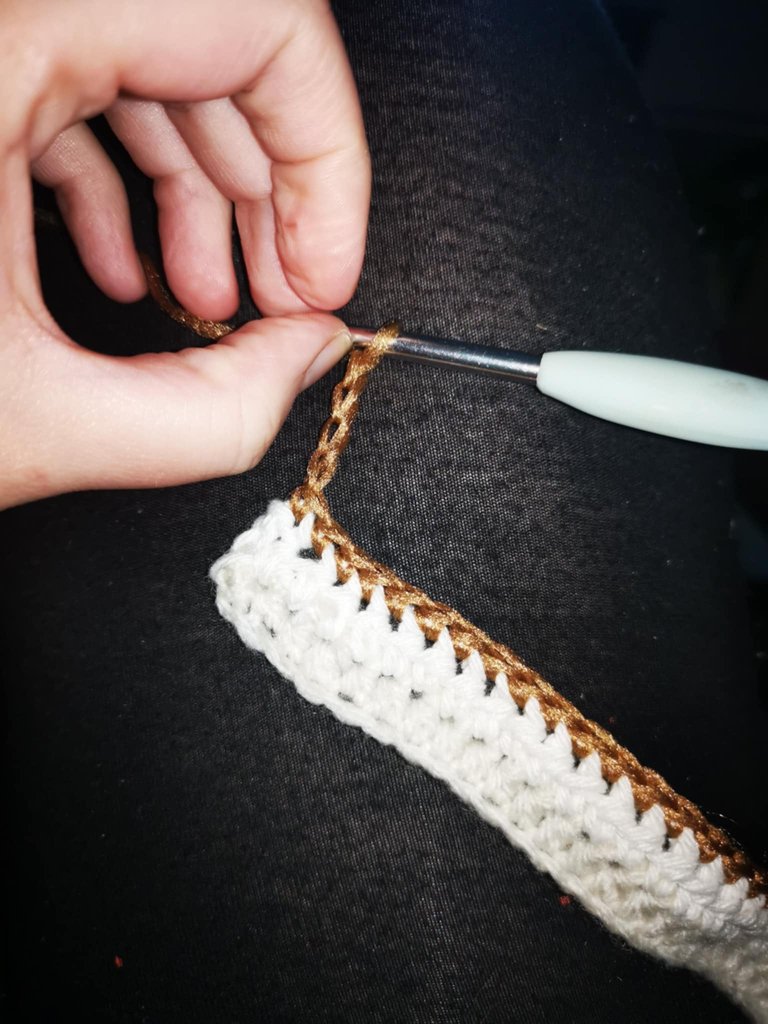
At the end of the row, I changed colors. To do this, you need to stop before the end of the last half double crochet, when you have 3 yarns on your hook. Insert the new yarn and complete the half double crochet by passing through the 3 yarns on the hook.

The color change is complete; you can cut the previous yarn and tie a knot with the beginning of the new yarn.
Next, chain 2 before turning the project for the next row.
For row 2, we will work half double crochets all the way through. And to weave in the ends as you go, I recommend including the two small yarns in your half double crochets.
At the end of the row, stop before the end of the last half double crochet to change colors. And here, we insert the third color (the thinner yarn).
Chain 1 before turning the project.
Once the project is turned, you can begin your third row. For this one, we'll do a row of single crochets.
At the end of the row, cast on 4 chain stitches, then turn the project.
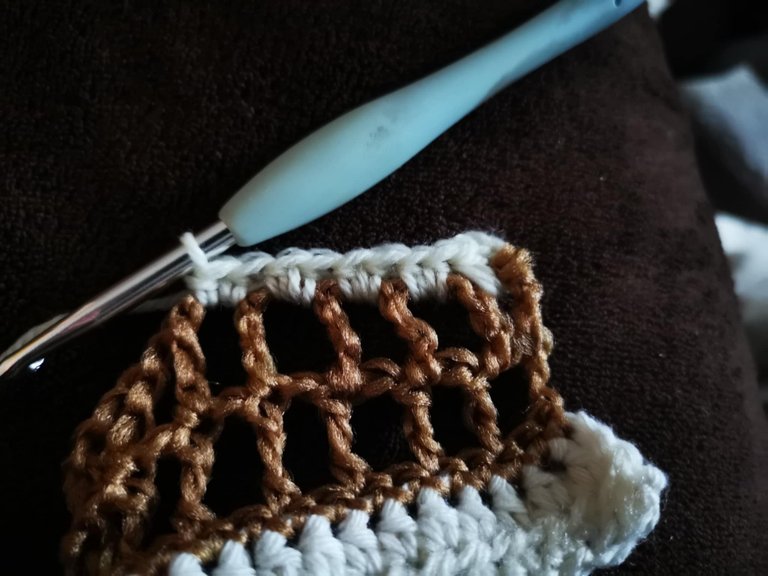
And with the same color, we'll work a row of treble crochets, skipping 1 stitch each time. And to separate each treble crochet, we need to make a chain stitch.
So, for this row number 4, we'll start by skipping a stitch after our 4 chain stitches, then we'll make a first treble crochet. Then we'll make a chain stitch, skip a stitch, and make our treble crochet in the stitch following the one we just skipped. And this continues until the end of the row.
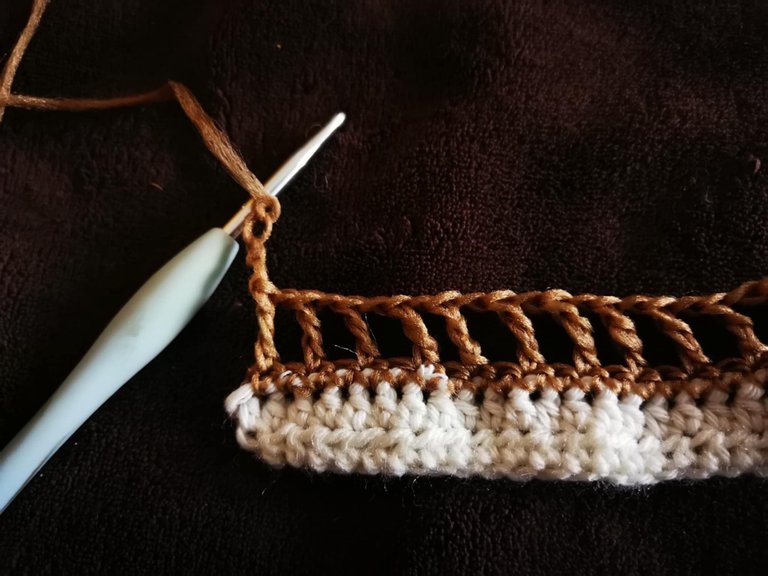
At the end of this row, we'll simply cast on 4 chains and turn the project.
For row 5, we'll work another row of treble crochets + 1 chain, skipping one stitch each time.
And at the end of the row, we'll change colors and cast on 2 chains, then we'll turn the project.
For row 6, we'll work 2 half double crochets in each space. Except for the first space, where we only need to work 1 half double crochet since the 2 chain stitches count as 1 half double crochet.
At the end of the row, cast on 2 chain stitches and turn the project.
For row 7, we'll work 1 half double crochet in each stitch of the previous row. Continue this until we reach the end of the row. Then, change color, cast on 1 chain stitch, and turn the project.

For row 8, I worked a row of single crochets: 1 single crochet in each stitch of the previous row. And at the end of the row, I changed color, cast on 1 chain stitch, and turned the project.
For row 9, I worked a row of single crochets: 1 single crochet in each stitch of the previous row. And at the end of the row, I cast on 5 chain stitches before turning my project.

For row 10, we'll do a row of double treble crochets, skipping 1 stitch each time. To separate each double treble crochet, we need to make a chain stitch.
So, for this row number 10, we start by skipping a stitch after our 5 chain stitches, then we make a first double treble crochet. Then we make a chain stitch, skip a stitch, and make our double treble crochet in the stitch following the one we just skipped. And this continues until the end of the row. For the last double treble crochet, we need to stop just before the end to make a color change.
Then, we need to cast on 2 chain stitches and turn the project.
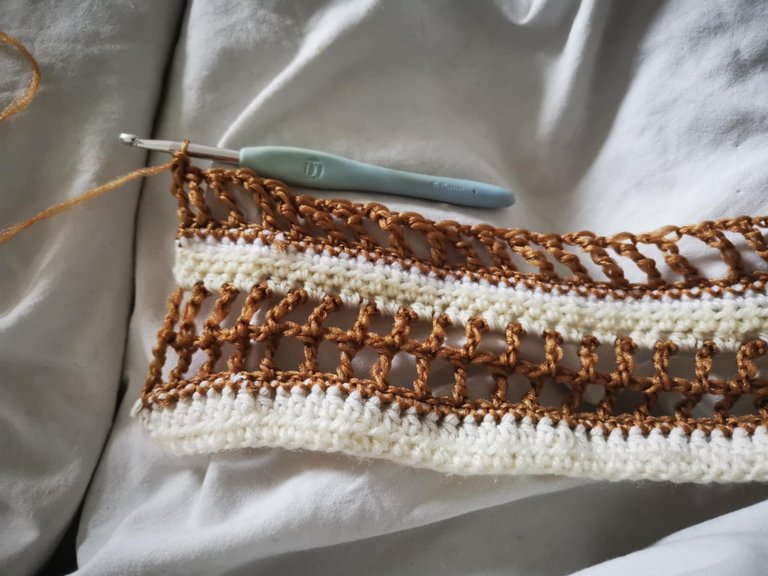
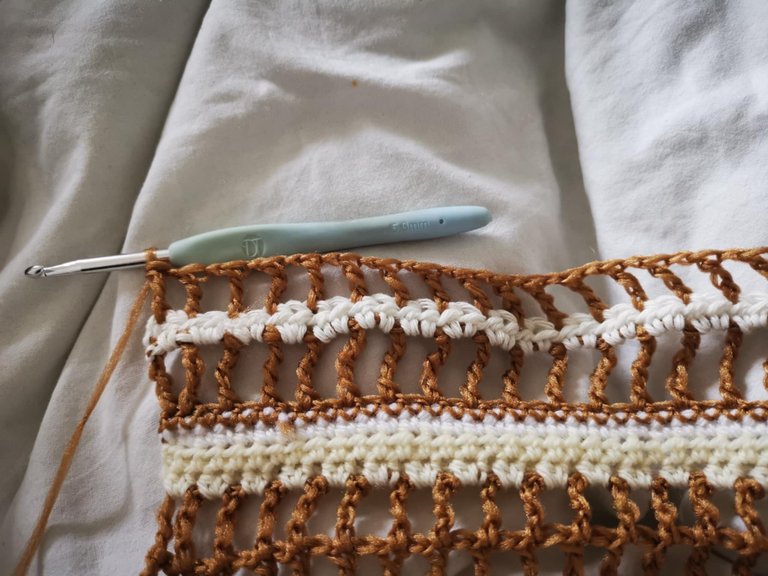
As you can see, the rows follow one another and are similar. You can make as many rows as you want and combine them however you like. And the same goes for colors; you create your own combination.
But here's the sequence I followed for the following rows:
Row 11: One row of 2 half double crochets in each space + cast on 4 chains;
Row 12: One row of treble crochets + 1 chain, skipping 1 stitch each time + cast on 5 chains;
Row 13: One row of double treble crochets + 1 chain, skipping 1 stitch each time + cast on 2 chains;
Row 14: One row of 2 half double crochets in each space + cast on 3 chains;
Row 15: One row of double crochets + 1 chain, skipping 1 stitch each time + cast on 4 chains;
Row 16: A row of treble crochets + 1 chain stitch, skipping 1 stitch each time + cast on 5 chain stitches;
Row 17: A row of double treble crochets + 1 chain stitch, skipping 1 stitch each time + cast on 2 chain stitches;
Row 18: A row of 2 half double crochets in each space + cast on 1 chain stitch;
Row 19: A row of single crochets in each stitch of the previous row + cast on 3 chain stitches;
Row 20: A row of double crochets + 1 chain stitch, skipping 1 stitch each time + cast on 2 chain stitches;
Row 21: A row of 2 half double crochets in each space + cast on 5 chain stitches;
Row 22: One row of double treble crochets + 1 chain, skipping 1 stitch each time + cast on 2 chain stitches;
Row 23: One row of 2 half double crochets in each space + cast on 1 chain stitch;
Row 24: One row of single crochets in each stitch of the previous row + cast on 1 chain stitch;
Row 25: One row of single crochets in each stitch of the previous row + cast on 4 chain stitches;
Row 26: One row of treble crochets + 1 chain, skipping 1 stitch each time + cast on 5 chain stitches;
Row 27: One row of double treble crochets + 1 chain, skipping 1 stitch each time + cast on 2 chain stitches;
Row 28: A row of 2 half double crochets in each space + cast on 2 chain stitches;
Row 29: A row with 1 half double crochet in each stitch of the previous row + cast on 1 chain stitch;
Row 30: A row of single crochets in each stitch of the previous row + cast on 1 chain stitch;
Row 31: A row of single crochets in each stitch of the previous row + cast on 4 chain stitches;
Row 32: A row of treble crochets + 1 chain stitch, skipping 1 stitch each time + cast on 5 chain stitches;
Row 33: A row of double treble crochets + 1 chain stitch, skipping 1 stitch each time + cast on 2 chain stitches;
Row 34: A row of 2 half double crochets in each space + cast on 3 chain stitches;
Row 35: A row of double crochets + 1 chain stitch, skipping 1 stitch each time + cast on 2 chain stitches;
Row 36: A row of 2 half double crochets in each space + cast on 5 chain stitches;
Row 37: A row of double treble crochets + 1 chain stitch, skipping 1 stitch each time + cast on 2 chain stitches;
Row 38: One row of 2 half double crochets in each space + cast on 1 chain;
Row 39: One row of single crochets in each stitch of the previous row.
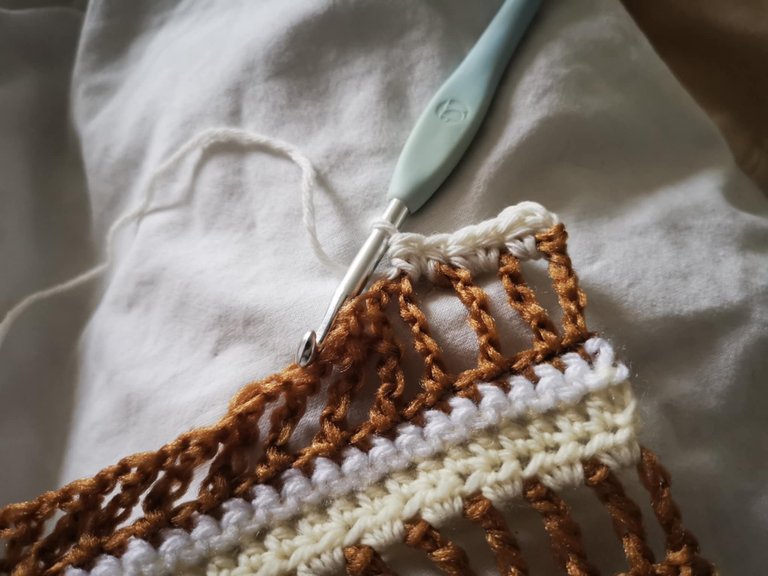

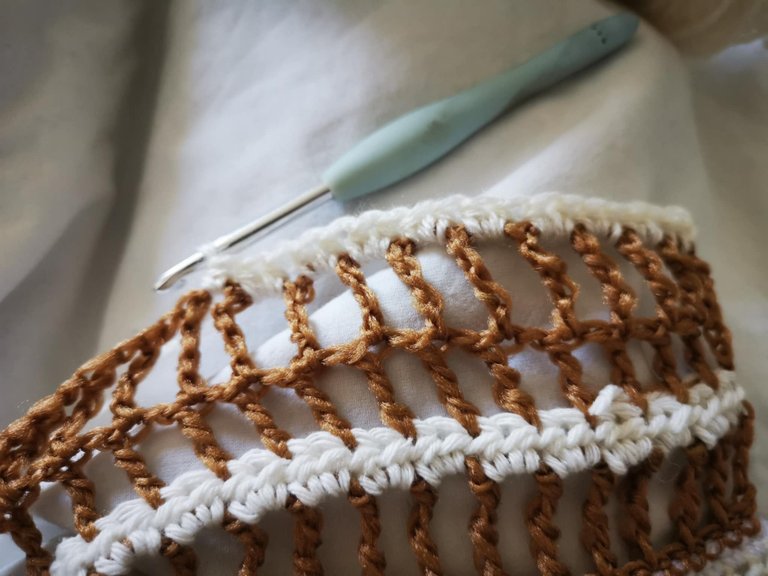
After 39 rows, I reached the length I wanted! But if it seems too short, you can continue by alternating rows of double crochets, treble crochets, double treble crochets, half double crochets, and single crochets as you see fit.
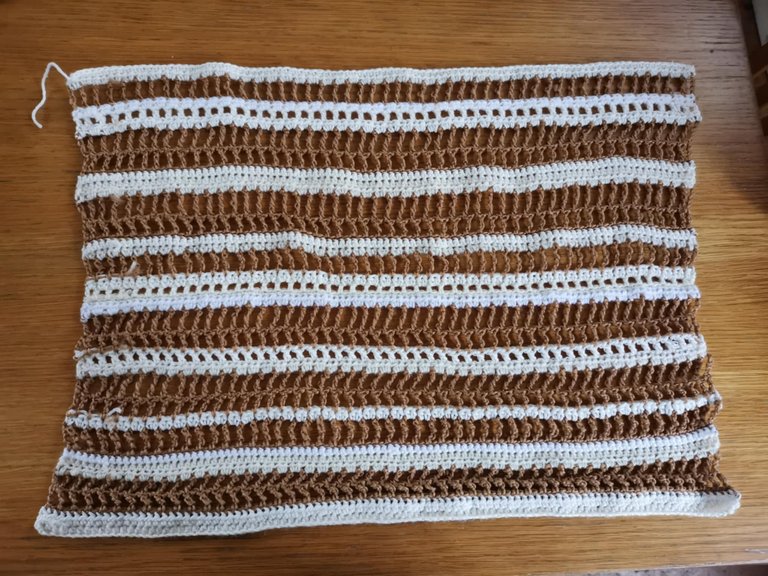
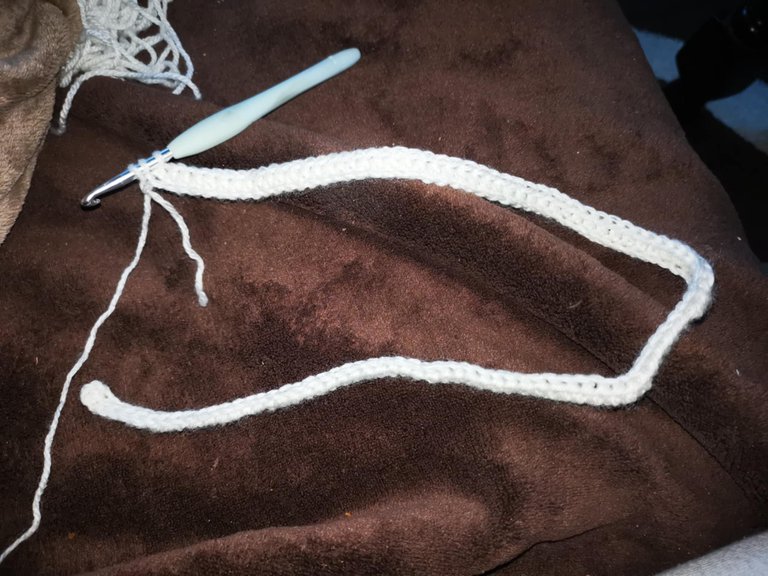
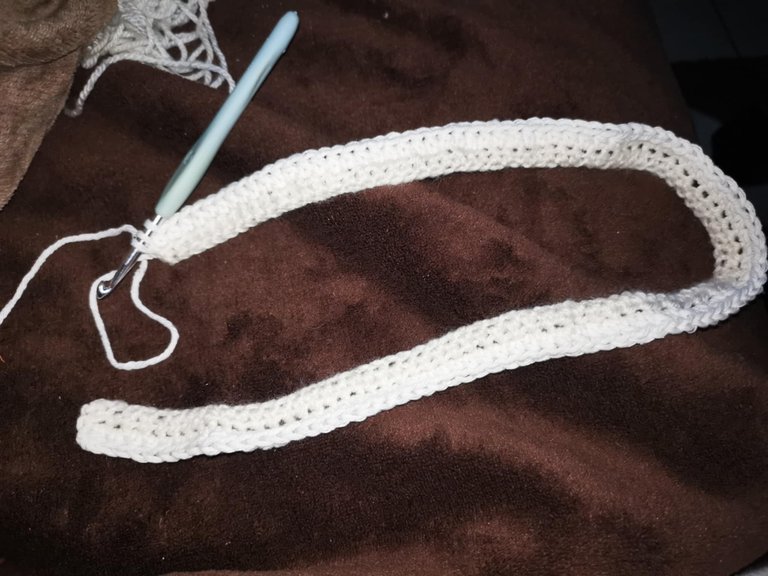
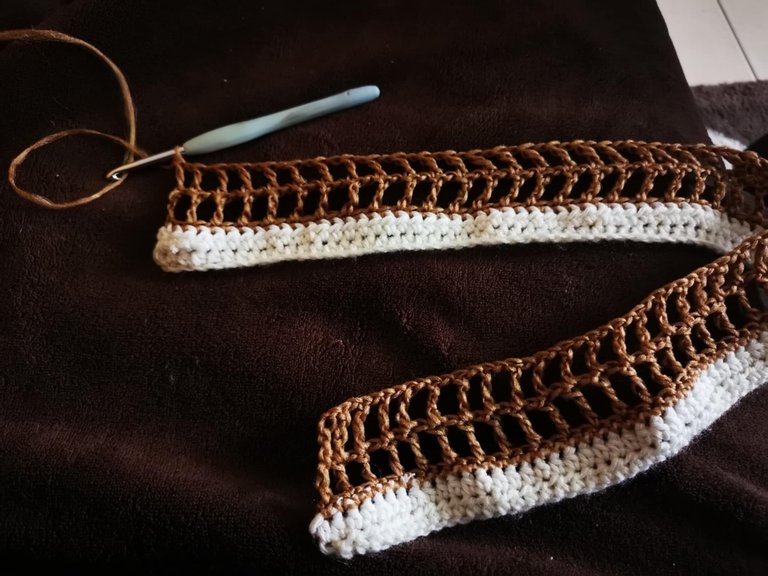
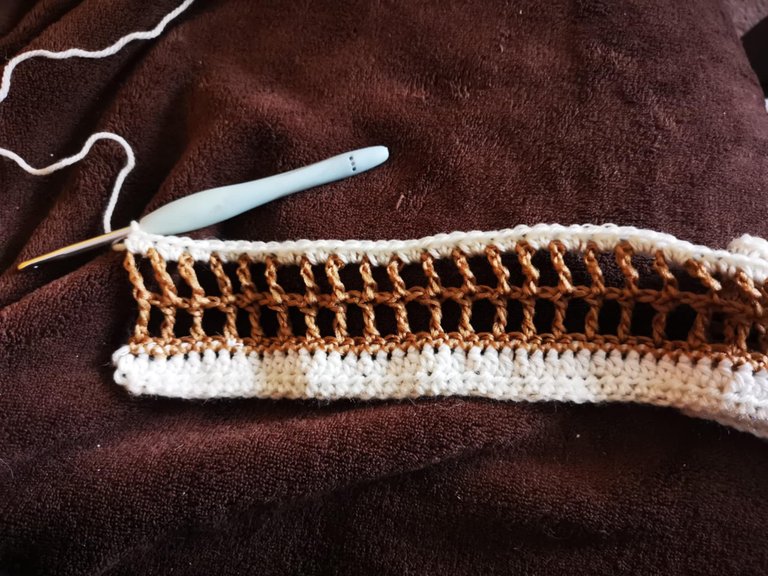
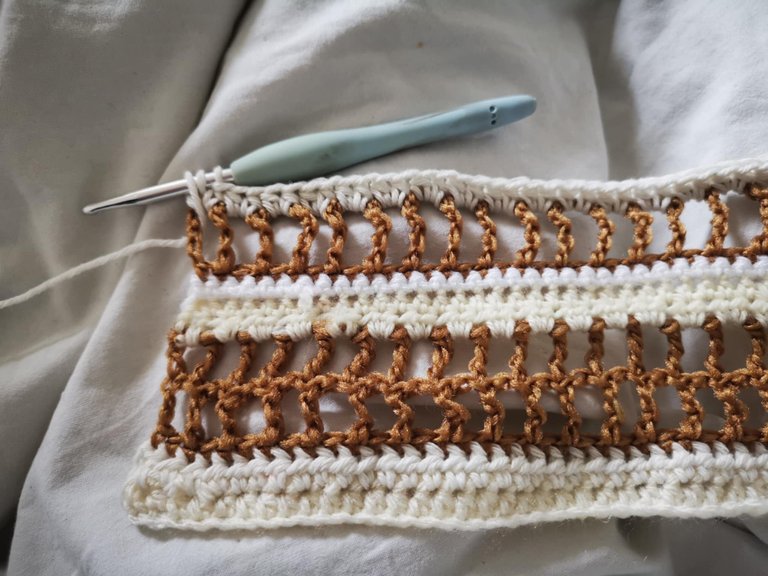
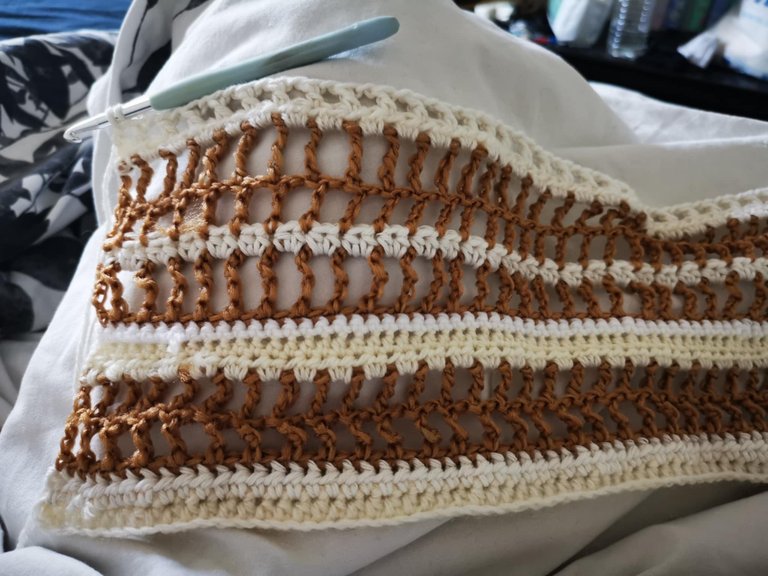
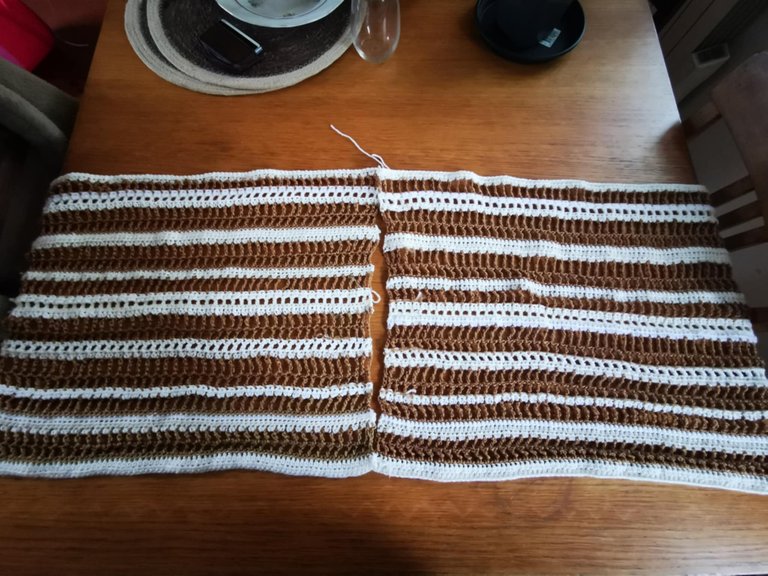
So the first side was finished! And since this top is made up of two sides: one for the front and one for the back, you now need to make the same panel a second time.
Here are the two finished sides:
Next, it's time to assemble!
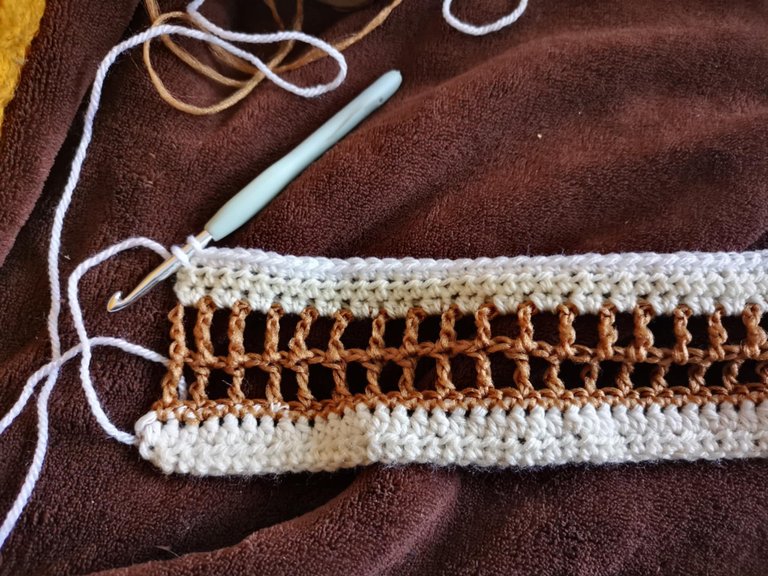
To do this, you need to determine how much space you want to leave for your head. For my part, I left 20 cm. So, I placed markers to show you how far back I should sew.
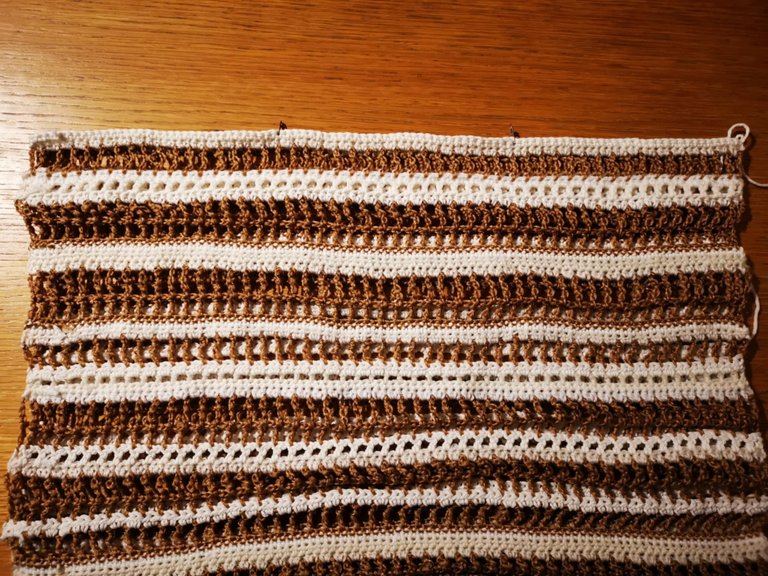
Don't forget to turn your work inside out before sewing.
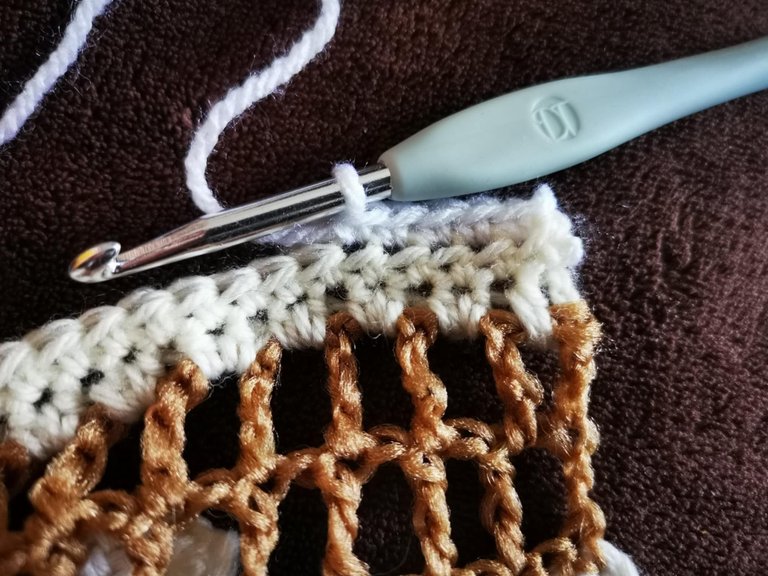
To join the tops of the panels together, I used the slip stitch technique. So, I took my white yarn and slip stitched from the outside of the panel to the marker. I did one side, then the other.
Next, I need to join the sides while leaving enough space for the sleeves. I left almost 20 cm. And this time, to join the two panels, I used a yarn needle and sewed. Always keep your work inside out when sewing.
I sewed both sides and the top was almost finished!
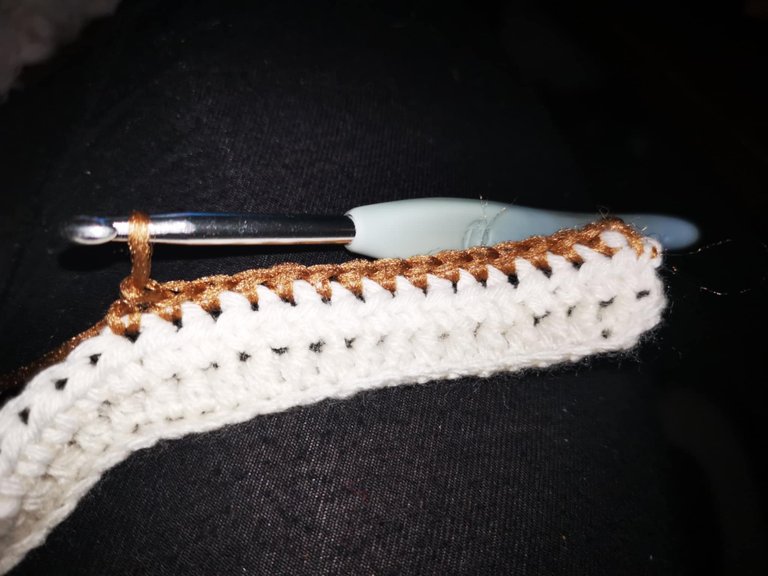
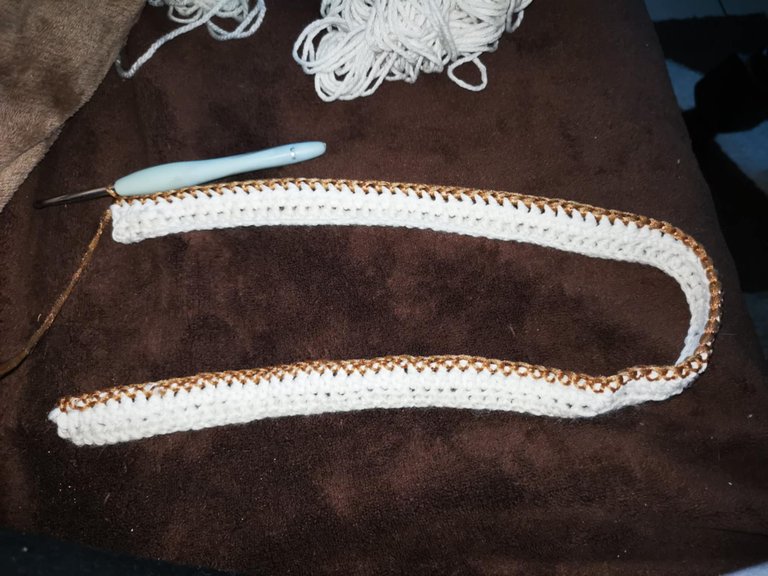
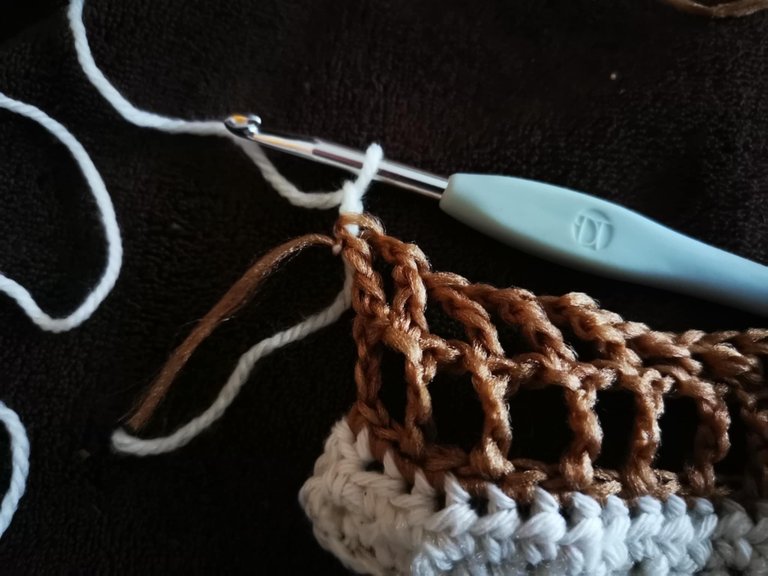
To improve the sleeve edges, I simply added a row of white half double crochets.
And then, I need to weave in and cut the remaining ends.
After this step, the top is finally finished!
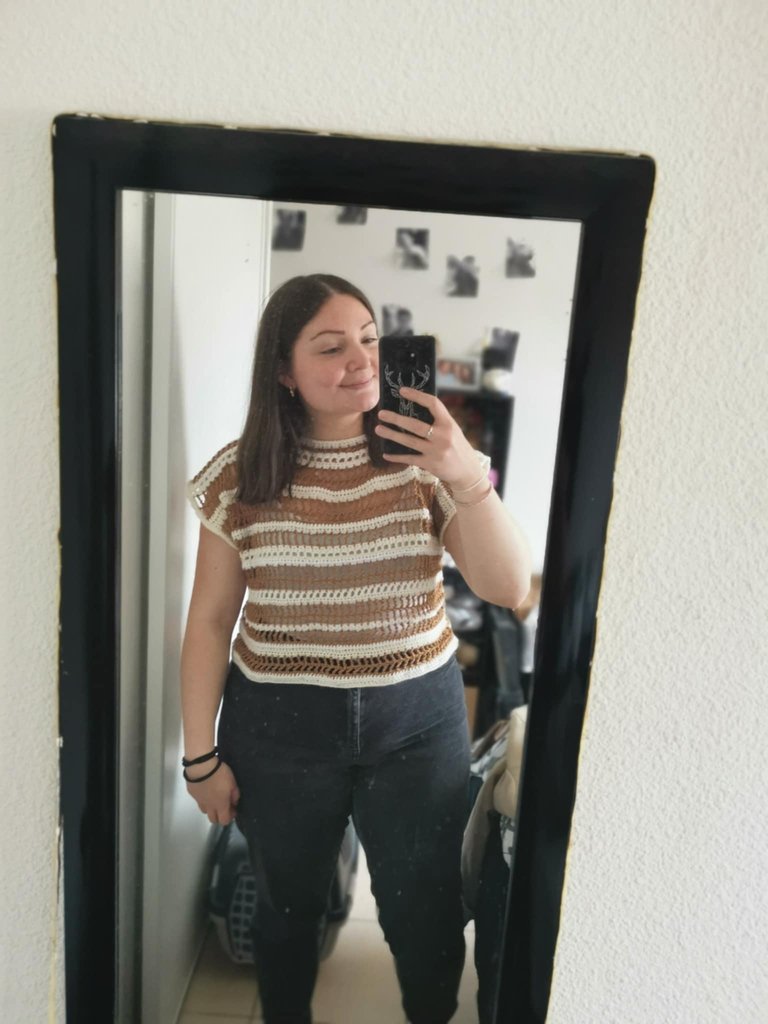

It's a sleeveless version, but I'm thinking of making another one in different colors and with sleeves!
I wore this top with a white tank top underneath and a beige suit jacket. It's quite comfortable to wear! 👍

I hope this little tutorial has inspired you to create your own clothes, because it's really satisfying to do and it brings so much pride! I love wearing what I create; I feel so proud to wear my creations 😁
Anyway, if any of the steps aren't very clear, don't hesitate to ask questions in the comments!
See you soon,
Johanna
PS: I used Google Translate to translate the English part.
Hello les amis et les crochet lovers ! J’espère que vous allez tous très bien et que vous avancez comme vous le souhaitez dans vos projets. 😁
Il y a quelques semaines, je me suis lancé un défi : me crocheter un top pour l’anniversaire de ma nièce, qui va faire une grande fête pour ses 18 ans. Le thème de la soirée, c’est blanc et doré, alors j’ai été en ressourcerie (magasin de seconde main) pour chercher du fil doré ou blanc et par chance, j’en ai trouvé ! 👍
J’ai trouvé du fil doré pour 50 centimes. Et le reste, ce sont des fins de pelotes ou des pelotes qu’on m’avait donné il y a quelque temps.
J’ai choisi de faire un top ajouré pour utiliser moins de fil et aussi pour le design. 😊
La réalisation de ce top est vraiment simple et accessible aux débutants. Il suffit de connaître les points de base : maille serrée, demi-bride, bride, double bride, triple bride. Il faut également savoir faire des changements de couleur.
C’est très agréable à faire, et le top se forme assez vite. Je pense qu’il peut se réaliser en quelques jours à peine. Pour ma part, je faisais quelques rangs chaque soir et je l’ai réalisé en 1 semaine et demie.
Il est personnalisable à l'infini, vous pouvez utiliser les couleurs de votre choix et le nombre de couleurs que vous souhaitez. Les différents points utilisés peuvent également être adaptés selon vos goûts. Vous pouvez rajouter des manches si vous le souhaitez.
Pour le réaliser, j’ai suivi des vidéos sur Tiktok, je vais donc vous retranscrire les différentes étapes ici ! 😁
En bref, voici le tutoriel de ce petit top d’été au crochet 👇
Le matériel
- 1 fil fin (le doré pour ma part) ;
- 1 à 2 couleurs de fil acrylique (pour ma part, j’ai pris plusieurs fins de pelotes de blanc et blanc écru) ;
- 1 crochet 5mm ;
- des ciseaux ;
- une aiguille à laine.
Les étapes de fabrication
Pour commencer, j’ai fait un noeud coulant avec une première pelote de fil acrylique blanc :
Puis, j’ai monté 100 ml en l’air pour que la chaînette de départ aille environ d’une épaule à l’autre. Vous pouvez monter le nombre de mailles en l’air qui correspond à l’espacement entre vos deux épaules, simplement, il faut que ce soit un multiple de 2.
Pour le premier rang, nous allons faire des demi-brides. Donc, pour commencer, j’ai d’abord monté 1 maille en l’air, puis j’ai fait une première demi-bride dans la troisième maille.
Et j’ai ensuite fait des demi-brides tout le long du rang.
À la fin du rang, j’ai changé de couleur. Pour cela, il faut s’arrêter avant la fin de la dernière demi-bride, au moment où vous avez 3 fils sur votre crochet. Il faut insérer le nouveau fil et terminer la demi-bride en passant dans les 3 fils présents sur le crochet.
Le changement de couleur est terminé, vous pouvez couper le fil précédent et faire un noeud avec le début du nouveau fil.
Ensuite, il faut faire 2 mailles en l’air avant de tourner le projet pour le prochain rang.
Pour le rang numéro 2, nous allons faire des demi-brides tout le long. Et pour rentrer les fils au fur et à mesure, je vous conseille d’inclure les deux petits fils dans vos demi-brides.
À la fin du rang, on s’arrête avant la fin de la dernière demi-bride pour pouvoir changer de couleur. Et ici, on vient insérer la troisième couleur (le fil plus fin).
Il faut monter 1 maille en l’air avant de tourner le projet.
Une fois le projet tourné, vous pouvez commencer votre rang numéro 3. Et pour celui-ci, on va faire un rang de mailles serrées.
Arrivé à la fin du rang, il faut monter 4 mailles en l’air, puis tourner le projet.
Et avec la même couleur, on va faire un rang de doubles brides en sautant 1 maille à chaque fois. Et pour séparer chaque double bride, il faut faire une maille en l’air.
Donc, pour ce rang numéro 4, on commence par sauter une maille après nos 4 mailles en l’air, puis on fait une première double bride. Ensuite, on fait une maille en l’air, on saute une maille et on fait notre double bride dans la maille qui suit celle que l’on vient de sauter. Et cela jusqu’à la fin du rang.
Arrivé à la fin de ce rang, on va simplement monter 4 mailles en l’air et tourner le projet.
Pour le rang 5, on va faire de nouveau un rang de doubles brides + 1 maille en l’air en sautant une maille à chaque fois.
Et arrivé à la fin du rang, on va faire un changement de couleur et monter 2 mailles en l’air, puis on va tourner le projet.
Pour le rang 6, on va faire 2 demi-brides dans chaque espace. Sauf pour le premier espace, où on doit faire seulement 1 seule demi-bride puisque les 2 mailles en l’air compte pour une demi-bride.
Arrivé à la fin du rang, on monte 2 mailles en l’air et on tourne le projet.
Pour le rang 7, on va faire 1 demi-bride dans chaque maille du rang précédent. Et ceci jusqu’à atteindre la fin du rang. Ensuite, on change de couleur, on monte 1 maille en l’air et on tourne le projet.
Pour le rang 8, j’ai fait un rang de mailles serrées : 1 maille serrée dans chaque maille du rang précédent. Et à la fin du rang, j’ai changé de couleur, j’ai monté 1 maille en l’air et j’ai tourné le projet.
Pour le rang 9, j’ai fait un rang de mailles serrées : 1 maille serrée dans chaque maille du rang précédent. Et à la fin du rang, j’ai monté 5 mailles en l’air avant de tourner mon projet.
Pour le rang 10, on va faire un rang de triples brides en sautant 1 maille à chaque fois. Pour séparer chaque triple bride, il faut faire une maille en l’air.
Donc, pour ce rang numéro 10, on commence par sauter une maille après nos 5 mailles en l’air, puis on fait une première triple bride. Ensuite, on fait une maille en l’air, on saute une maille et on fait notre triple bride dans la maille qui suit celle que l’on vient de sauter. Et cela jusqu’à la fin du rang. Pour la dernière triple bride, il faut s’arrêter juste avant la fin pour pouvoir effectuer un changement de couleur.
Puis, il faut monter 2 mailles en l’air et tourner le projet.
Vous l’avez compris, les rangs se succèdent et se ressemblent. Vous pouvez faire le nombre de rangs que vous voulez et les combiner comme bon vous semble. Et pareil pour les couleurs, c’est vous qui créez votre propre combinaison.
Mais voici l’enchaînement que j’ai suivi pour les rangs suivants :
**Rang 11 **: Un rang de 2 demi-brides dans chaque espace + on monte 4 mailles en l’air ;
Rang 12 : Un rang de doubles brides + 1 maille en l’air, en sautant 1 maille à chaque fois + on monte 5 mailles en l’air ;
Rang 13 : Un rang de triples brides + 1 maille en l’air, en sautant 1 maille à chaque fois + on monte 2 mailles en l’air ;
Rang 14 : Un rang de 2 demi-brides dans chaque espace + on monte 3 mailles en l’air ;
Rang 15 : Un rang de brides +1 maille en l’air, en sautant 1 maille à chaque fois + on monte 4 mailles en l’air ;
Rang 16 : Un rang de doubles brides + 1 maille en l’air, en sautant 1 maille à chaque fois + on monte 5 mailles en l’air ;
Rang 17 ; Un rang de triples brides + 1 maille en l’air, en sautant 1 maille à chaque fois + on monte 2 mailles en l’air ;
Rang 18 : Un rang de 2 demi-brides dans chaque espace + on monte 1 maille en l’air ;
Rang 19 : Un rang de mailles serrées dans chaque maille du rang précédent + on monte 3 mailles en l’air ;
Rang 20 : Un rang de brides +1 maille en l’air, en sautant 1 maille à chaque fois + on monte 2 mailles en l’air ;
Rang 21 : Un rang de 2 demi-brides dans chaque espace + on monte 5 mailles en l’air ;
Rang 22 : Un rang de triples brides + 1 maille en l’air, en sautant 1 maille à chaque fois + on monte 2 mailles en l’air ;
Rang 23 : Un rang de 2 demi-brides dans chaque espace + on monte 1 maille en l’air ;
Rang 24 : Un rang de mailles serrées dans chaque maille du rang précédent + on monte 1 maille en l’air ;
Rang 25 : Un rang de mailles serrées dans chaque maille du rang précédent + on monte 4 mailles en l’air ;
Rang 26 : Un rang de doubles brides + 1 maille en l’air, en sautant 1 maille à chaque fois + on monte 5 mailles en l’air ;
**Rang 27 **: Un rang de triples brides + 1 maille en l’air, en sautant 1 maille à chaque fois + on monte 2 mailles en l’air ;
Rang 28 : Un rang de 2 demi-brides dans chaque espace + on monte 2 mailles en l’air ;
Rang 29 : Un rang avec 1 demi-bride dans chaque maille du rang précédent + on monte 1 maille en l’air ;
**Rang 30 **: Un rang de mailles serrées dans chaque maille du rang précédent + on monte 1 maille en l’air ;
**Rang 31 **: Un rang de mailles serrées dans chaque maille du rang précédent + on monte 4 mailles en l’air ;
Rang 32 : Un rang de doubles brides + 1 maille en l’air, en sautant 1 maille à chaque fois + on monte 5 mailles en l’air ;
Rang 33 : Un rang de triples brides + 1 maille en l’air, en sautant 1 maille à chaque fois + on monte 2 mailles en l’air ;
**Rang 34 **: Un rang de 2 demi-brides dans chaque espace + on monte 3 mailles en l’air ;
Rang 35 : Un rang de brides +1 maille en l’air, en sautant 1 maille à chaque fois + on monte 2 mailles en l’air ;
Rang 36 : Un rang de 2 demi-brides dans chaque espace + on monte 5 mailles en l’air ;
Rang 37 : Un rang de triples brides + 1 maille en l’air, en sautant 1 maille à chaque fois + on monte 2 mailles en l’air ;
**Rang 38 **: Un rang de 2 demi-brides dans chaque espace + on monte 1 maille en l’air ;
**Rang 39 **: Un rang de mailles serrées dans chaque maille du rang précédent.
Après 39 rang, je suis arrivé à la longueur qui me convenait ! Mais si cela vous paraît trop court, vous pouvez continuer en alternant les rangs de brides, doubles brides, triples brides, demi-brides et mailles serrées comme bon vous semble.
La première face était donc terminée ! Et comme ce top est composé de 2 faces : une pour le devant et une pour le dos, il faut maintenant refaire le même panel une deuxième fois.
Voici les deux faces terminées :
Il faut ensuite passer à l’assemblage !
Pour cela, vous devez déterminer l’espace que vous souhaitez laisser pour passer votre tête. Pour ma part, j’ai laissé 20 cm. J’ai donc placé des marqueurs pour savoir jusqu’où je devais coudre.
N’oubliez pas de retourner votre ouvrage avant de coudre.
Pour relier le haut des faces entre elles, j’ai utilisé la technique de la maille coulée. J’ai donc pris mon fil blanc, et j’ai fait des mailles coulées de l’extérieur du panel jusqu’au marqueur. J’ai fait un côté, puis l’autre.
Ensuite, il faut relier les côtés tout en laissant un espace suffisant pour les manches. J’ai laissé presque 20 cm. Et cette fois-ci, pour relier les deux faces, j’ai utilisé une aiguille à laine et j’ai cousu. Il faut toujours que votre ouvrage soit à l’envers pour coudre.
J’ai cousu les deux côtés et le top était presque terminé !
Pour améliorer les bordures des manches, j’ai simplement rajouté un rang de demi-brides blanches.
Et ensuite, il faut rentrer et couper les fils restants.
Après cette étape, le top est enfin terminé !
C’est une version sans manche, mais je pense m’en refaire un avec d’autres couleurs et des manches !
J’ai porté ce top avec un débardeur blanc en dessous et avec une veste de costume beige. Il est assez agréable à porter ! 👍
J’espère que ce petit tutoriel vous aura donné envie de créer vos propres vêtements, parce que c’est vraiment satisfaisant à faire et ça apporte tellement de fierté ! J’adore porter ce que je crée, je me sens tellement fière de porter mes créations 😁
Bref, si jamais certaines étapes ne sont pas très claires, n’hésitez pas à poser vos questions en commentaire !
À bientôt,
Johanna
PS : J’ai utilisé Google Traduction pour traduire la partie en anglais.
The top is so beautiful, I love it, and the color combination is amazing, thanks for sharing.
Thank you so much! I'ma glad you like my top 😁
Wow, it's so beautiful, unique and stylish. I like the color combination. The clothes really suit you. You are very good at knitting😅
Thank you so much for all these compliments, it really makes me super happy! 😁
You're welcome, keep up the good work friends.
This is really beautiful 😍😍
Thank you so much 🥰
Welcome 🤗🤗
My God!!!
This top is really cool vibe. But how you are going to wear this crochet top in the summer. Won't you feel hot in this???
By the way it's looking really good.
Thank you very much! In France, and especially in Normandy, summer is not very hot, with maximum temperatures of 25 or 28 degrees. But that's mostly for the days when it's cooler, around 20 degrees. The top is openwork so it's not very hot 😁
You made a very nice top. It will be quite comfortable in the hotday.
Yes I hope ! Thank you so much 😁
!PIZZA
Your post has been manually reviewed for curation by the Principality of Bastion.
Check the Trail of posts we voted
Principality of Bastion - Our Leit Motiv? Let's Grow Together.
Principality's site | Minava NFT Market | Discord | Our Twitch Channel
You may TRAIL this account if you like the curation we do, or join our discord to know more about what we do.

!BBH
$PIZZA slices delivered:
@itharagaian(6/10) tipped @altheana
Come get MOONed!
Such a lovely summer crochet top. You balanced style and comfort beautifully. Bravo.
selected by @stevenson7
Thank you very much. I'm glad you like this summer top 😁
Hi altheana, you look very pretty in a summer top. The colors you chose are beautiful.