Frontier Format Strategy: Winning Against the Big Guns
Good day, everyone, and Splinterlands community, today it's a to present yet another strategy, with this one focusing on the Frontier Format. I'll walk you through how a simple but powerful tactic can compete with even strong opponents in this match. My objective is to provide useful advice and share a brief account of my experience in planning my lineup, positioning my units, and adjusting to the battle's rule sets. With the right cards and calculated placement, you can transform what appears to be a difficult matchup into an unexpected win. This format gives you a lot of imaginative strategy choices.

My entry for the current Hive/peakd-hosted Splinterlands Community Engagement Challenge: Tutorials and Tips from the Community is also related to this post. The big difference between my opponent's and my decks—they had stronger, higher-level cards, but I was still able to outplay them (with a little help from luck)—was what really made this battle exciting for me. Whether you're an experienced player trying out new combos or a beginner learning the fundamentals, Frontier is one of the greatest formats to begin your Splinterlands adventure. Even when the odds aren't in your favour, a well-planned strategy and good coordination between your lineup and the rule sets can completely change the outcome, even though high-level stats frequently translate into higher winning chances.

Let’s jump right into the action! Check out my Frontier Format battle here: Watch the Battle

I typically look over the opponent's past battles; if I notice any unusual summoner favouritism, I probably plan to counter and will simply use the best lineup strategy possible given the rules.
Only fire and water are inactive in this battle, which follows the Born Again and Rise of the Commons rule set with a 31 mana cap. And sure, I look at the opponent's past battles, where every car is at its highest level. "Good game, I'll guarantee defeat in this match😅," I say. However, I still plan for a small victory because I never know what the future holds.
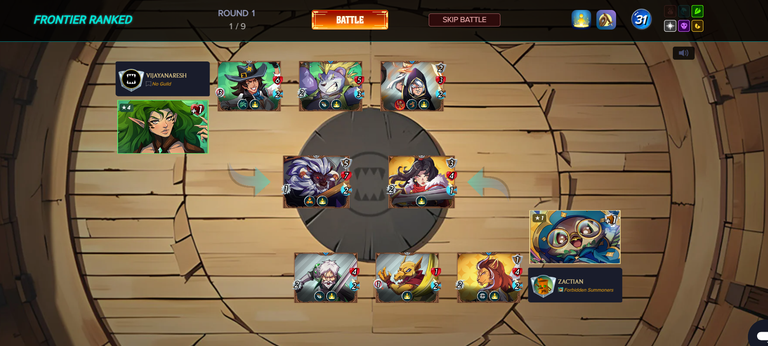
I chose to go with the Incessant Sage as my summoner for this match, and I created my lineup around a melee damage with Sneak and Opportunity attacks strategy. Because of its strong stats, three armour, four health, and two melee damage, I put Twice Yester Knight in the top spot. It is a dependable frontline tank and a steady source of melee damage. I used Sherringham Logger in the second position, which has decent stats with 1 armour, 4 health, and 2 melee damage. It also allows putting pressure on the opponent's backline. I selected Vengeful Monk as my primary offensive threat, focusing on low-health enemy units to rapidly deplete their lineup, while I positioned Grand Consul Minion as support to deal ranged damage. The goal of this configuration was to effectively disrupt weaker enemy positions while maximising sustained melee pressure.
At while, my opponent used New Beluroc Aegis, Wellheimdale Deputy, Vicious Quillion, and Spellmonger after choosing the Aurelia summoner. Their lineup initially appeared a little disorganised, especially the selection of New Beluroc Aegis, who seemed less ideal than other possible frontline picks like Dread Trafarian 😅. Even with this risky positioning, my opponent's units were maxed out compared to my level 1 lineup, giving them a sizable card level advantage. The issue was whether their superior stats would allow it to win with ease or if my well-thought-out positioning and strategy would be sufficient to reverse this pattern. For a peek out how it went, let's dive into the battle rounds.
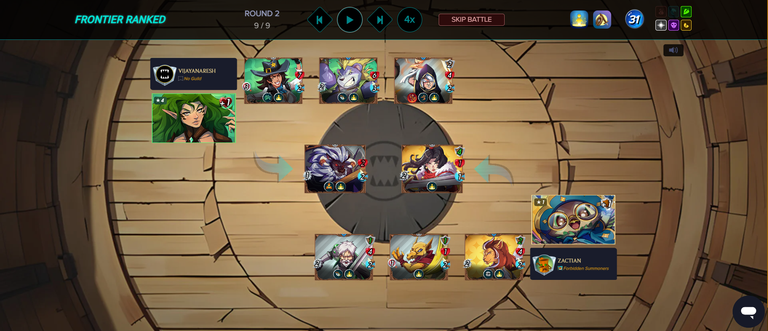
I could already see my lineup strategy beginning to work by the end of the second round. Incessant Sage's additional +1 armour boost was really helping to keep my team strong and make it difficult for the opposition to get past my defences. My attacks, meanwhile, were focused on their New Beluroc Aegis with the Taunt ability, which allowed me to quickly bring it down by directing concentrated damage. However, the opponent's Wellheimdale Deputy was a bad decision that hardly made an impact on the conflict. Vicious Quillion was the team's sole remaining major threat, but with the early lead and the opponent's lineup mistakes I was sure I could win.
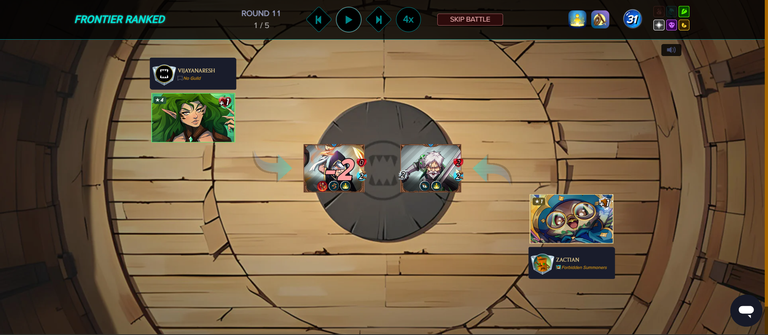
Because of its poor (1 stat health), the opponent's Vicious Quillion was occupied by the end of round 11, defeating my Grand Consul Minion. This provided me with the opportunity I required to win. Spellmonger's placement in the rear was a wise move, but Wellheimdale Deputy and New Beluroc Aegis' selection and placement were glaring errors that compromised their overall plan.
All in all, I was lucky to win; if my opponent had looked over their lineup more thoroughly and made better changes, I probably would have lost. The significance of proper card placement and having a solid grasp of which cards best fit particular rule sets is made clear by this battle.

A Big Thanks! For supporting me, being here, and coming this far. I hope this strategy assists you with some of your battles with these rule sets in modern format conclave and rebellion sets.
Use my referral link: Click Here
Credits:
Thumbnail Edited the Design photo Splinterlands Modern League using PicsArt
Screenshot In-game splinterlands
Congratulations @zactian! You have completed the following achievement on the Hive blockchain And have been rewarded with New badge(s)
Your next target is to reach 1000 upvotes.
You can view your badges on your board and compare yourself to others in the Ranking
If you no longer want to receive notifications, reply to this comment with the word
STOPCheck out our last posts:
Thanks for sharing! - @lenonmc21
