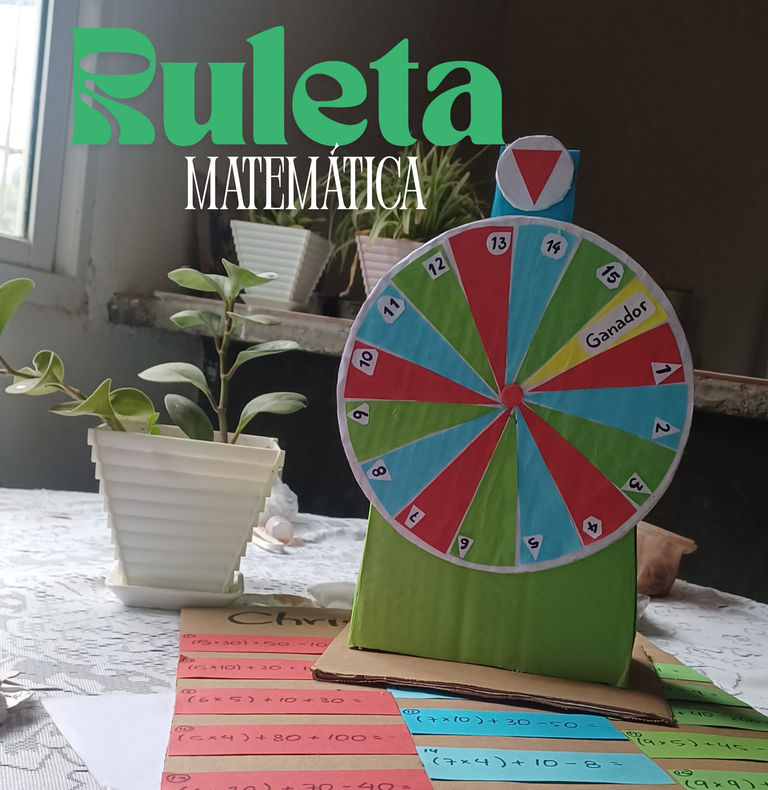
Ruleta Matemática
Saludos queridos amigos de la comunidad Hive DIY!
Espero se encuentren de maravilla el día de hoy les quiero presentar el proyecto que hice junto a @Oscarly para su hijo de 5to grado Christopher, hace un par de días me habían comentado acerca de esta actividad y entre todas las opciones preferimos hacer una ruleta con algunas operaciones matemáticas para resolver dependiendo de la suerte, les mostraré un poco del proceso de creacion de este proyecto.
Greetings dear friends of the Hive DIY community!
I hope you are feeling great today I want to present the project I made with @Oscarly for her 5th grade son Christopher, a couple of days ago I had been told about this activity and among all the options we preferred to make a roulette with some mathematical operations to solve depending on luck, I will show you a little of the process of creating this project.
Como este proyecto fue un poco improvisado no tome fotos de los materiales, pero los describiré rápidamente.
- Caja de cartón.
- Papeles de colores.
- Un tornillo
- Pega, Silicon
- Tijeras
- Tapa de botella
- Marcadores.
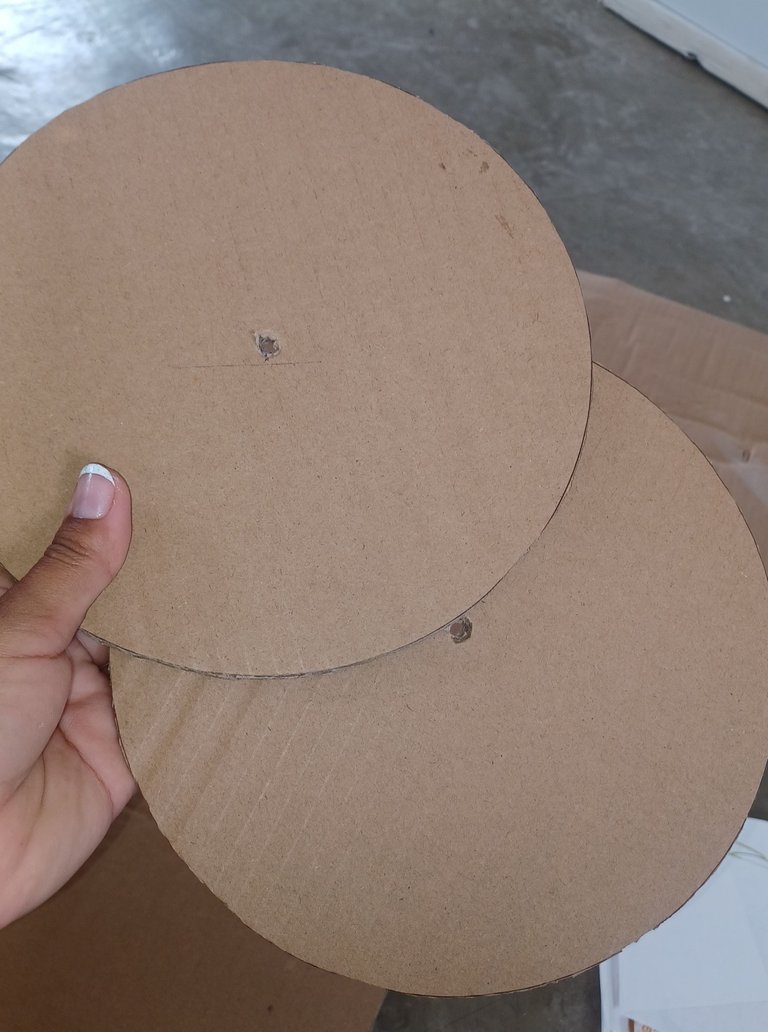
Lo primero que hice fue marcar en el cartón dos círculos grandes, yo use la tapa de olla, con un diámetro de 21cm.
Since this project was a bit impromptu I didn't take pictures of the materials, but I'll describe them quickly.
- Cardboard box.
- Colored paper.
- A screw
- Glue, Silicon
- Scissors
- Bottle cap
- Markers.
The first thing I did was to mark on the cardboard two large circles, I used the pot lid, with a diameter of 21cm.
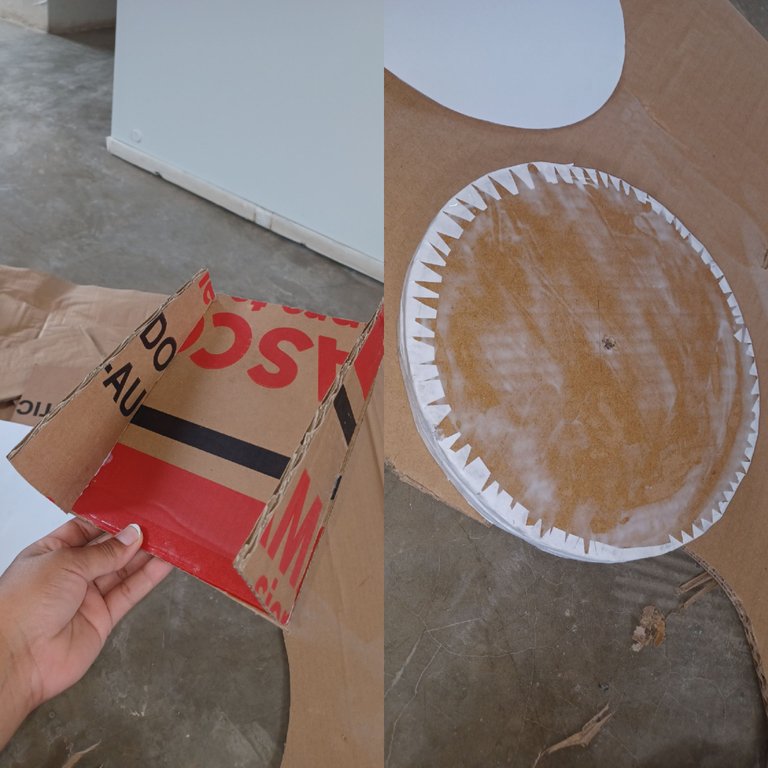
Para la base corte dos rectángulos de 18x20 cm y los lados laterales de 5 cm, a cada cara le rebaje dos centímetros en la parte superior, para darle la forma de las ruletas.
For the base, cut two 18x20 cm rectangles and 5 cm lateral sides, and cut two centimeters off the top of each side to give it the shape of the roulette wheels.

Lo siguiente que hice fue abrir un agujero por la mitad del círculo, usando el tornillo que usaré como eje, hecho esto procedí a asegurar ambos círculos muy bien con pega y usando una cinta de papel cubrir muy bien, luego recorte dos círculos de papel y los pegue en ambas caras del círculo de cartón.
Para la base, comencé pegando la cara frontal con las dos caras laterales para esta parte use barras de silicon para asegurar mejor la forma. Deje así mientras se secaba bien el círculo de la ruleta.
The next thing I did was to open a hole in the middle of the circle, using the screw that I will use as an axis, then I proceeded to secure both circles very well with glue and using a paper tape to cover them very well, then I cut out two paper circles and glued them on both sides of the cardboard circle.
For the base, I started by gluing the front face with the two side faces, for this part I used silicone sticks to better secure the shape. I left it like this while the roulette circle dried well.
Luego ubiqué el centro en la parte superior de la base y usando el tornillo abrí un pequeño orificio, para asegurar muy bien y darle la estabilidad para girar coloque una tapa de botella en la punta del tornillo y la pegue con silicon en la parte interna de la base de la caja, hecho esto si procedimos a pegar la cara trasera a la base.
También recorte un trozo de cartón para cubrir la parte superior y colocar otro trozo hacia arriba para ubicar la flecha que indicara el número elegido al azar*
Then I placed the center at the top of the base and using the screw I opened a small hole, to secure very well and give it the stability to rotate I placed a bottle cap on the tip of the screw and glued it with silicone on the inside of the base of the box, done this if we proceeded to glue the back side to the base.
Also cut a piece of cardboard to cover the top and place another piece upwards to place the arrow that will indicate the randomly chosen number*.

Con todas las piezas en su lugar procedimos a forrar toda la base, usamos varias hojas de papel color verde para cubrir toda la superficie de la base, luego seccionamos el círculo para colocar los diferentes colores y número, comencé marcando una cruz y luego seguí seccionado por la mitad de cada sección hasta conseguir 16 secciones del círculo.
Seguidamente recortamos las formas en los papeles de colores y los pegamos en su lugar, resultando en 5 franjas de los tres colores y nos sobro un espacio que tendrá una oportunidad única en este juego y ganarse una recompensa inmediata.
With all the pieces in place we proceeded to line the entire base, we used several sheets of green paper to cover the entire surface of the base, then we sectioned the circle to place the different colors and number, I started by marking a cross and then continued sectioning in half of each section until we got 16 sections of the circle.
We then cut out the shapes in the colored papers and glued them in place, resulting in 5 stripes of the three colors and we have a space left over that will have a unique opportunity in this game and earn an immediate reward.

Y para culminar esta manualidad, recortamos pequeñas tiras de papel donde escribimos las operaciones matemáticas que se tendrán que resolver dependiendo el número que el azar marque para cada jugador, gana el jugador que complete 5 operaciones del mismo color.
And to finish this craft, we cut small strips of paper where we write the mathematical operations that will have to be solved depending on the number that randomly marks for each player, the player who completes 5 operations of the same color wins.

Esta ha sido una actividad muy entretenida, me divertí tanto girando la rueda que me provoca construir uno para mi escritorio con algunas combinaciones que me inspiren a dibujar, tal vez...
A ustedes que les parece esta manualidad didáctica para niños?
This has been a very entertaining activity, I had so much fun spinning the wheel that I want to build one for my desk with some combinations that will inspire me to draw, maybe....
What do you think about this didactic craft for children?

¡Muchas gracias por leer!
¡Hasta la próxima!
Thank you very much for reading!
See you next time!
Muy buen proyecto y bien ejecutado, un juego totalmente didáctico y educativo.
!discovery 30
Muchas gracias 😘
This post was shared and voted inside the discord by the curators team of discovery-it
Join our Community and follow our Curation Trail
Discovery-it is also a Witness, vote for us here
Delegate to us for passive income. Check our 80% fee-back Program
A completely didactic and educational work that serves to make the education of the little ones in the house more striking.Thank you for leaving us your detailed step-by-step instructions.
selected by @dayadam
Gracias ✨️
¡Felicidades! Esta publicación obtuvo upvote y fue compartido por @la-colmena, un proyecto de Curación Manual para la comunidad hispana de Hive que cuenta con el respaldo de @curie.
Si te gusta el trabajo que hacemos, te invitamos a darle tu voto a este comentario y a votar como testigo por La Colmena.
Si quieres saber más sobre nuestro proyecto, te invitamos a acompañarnos en nuestro servidor de Discord.
Gracias por el apoyo!
Saludos, por curiosidad; si la ruleta cae en ¨ganador¨, ¿Qué premio recibe? ¿se salva de que no le pongan una operación matemática? 😁
Saludos!
Pues una de las ideas para esa opción es que responda una pregunta fácil de las tablas de multiplicar o cualquier otra pregunta relacionada con la asignatura y recibir algún dulce.
Que creativa y divertida forma de resolver problemas matematicos, nunca fui buena en esa materia jaja pero asi creo que las hubiese visto de otra manera, me encanta 😍
Tampoco es de mis materias favoritas jaja, pero mi ahijado es muy bueno en las matemáticas 🥰
Este es un magnífico recurso. Lo lúdico se une al proceso de aprendizaje y eso es fantástico. Gracias por esta excelente idea