DIY || How To Make A Crochet Scrunchy.
The last time I made a crochet scrunchy was approximately last year and if I'm being honest, I do not know where all of the scrunchies I've made in the past years have gone; they probably have been carried by someone who has more use for them.

Be that as it may, my crochet student mentioned during one of our classes that she wants to learn how to make a crochet scrunchy and I agreed to teach her. This is because, as a crochet beginner who wants to make sales, it's always best to hone the crochet skills by practicing with smaller projects and this isn't the only perk. People are usually more open to the idea of buying cheaper items and this in itself is an opportunity to prove oneself to their clients. If your client can trust you to make durable items that are smaller, then there is a possibility they will trust you with even bigger projects. So, yes! crochet scrunchies are also very important.

Before the class, I made a sample with which I will be instructing my student and once she arrived, we got right into business. I'll be taking you through the process of making a crochet scrunchy.

Materials Needed

- Yarn
- 4.0mm hook
- Elastic band
- Darning needle
- A pair of scissors
Procedure

To begin, I make a slip knot and work the slip knot into the elastic band. For this part, it's best to use an elastic band that isn't already stretched out to prevent ending up with a loose scrunchy.

Into the elastic band, I make a series of single crochet stitches(enough to go round the entire band) till the very end. To end the row, I make a slip stitch into the very first stitch and make a chain of two in preparation for the next row.

In order to get a fuller and thicker scrunchy, I'd advise that the initial single crochet stitches are pulled tightly close together.

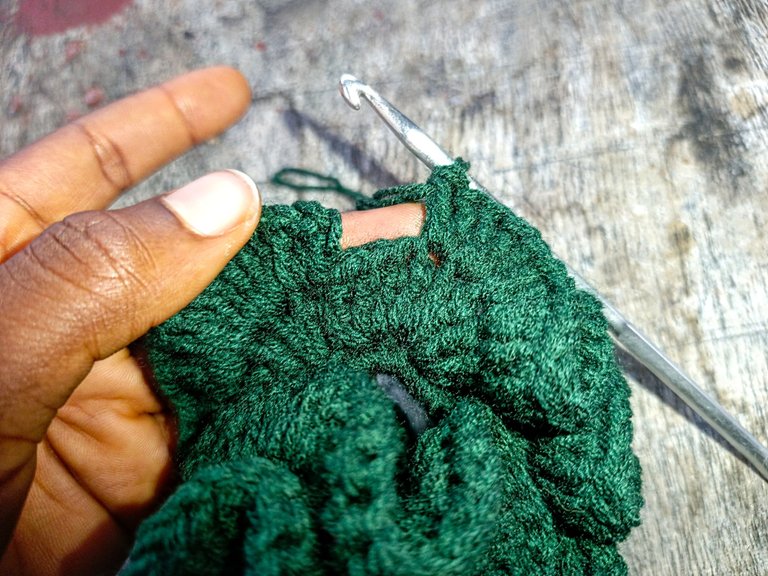
For the second row, make two double crochet stitches into the very same space where we made the chain two. Without making a separating chain one, make three double crochet stitches(a cluster) into the very next space. Continue making clusters into every single space till the very end of the row. At the end, make a slip stitch to end row two.

Some people can choose to keep their scrunchies light and simple and by doing so, stop on the second row. But to get a wavier scrunchy, it's best to add one more row.
For row three, make a chain two and place two more double crochet stitches into the same space. Then repeat the same pattern as the previous row to the very end. Make a slip stitch to signify the end of the row.
While making my third row, one of the worst things that can happen to a crochet artist happened; my yarn finished just a few stitches to the end. This lead to a series of tying, cutting and hiding but I handled it:)

If you want your scrunchy to be in one color, then this will be the final step for you.

However, if you want an extra color, go ahead to change yarn colours and work single crochet stitches round the scrunchy till the very end. I used a contrasting colour, cream colour, and this made the single crochet stitches standout better.

The last thing I did was sew in my loose end using a darning needle and that brought me to the end.

It took me about 45 minutes from the start to the finish of this project and I'm really glad how it turned out.

My student came later in the day, followed the above described steps carefully and she made herself a beautiful scrunchy using white and blue yarns.
Images belong to me, except stated otherwise.
This is awesome and it is beautifully made
Your student is really a fast learner
I'm absolutely glad she's a fast learner.
Thank you😊
This is so neat and beautiful, get a teacher like Wongi and you’d be glad that you did.
Lovely work.
selected by @ibbtammy
Thank you so much 🤭
Omg, I love the white one with pastel blue—it’s such a cute color combo. The green one’s pretty too, definitely more subtle and elegant.
I’ve always wanted to learn how to crochet, but I still need to get the materials. Saving this tutorial for when I finally start—it’s super well explained. ✨
I'm so happy you found this post easy to understand.
I wish you all the best and lots of luck of joy on your crochet journey—when you begin:) Please do tag me to your ceochet posts; I'd love to see them.
Also, thank you for your appreciation😊
Sending Love and Ecency Curation Vote!

Thank you✨
This is so beautiful. 😍 I love the colour combo for the white and blue.
This made me remember my first crochet scrunchies as a learner those days. I was super excited when i finally got it right because i thought i wont be able to do it.
Crochet 🧶😍 is beautiful 😍❤️ and words along can't explain it beauty.
This scrunchy looks so neat! I'm amazed you did this on your first try🤭 I'm guessing you can make scrunchies now with your eyes closed.
I absolutely agree with you. It's an art, one I love very much❣️.
Of cause o. You can't just see a crochet 🧶 project and ignore.
I agree
Congratulations @wongi! You have completed the following achievement on the Hive blockchain And have been rewarded with New badge(s)
Your next target is to reach 55000 upvotes.
You can view your badges on your board and compare yourself to others in the Ranking
If you no longer want to receive notifications, reply to this comment with the word
STOPThank you ✨
All good @wongi! You are a true inspiration for Hive! Keep going and reach your new target!
que hermosaas,! están muy lindas y bien elaboradas
how beautiful! They are very pretty and well made
Thank you very much 😊