Learning Rocket Building Tips in KSP!
What's up my Hive Gamers!?
I'm back to share that the newest episode of my "Let's Play Kerbal Space Program" Series is now live on YouTube!
If you are having issues building rockets in KSP, then this episode is definitely for you!
But First, A Shout-Out!
Before I get too far into this post, I would like to give a huge shout-out to @jeffjagoe for his recent sub to my YouTube channel! Thank you so much Jagoe, I truly appreciate your support, and welcome to the FourTwoZero Family!

Intermediate Construction Training Overview

During this training exercise, Resident Rocket Scientist, Werner Von Kerman, meets us back inside the Vehicle Assembly Building (VAB) to teach us how to build a rocket that's capable of reaching suborbital flight!
Not only is this training going to be pivotal in our mission to master the art of space travel, but we will also get to learn some extra tips that will help us while building!

Adjusting Parachute Options (Cont.)
Now, we got to learn a little bit about how to adjust our parachute options during the Basic Construction Training, but we'll recap since I didn't explain what we did during that blog!
In that training, we learned how to open our parachute options by Right Clicking on the parachute, after placing it on our rocket.
Once the Parachute Options tab is open, we can see that there are two separate settings sliders, which are listed below.
Minimum Pressure = Prevents the Parachute from opening/activating until above this value (in atmospheres or ATM)
Altitude = The Opening Height (in meters or m) of the Parachute (Fully-Deployed)
By default, the Minimum Pressure Slider is set to 0.04 (atmospheres), and the Altitude Slider is set to 1000 (meters).
During the basic construction training, we adjusted the Minimum Pressure Slider to 0.2 Atmospheres, which we learned is roughly 9 kilometers in altitude above Kerbin.
This means that even if we staged the Parachute at 20 kilometers above Kerbin, the Minimum Pressure Setting would prevent the parachute from being deployed until we reached the 9 kilometer altitude mark.
So, with that overview out of the way, let's move onto the Intermediate Construction Parachute Options!
Immediately after removing the RT-5 'Flea' Engine from our "Hopper" rocket, we were immediately instructed to open the parachute options, and verify that the Altitude Slider was still set to 1000 meters.
This time, instead of leaving the Min Pressure Slider at 0.2 atmospheres, we were instructed to move the slider all the way to the right, which equalled 0.75 atmospheres.
On Kerbin, 0.75 ATM is roughly 2 kilometers above the surface, meaning that we will have a much shorter time during our descent!

I also did some quick calculations about what that means for our Min Pressure Slider:
If 0.2 ATM is 9 km above Kerbin, and 0.75 ATM is 2 km above Kerbin; then there is a total of 7 km in the 0.55 ATM difference.
With these numbers, we can roughly figure that every 0.07-0.08 ATM = 1 km in Kerbin's atmosphere (shown below).
0.2 ATM = 9 km above Kerbin
0.2 + 0.07 = 0.27 ATM, roughly 8 km.
0.27 + 0.08 = 0.35 ATM, roughly 7 km.
0.35 + 0.08 = 0.43 ATM, roughly 6 km.
0.43 + 0.08 = 0.51 ATM, roughly 5 km.
0.51 + 0.08 = 0.59 ATM, roughly 4 km.
0.59 + 0.08 = 0.67 ATM, roughly 3 km.
0.67 + 0.08 = 0.75 ATM, which we know to equal 2 km above Kerbin.
Obviously the math isn't perfect, but you get the idea!
If you plug it into a calculator, 0.55 ÷ 7 = 0.0785, so right at 0.08 if you round to the nearest hundredth!
The reason I took the time to do this math, was because I thought it might become handy in the future, when we attempt to land on other planets!
Anyways, on with the training!

After we finished up adjusting our parachute options, we were then instructed to rename our craft in order to continue, so I named this bad lad the "Jumper" since it was a slight upgrade from our Hopper!
Then, we were told we were going to be placing a science experiment on our craft! However, we need to be careful adding parts all willy-nilly, because we might throw our craft off balance!

How to Activate Symmetry Options
So how do we solve that problem? By activating the Symmetry Options of course!

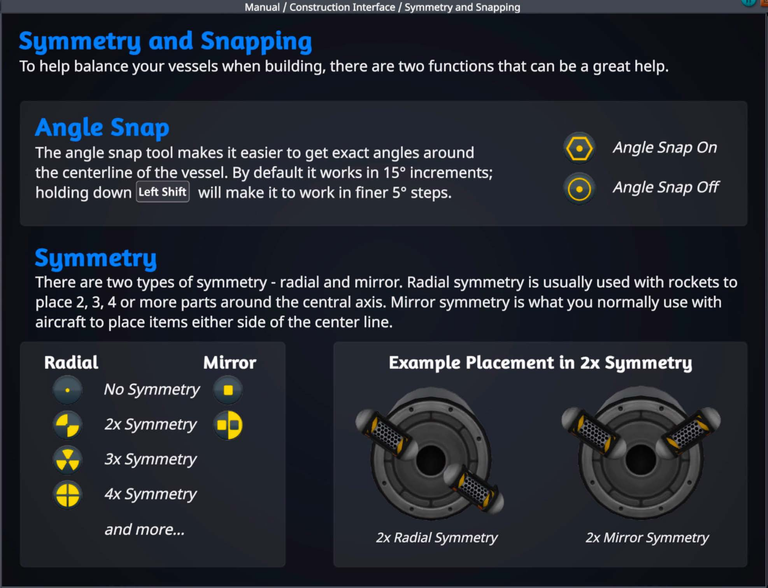
We can cycle through the Symmetry Options with the X key, initially taking you from single part placement to 2x symmetry, which places 2 parts on our craft, keeping everything well balanced during flight!
By pressing the X key again, you can continue to cycle through the symmetry options, which include 3x, 6x, and 8x Symmetry Placements! This will definitely come into handy when placing those pesky stabilizer fins on our rockets!
Now that we have 2 of the Goo Containment Units placed symmetrically on our craft, we need to add an engine to be able to reach space! But, instead of choosing the Solid Fuel Engine like we did previously, were actually going to use a Liquid Fuel Engine, which requires Fuel Cells!
Since we intended to add additional parts (and weight) to our rocket design, we were instructed to place a TD-12 Decoupler onto our MK-1 Command Pod in order to remove the extra parts before descent.

Duplicating Parts (Copy & Paste)
Now that we've added the TD-12 Decoupler to our rocket, it's time to add our fuel cells!
The only fuel cell currently available to us in this training exercise is the FL-T100, so we placed it on our new "Jumper" rocket, and we were then informed how to Duplicate Parts, so we wouldn't have to continuously grab a new part from the toolbox!
To Duplicate a Specific Part (like the FL-T100 Liquid Fuel Cell), you hold the Left Alt key while Left Clicking on the part you would like to copy! Once you click the part, you will immediately be holding a duplicate of that part for placement!

Liquid Fuel Engine Information
We went ahead and added a total of five FL-T100 Fuel Cells, as instructed, and then finally added of LV-T45 'Swivel' Liquid Fuel Engine.
Unlike the RT-5 'Flea' Engine, this new LV-T45 'Swivel' Engine requires both Liquid Fuel and Oxidizer to burn, which is exactly what the FL-T100 fuel cells contained! Lucky us!

How to Toggle Angle Snap
Now that we have fuel cells and an engine placed on our rocket, we will need some fins to stabilize our craft during flight!
This time, we'll set our Symmetry to 4x (by hitting the X key), but instead of going ahead and placing them straight away, we're going to learn how to toggle the Angle Snap Options!
The Angle Snap option is quite useful when placing parts such as fins on our spacecraft, by allowing us to snap to 15° angles around the rocket.
You can toggle the Angle Snap Option on or off by pressing the C key, and for added precision, you can hold the Shift key to snap our parts on at 5° angles!
After placing our 4 fins at the bottom of our "Jumper" rocket, we saved our build for later use, and had officially completed the Intermediate Construction Training Exercise!

Training Overview
With this Training Exercise completed, we have now discovered the keyboard shortcuts for activating Symmetry Options, duplicating parts, and Toggling Angle Snap during our rocket design process!
We also learned that 0.75 atmospheres equals approximately 2 kilometers (km) on Kerbin, which should help us out when adjusting our parachute settings in future builds!
Personally, I think that the information provided in the Intermediate Construction Training is extremely important, and will prove to be very useful during our career mode gameplay!
But unfortunately, that's where we will end this update, but don't forget to tune-in next time where we're going to be learning how to fly the "Jumper" Rocket we just created!
Thank you all for tuning-in, and I hope you enjoyed!
I love to hear from you! Don't forget to reply with any questions, comments, or even if you have any suggestions for me as a content creator!
If you would like to stay updated on the most current Spaced-Out Adventure, and to witness the growth of a new YouTube channel and Community, don't forget to Subscribe/Follow me on social media!
Until the next Spaced-Out Adventure,
Stay Toasty My Friends!
The Anarchist ✌🏼💚
