Tarjeta de cumpleaños personalizada: ¡Paso a paso! 🌷✨ | Dale un toque personal y único a tus regalos 🩷☄️ [ESP-ENG]
Hello my creative Hive Diy family! How are you all doing here, I'm well and I hope you are too. I wish you all lots of health, peace, happiness and love every day, as well as days full of 100% creativity and productivity, to keep creating with love and constancy beautiful crafts to share in our community.💜
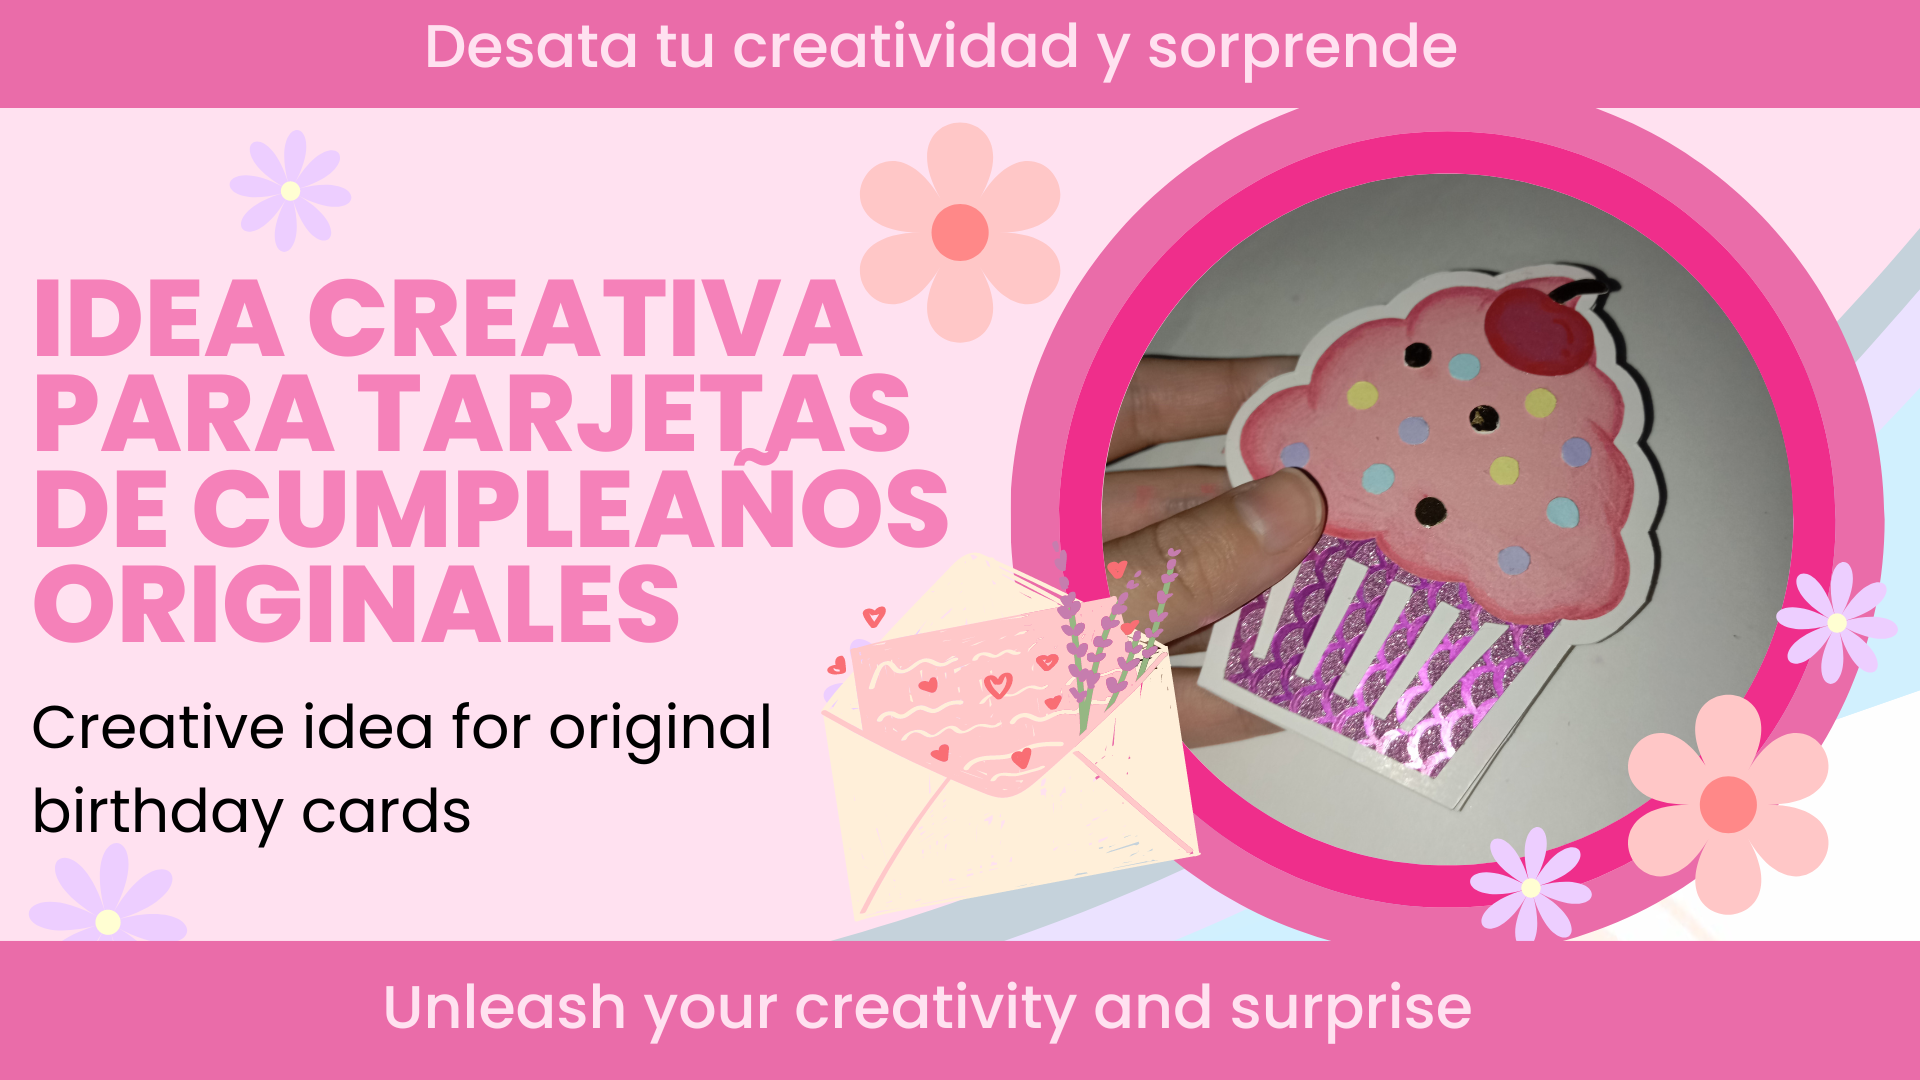
¡Buenas tardes mi gente! El día de hoy les traigo una excelente idea de tarjeta, para acompañar esos regalos llenos de amor para nuestras personas especiales en sus cumpleaños, está es una tarjeta única, hermosa y diferente que podemos elaborar fácilmente, además nos puede sacar de apuros y marcar la diferencia, yo he quedado encantada con el resultado, sin duda, acompañame a ver este paso a paso que preparé para tí.✨
Good afternoon my people! Today I bring you an excellent card idea, to accompany those gifts full of love for our special people on their birthdays, this is a unique, beautiful and different card that we can easily make, plus we can get out of trouble and make a difference, I have been delighted with the result, no doubt, join me to see this step by step that I prepared for you.✨
Está es una tarjeta especial para mí hermana, quien cumple años en un poco más de una semana, por tal motivo quise hacerle una hermosa tarjeta, llamativa y especial, así encontré diferentes ideas que me dieron inspiración, se las dejaré al final del post, junto con su enlace.💗
This is a special card for my sister, who has her birthday in a little more than a week, so I wanted to make her a beautiful card, striking and special, so I found different ideas that gave me inspiration, I'll leave them at the end of the post, along with the link.💗
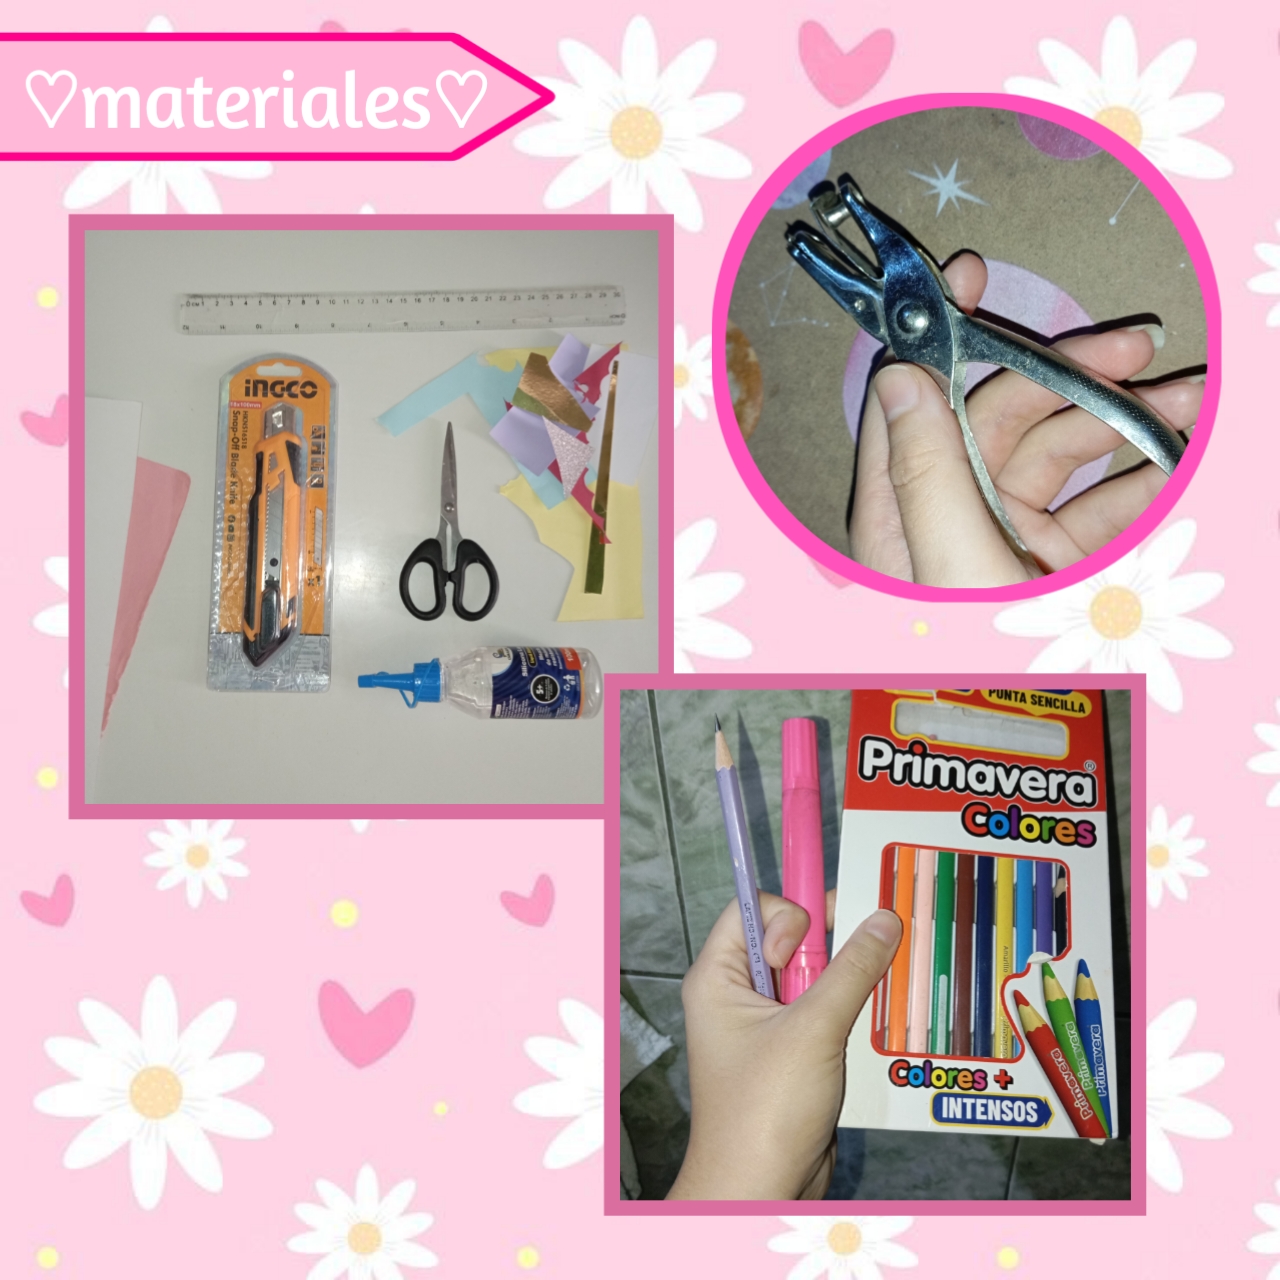
♡🩷☄️Materials☄️🩷♡
- Cartulinas del color de nuestra preferencia
- Retazos de cartulina
- Silicón
- Cutter/exacto
- Regla
- Tijeras
- Lápiz
- Colores
- Cardboard in the colour of your choice
- Scraps of cardboard
- Silicone
- Cutter/acto knife
- Ruler
- Scissors
- Pencil
- Coloured pencils
♡🩷✨Step by Step✨🩷♡
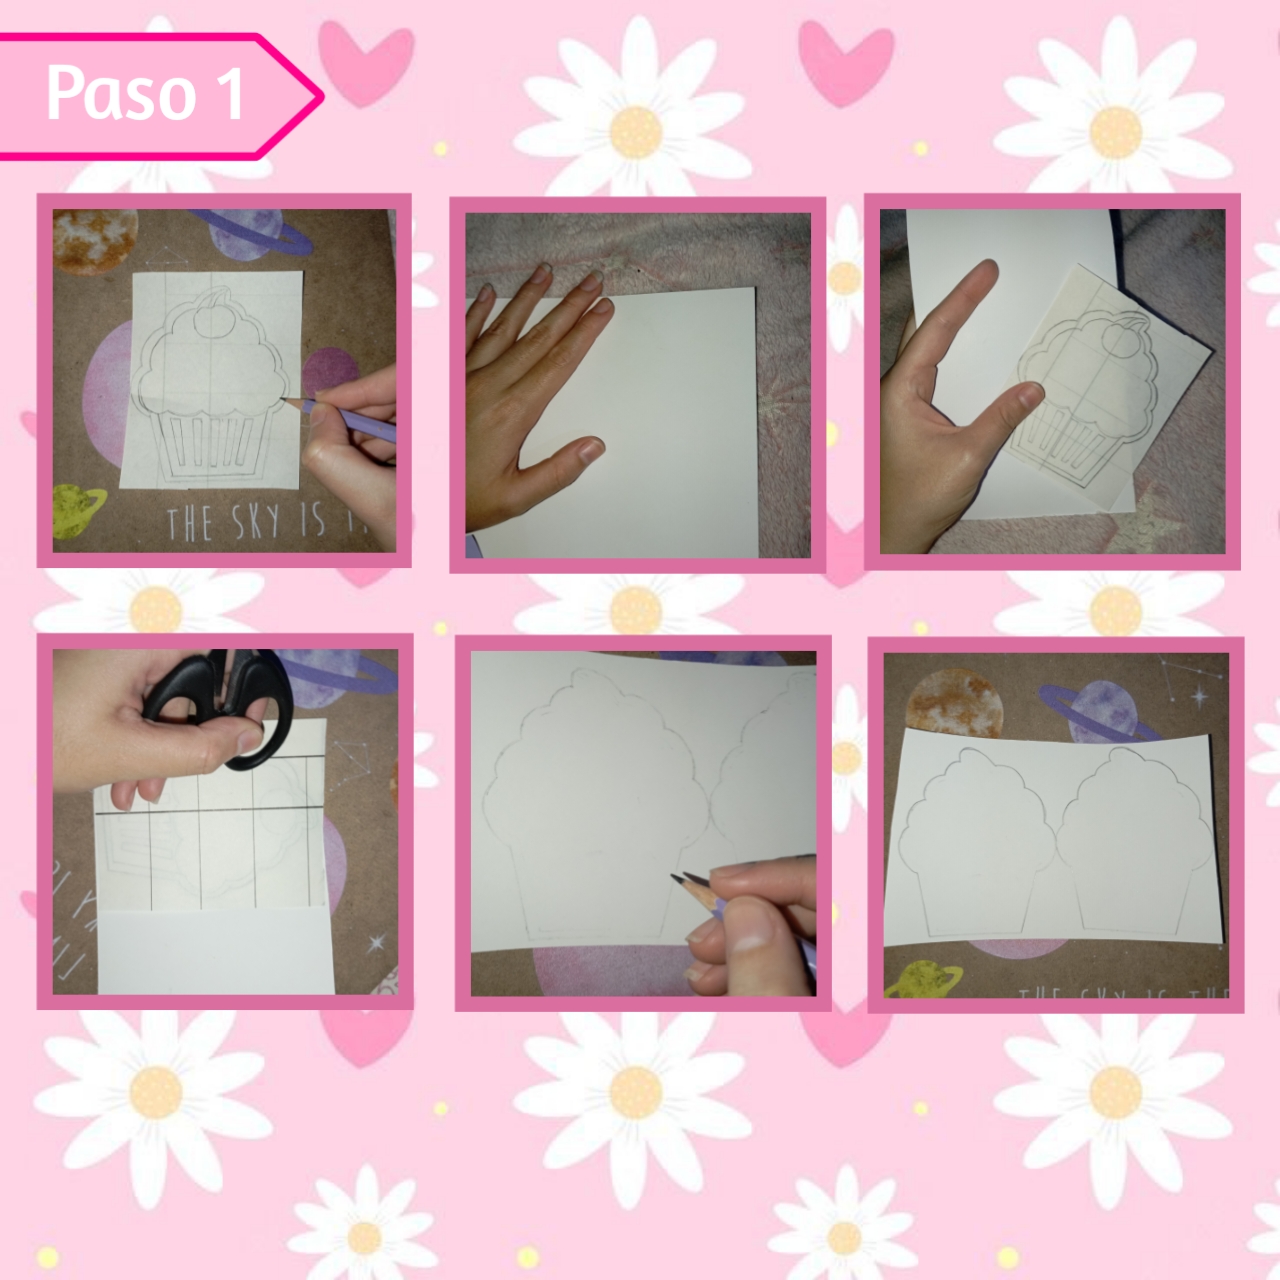
Paso 1:
Step 1:
Primeramente tomaremos nuestra plantilla (puede ser cualquier Cupcake en capas, a nuestra elección), puede ser impresa o echa mano, como prefieran, así con nuestro lápiz, remarcamos el trazo muy bien, luego tomamos nuestra cartulina, dependiendo de la pieza que sacaremos, yo usé la blanca para el borde más grande, así, por el revés de la cartulina, encima colocaremos la plantilla al revés y con la parte de atrás de una tijera iremos remarcando por encima hasta que se traspase la imágen por completo, al terminar esta parte podemos remarcar y arreglar detalles con el lápiz.
First we will take our template (it can be any Cupcake in layers, at our choice), it can be printed or handmade, as you prefer, so with our pencil, we mark the line very well, then we take our cardboard, depending on the piece that we will take out, I used the white one for the biggest border, so, on the back of the cardboard, we will place the template upside down and with the back part of a scissors we will mark out the image completely, when we finish this part we can mark out and fix the details with the pencil.
Cabe señalar, que yo marqué dos piezas iguales pegadas, para que la tarjeta se habrá y pueda ir el mensaje ahí, si quieren tomar está opción estén pendientes de poner una pieza invertida y la otra normal, yo en está parte me equivoqué, pero lo arregle más adelante.
It should be noted that I marked two equal pieces glued together, so that the card will be there and the message can go there, if you want to take this option be aware to put one piece inverted and the other normal, I was wrong in this part, but I fixed it later.
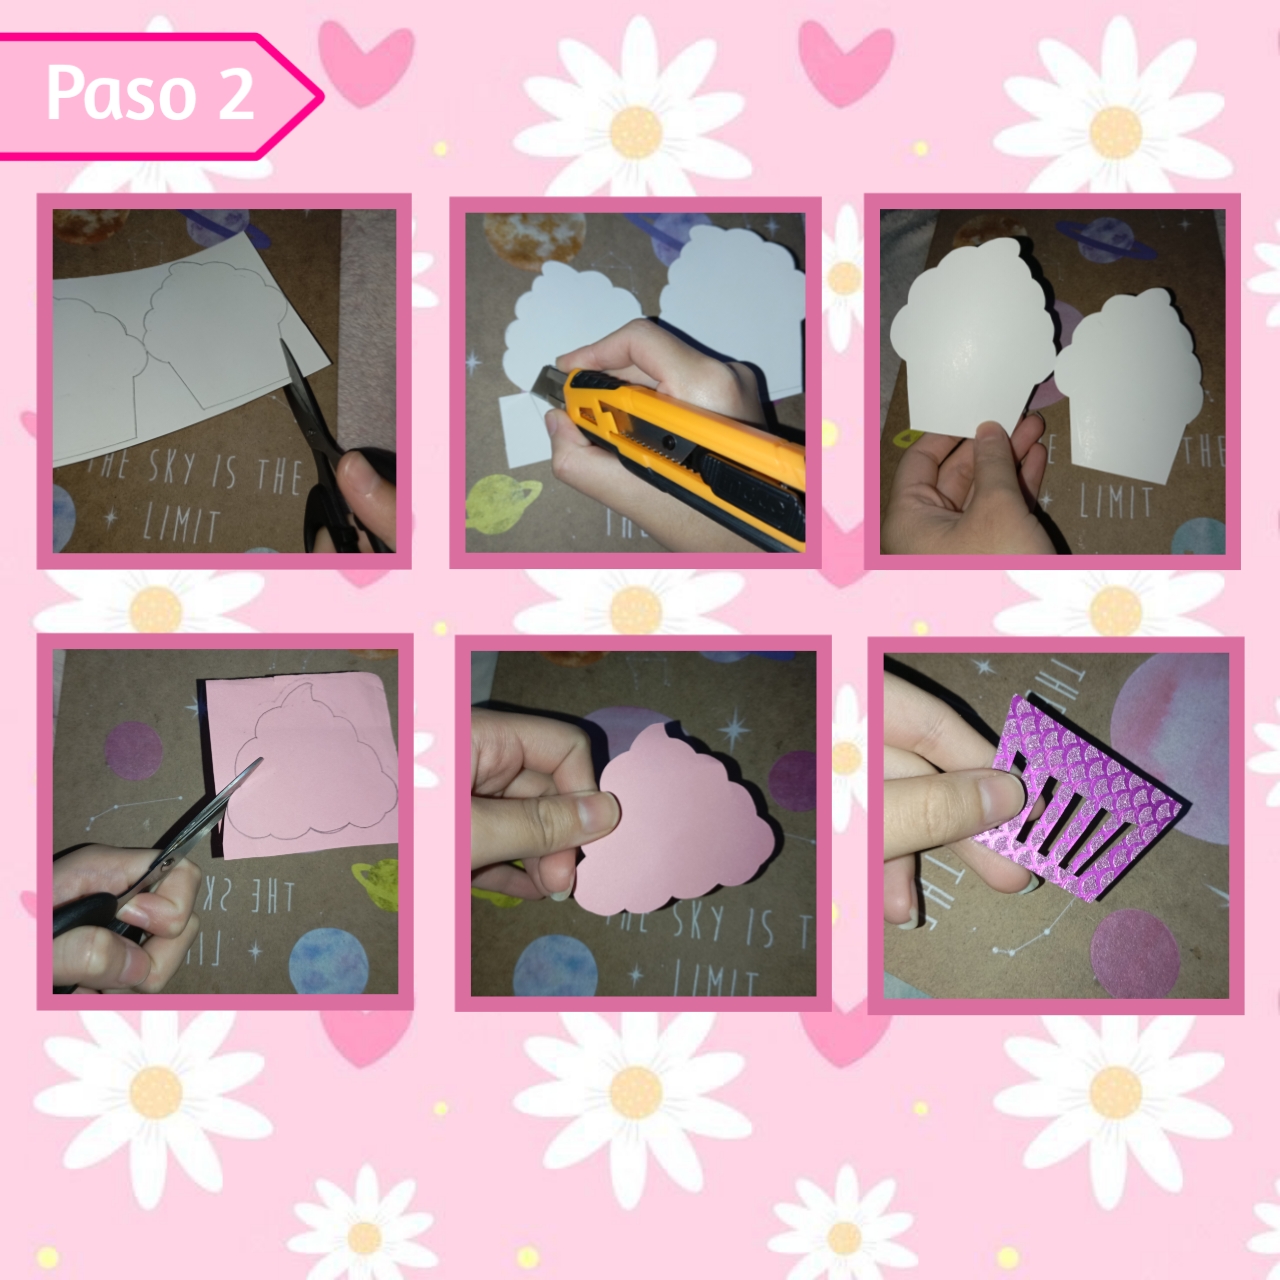
Paso 2:
Step 2:
Continuamos recortando la pieza que marcamos previamente, las partes rectas las vamos a recortar con la regla y exacto, hasta sacar la pieza completa. Después en las demás cartulinas de nuestra elección, vamos a marcar las demás piezas e igualmente recortaremos, usando nuestras dos herramientas; el cutter y las tijeras, así hasta tener todas las piezas, en total son cuatro.
We continue cutting out the piece that we marked previously, the straight parts we are going to cut out with the ruler and exactly, until we have the complete piece. Then on the other pieces of cardboard of our choice, we are going to mark the other pieces and cut them out using our two tools; the cutter and the scissors, until we have all the pieces, there are four in total.
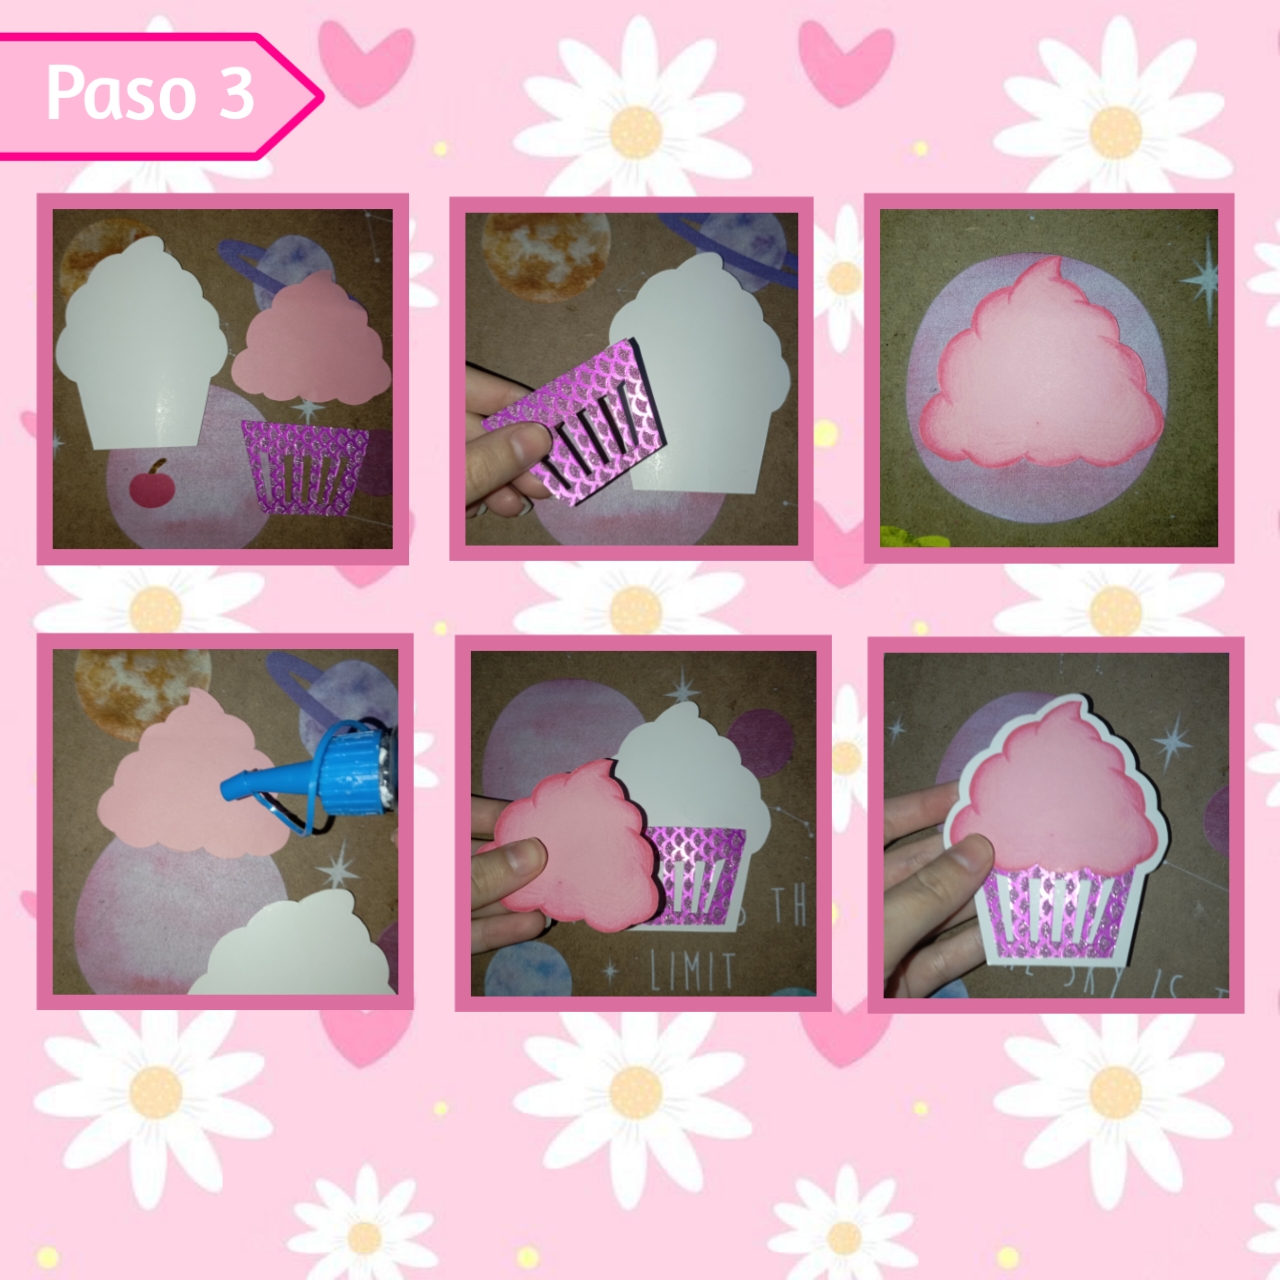
Paso 3:
Step 3:
Ahora bien, con todas las piezas a la mano, empezaré tomando la pieza del capacillo, agregando silicón frio en está y uniendo a la pieza blanca centrando bastante bien. Por otro lado, vamos a tomar la pieza que simula la "crema" y con los colores vamos a difuminar para dar profundidad, también le agregaremos silicón en la parte de atrás y colocaremos esta encima de la pieza anterior, un pedazo sobre el capacillo.
Now, with all the pieces at hand, I will start by taking the layer piece, adding cold silicone on it and joining it to the white piece, centring it quite well. On the other hand, we are going to take the piece that simulates the "cream" and with the colours we are going to blend it to give depth, we will also add silicone on the back and we will place it on top of the previous piece, a piece on top of the layer.
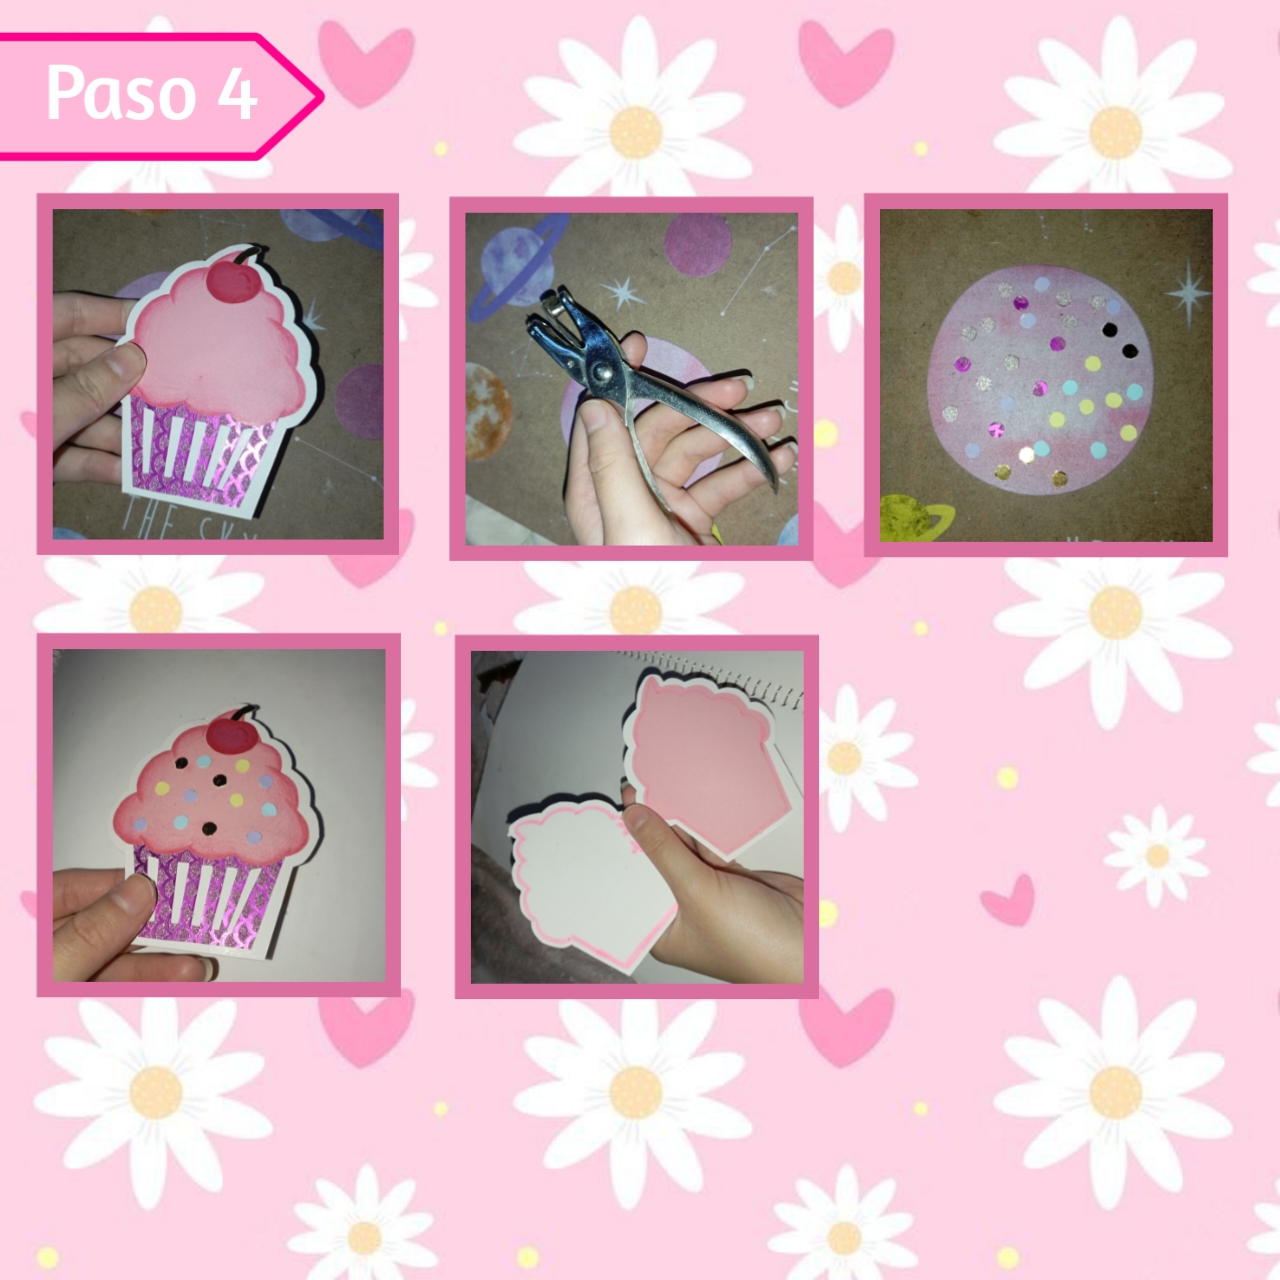
Paso 4:
Step 4:
Para finalizar le agregaremos en la parte de atrás silicón a la cereza y la pegaremos en la punta del cupcake muy bien, también con ayuda de una perforadora de círculos, vamos a tomar los retazos de cartulina y sacamos varios círculos variando colores según nuestro gusto y diseño, así los pegaremos alternando los colores según más nos guste. Por último, recorte otra forma de cupcake en cartulina rosa (más pequeña) y la pegué en la parte interna de la tarjeta, para escribir nuestro mensaje especial, decore un poco y listo.
To finish we will add silicone to the back of the cherry and stick it on the tip of the cupcake very well, also with the help of a circle puncher, we will take the pieces of cardboard and make several circles varying colours according to our taste and design, so we will stick them alternating the colours as we like. Finally, I cut out another cupcake shape in pink cardboard (smaller) and glued it on the inside of the card, to write our special message, decorate a little and that's it.
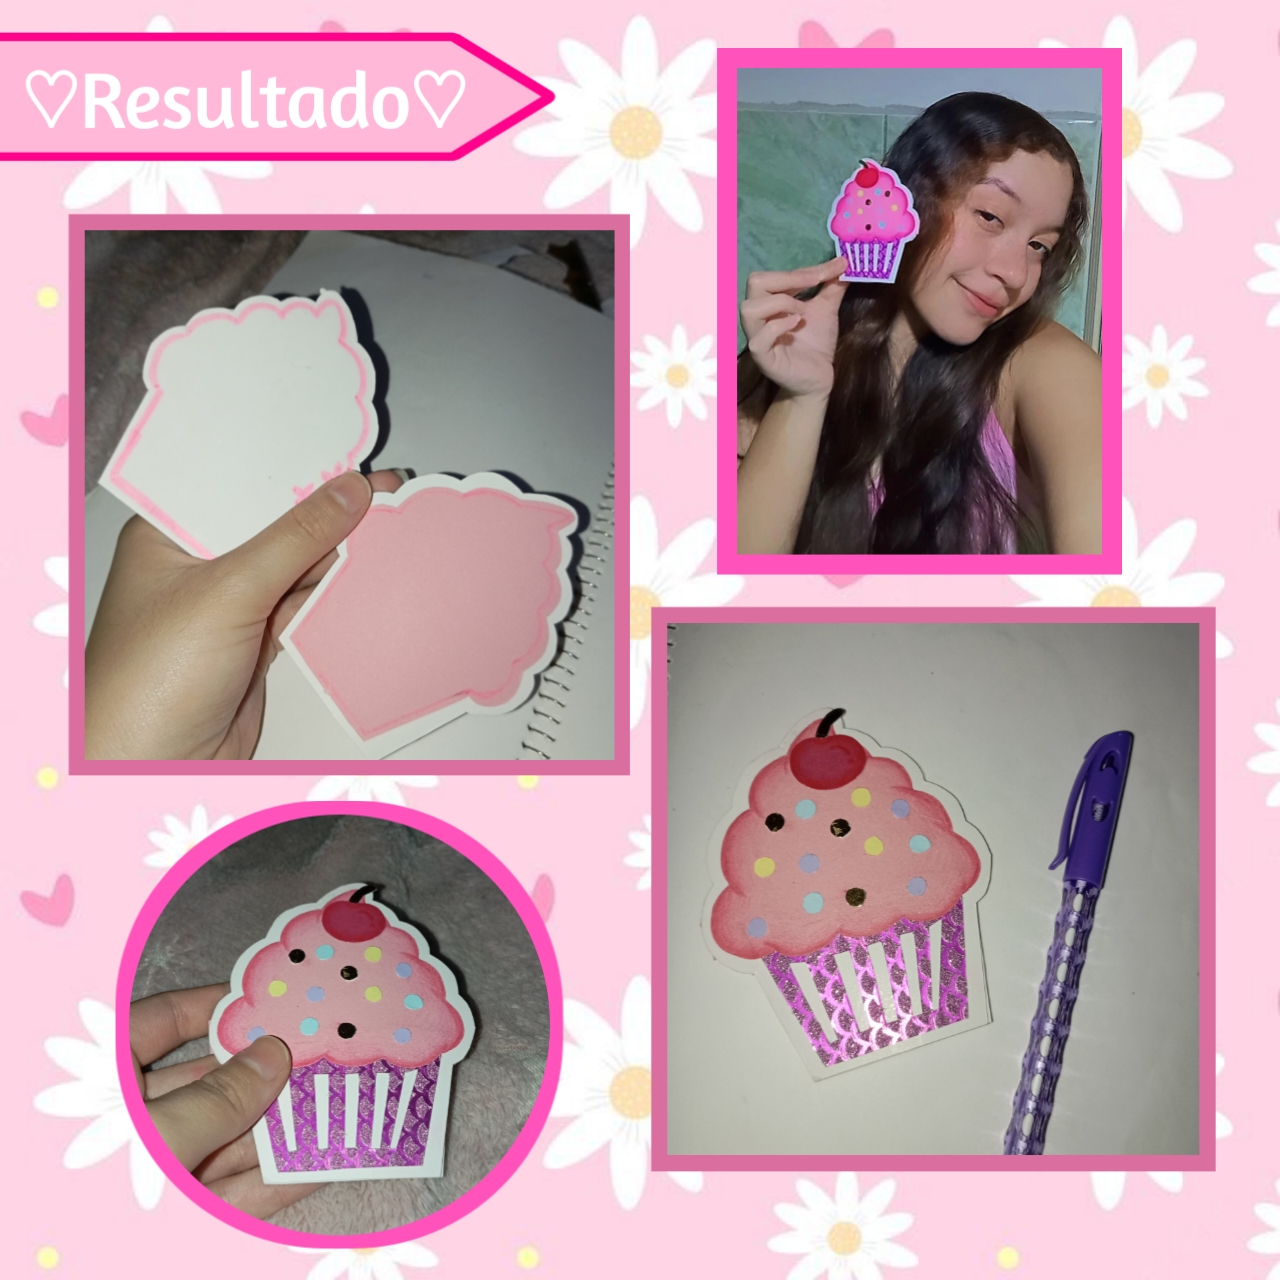
De está manera, siguiendo esta serie de pasos sencillos y en corto tiempo, pueden realizar está tarjeta, ideal para acompañar los regalos de nuestras personas especiales en sus cumpleaños. Es una tarjeta súper cute, le va a encantar a la persona que se la den, además es 100% personalizable, pueden elegir el tamaño de su preferencia y necesidad, además los colores pueden variar, impulsen su creatividad y pueden crear una hermosa creación en poco tiempo.🩷
This way, following this series of simple steps and in a short time, you can make this card, ideal to accompany the gifts of our special people on their birthday. It is a super cute card, the person you give it to will love it, it is also 100% customizable, you can choose the size of your preference and need, also the colours can vary, boost your creativity and you can create a beautiful creation in a short time.🩷
Fuente 1
Fuente 2
Fuente 3
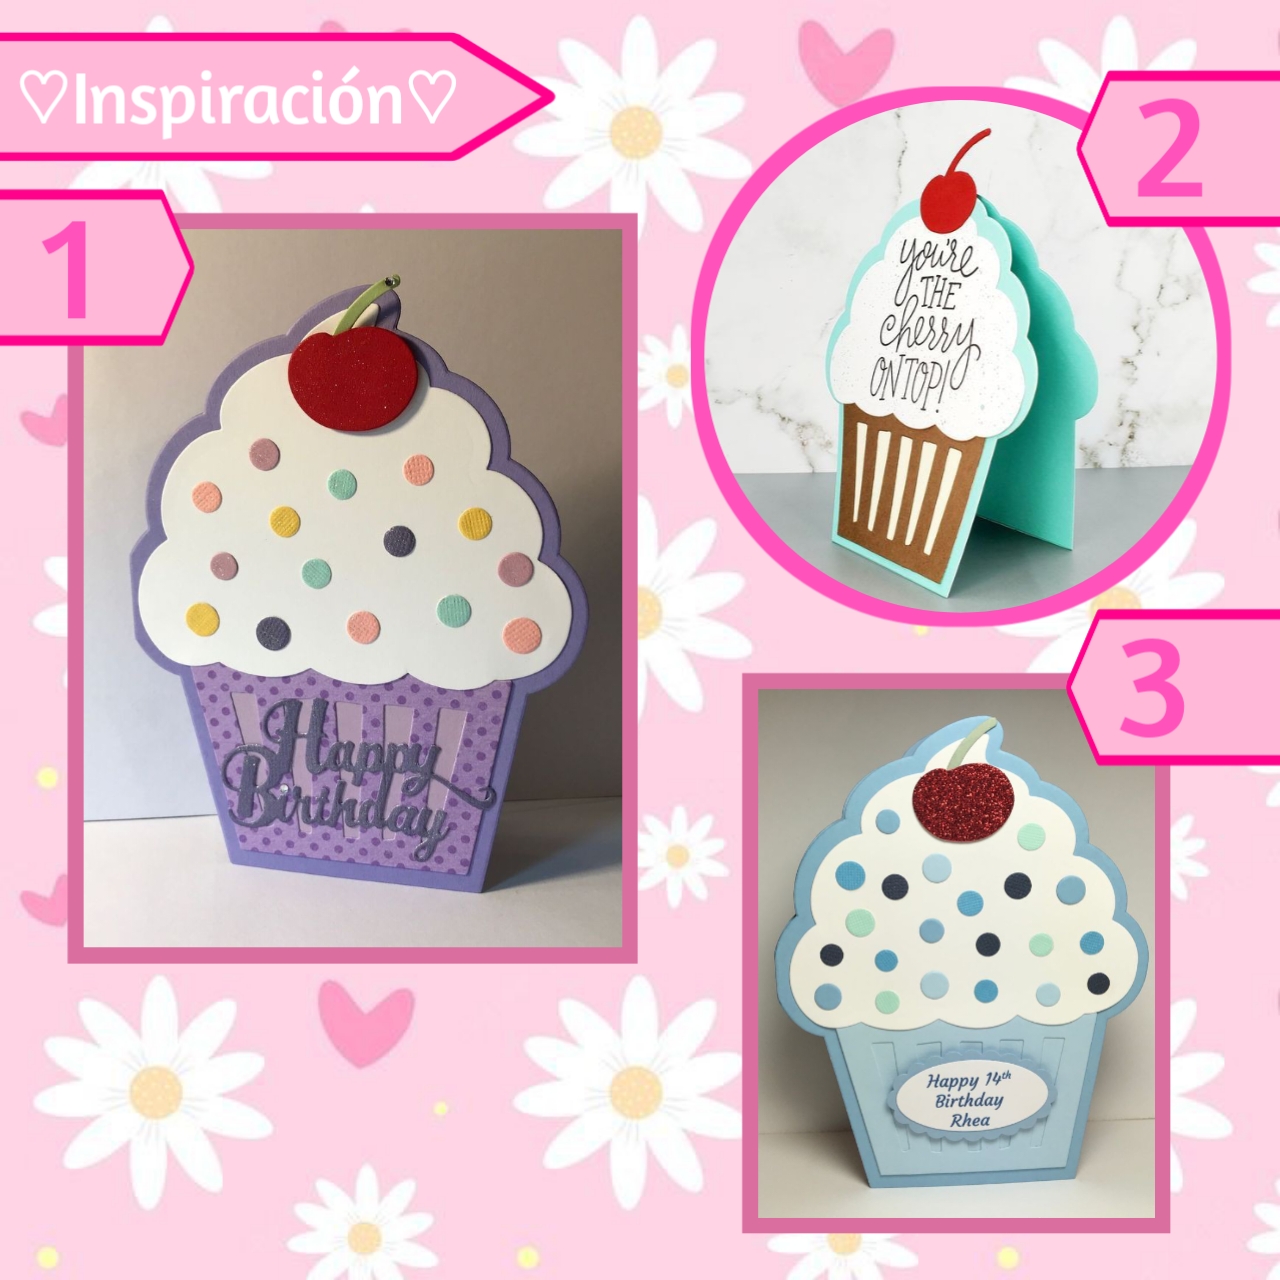
Lo prometido es deuda, así por aquí les dejó mi inspiración y unas ideas que encontré, para que puedan recrearlas y cambiar a su gusto lo que quieran.✨
As promised, here is my inspiration and some ideas that I found, so that you can recreate them and change what you want ✨.
Esto es todo por la tarde de hoy, espero les haya encantado el resultado tanto como a mí y les sea de gran utilidad en esas ocasiones especiales y únicas. Comenten y compartan si les ha gustado, los leeré en los comentarios, un fuerte abrazo.🌷
That's all for today's evening, I hope you loved the result as much as I did and that it will be very useful for those special and unique occasions. Comment and share if you liked it, I'll read you in the comments, big hugs 🌷.
🩷🌷¡Gracias por leer! Hasta el próximo DIY 🌷🩷
🩷🌷Thanks for reading! See you next DIY 🌷🩷
Photos of my authorship taken from my Xiaomi Redmi 13C phone, edited in the free version of Canva and PixelLab
@tipu curate
!PGM
!LOLZ
Upvoted 👌 (Mana: 65/75) Liquid rewards.
lolztoken.com
They can't see the red flags.
Credit: reddit
@stefania16, I sent you an $LOLZ on behalf of elikast
(1/8)
Delegate Hive Tokens to Farm $LOLZ and earn 110% Rewards. Learn more.
Gracias por el apoyo.🥺✨
Such a beautiful birthday card you’ve got there, good job friend!
Thank you very much!✨
Esta muy buena esta idea de hacer las tarjetas superponiendo las capas. Quedó lindo ☺️
Sii, da un efecto 3D, me estoy volviendo adicta a hacer este tipo de tarjetas creativas, es que se ven muy lindas y tiernas.
Muchísimas gracias amiga, saludos.🩷✨
Muy bonita idea amiga. Bendiciones 😘.
Gracias amiga, igualmente para ti, un abrazo.💜🤗
Qué colores tan llamativos has usado para esta tarjeta de cumpleaños, la decoración es muy estupenda, e ideal para un cumpleaños.
Escrito por lionsaturbix / Written by lionsaturbix
¡¡¡Buen trabajo!!! Gracias por publicar tu excelente contenido en Hive Diy.
Esa es la idea, usar colores que resalten y muestren alegría.
Muchas gracias por la observación y el apoyo, saludos.✨💜