Switches with indicator light[Eng+Spa]
Greetings to the Hive DIY community. I hope you're in the best possible situation, full of good ideas, and in excellent spirits.
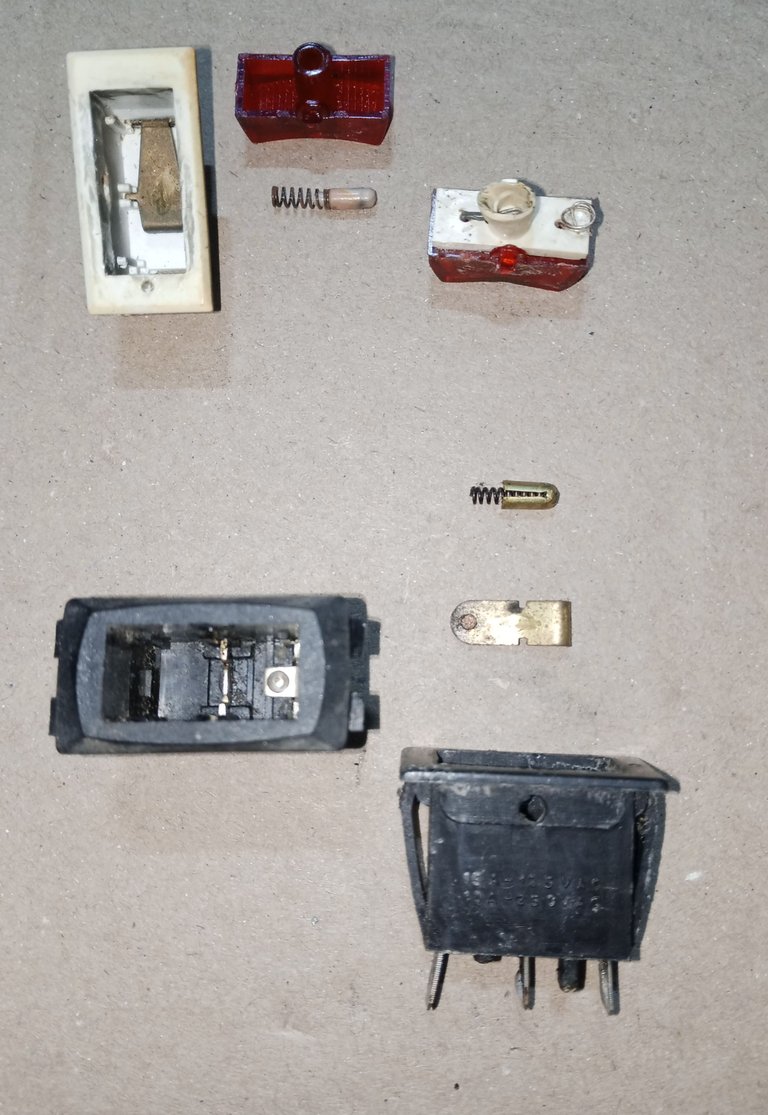
This time, I'm sharing a short post about what I promised in the previous presentation, about the details of switches with one pilot light and three connectors.
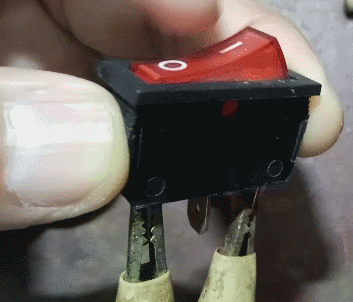
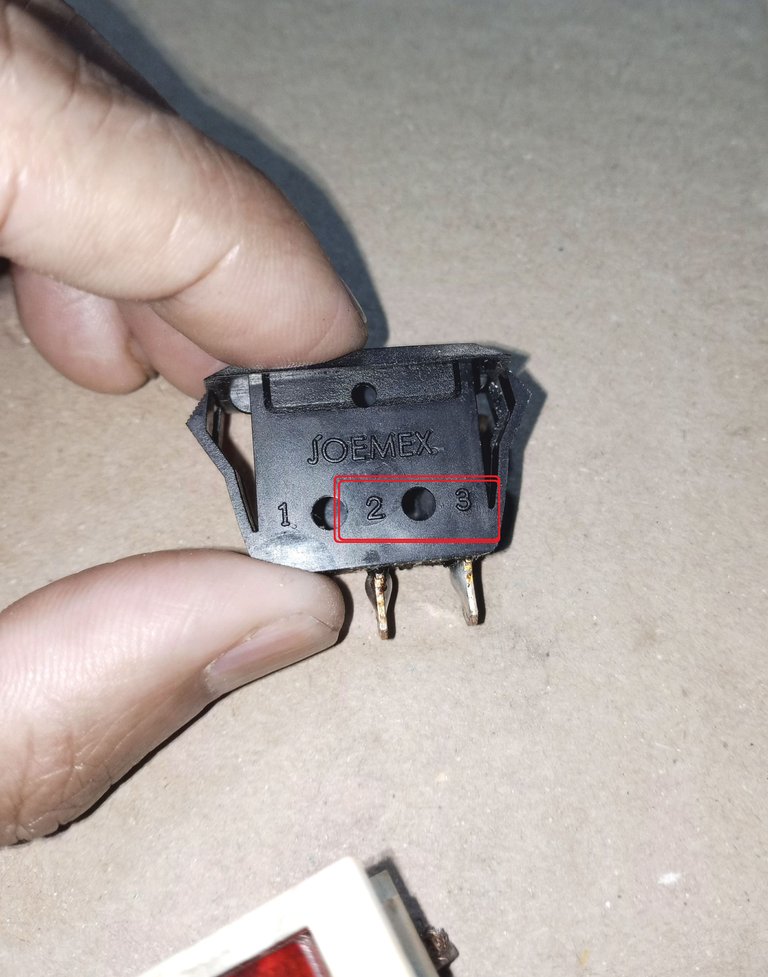
These switches have an additional connection or pin, which is used to turn the indicator light on or off, and are common in several household appliances.
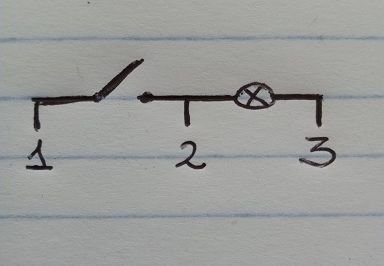
The connection, although it may not seem like it, is very simple: the line to be interrupted, L1, is connected to the pin marked number 1, the switch output is connected to pin 2, and pin three is connected to the neutral N1, so that the switch's indicator light can turn on.
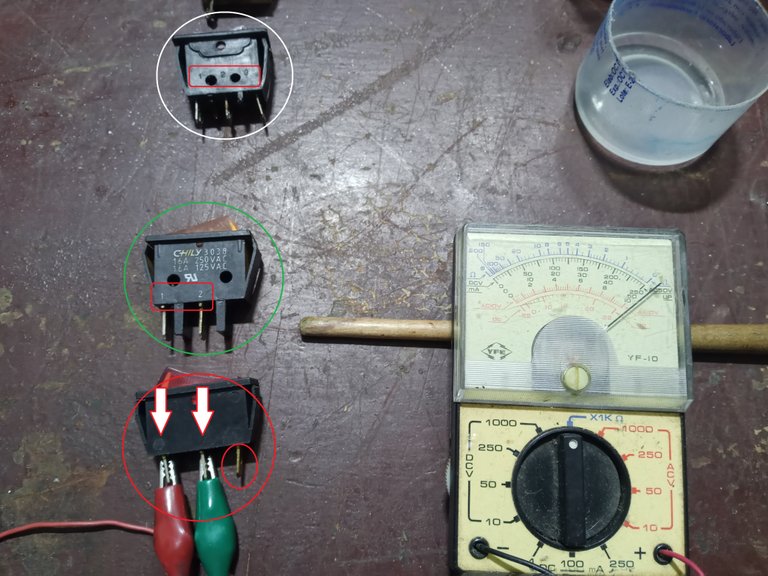
But when you find that what you have in front of you are three-pin switches, without any indication, without markings, all you need is a tester.
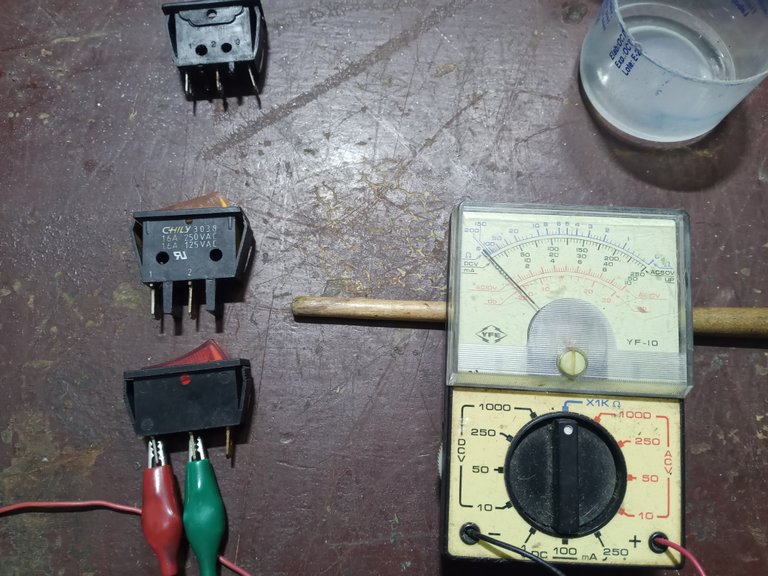
Pin two is always the center one; we're only looking to identify pin one, which is the voltage input L1. Most commonly, pin three, which is the neutral pin N1 and is at the other end of the switch, is a different color. However, on some switches, all the pins are the same color.
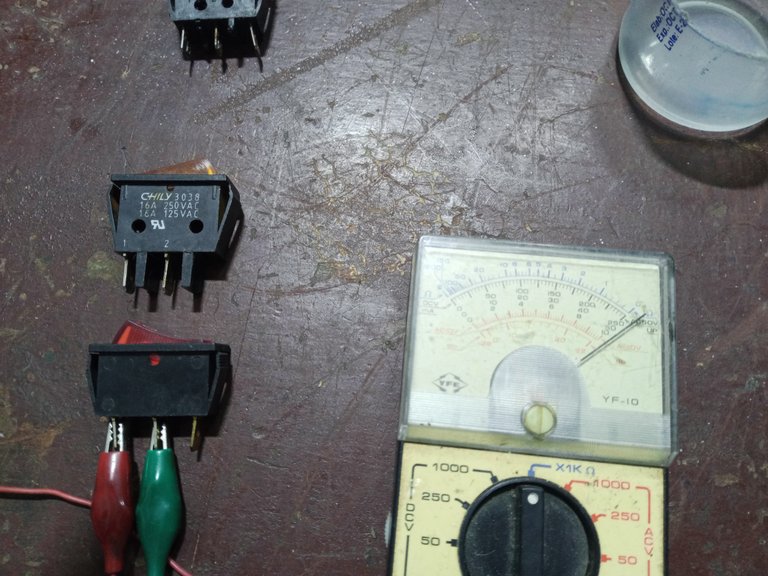
If it toggles on and off, we know we've located pin one, which is voltage input L1.
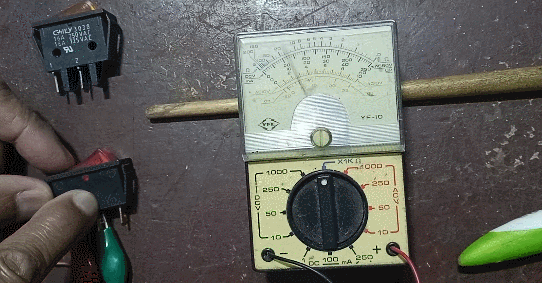
If we want to check the status of the switch's pilot light, we connect the power supply between pin one and pin three.
It's 110 volts, so caution is required to avoid accidents and the appropriate equipment. I use a properly conditioned test lamp for the repairs I perform in the workshop.
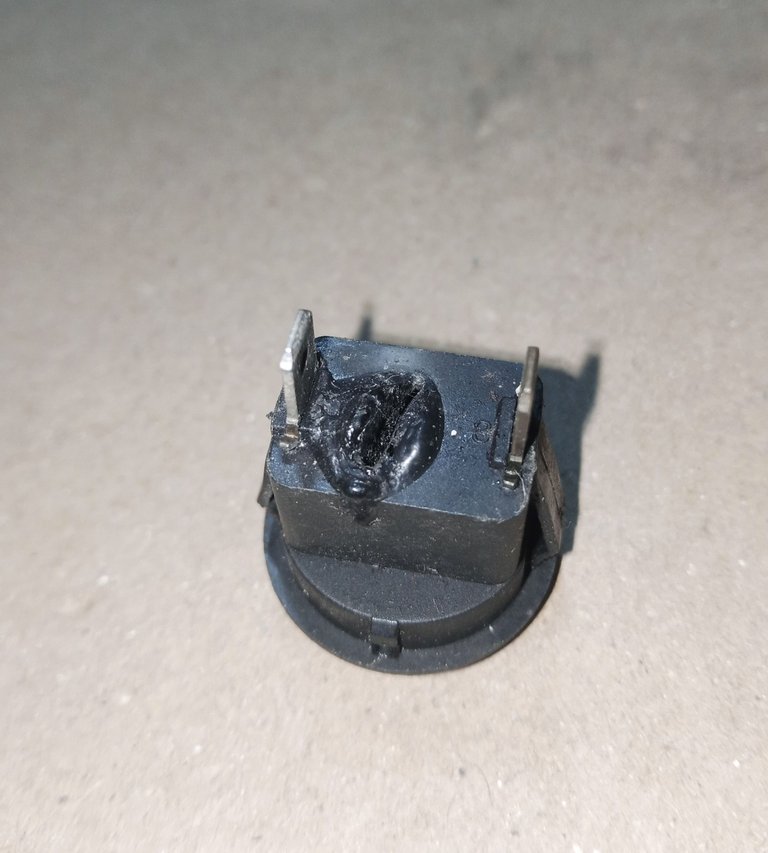
As with everything, you'll always find that the standards aren't always followed. If it's a two-pin switch, you may find switches that don't follow the connection order.
When these switches are damaged, they are generally beyond repair, and since they are so inexpensive in most countries, it is always preferable to replace them.
Sadly, I live in a country where spare parts are absurdly and exaggeratedly expensive, such as the thermostat or heating element on an electric stove costing the same as or more than buying a new electric stove.
So here we have to repair everything that falls into our hands.
But I'm also aware that showing you how to repair these switches would be pretty useless information. So I am satisfied with what has been shown. This was all going to be part of the previous post, but I had to edit it and share it separately, or you would have gotten bored with such a long post.
In any case, we have to take life as best we can; it's the life we're given, and our duty is to see how we move forward in the best way possible.
Thank you so much for stopping by and reading.
Have a great week.
Peace.
- I used Google Translate for the English language.
- I used TextStudio for the Spanish header.
- Unless otherwise noted, the images are screenshots of my workshop work.

Saludos a la comunidad de Hive Diy, espero que estén en la mejor situación que sea posible, estén llenos de buenas ideas y excelente ánimo.
En esta ocasión les comparto una pequeña publicación de lo que les prometí en la presentación anterior, sobre los detalles de los interruptores con una luz piloto y tres conectores.
Estos interruptores tienen una conexión o un pin adicional, que sirve para encender o apagar la luz indicadora, y son comunes en varios artefactos del hogar.
La conexión, aunque no lo parezca, es muy simple, la línea a interrumpir que es L1 se conecta al pin marcado como número 1, la salida del interruptor se conecta al pin número 2, y en el pin número tres se conecta al neutro N1, para que la luz indicadora del interruptor se pueda encender.
Pero cuando te encuentras que lo que tienes ante ti, son interruptores de tres pines, sin ninguna indicación, sin marcas, solo necesitamos ayudarnos con un tester.
El pin número dos siempre es el del centro, solo buscamos identificar el pin número uno, que es la entrada de voltaje L1. Lo más común es que el pin número tres, que es el pin del neutro N1 y está en el otro extremo del interruptor, sea de un color diferente. Aun así, en algunos interruptores todos los pines son del mismo color.
Si se activa y desactiva, sabemos que tenemos ubicado el pin número uno, que es la entrada de voltaje L1.
Si queremos verificar el estado de la luz piloto del interruptor, conectamos la alimentación eléctrica entre el pin número uno y el pin número tres.
Son 110 volts, se requiere de precaución para evitar accidentes y el equipo apropiado, yo uso una lámparas de pruebas debidamente acondicionada para las reparaciones que realizo en el taller.
Como en todo, siempre van a encontrar que las normas no se cumplen siempre, si es un interruptor de solo dos pines, pueden encontrar interruptores en que no se respeta el orden de conexión.
Estos interruptores cuando se dañan, por lo general no tienen reparación y como son tan económicos en la mayoría de los países, es preferible siempre cambiarlos.
Tristemente, yo vivo en un país en que los repuestos tienen un costo absurdo y exagerado, como por ejemplo: que una llave o una resistencia de una cocina eléctrica, cuesta lo mismo o más caro que comprar una cocina eléctrica nueva.
Así que aquí nos toca reparar todo lo que caiga en nuestras manos.
Pero también estoy consciente de que enseñar como se reparan estos interruptores, les resultaría una información bastante inútil. Por lo que ya con lo mostrado quedo conforme. Todo esto iba a ser parte de la publicación anterior, pero he tenido que editarla y compartirla aparte, o se habrían aburrido con un trabajo tan largo.
En todo caso, hay que tomarse la vida lo mejor que sea posible, es la vida que nos tocó y nuestro deber es ver como salimos adelante de la mejor manera a nuestro alcance.
Muchas gracias por pasar y leerme.
Que tengan una excelente semana.
Paz.
- He usado el traductor de Google para el idioma inglés.
- Use el programa de TextStudio para el encabezado en español.
- Las imágenes a menos que lo indique son capturas de mi trabajo en el taller.
Es un tema breve, pero da para bastante explicación.
Te quedaron bien los GIF para que el post sea más claro.
!BBH !LUV !ALIVE !PIZZA

$PIZZA slices delivered:
@pedrobrito2004(1/5) tipped @soltecno
Come get MOONed!
This post has been manually curated by @bhattg from Indiaunited community. Join us on our Discord Server.
Do you know that you can earn a passive income by delegating to @indiaunited. We share more than 100 % of the curation rewards with the delegators in the form of IUC tokens. HP delegators and IUC token holders also get upto 20% additional vote weight.
Here are some handy links for delegations: 100HP, 250HP, 500HP, 1000HP.
100% of the rewards from this comment goes to the curator for their manual curation efforts. Please encourage the curator @bhattg by upvoting this comment and support the community by voting the posts made by @indiaunited.
Thank you so much, my friend @bhattg, and thanks to the @indiaunited community for the support.
I hope you are in good health and have a great week.
Many thanks to our friend @bhattg and the @hivepakistan community for their support.
I hope you have a great week.
Congratulations @soltecno! You have completed the following achievement on the Hive blockchain And have been rewarded with New badge(s)
Your next target is to reach 250 posts.
You can view your badges on your board and compare yourself to others in the Ranking
If you no longer want to receive notifications, reply to this comment with the word
STOP200 posts, Wow! That's really great.
Thank you so much for stopping by and letting me know. Every time I read you, you always have something good to share.
Have a great month and excellent health.
You're welcome @soltecno! Have a nice day 😊👍
!BEER
Saludos, muchas gracias por pasar.
Que estén bien y con salud.
View or trade
BEER.Hey @soltecno, here is a little bit of
BEERfrom @nupulse for you. Enjoy it!Learn how to earn FREE BEER each day by staking your
BEER.View or trade
BEER.Hey @soltecno, here is a little bit of
BEERfrom @nupulse for you. Enjoy it!Learn how to earn FREE BEER each day by staking your
BEER.Amigo mío, siento que te tengo super abandonado pero mis proyectos no me están dejando ni un poco de tiempo para Hive. No siempre es necesario explicar todo a detalle, entiendo que quieres compartir lo que haces pero si no estas en tema o trabajas de esto puede ser información muy especifica jajaja pero de todas formas se aprecia y se aprende.
No pasa nada amigo, cuando puedas será bien, espero que estés cosechando progresos en tus asuntos.
Me ha pasado que las personas, por lo general, no entienden como conectar ese interruptor y el resto del aparato está bien.
No puedo explicar demasiado, ya que sería información inútil en otros países.
Gracias por leerme y dejar un comentario.
Yo viendo el gif :) Mi amigo aprendio a generar movimientos en su blog.
Estos swichs de ahora se dañan con mucha facilidad, ni hablar de los pulsadores para computadoras.. me ha tocado reemplazarlos, pero repararlos??? esto es otro nivel, me encantaron tus recomendaciones y aprender de ello.
Estoy como un niño con las animaciones, espere usted a que yo aprenda a hacer uso del programa gráfico.
Gracias siempre por el apoyo, por leerme y comentar.
Que tenga un buen final de semana.