Modifying my gaming mouse. [Eng+Spa]
Greetings to the Hive DIY community. I hope you're having a great week. I'm continuing to improve my health and catch up on the workshop.
All of us who have a hobby we passionately enjoy end up modifying or creating our own gear tailored to our particular play style.
Some gamers create their own keyboards for fighting games, while others have created mice to use with their feet (for players missing a limb).
A common modification for FPS games years ago was to add a button parallel to the mouse's trigger button, connected to a 555 chipset.
This allowed for increased firepower, literally emptying the magazine with a single mouse click. It doesn't count as software cheating, as it was a hardware modification and was undetectable by software. (muajajaja)
Nowadays, it's common for gaming mice to have this feature. Although certain operating limits are respected, some games already detect abnormal hardware changes and can penalize you.
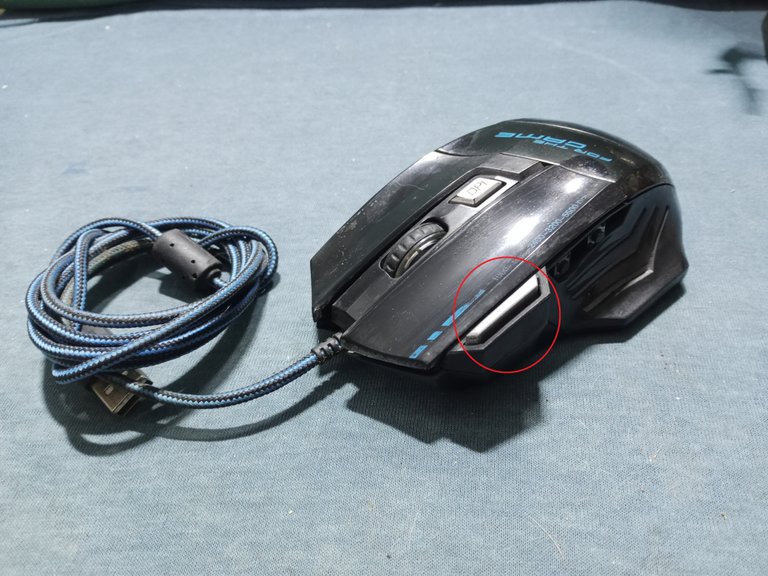
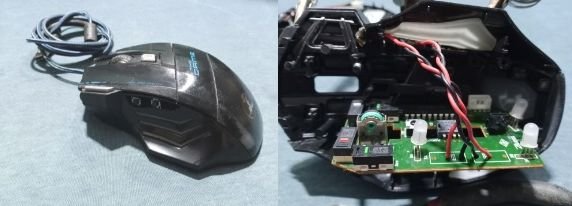
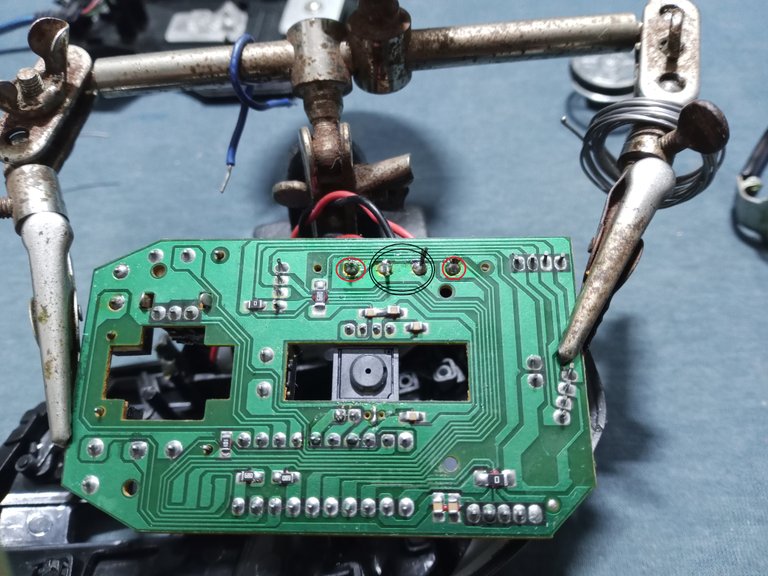
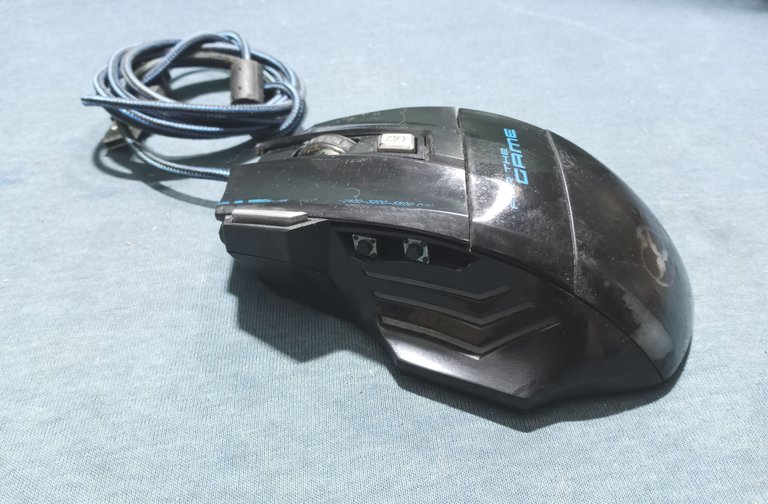
In my case, I've been repairing and modifying my gaming mouse. To be honest, I'm quite satisfied with the performance of this mouse model. My only issue was with the factory-installed side buttons.
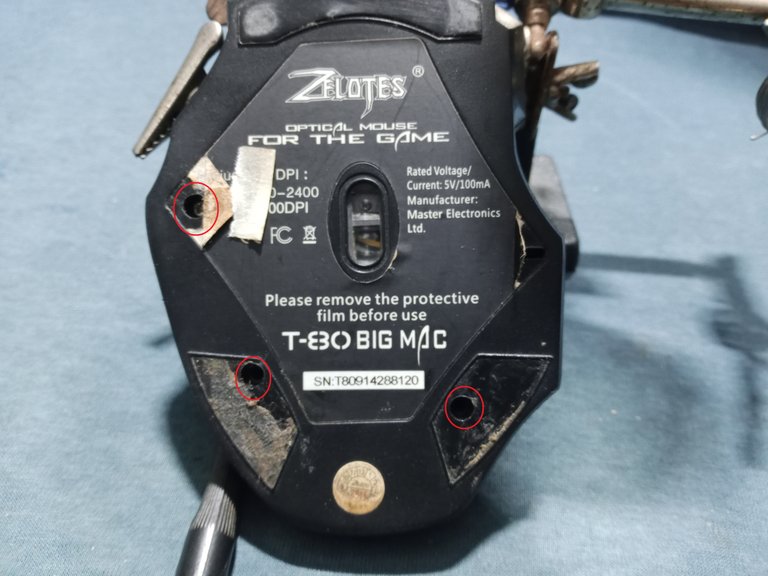
When you take this model apart, the screws are hidden under two of the plastic pads and on one side of the label.
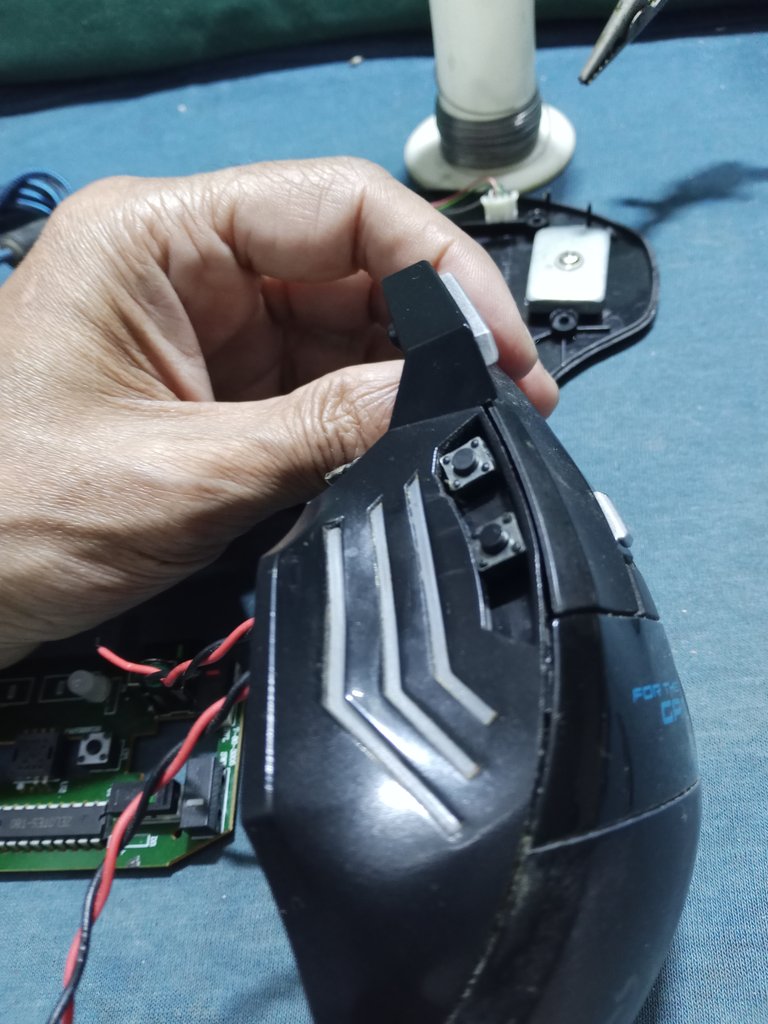
The two side buttons that came with the mouse from the factory were once activated by plastic levers that ran from the mouse's plastic cover to the printed circuit board. Over time, the levers became deformed or broke.
I replaced the original buttons with more robust ones and placed them directly on the mouse housing.
I removed the buttons that connected to the plastic extension levers on the circuit board and replaced them with the pushbuttons. I cut a piece of black plastic from a VHS tape cartridge case to fit it into the internal guide where the levers were previously secured.
Using the factory-installed guide slot, I secured the plastic support and made it firm enough to hold the buttons.
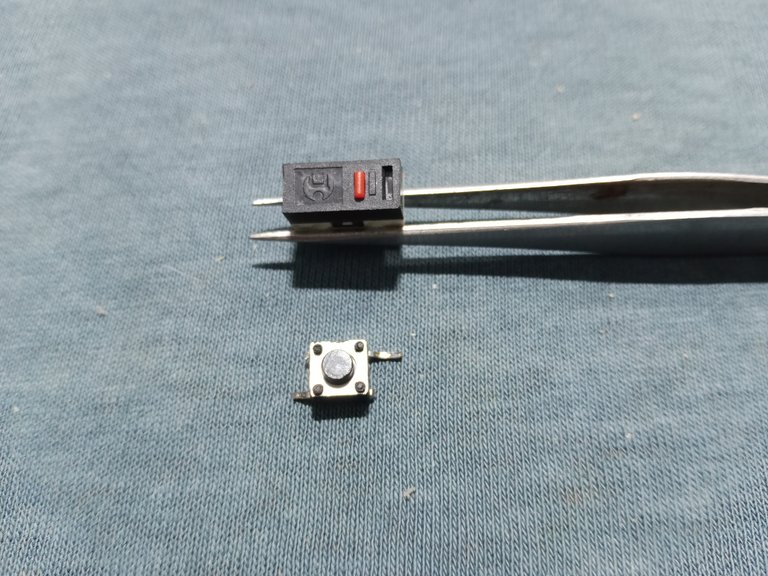
Connecting the pushbuttons is quite simple. The two side pins are the normally open contacts; pressing the button will activate the signal.
We can use the other two side pins to help hold the pushbuttons to the backing plate, or you can cut them off. The pushbutton will still be secured with silicone or epoxy glue.
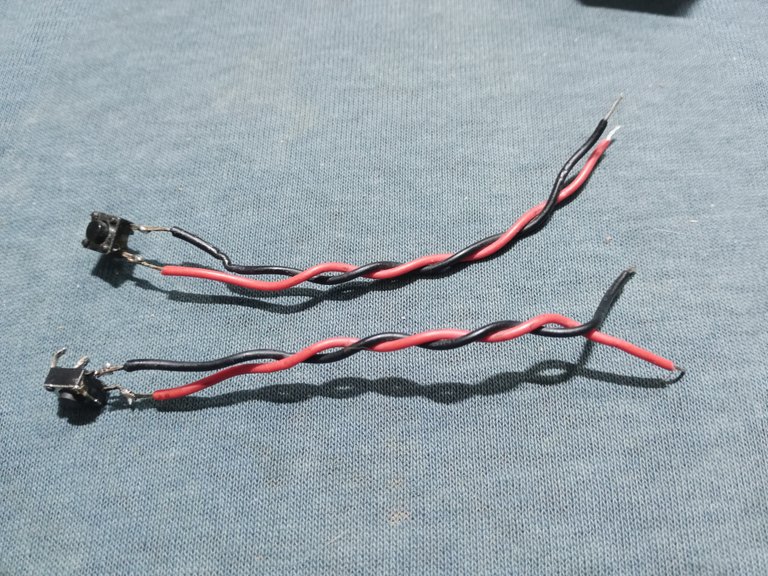
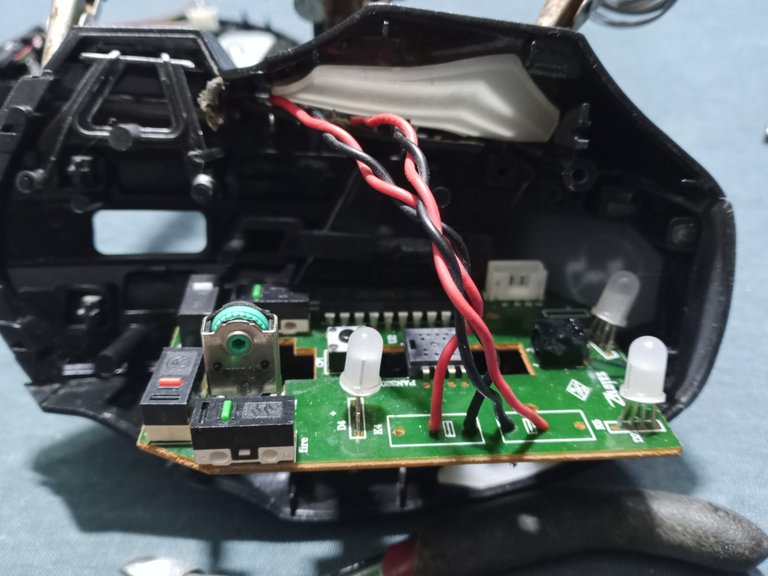
The black wires go to a common connection on the PCB, and the red wires are soldered to the circuit's independent signal.
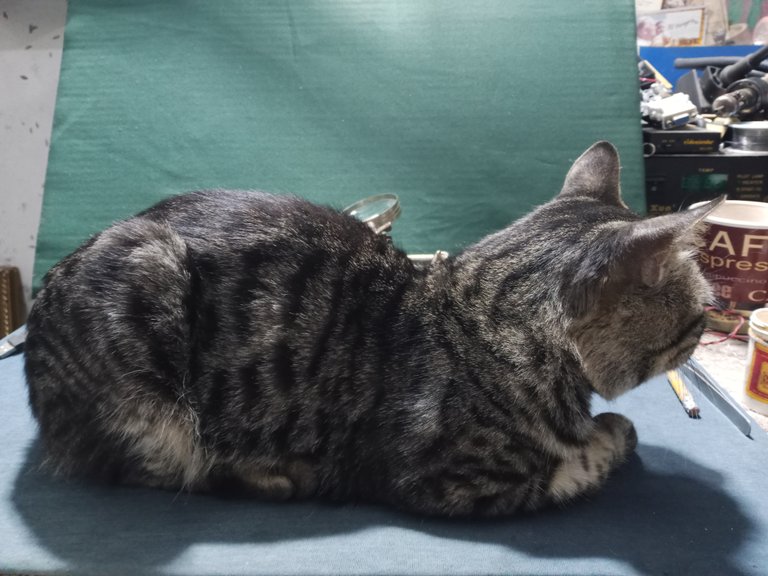
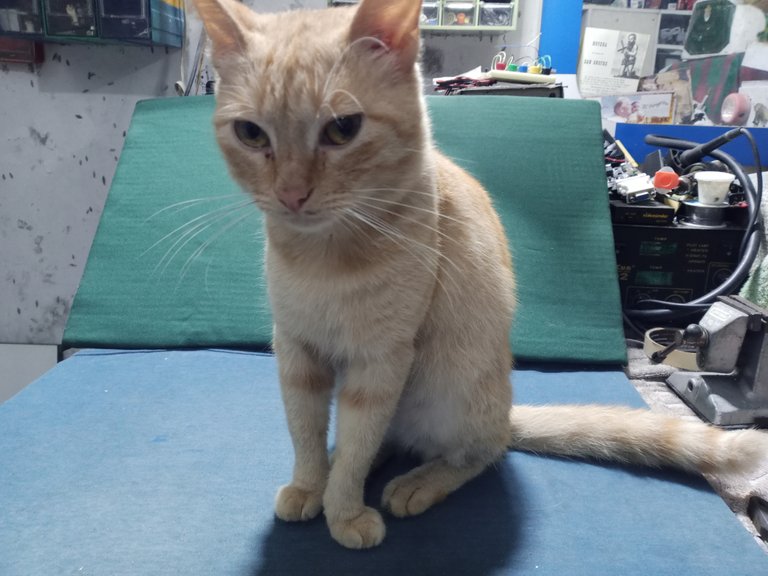
I just slipped up and boom, the production manager showed up for an ear-scratching inspection.
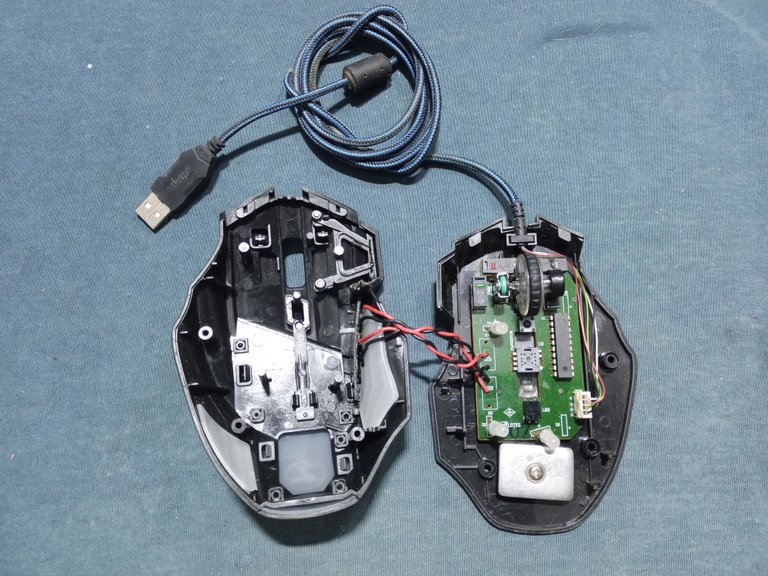
A view before assembling the mouse with the button layout.
At some point, I lost sight of the plastic pads that cover the screws. I need to make some that work properly.
In the meantime, I'll use masking tape, or as we colloquially call it around here, "tirro."
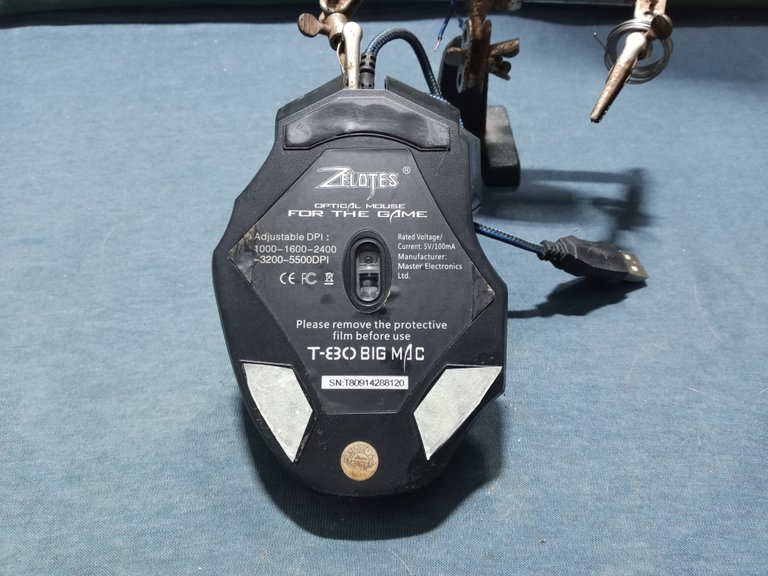
Finally, I cleaned it up a bit, polished it with wax, and I'm happy with it.
Thank you so much for stopping by.
Have a great week.
Peace.
- I used Google Translate for the English language.
- I used TextStudio for the Spanish header.
- Unless otherwise noted, the images are screenshots of my workshop work.

Saludos, a la comunidad de Hive Diy, espero que estén teniendo una semana genial, sigo recuperando la salud y poniéndome al día con el taller.
Todos los que tenemos un pasatiempo que disfrutamos con pasión terminamos por modificar o crear nuestro equipos adaptados según nuestro estilo particular de juego.
Algunos jugadores crean su propio teclado para juegos de lucha, otros han creado ratones para usar con los pies (para jugadores sin alguna extremidad)
Una modificación que se solía hacer años atrás para juegos FPS, era agregar un botón en paralelo al botón de disparo del ratón conectado a un circuito con un circuito integrado 555.
Con esto se lograba multiplicar el disparo, literalmente vaciabas el cargador con un solo clic del ratón. No cuenta como trampa de software, ya que era una modificación del hardware, era indetectable por software. (muajajaja)
Hoy día es normal que los ratones de juego ya traigan esa característica, aunque se respetan ciertos límites de funcionamiento, algunos juegos ya detectan alteraciones anormales del hardware y te pueden sancionar.
En mi caso he ido reparando y modificando mi ratón de juego, para ser franco estoy bastante conforme con las prestaciones de este modelo de ratón, mi único problema era con los botones laterales que trae de fábrica.
Cuando desarmas este modelo, tiene oculto los tornillos bajo dos de las almohadillas plásticas y en un lateral de la etiqueta.
Los dos botones laterales que traía el ratón de fábrica, eran en su tiempo activados por palancas plásticas que iban de la cubierta plástica del ratón hasta la placa del circuito impreso. Con el tiempo las palancas se deformaban o se rompían.
Yo he reemplazado los botones originales por unos botones que son más robustos y los he colocado directamente en la carcasa del ratón.
Retire los botones que conectaban con las palancas de extensión plásticas hasta la placa de circuitos y en su lugar coloque los pulsadores, corte un trozo de plástico negro de una caja de cartucho de cinta para VHS, para colocarlo en la guía interna, en donde antes se aseguraban las palancas.
Con la ranura de guía que ya traía de fábrica, hice que el plástico de soporte quedara asegurado y le diera firmeza para sostener los botones.
La conexión de los pulsadores es bastante sencilla, los dos pines laterales son el contacto normalmente abierto, al pulsar el botón activaremos la señal.
Podemos usar los otros dos pines laterales para ayudar a sostener los pulsadores en la placa de soporte o puedes cortarlos, igual se terminará de fijar el pulsador con silicona o con pegamento epoxi.
Los cables negros van a una conexión común de la placa impresa y los cables rojos van soldados a la señal independiente del circuito.
Solo tuve un descuido y zas, el gerente de producción se presentó para una inspección de rascar orejas.
Una vista antes de armar el ratón con el arreglo de los botones.
En algún momento perdí de vista las almohadillas plásticas que cubren los tornillos, tengo que fabricar unas que funcionen bien.
Mientras usaré cinta de enmascarar o como le llamamos coloquialmente por aquí "tirro".
Finalmente, le hice algo de limpieza, lo pulí con cera y me quedo conforme.
Muchas gracias por pasar a leerme.
Que tengan una excelente semana.
Paz.
- He usado el traductor de Google para el idioma inglés.
- Use el programa de TextStudio para el encabezado en español.
- Las imágenes a menos que lo indique son capturas de mi trabajo en el taller.
This post has been manually curated by @bhattg from Indiaunited community. Join us on our Discord Server.
Do you know that you can earn a passive income by delegating to @indiaunited. We share more than 100 % of the curation rewards with the delegators in the form of IUC tokens. HP delegators and IUC token holders also get upto 20% additional vote weight.
Here are some handy links for delegations: 100HP, 250HP, 500HP, 1000HP.
100% of the rewards from this comment goes to the curator for their manual curation efforts. Please encourage the curator @bhattg by upvoting this comment and support the community by voting the posts made by @indiaunited.
Grateful for the support of my friend @bhattg and the @indiaunited community.
I hope you have a peaceful and productive week.
Trabajo de reparación o adaptación interesante.
Por cierto, eso del gato que salta a la mesa donde hay un ratón, suena normal, si no fuera porque se trata de otro tipo de ratón, y lo que este gato bandido quiere es que le rasquen la oreja 😅
Y luego, pensando que de seguro si te trasnochas jugando, el gato igual te despertará en la madrugada al estilo del de abajo:

!BBH !LUV !ALIVE !PIZZA
Si es que en la madrugada les da por llamar para algo: salir, tomar agua o comer en plena madrugada.
Cuando uno quiere dormir, el gato se pone en estilo fiebre del sábado por la noche.
$PIZZA slices delivered:
@pedrobrito2004(1/5) tipped @soltecno
Come get MOONed!
Como siempre nos dejas un excelente trabajo muy útil para poder arreglar las cosas por nosotros mismos, y tratar de abaratar los costos en estos tiempos de crisis.
Ya veo que tenemos un asistente igual, nos apoya bastante en el trabajo, jajajajja...
!discovery 35
Muchas gracias por leerme y comentar, en realidad son dos los gerentes de supervisión y son muy estrictos.
Y la gata del vecino se mudó y no tiene intenciones de irse.
Espero que tenga usted una excelente semana.
This post was shared and voted inside the discord by the curators team of discovery-it
Join our Community and follow our Curation Trail
Discovery-it is also a Witness, vote for us here
Delegate to us for passive income. Check our 80% fee-back Program
Thanks to the @Discovery-it community for supporting my post, it's greatly appreciated.
I hope you have a great week.
Thanks as always for leaving us more useful tutorials so we can try to solve things at home with electronic devices by ourselves.
selected by @dayadam
The value of knowledge is in sharing it. I'm simply sharing my humble contribution, with the best of intentions.
Thank you so much for the support to the curator @dayadam and the @diyhub community.
Thank you so much for your trust and support of the @innerblocks community.
Have a very creative and productive week.
Congratulations @soltecno! You have completed the following achievement on the Hive blockchain And have been rewarded with New badge(s)
Your next payout target is 4000 HP.
The unit is Hive Power equivalent because post and comment rewards can be split into HP and HBD
You can view your badges on your board and compare yourself to others in the Ranking
If you no longer want to receive notifications, reply to this comment with the word
STOPAs always, it's a pleasure to greet you. I hope you continue your good work.
Take care of yourselves and have a great week.
Have a great week too @soltecno
What a good mention of the players with different abilities, it is amazing how they prepare themselves to still enjoy their games and do it in an excellent way.
It's like when people modified cars and customized them to their liking. People even made their own fuel mixtures and made custom parts.
In the game, you can find players who make a multitude of modifications, modifications, and some even create their own peripherals.
Thanks so much for stopping by and commenting, friend @nitsuga12
Es como cuando las personas modificaban los autos y los preparaban según su gusto, incluso las personas hacían sus propias mezclas de combustible y fabricaban partes personalizadas.
En los jugadores puedes encontrar quienes hacen multitud de adaptaciones, modificaciones e incluso algunos crean sus propios periféricos.
Muchas gracias por pasar y comentar amigo @nitsuga12
!BBH
Greetings, thank you very much for the support.
Muy buen trabajo!
Amigo, gracias por pasar y leerme.