Aiwa 43" Smart TV with stripes, first aid [Eng+Spa]
Greetings to the Hive DIY community, hoping you have a great week with lots of enthusiasm and excellent ideas in your projects.
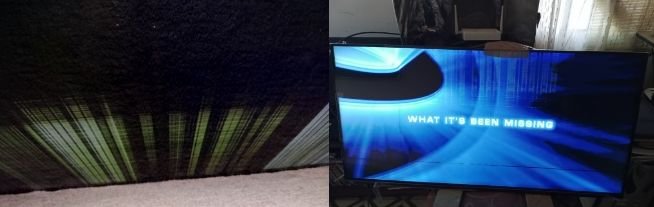
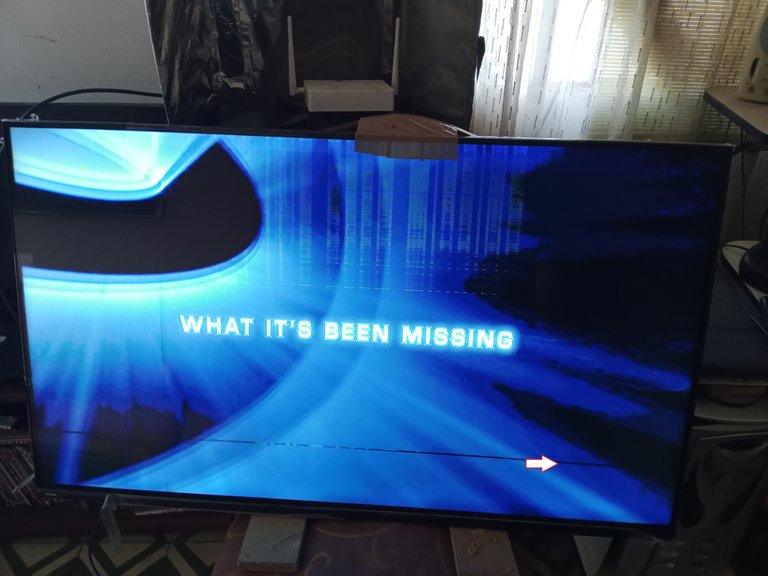
On this occasion I share with you how to do first aid in a very simple way to a TV that only has horizontal lines on the screen.

This is a TV that came to my workshop for recycling, with image failures, without the bases to stand it up and without the remote control.
The TV has a crack on one side of the screen, this also causes a type of failure in the images.

This failure of stripes on the screen is common when there is damage to the T-Con card, which is the card that controls the image on the screen and is directly connected to one of the edges of the screen.
It's a 43" Aiwa TV that costs between $200 and $300, it's worth it, so I check and try to repair it.
Access to the electronic boards is easy on this TV model, I just remove the screws from the back cover and I have all the electronic parts in sight.

The green board where the voltage input is connected (it's the one with the big black capacitor and the yellow transformer) is the power supply board.
There are TV models that have the voltage source separate from the TV, so the power source is outside the TV, that's why you have to be sure before applying voltage to the TV: that TV model is on the work table.
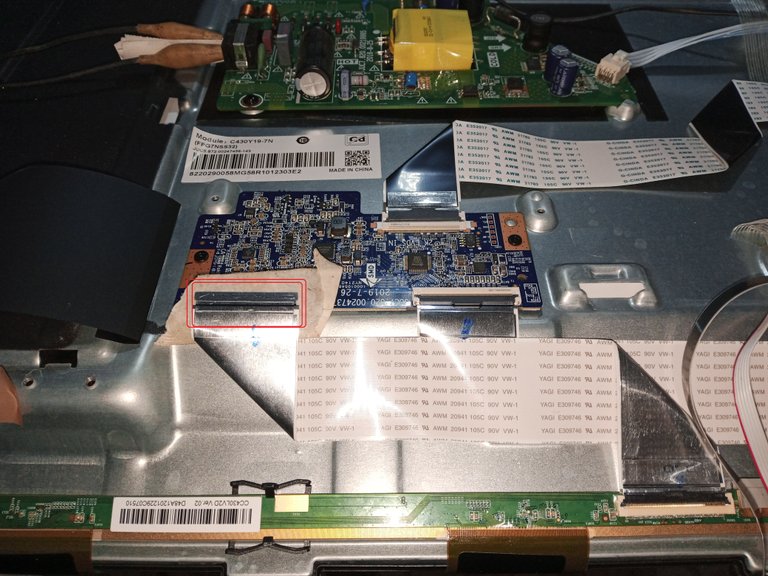
The fault that concerns us on this occasion is a common fault when the T-Con card is damaged, it is the card in the red highlighted box that is connected to the screen with two white flat flex type cables.
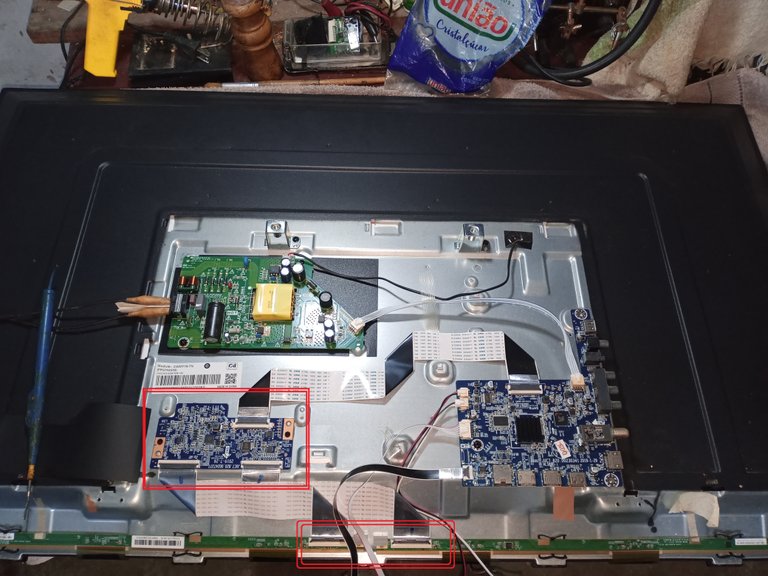
The left flex cable controls the left side of the screen, and the right flex cable controls the right side of the screen, it is like that because of the size of the screen.
On smaller TV models, the T-Con board only has one flex cable to control the screen image.
On other TV models, the T-Con board is integrated into the screen and is a little more complicated to repair.
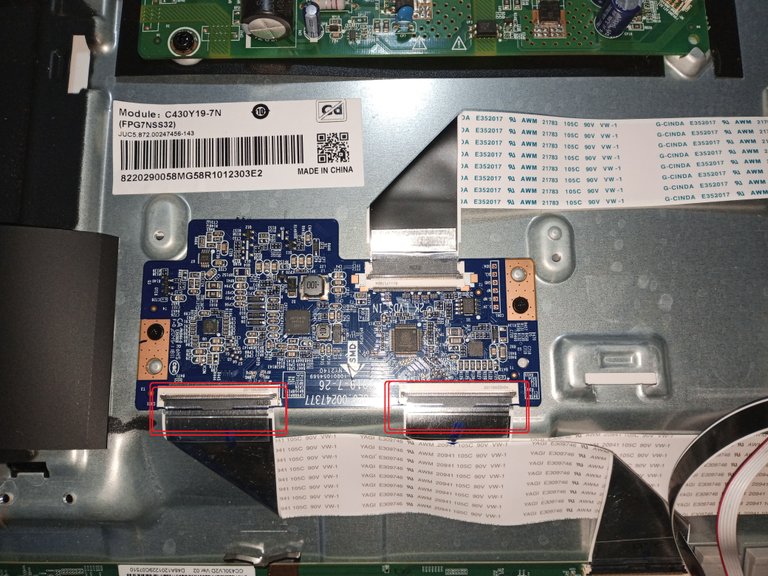
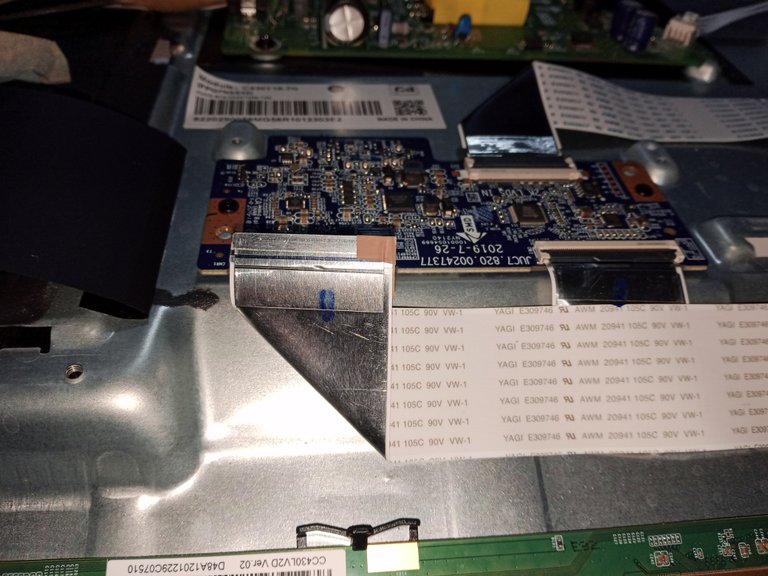
A simple trick is with the TV disconnected from the power source and turned off, we lift the brown tab that holds one of the white flex cables and remove it from the connector.
I usually cover the end of the cable with tape to avoid accidents and leaving only one of the T-Con flex cables, connect the TV to the electricity and turn it on.
Fortunately I lifted the left cable first to test it and when I checked I managed to get a good image on the screen, so this left output of the T-Con card is the one that has the fault.
Now the trick or fix to make the TV work while I get to buy the replacement or while I repair another card and replace the damaged T-Con, is to cancel a part of the flex cable output on the side that has the fault (in this case it is the cable on the left side).
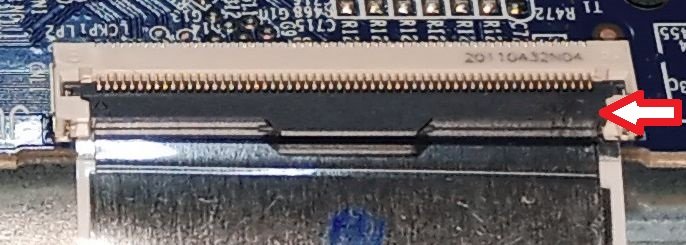
Sometimes it is as simple as: disconnect the TV from the power source, count 12 pins of the flex cable on the side that is failing, starting from the end on the right side, cover with adhesive tape and connect the flex cable, secure it with the brown pressure tab and verify that there is a good signal on the screen.
On this occasion, in particular, the fault was on the left side of the flex cable output, I had to count the 12 pins of the cable on the left side to do the test and verify that the TV displayed the image on the screen correctly.

So we can keep using the TV while we get the replacement or repair the T-Con board.
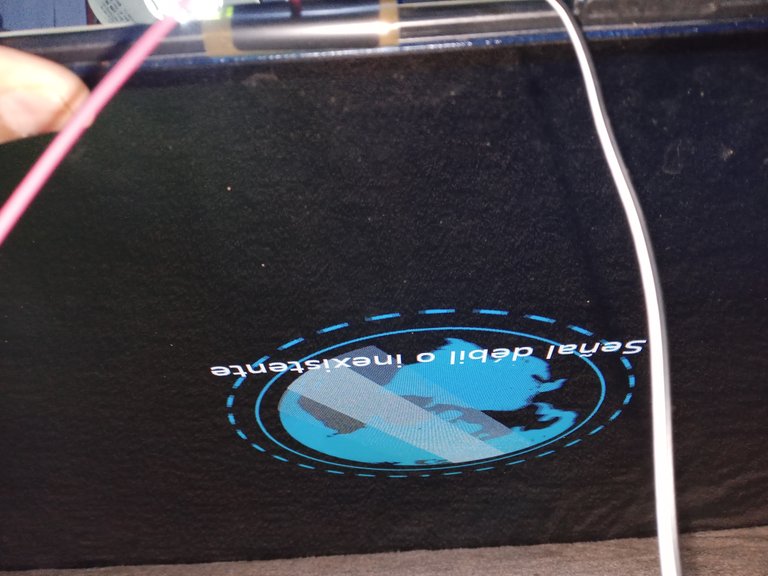
The black line in the image is from the break at the edge of the screen.
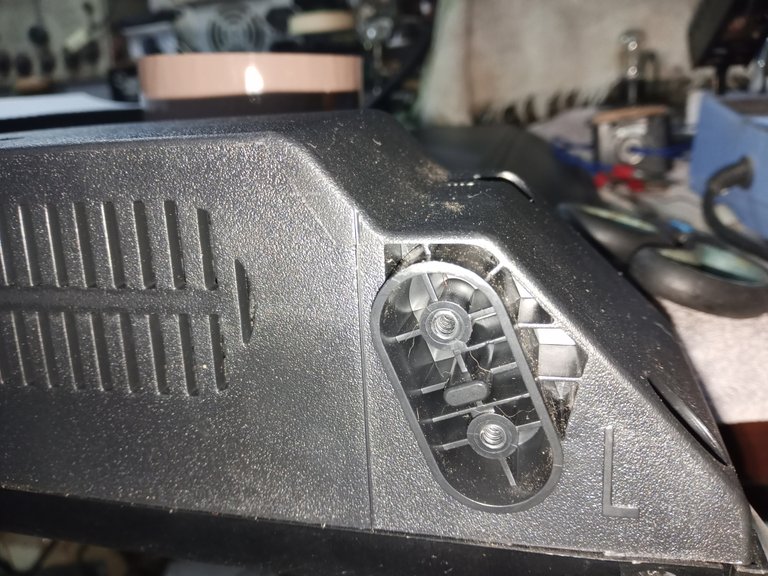
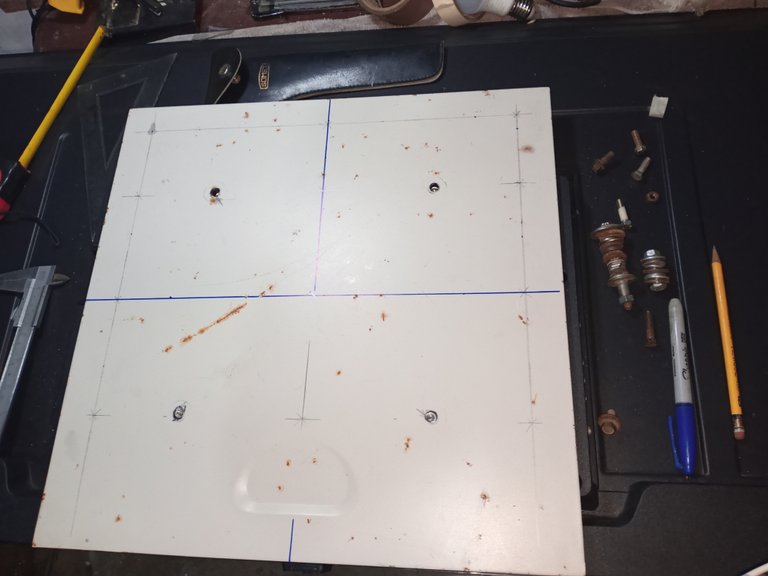
Since the TV doesn't have the bases to keep it upright, I'm making a stand to hang it on a wall, using an old computer case cover that I recycled a while ago and had in my storage.
The supervisor fell asleep from overwork.

Thank you very much for stopping by and reading me.
Have a great week.
Peace.
- I used Google Translate for the English language.
- The images unless indicated are screenshots of work in my workshop.
- I used TextStudio for the decorative banner in Spanish.

Saludos a la comunidad de Hive DIY, deseando que tengan una excelente semana con mucho entusiasmo y excelentes ideas en sus proyectos.
En esta ocasión les comparto como hacer los primeros auxilios de manera muy sencilla a un TV que solo presenta rayas horizontales en la pantalla.
Este es un TV que llego a mi taller para reciclaje, con fallas de imagen, sin las bases para ponerlo en pie y sin el control remoto.
El TV tiene un golpe con rotura en un lado de la pantalla, esto también causa un tipo de falla en las imágenes.
Esta falla de rayas en la pantalla, es común cuando hay un daño en la tarjeta de T-Con, que es la tarjeta que controla la imagen en la pantalla y está conectada directamente a uno de los bordes de la pantalla.
Es un TV Aiwa de 43" con un costo de entre 200 $ y 300 $, vale mucho la pena, así que reviso y trato de repararlo.
El acceso a las tarjetas electrónicas es sencillo en este modelo de TV, apenas retiro los tornillos de la cubierta trasera y tengo todas la partes electrónica a la vista.
La tarjeta verde a donde se conecta la entrada de voltaje (es la que tiene el capacitor negro grande y el transformador amarillo) es la tarjeta de la fuente de poder.
Hay modelos de TV que tienen la fuente de voltaje separada del TV, en sí que la fuente de poder está fuera del TV, por eso hay que estar seguro antes de aplicar voltaje al TV: que modelo de TV se tiene en la mesa de trabajo.
La falla que nos ocupa en esta ocasión es una falla común cuando la tarjeta de T-Con está dañada, es la tarjeta en el recuadro resaltado en rojo que está conectada a la pantalla con dos cables planos blancos de tipo flex.
El cable flex de la izquierda controla el lado izquierdo de la pantalla, y el cable flex derecho controla el lado derecho de la pantalla, es así por el tamaño de la pantalla.
En modelos de TV más pequeños, la tarjeta de T-Con solo tiene un cable flex para controlar la imagen de la pantalla.
En otros modelos de TV, la tarjeta de T-Con está integrada a la pantalla y es un poco más complicado la reparación.
Un truco sencillo es con el TV desconectado de la fuente de electricidad y apagado, levantamos la pestaña marrón que sostiene uno de los cables blancos flex y lo retiramos del conector.
Yo acostumbro a cubrir la punta del cable con cinta para evitar accidentes y dejando solo uno de los cables flex de la T-Con, conectar el TV a la electricidad y encenderlo.
Por fortuna levanté primero el cable de la izquierda para hacer la prueba y al verificar logré tener una buena imagen en la pantalla, así que esta salida izquierda de la tarjeta de T-Con es la que presenta la falla.
Ahora el truco o el apaño para hacer funcionar el TV mientras consigo comprar el repuesto o mientras reparo otra tarjeta y reemplazo la T-Con dañada, es anular una parte de la salida del cable flex del lado que presente la falla (en este caso es el cable del lado izquierdo).
En algunas ocasiones es tan simple como: desconectar el TV de la fuente de electricidad, contar 12 pines del cable flex del lado que está fallando, a partir del extremo del lado derecho, cubrir con cinta adhesiva y conectar el cable flex, asegurarlo con la pestaña marrón de presión y verificar que haya una buena señal en la pantalla.
En esta ocasión, en particular, la falla estaba al lado izquierdo de la salida del cable flex, tuve que contar los 12 pines del cable del lado izquierdo para hacer la prueba y verificar que el TV presentara bien la imagen en la pantalla.
Así podemos seguir usando el TV mientras conseguimos el repuesto o reparamos la tarjeta de T-Con.
La línea negra en la imagen es por la rotura en el borde de la pantalla.
Como el TV no tiene las bases para mantenerlo en pie, estoy haciendo un soporte para colgarlo en una pared, usando una tapa de case de computador antiguo que recicle hace un tiempo y tenía guardado en mí deposito.
El supervisor se quedó dormido por el exceso de trabajo.
Muchas gracias por pasar y leerme.
Que tengan una excelente semana.
Paz.
- He usado el traductor de Google para el idioma inglés.
- Las imágenes a menos que se indique son capturas de trabajo en mi taller.
- He usado TextStudio para el banner decorativo en español.
Es interesante todo el proceso. No sabía en realidad que se podía hacer unos ‘primeros auxilios’ mientras se compra una nueva tarjeta.
Es muy bueno que este modelo tuviera fácil acceso a sus componentes, porque recuerdo algunos equipos que pareciera que el diseñador odiara a los técnicos de reparación y mantenimiento, y les hiciera un diseño de circuitería que es un infierno para reparar.
Fue gracioso lo del gato :)
!ALIVE !LUV !BBH
@soltecno, @pedrobrito2004(1/4) sent you LUV. | tools | discord | community | HiveWiki | <>< daily
Hay monitores en que hay que desmontar absolutamente todo para hacer una revisión simple, agradezco mucho cuando es algo más simple para poder revisar.
Hola hermano, también he tenido es tipo de fallas y la solución ha sido la cinta adhesiva jjj, gracias a eso se ha podido recuperar desde el más allá unos cuantos TV ,a veces encontrar los repuestos es algo difícil, por lo menos acá en mi país. Saludos hermano
Saludos, muchas gracias por comentar, le cuento que conseguí la T-Con en 30 $, pero usada por lo que no puedo garantizar la duración con seguridad.
Por aquí tampoco es fácil con los repuestos o las herramientas, cuando los consigues en la mayoría de los casos te cobran tres a cuatro veces el precio.
Es como una solución para usar el TV mientras resuelven la reparación.
Que tengas una excelente semana.
Si esas piezas no son fáciles de conseguir, pero bueno e hombre está andando eso cuenta jj. Saludos
This post has been manually curated by @bhattg from Indiaunited community. Join us on our Discord Server.
Do you know that you can earn a passive income by delegating to @indiaunited. We share more than 100 % of the curation rewards with the delegators in the form of IUC tokens. HP delegators and IUC token holders also get upto 20% additional vote weight.
Here are some handy links for delegations: 100HP, 250HP, 500HP, 1000HP.
100% of the rewards from this comment goes to the curator for their manual curation efforts. Please encourage the curator @bhattg by upvoting this comment and support the community by voting the posts made by @indiaunited.
Very grateful for the support of friend @bhattg and the @indiaunited community.
I hope you have a great week.
Lo peor que le puede pasar a uno es que se le presenten esas líneas en el televisor. Me sorprendió bastante la sencillez de armado y dispositivos que tiene dentro, hasta casi que me sentí decepcionado de que hayan tan pocas cosas dentro ajajaja
Pd: ese supervisor no se gano la cena, así que para mi no deberia comer jajaja
En comparación con la cantidad de tarjetas y componentes que tenía un TV de TRC convencional, estos TV me resultan más cómodos para trabajar.
Algunos de estos TV tienen solo unas dos o tres tarjetas pequeñas.
Muchas gracias por leerme y comentar.
Congratulations @soltecno! You have completed the following achievement on the Hive blockchain And have been rewarded with New badge(s)
Your next target is to reach 17000 upvotes.
You can view your badges on your board and compare yourself to others in the Ranking
If you no longer want to receive notifications, reply to this comment with the word
STOPCheck out our last posts:
Greetings, thank you very much for stopping by and letting me know.
I hope you have a great March.
You're welcome @soltecno. Looking forward to you reaching your next target 😅