Nuevo Bloc Nuevas Ideas (🇪🇸 | 🇺🇸)
FULL ENGLISH VERSION

Hey beautiful people of #HiveDIY! Guess who ran out of sketch paper? Since I don't have any more cardstock sheets in my old pad, I decided to find something else to keep drawing on. I stumbled upon this little notebook/planner from a local company where I live, and it comes with graph paper! So, I'll keep sharing more of my geometric art creations with you all.

𝐒𝐭𝐞𝐩-𝐛𝐲-𝐒𝐭𝐞𝐩
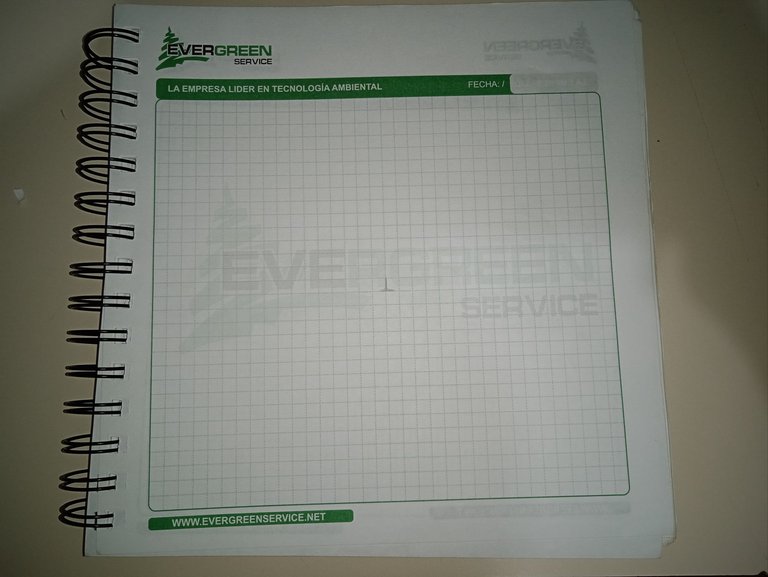
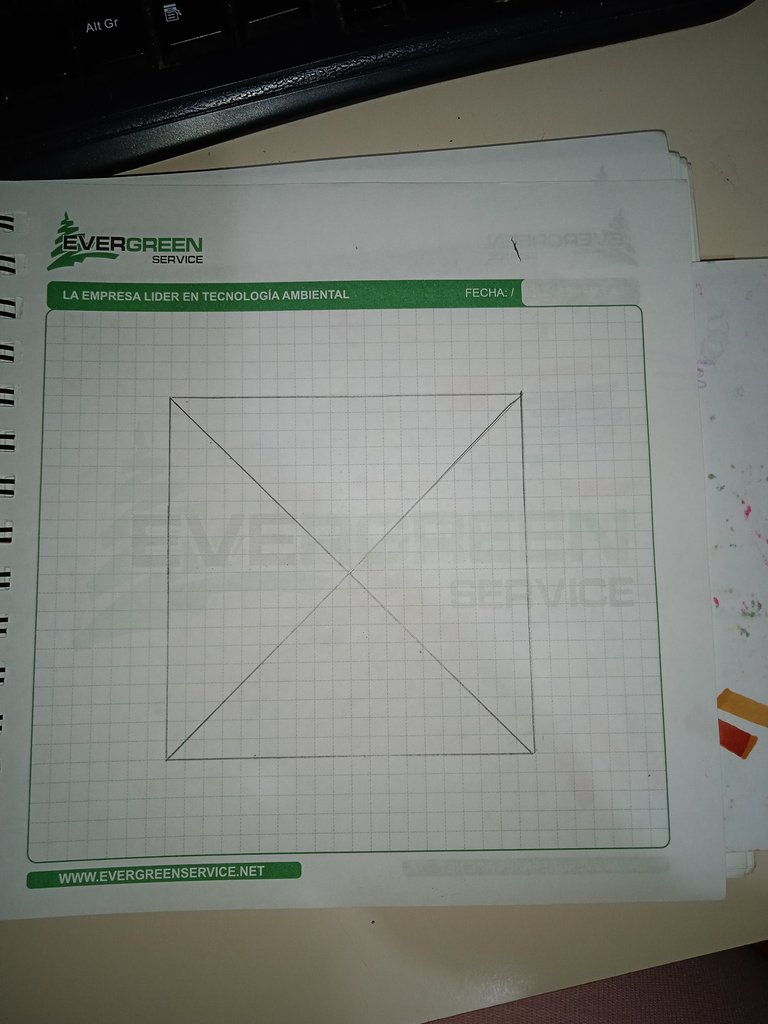
You can see the page grid more clearly here. The first thing I did was find the center of the page; that's where I'd start creating my design, counting the lines to know how far the drawing would go.
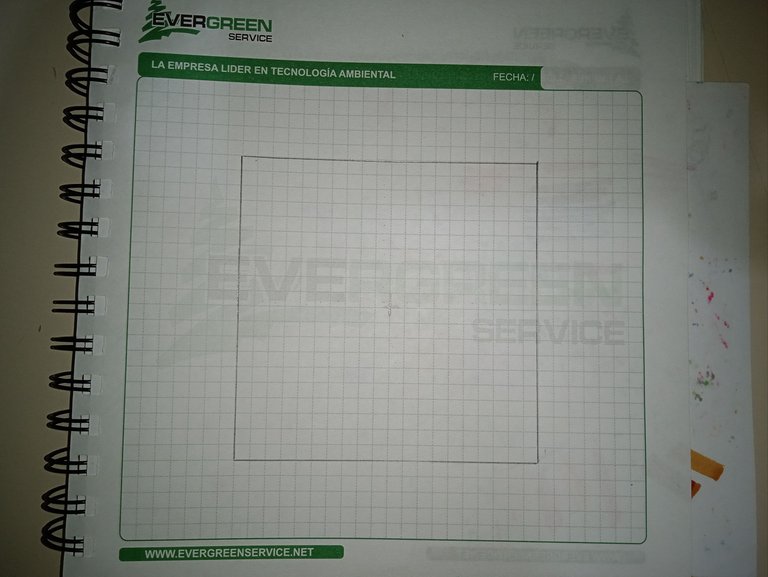
Here, I've already set the limit for my central drawing. I didn't take an exact measurement, but I did count the number of grid squares. Each side is a total of 20 squares long, or if you prefer to count from the center outwards, it's 10 squares to each side.
 | 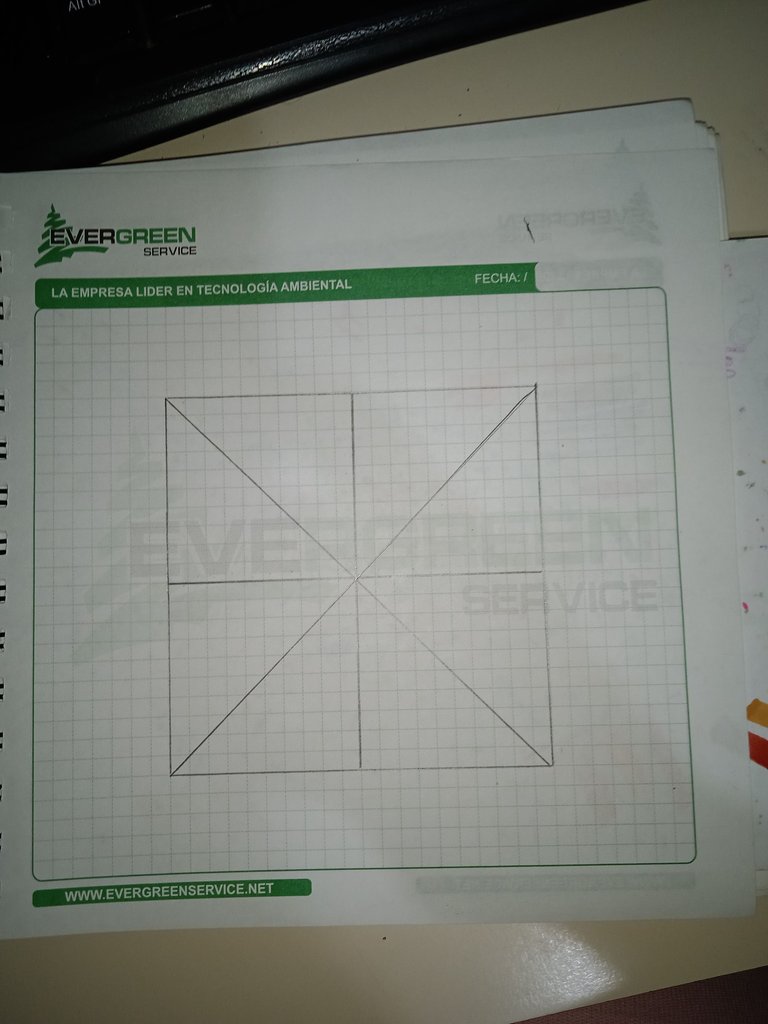 |
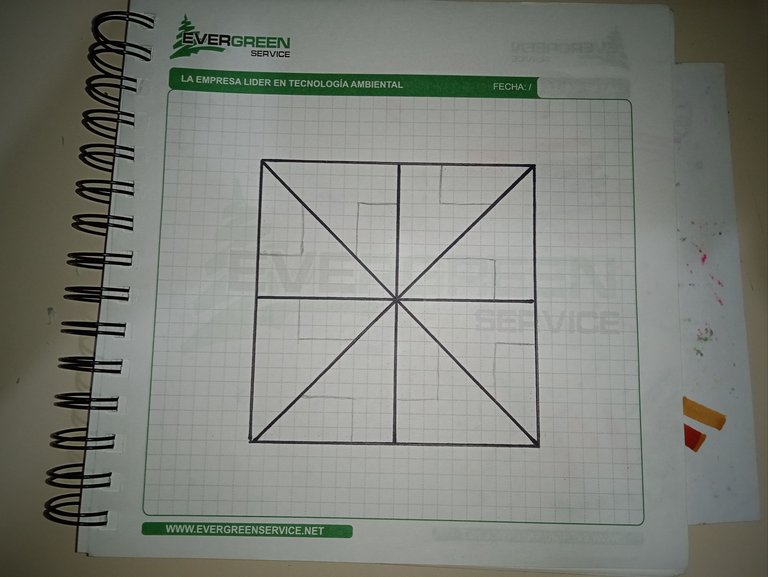
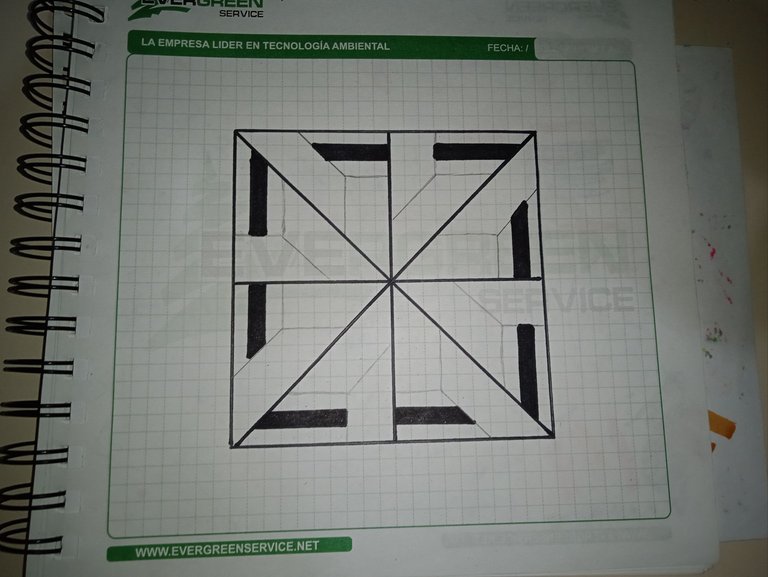
Now I started drawing diagonal lines to mark an "X" from corner to corner, and then a cross.
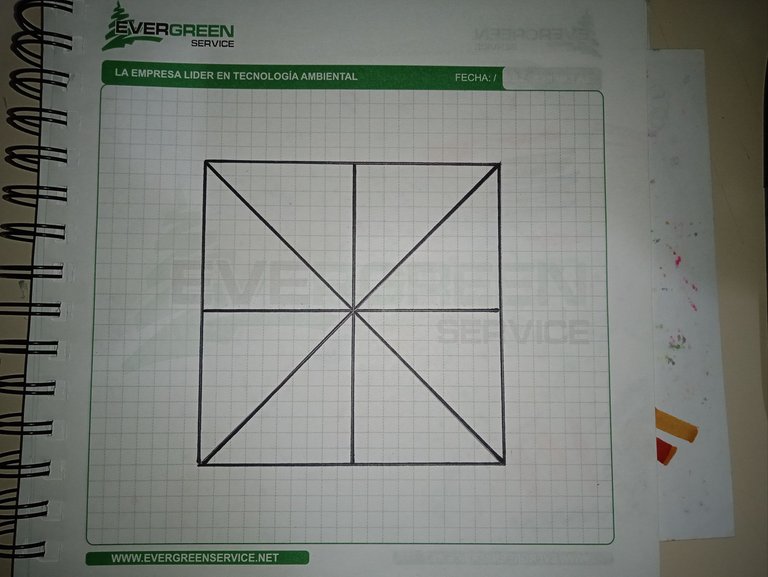
The next step is to outline everything in black, making it appear as in the previous image.
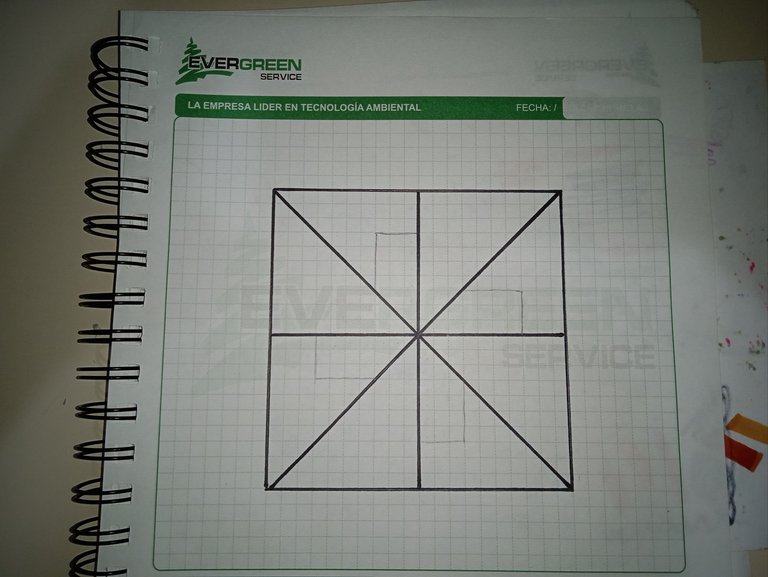
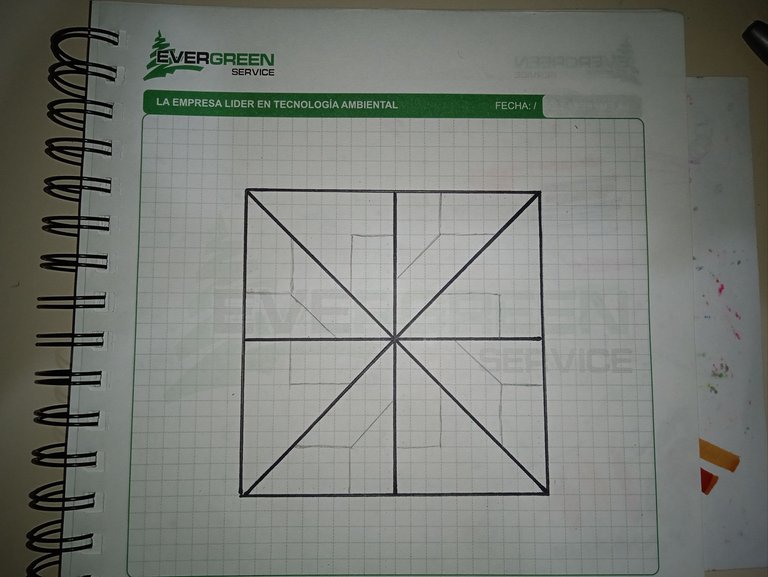
To begin building the inner figure, I started drawing lines in pencil from the inside out, using the lines that form a cross as my guide. For this, I counted 7 squares from the center outwards and marked a kind of "L" shape there, leaving 3 squares downwards and extending the remaining line to meet the diagonal. I repeated this step on all four sides.
To avoid mistakes during the process, I recommend turning your pad as you go; it will help you more easily orient yourself for where to draw the lines.
Next, I used the lines forming the "X" as a guide. Counting from the outside in, I created the same kind of "L" shape. From the corner to the center, it's 7 squares; then, 3 squares up, with the rest of the line aligning with the diagonal to form the "L."
 | 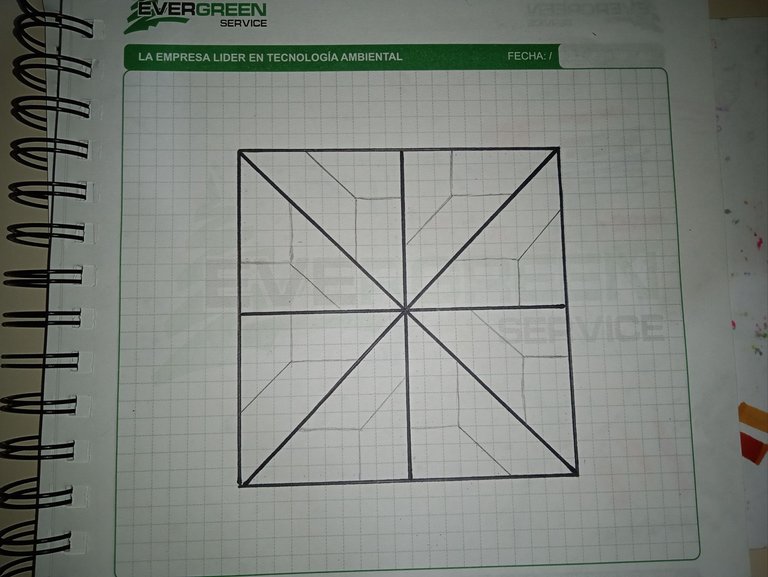 |
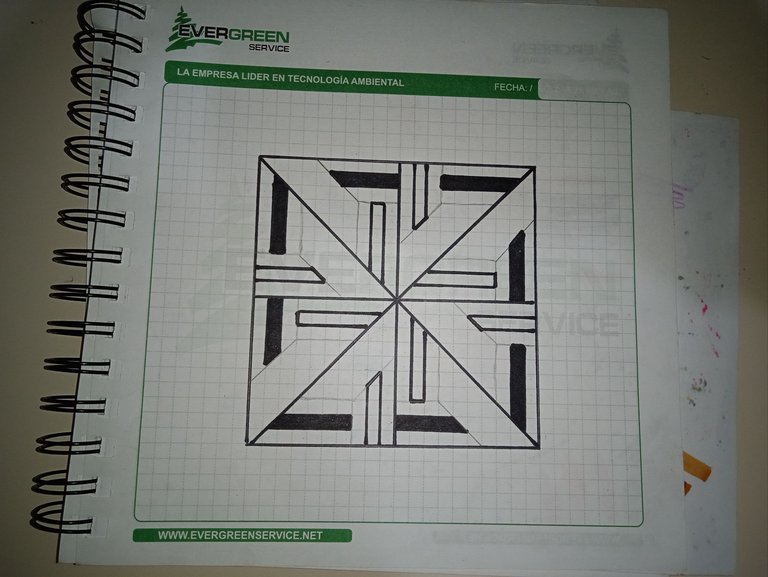
This next step is a bit tricky, but I'll do my best to explain it clearly, part by part. I found it a bit complicated at first, but once I visualized it, it flowed perfectly.
As you can see, I first use the lines that form the cross (+) as my guide. The idea here is to stop at each corner of the outermost "L" in the drawing and draw a diagonal line, counting 3 squares towards the main center line. This step is repeated for each of the four sides.
Now, you'll need to stop at the corners of the inner "L" shapes, the ones that are close to the "X" lines. Once at that corner, draw another diagonal line, similar to the previous one, counting 3 diagonal squares and ending at the limiting border line of the square.
If you follow these steps correctly, you'll achieve the image shown above.
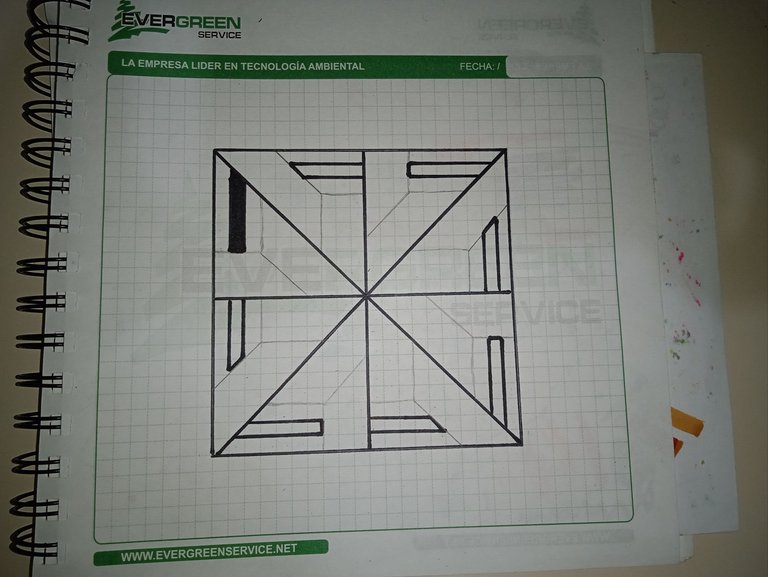 |  |
Alright, now for the fun part that requires more concentration! This is where you'll start coloring and filling in the corresponding spaces.
As you can see, I began with the outer "L," drawing a black line right through its center. Remember, I left a space of 3 squares? Well, now it's time to fill in that middle section, as shown in the first image.
Once all the lines are highlighted, color them in with black or your preferred color. I chose black for mine.
 | 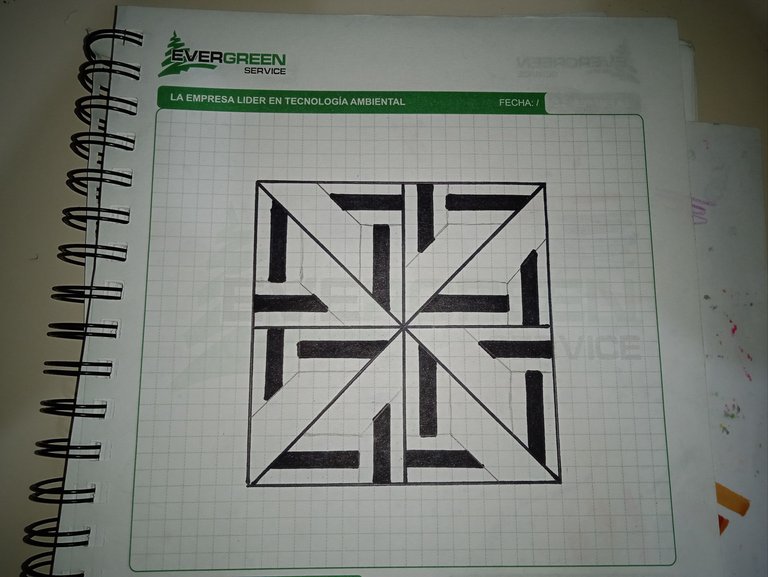 |
Now it's time to highlight the middle line of the second "L"—the one that's internal and close to the center—along with the rest of the horizontal line that runs parallel to each "L" you marked earlier. The image shows exactly what I mean.
After that, just fill them in with black again, and you'll get the result in image 2.
 |  |  |
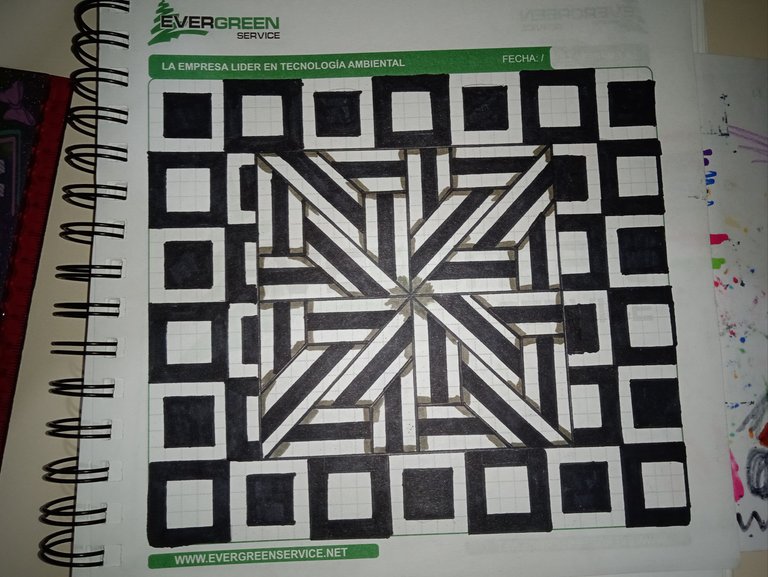
Alright, we're back to the tricky part of the drawing: the diagonals. Remember, I'm still drawing the middle line and haven't highlighted the pencil strokes yet. I drew two diagonals in each corner, making a total of eight diagonals.
Then, I carefully filled them in, making sure not to get confused, working on one side first and then the other.
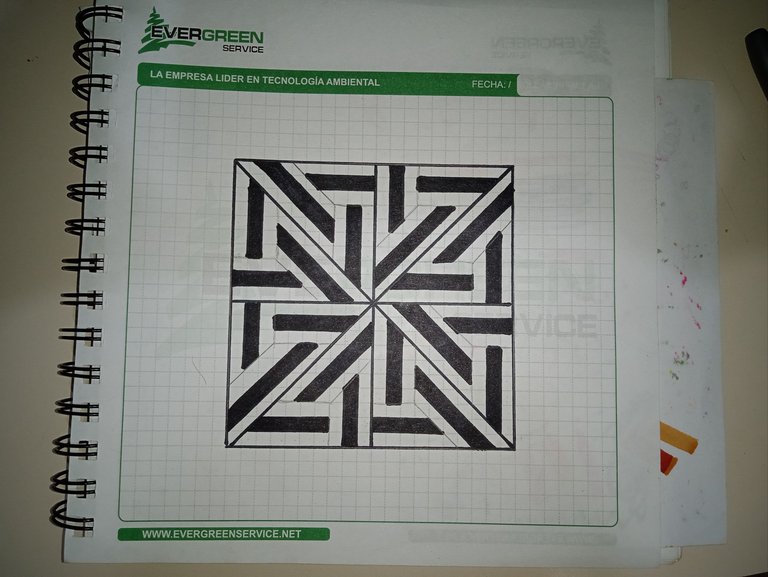
The third image shows what the square looks like with all the middle lines filled in. Once you reach this step, you can finally highlight the lines you drew in pencil. You'll get the following result:

You could stop the drawing here, but I'm someone who loves to fill in all the blank spaces. So, at this point, I wanted to give it a touch of depth, though I'm not sure I quite achieved it. For that, I used a gray tone, or you could just use a pencil. My image ended up looking like this:

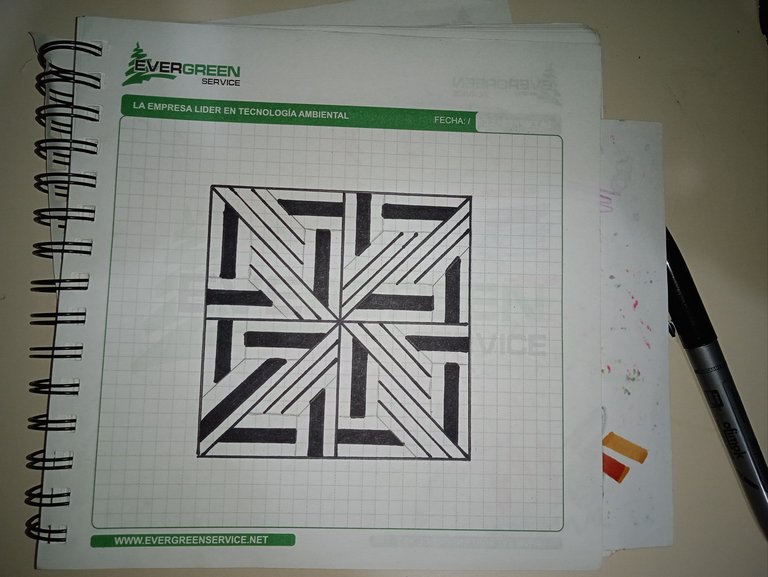
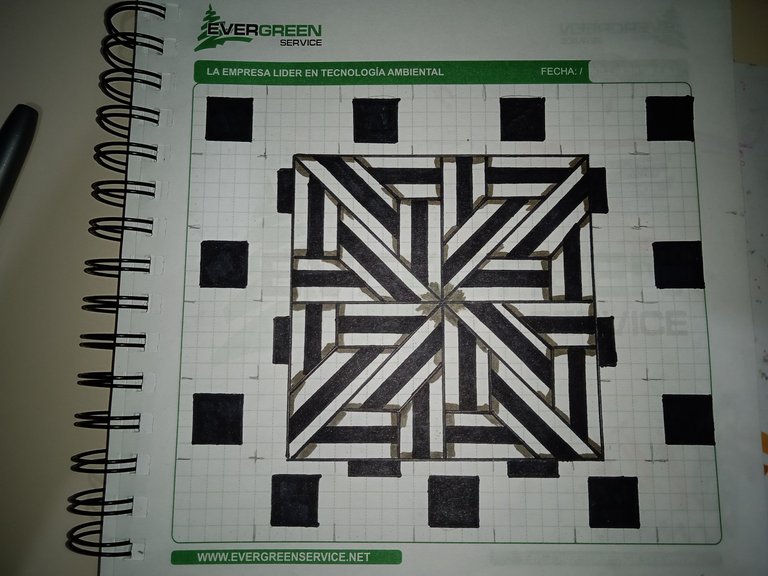
Well, now it's time to add the exterior design to fill up the entire grid space. For this, I wanted to use a fairly simple design, giving more visual weight to the central image.

In pencil, I drew a kind of 3x3 grid square. I left an outer line around it, then a blank space, before repeating the shape. I'll summarize the coloring process in one image, as it's pretty straightforward to follow once you see it painted.
 |  |
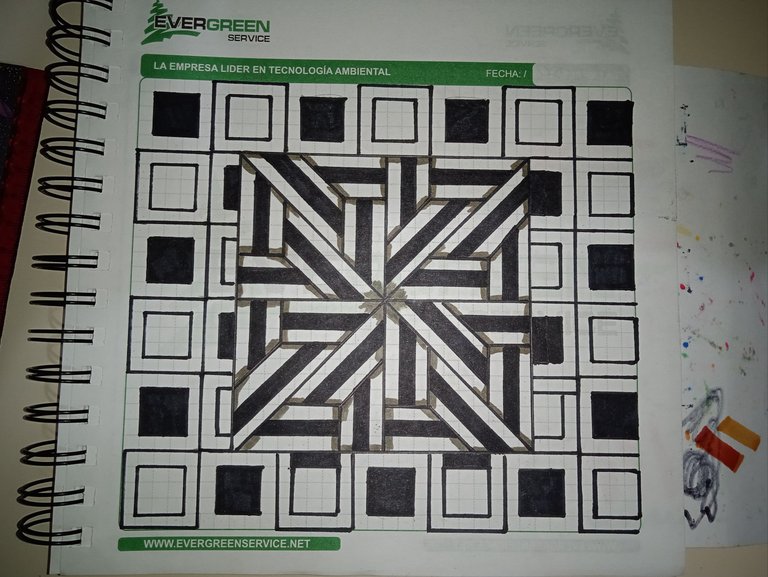 |  |
Yep, I know—a lot of black and white! 🤣 To keep it short, you'll notice I made a square with a white border and a black fill, followed by a white square with a black border, alternating them.
If you like how the drawing looks up to this point, you can stop here. For me, there was just too much black and white; it was a bit jarring. So, I decided to add some color, especially to the center figure, since I wasn't really happy with the shading I'd done.
So, the next step is to color it in. In my case, I wanted to use three different shades for the center: Green, Light Blue, and Bluish Gray. This part is completely up to each artist's discretion; mine turned out like this:

For the exterior, I wanted to use a different color. Two shades of red: one called Hermilio and another called Carmine. I chose Vermilion for the border of the black squares.
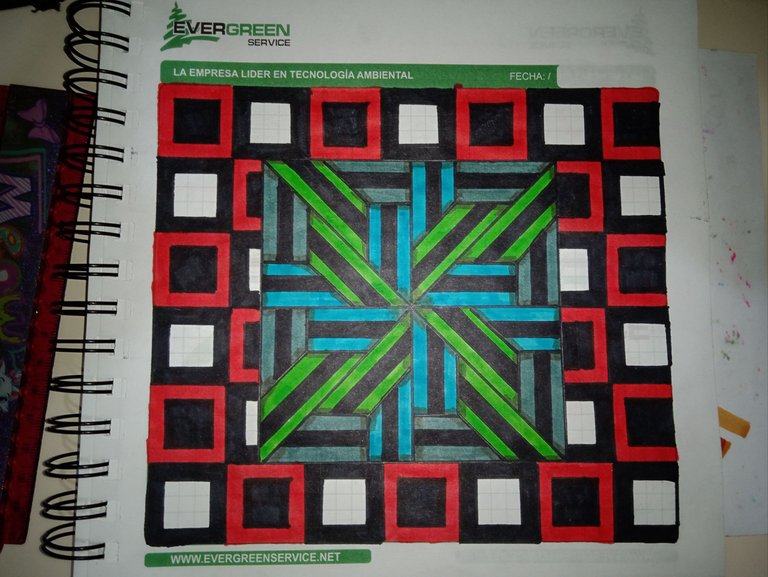
At this point, I used Carmine in the blank spaces, resulting in the final look you see here:
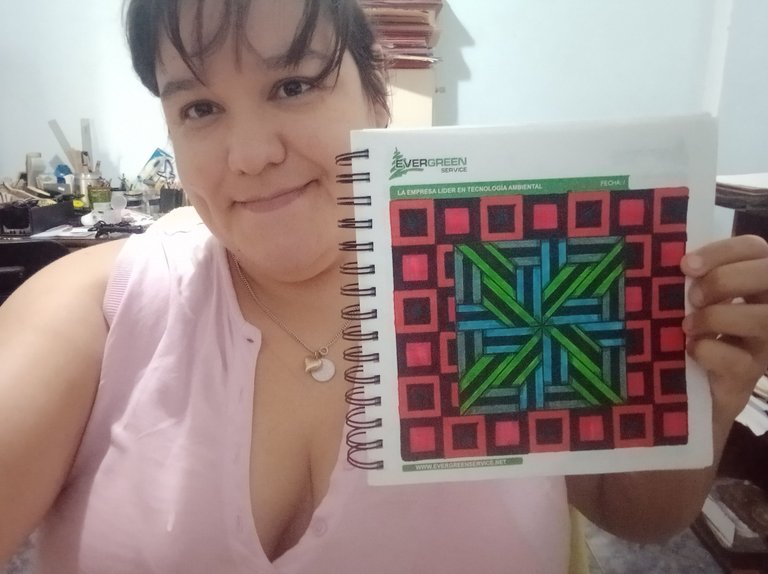
𝐅𝐢𝐧𝐚𝐥 𝐑𝐞𝐬𝐮𝐥𝐭
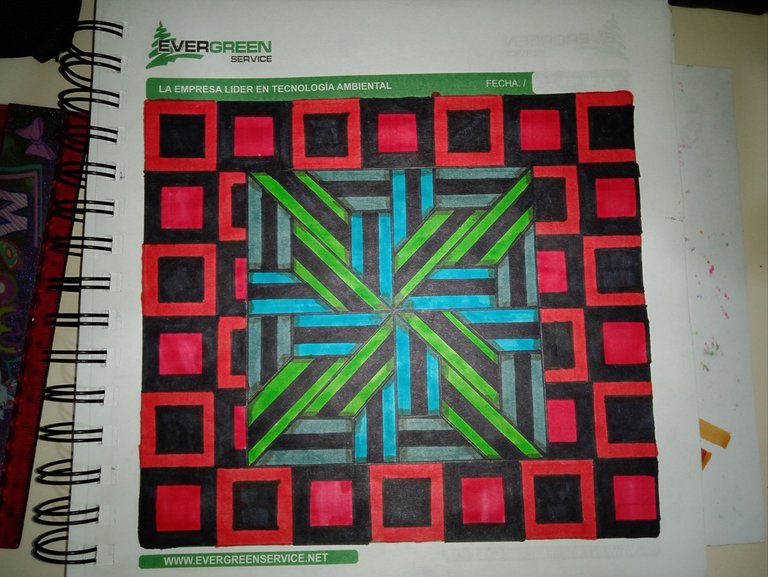
Alright, here's the final result! I like how the reds contrast with the center colors, and the black adds an elegant touch, too. What do you all think? Do you enjoy this type of drawing? They're super destressing for me! Let me know in the comments! See you in my next post! 💚
Español
Saludos bellezas de #HiveDIY. ¿Adivinen a quién se le acabó el bloc de dibujo? En vista de que ya no tengo más hojas de cartulinas en mi antiguo Bloc, decidí buscar otra cosa que me sirviera para seguir dibujando y me he encontrado este pequeño cuaderno/agenda de una empresa de la zona donde vivo, el cual viene con hojas cuadriculadas! Así que continuaré compartiendo con ustedes más de mis creaciones artísticas geométricas.
𝐏𝐚𝐬𝐨 𝐚 𝐏𝐚𝐬𝐨
Acá se puede notar mejor el cuadriculado de la hoja. Y bueno lo primero que hice fue ubicar el centro de la página, de allí empezaría a crear mi diseño contando las líneas para saber hasta dónde llegaría el dibujo.
Aquí ya tengo el límite hecho para mi dibujo central. Medida como tal no le tomé pero si conté la cantidad de cuadrículas. Cada lado tiene un total de 20 cuadritos de largo o si prefieres contar del centro a cada lateral, serían 10 cuadritos hacia afuera.
| |
Ahora me dispuse a hacer líneas en diagonal para marcar una X de esquina a esquina y luego una cruz.
El siguiente paso es remarcarlo todo en negro, quedando como la imagen anterior.
Para empezar a armar la figura interna, empecé haciendo líneas a lápiz de adentro hacia afuera, tomando de guía las líneas que forman una cruz. Para ello, conté del centro hacia afuera 7 cuadritos, y allí marqué como una especie de L dejando 3 cuadritos hacia abajo y la línea restante que llegara a la diagonal. Hice este paso con los cuatro lados.
Para que no te equivoques en el proceso, te recomiendo irle dando vuelta al bloc y así te ubiques más fácilmente dónde harás las líneas.
Luego tomé de guía las líneas que formaban una X. Contando de afuera hacia adentro y haciendo la misma especie de L. De la esquina al centro son 7 cuadrados, 3 hacia arriba y el resto de la línea que caiga con la diagonal formando así la L.
| |
Este paso es algo engorroso. Pero lo voy a explicar por parte lo mejor posible. En mi caso se me hizo algo complicado, pero una vez lo visualicé fluyó a la perfección.
Como ven primero tomo de guía las líneas que hacen la cruz (+) y la idea aquí es detenerse en cada esquina de la L más externa del dibujo y trazar una diagonal contando 3 cuadritos a la línea principal del centro. Este paso se repite con cada uno de los lados, es decir, 4 veces.
Ahora toca detenerse en las esquinas de las L internas, esas que están pegadas a las líneas de la X. Una vez en esa esquina, dibujar una diagonal igual a la anterior, contando 3 cuadritos diagonales y terminar en la línea límite del borde del cuadro.
Si sigues mis pasos correctamente lograrás la imagen de arriba.
| |
Bien ahora empieza lo divertido y lo que requiere más concentración ya que en este punto empezarás a colorear y rellenar los espacios correspondientes.
Como pueden ver, empecé con la L exterior, trazando una línea en negro por todo el centro. Recuerden que habíamos dejado un espacio de 3 cuadritos. Bueno ahora toca rellenar la parte del medio como lo muestro en la primera imagen.
Una vez todas las líneas estén resaltadas, coloreas con negro o con el color de tu preferencia. En mi caso quise usar el negro.
| |
Ahora toca resaltar la línea del medio de la segunda L, esa que se ve internamente, pegada al centro y el restante de la línea horizontal que le sigue paralelamente a cada L marcada anteriormente. En la imagen puedes ver mejor a qué me refiero.
Luego sólo queda rellenarlas de color negro nuevamente y te quedaría de resultado la imagen 2.
| | |
Bien, nuevamente volvemos a la parte engorrosa del dibujo: las diagonales. Recuerden que sigo dibujando la línea del medio y no he resaltado los trazo del lápiz. Hice 2 diagonales en cada esquina, haciendo un total de 8 diagonales.
Luego las rellené con mucho cuidado de no confundirme, primero de un lado y luego del otro.
La tercera imagen muestra cómo se ve el cuadro con todas las líneas del medio rellenadas. Una vez que llegues a este paso, ahora si puedes resaltar las líneas que habías hecho a lápiz. Quedando el siguiente resultado:
Ya en este punto puedes dejar el dibujo hasta aquí pero como soy de las que le gusta dibujar todos los espacios en blanco. Al llegar aquí quise darle un toque de profundidad pero creo que no lo logré. Para ello usé un tono gris o bien podrías usar el lápiz. La imagen me quedó así:
Bien ahora me toca agregar el diseño exterior, para completar todo el espacio cuadriculado. Para ello quise usar un diseño bastante sencillo, dándole peso a la imagen del centro.
A lápiz hice una especie de cuadrados de 3x3 cuadrículas. Dejando una línea externa alrededor del mismo y luego un espacio en blanco, para luego repetir la figura. El proceso de coloreado lo voy a resumir en un cuadro ya que es bastante sencillo de seguir una vez que lo ves pintado.
| |
| |
Si, lo sé. Mucho blanco con negro 🤣 Bien para ser breve, nota que hice un cuadro con borde blanco y relleno negro seguido de un cuadro blanco con borde negro de manera intercalada.
Si te gusta cómo quedó el dibujo hasta este punto puedes dejarlo hasta aquí. Para mí, me resultó mucho blanco con negro y me pegaba a la vista. Así que decidí echarle color, sobre todo a la figura del centro ya que no me terminaba de gustar ese sombreado que le había hecho.
Así que el siguiente paso es colorearlo. En mi caso quise usar para el centro 3 tonos diferentes, Verde, Azul Claro y Gris Azulado. Y esta parte quedará al criterio de cada artista, a mí me quedó así:
Para la parte externa quise usar otro color diferente. Dos tonos de Rojos en realidad, uno llamado Hermilio y otro llamado Carmine, y el Vermilion quise usar para el bode de los cuadros negros.
Llegado a este punto usé el Carmine en los espacios en blanco quedando como resultado final el siguiente:
𝐑𝐞𝐬𝐮𝐥𝐭𝐚𝐝𝐨 𝐅𝐢𝐧𝐚𝐥
Ahora sí, acá está el resultado final. A mí me gustó como quedó el contraste de los rojos con los colores del centro y el negro le da un toque elegante también. ¿A ustedes qué les pareció? ¿Les gusta este tipo de dibujos? A mí me desestresan, los leo en los comentarios! Hasta mi siguiente post! 💚


| 𝐄𝐥𝐞𝐦𝐞𝐧𝐭𝐨𝐬 (𝐄𝐥𝐞𝐦𝐞𝐧𝐭𝐬) | 𝐇𝐞𝐫𝐫𝐚𝐦𝐢𝐞𝐧𝐭𝐚𝐬 (𝐓𝐨𝐨𝐥𝐬) |
|---|---|
| Las Fotos Utilizadas a lo largo del Post son de mi galería (Photos used throughout the post are from my gallery) | Cámara del Teléfono Redmi Note 9A (Redmi Note 9A Phone Camera) |
| Contenido y Texto Original de mi Autoría (Content and Original Text of my Authorship) | DeepL |
| CANVA | |
| Grammarly |
Posted Using INLEO
Con colores le da mas profundidad, saludos @pannavi.
verdad que si? yo pensé lo mismo, al verlo con color pude notar el efecto que buscaba al querer darle profundidad. Gracias por pasar y comentar, aprecio un montón tu opinión! Un abrazo!