Limpié mi Teclado por Primera Vez 【 🇪🇸 - 🇺🇸 】
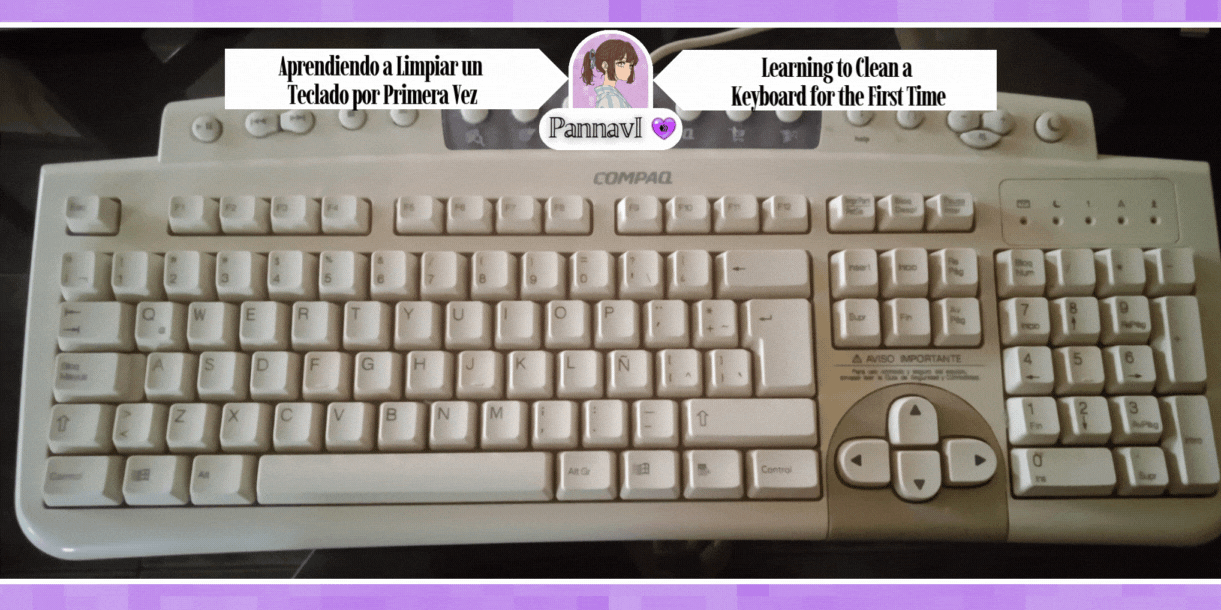
Saludos gente linda de #HiveDIY. Como es costumbre, los jueves me agrada compartir con ustedes tanto mi arte como ciertas cosas que hago, ya sea manualidades, costura o en este caso la limpieza de un teclado viejo. Acompáñenme leyendo para que conozcan más de mi experimento.
Greetings, lovely people of #HiveDIY. As usual, on Thursdays I'm happy to share with you both my art and some of the things I do, whether it's crafts, sewing, or, in this case, cleaning an old keyboard. Join me as I read on to learn more about my experiment.

ℙ𝕒𝕤𝕠 𝕒 ℙ𝕒𝕤𝕠 ┇ 𝕊𝕥𝕖𝕡 𝕓𝕪 𝕊𝕥𝕖𝕡

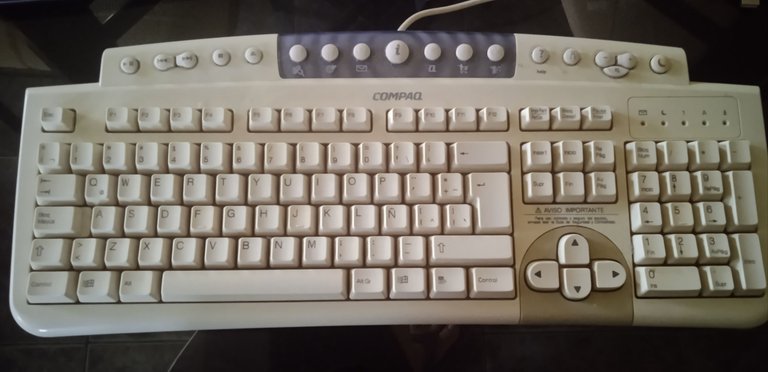
No recuerdo cuántos años tiene este teclado pero lo que si sé es que tenía desde que lo compré y lo usé que no lo limpiaba de manera profunda. De hecho nunca había limpiado ninguno de los teclados que he tenido por miedo a romperlos o dañarlos pero luego de tener una breve experiencia intensa acomodando algunas piezas dentro de mi PC me animé finalmente a hacerle mantenimiento a estos objetos.
I don't remember how old this keyboard is, but what I do know is that I haven't cleaned it thoroughly since I bought and used it. In fact, I'd never cleaned any of the keyboards I've owned for fear of breaking or damaging them, but after a brief, intense experience arranging some parts inside my PC, I finally decided to maintain these things.
Lo primero que hice fue buscar videos en YouTube de cómo hacerlo y al final de este post les dejaré el que me gustó más y el cual usé para guiarme. En el video recomendaban una Púa (para tocar la guitarra) pero como yo no tengo eso, la otra opción era una tarjeta de plástico o en mi caso elegí un destornillador de plástico.
Lo recomiendan de este material para no dañar ni raspar inadecuadamente las teclas. Mi teclado es normal, de esos que se clasifican como de membrana.
The first thing I did was look for YouTube videos on how to do it, and at the end of this post I'll share the one I liked best and used as a guide. The video recommended a pick (for playing the guitar), but since I don't have one, the other option was a plastic card, or in my case, a plastic screwdriver.
They recommend using this material to avoid damaging or scratching the keys. I have a standard keyboard, one of those classified as membrane.

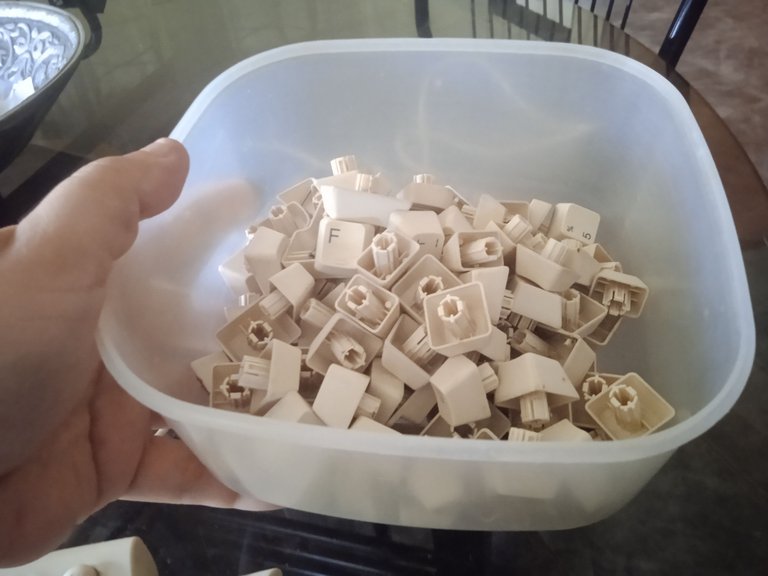
Así que con mucho cuidado saqué todas las teclas, una por una. En total son 98 teclas. Me recordaron al LEGO 🤣. Volviendo al tema, una vez que las tuve todas así sueltas, las metí en un envase para agruparlas en un solo lugar y también para lavarlas.
So, very carefully, I removed all the keys, one by one. There are 98 keys in total. They reminded me of LEGO 🤣. Back to the topic, once I had them all loose, I put them in a container to group them in one place and also to wash them.
| Agrupándolas | Colocando un Poco de Lavaplatos | Y dejándolas en Remojo por unos minutos |
|---|---|---|
 | 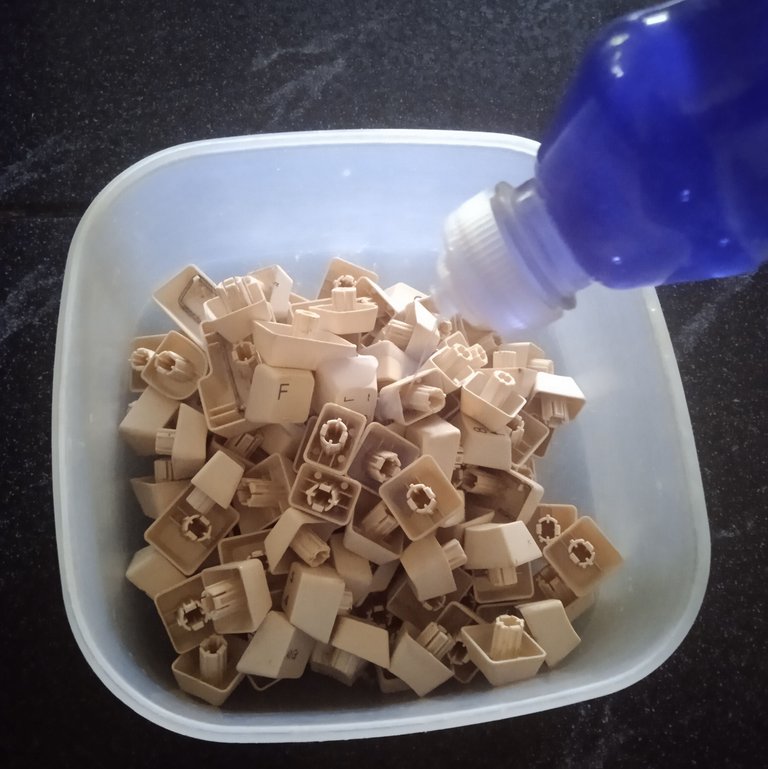 |  |
| Grouping them | Putting in a Little Dishwasher | And leaving them to soak for a few minutes |
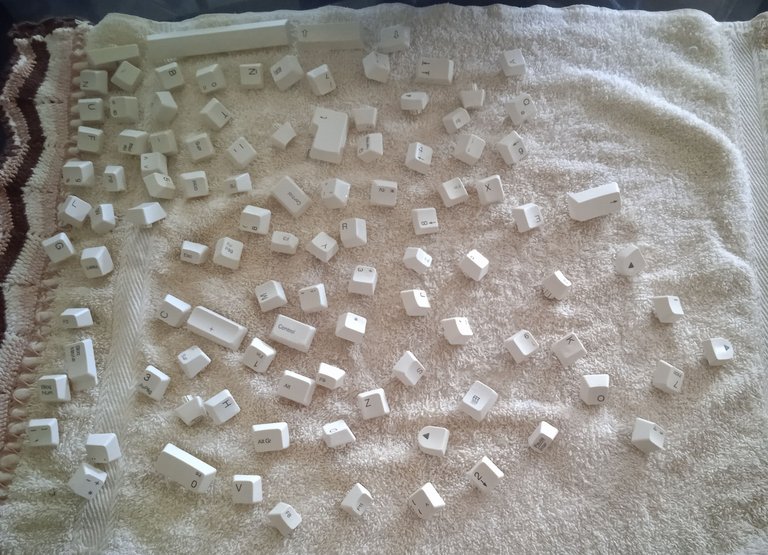
Luego las lavé bien a todas, una por una, en la cocina con la esponja de lavar los platos. Luego les quité el jabón con abundante agua y las acomodé en un pañito para dejarlas secar. Con el calor excesivo que hace estos días, se secaron rápido. ☀️
Then I washed them all thoroughly, one by one, in the kitchen with a dish sponge. Then I rinsed off the soap with plenty of water and laid them out on a cloth to let them dry. With the excessive heat these days, they dried quickly. ☀️
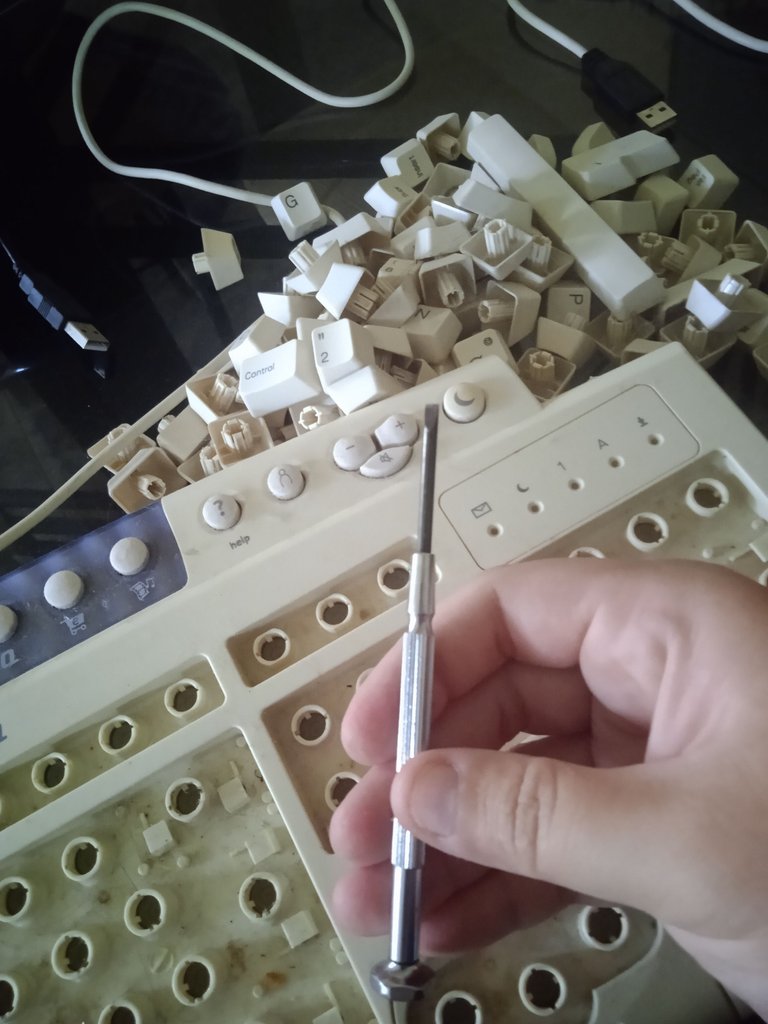
Ahora me tocó limpiar fue el teclado en sí. Para ello usé alcohol, un pañito, una brocha pequeña e hisopos. Y lo primero que hice fue sacudir toda la suciedad con la brocha, como si fuera una especie de plumero en miniatura.
Now it was my turn to clean the keyboard itself. To do this, I used alcohol, a cloth, a small brush, and cotton swabs. The first thing I did was brush off all the dirt with the brush, like a miniature duster.
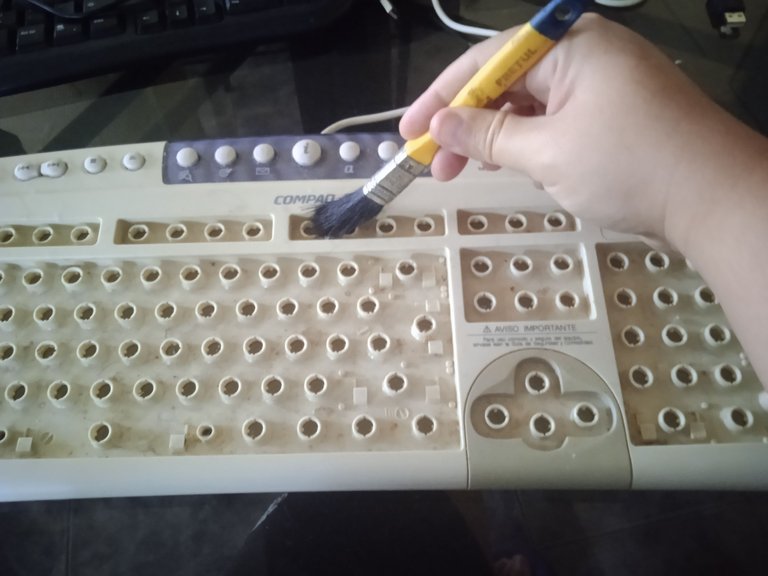
Luego de sacudirlo bien, tomé el pañito y lo humedecí con alcohol para limpiar la parte externa del teclado, es decir, todos sus bordes y las partes amplias entre los círculos.
After shaking it well, I took the cloth and moistened it with alcohol to clean the outside of the keyboard, that is, all its edges and the wide parts between the circles.

Ya para terminar la limpieza del teclado, tocó otra parte tediosa (porque la primera fue lavar las 98 teclas 🤣). Fue momento de usar los hisopos y limpiar cada espacio entre los círculos y dentro de los círculos humedeciendo los mismos con alcohol cada cierto tiempo y cambiándolos porque se ensuciaban rápido.
To finish cleaning the keyboard, another tedious part came up (because the first part was washing the 98 keys 🤣). It was time to use the cotton swabs and clean every space between the circles and inside them, moistening them with alcohol every so often and changing them because they got dirty quickly.

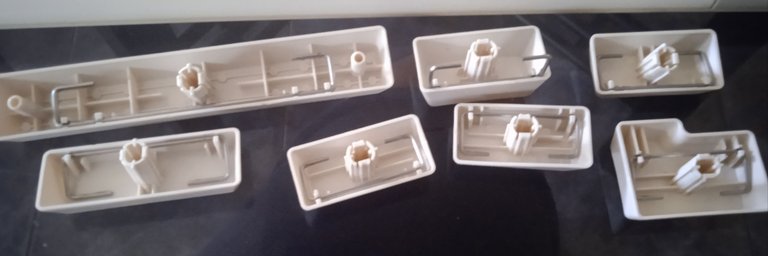
Para no hacer el post tan largo voy a mostrarles cómo quedó el teclado por dentro después de limpiarlo por completo y a detalle con alcohol:
To keep this post short, I'm going to show you what the keyboard looked like inside after thoroughly cleaning it with alcohol:
 |  |
|---|
Para las ranuras realmente pequeñas tuve que usar mondadientes de madera, raspando poco a poco, sacando la mugre y repasando el área con un hisopo humedecido con alcohol. Al final todo quedó completamente desinfectado. Y tocó armarlo de nuevo.
For the really small gaps, I had to use wooden toothpicks, scraping little by little, removing the dirt, and wiping the area with a cotton swab moistened with alcohol. In the end, everything was completely disinfected. It was time to put it back together.
Una de las cosas que noté cuando quitaba las teclas es que en este modelo en particular, algunas de ellas tenían un pequeño alambre que las ayudaba a calzar mejor en donde les correspondían. No sé si los otros 2 teclados que tengo serán así pero cuando los limpie lo averiguaré. Así que estas fueron las teclas que coloqué primero.
One of the things I noticed when removing the keys is that on this particular model, some of them had a small wire that helped them fit better into their proper place. I don't know if the other two keyboards I have are like this, but I'll find out when I clean them. So these were the keys I put on first.
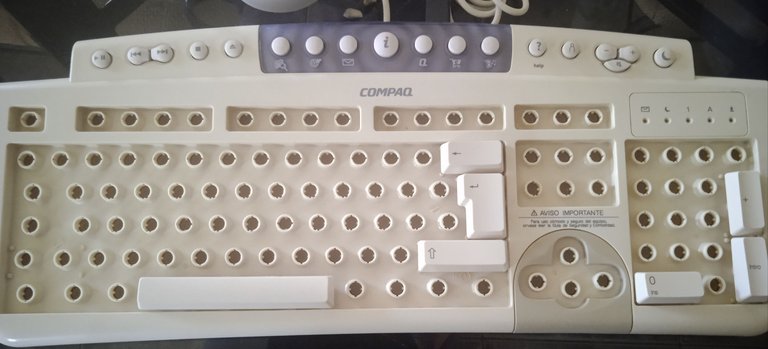
Cabe destacar que antes de que les quites las teclas a tu teclado para limpiarlo es necesario que le tomes una foto donde se vea todo completo con cada botón en él. Así sabrás dónde irá cada uno de ellos cuando te toque armarlo de nuevo. A continuación les muestro el resultado final:
It's worth noting that before you remove the keys from your keyboard to clean it, you need to take a photo of the entire keyboard, including each button. This way, you'll know where each one will go when you put it back together. Below is the final result:
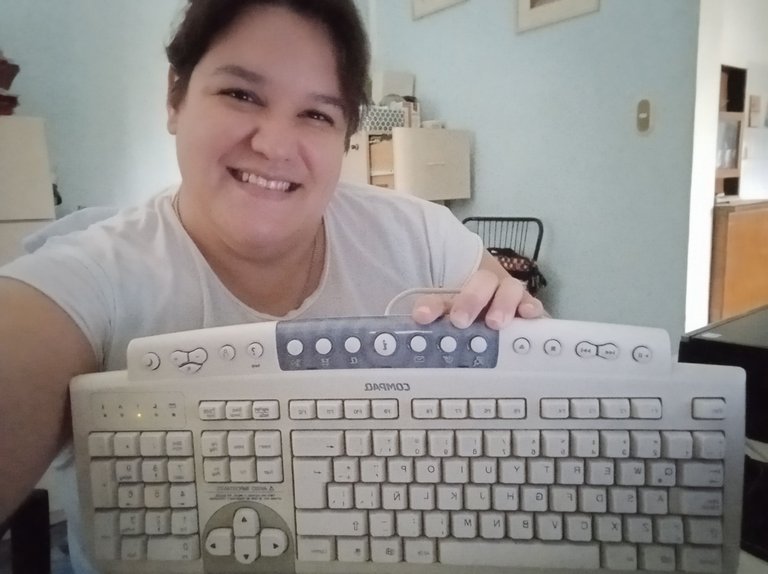
ℝ𝕖𝕤𝕦𝕝𝕥𝕒𝕕𝕠 𝔽𝕚𝕟𝕒𝕝 ┇ 𝔽𝕚𝕟𝕒𝕝 ℝ𝕖𝕤𝕦𝕝𝕥

Quedó limpiecito como un sol ☀️. Y pues me puse a usarlo después de toda esa limpieza que le di y quedó como nuevo. Así que creo que le daré un poco más de uso mientras le toca el turno de los otros 2 teclados negros que tengo extras por allí y que al igual que este no los he limpiado nunca.
Pero ya aprendí, no es tan complicado. Si quieres saber más detalles de cómo hacerlo, aquí te dejo el video tutorial que me gustó más. Espero que les haya agradado mi proceso. ¡Hasta mi siguiente post! 🌸
It came out sparkling clean ☀️. And so, after all that cleaning, I started using it, and it was as good as new. So, I think I'll give it a little more use while I get to the other two extra black keyboards I have lying around, which, like this one, I've never cleaned.
But I've learned; it's not that complicated. If you want to know more details on how to do it, here's the video tutorial I liked the most. I hope you enjoyed my process. See you in my next post! 🌸
𝕋𝕦𝕥𝕠𝕣𝕚𝕒𝕝

| Las Fotos Utilizadas a lo largo del Post son de mi galería | Photos used throughout the post are from my gallery |
| Cámara del Teléfono Redmi Note 9A | Redmi Note 9A Phone Camera |
| Edición hecha con Canva | Edited with Canva |
| Traducción hecha con Traductor Google | Translation made with Google Translate |

Qué genial y maravilloso....hay que tener sobre todo mucha paciencia para eso, paciencia que yo no tengo 🤣 pero ya sé a dónde llevar el mío cuando decida limpiarlo.... fantástico.
Te envío un gran abrazo desde Cuba ✨✍️
jajajaja si va!
Esooooooooo, te quedó fue bello :3
!PAKX
!PIZZA
View or trade
PAKXtokens.Use !PAKX command if you hold enough balance to call for a @pakx vote on worthy posts! More details available on PAKX Blog.
Muchas gracias estimado Culebro 🐍
$PIZZA slices delivered:
@culebro(1/5) tipped @pannavi
Come get MOONed!
Wowww no creo tener paciencia para ello, pero tú lo lograste, te quedó genial.
!discovery 25
Si, mucha paciencia jajajaja sobre todo al lavar las teclas individualmente.. Todo un proceso mediante el cual.. pero valió la pena, ahora mi teclado está super limpio. Gracias por pasar y comentar!
This post was shared and voted inside the discord by the curators team of discovery-it
Join our Community and follow our Curation Trail
Discovery-it is also a Witness, vote for us here
Delegate to us for passive income. Check our 80% fee-back Program
Thanks for the support!
Thanks for the support!
Thanks for the support!
Wow, I admire you for this! I've never done it, and once they don't work, all I do is buy a new one, haha. The best part is that you share your experience and explain it in detail. I didn't even know you could clean your keyboard this way. Great work! ✌️
Thanks so much! I didn't know either. What I did know was that it was pretty dirty, hahaha, and I had to learn by searching on YouTube. Thanks for stopping by and commenting!
"Quedó limpiecito como un sol" entendí la referencia jeje🤭
Me encantó tu post, hiciste de un proceso que es súper tedioso algo entretenido y hasta divertido de leer✨️ y además muy útil, ahora ya sé como limpiar mi teclado💖
Muchas gracias, captaste la esencia de mi post XD o mejor dicho el propósito que buscaba al compartir mi experiencia. Gracias Gracias por tu lindo comentario
Este proceso fue super satisfactorio 🧽 ✨ me gustan mucho los topicos de limpieza y no habia visto antes por aqui un registro de mantenimiento de teclado, que lindo que sea blanco 💗
Me gustan los teclado viejos porque el sonido de las teclas ademas de relajante es nostálgico, tengo 2 teclados asi pero negros en casa, como tu no me he animado a hacerles limpieza por temor a dañarlos pero despues de ver tu proceso me siento motivada òwó)/ 🧼
Lo mejor fue comparar el antes y el después, sí se nota la diferenciaaa! 💯 👏🏻
Your reply is upvoted by @topcomment; a manual curation service that rewards meaningful and engaging comments.
More Info - Support us! - Reports - Discord Channel
Hola hermosa, es un honor tenerte por mi blog, eres una de las que más admiro por su contenido desde que llegué a Hive.
Así es, limpiarlo a fondo le dió ese sonido especial y característico a los teclados viejos jejeje Gracias Gracias!
Si que fue una limpieza profunda jajajaja, muy bien, cierto que después que lo limpiaste se siente tan sabroso escribir.
Si! y lo mejor es que quedó como nuevo. Me gustó bastante limpiar el teclado, aunque fue tedioso por momentos, valió la pena el esfuerzo. Lo que más me gustó fue desarmarlo y volverlo a armar, fue como jugar con Lego. Un abrazo!
¡Felicitaciones!
Estás participando para optar a la mención especial que se efectuará el domingo 7 de septiembre del 2025 a las 8:00 pm (hora de Venezuela), gracias a la cual el autor del artículo seleccionado recibirá la cantidad de 1 HIVE transferida a su cuenta.
¡También has recibido 1 ENTROKEN! El token del PROYECTO ENTROPÍA impulsado por la plataforma Steem-Engine.
1. Invierte en el PROYECTO ENTROPÍA y recibe ganancias semanalmente. Entra aquí para más información.
2. Contáctanos en Discord: https://discord.gg/hkCjFeb
3. Suscríbete a nuestra COMUNIDAD y apoya al trail de @Entropia y así podrás ganar recompensas de curación de forma automática. Entra aquí para más información sobre nuestro trail.
4. Visita nuestro canal de Youtube.
Atentamente
El equipo de curación del PROYECTO ENTROPÍA
Muchas gracias chicos! son los mejores!