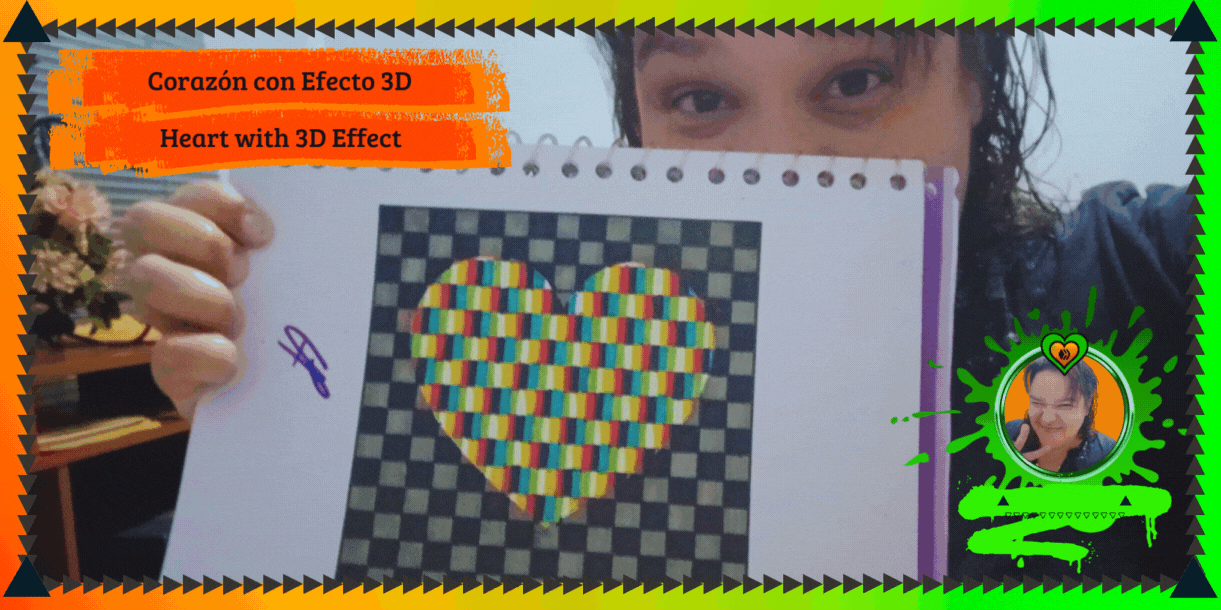
Dibujando un Corazón con Efecto 3D (🇪🇸 | 🇺🇸)
FULL ENGLISH VERSION

Greetings, my #HiveDIY people. It gives me pleasure to share with you today, so I bring you something extra special. My week has been a bit stressful, and I've been busy with other things, so I've slowed down here at Hive, but I hope to get back on track next week. Anyway, I'm a bit of a romantic, and looking for a way to de-stress, I decided to do something different this time. Read on to see the process.

𝐒𝐭𝐞𝐩-𝐛𝐲-𝐒𝐭𝐞𝐩
Someone says that drawing serves as therapy, and since I've been practicing drawing more, my drawings I've proven it; it helps me to disconnect my mind and not think about anything but wanting to see the final result of my art.
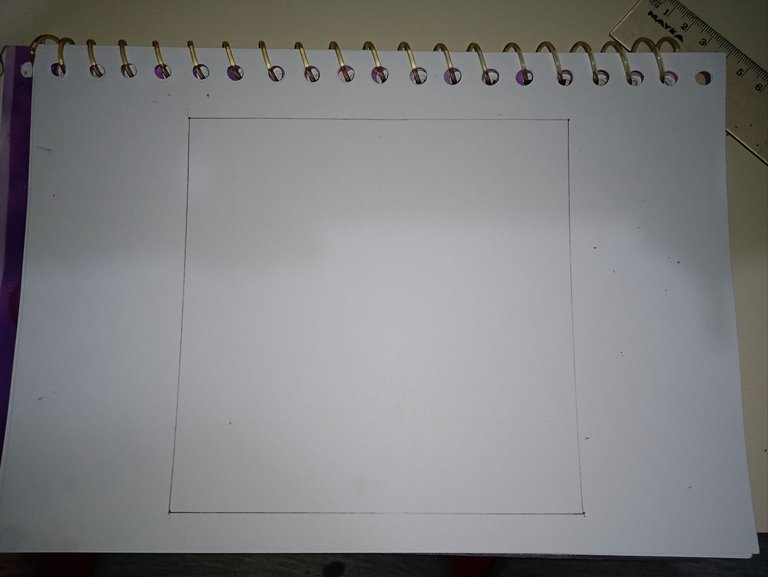
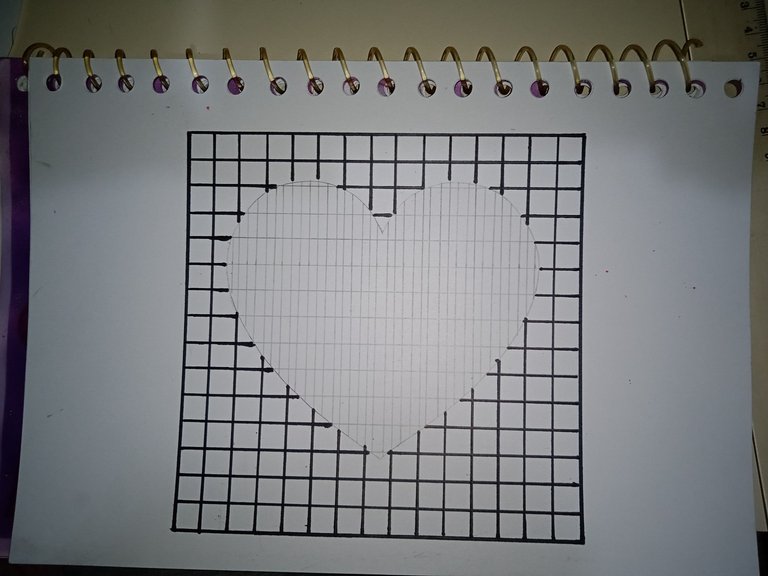
So today I thought, What about making a Heart with 3D Effect?. And so I started. I made a 15x15 CM square frame as shown in the first image.
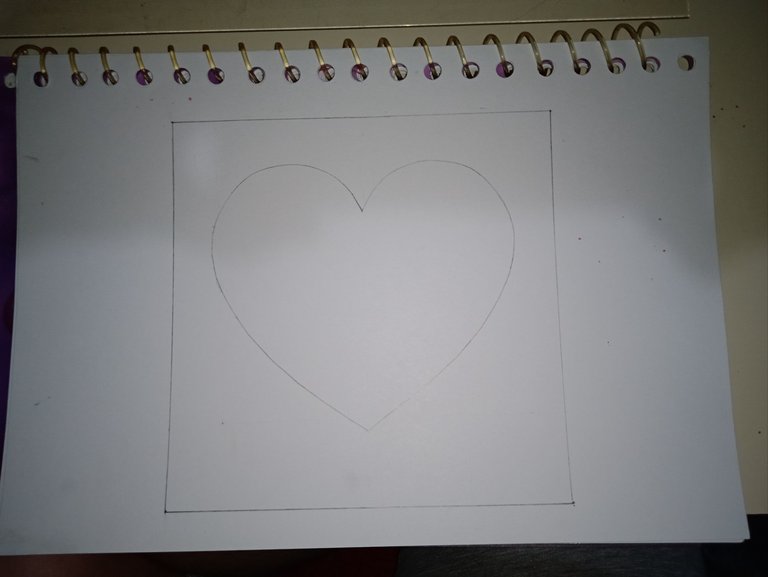
Then I drew a heart freehand, but you can also use a template to make it straighter and neater. The measurement of the heart was by eye percent, I just wanted it to be centered as much as possible and a little smaller than the square.
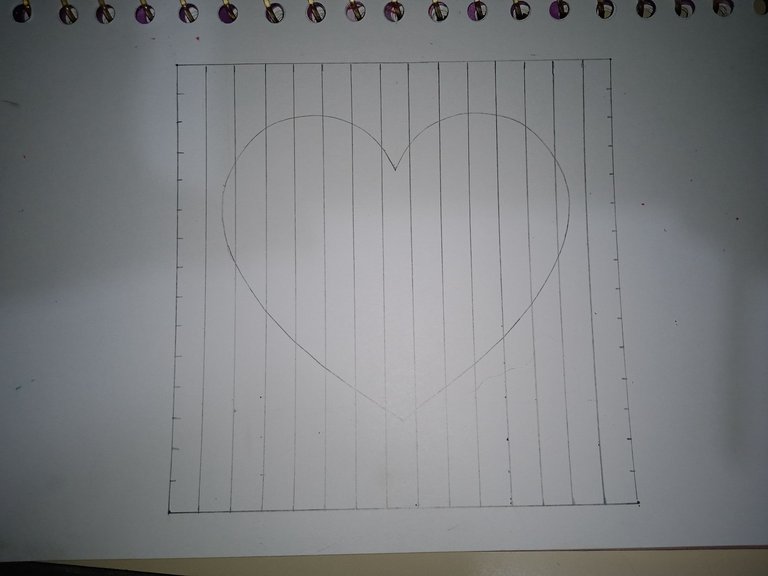
Then I started making vertical lines and marking the points to draw the horizontal lines. Each line has a spacing of 1 CM, making a total of 14 vertical lines.
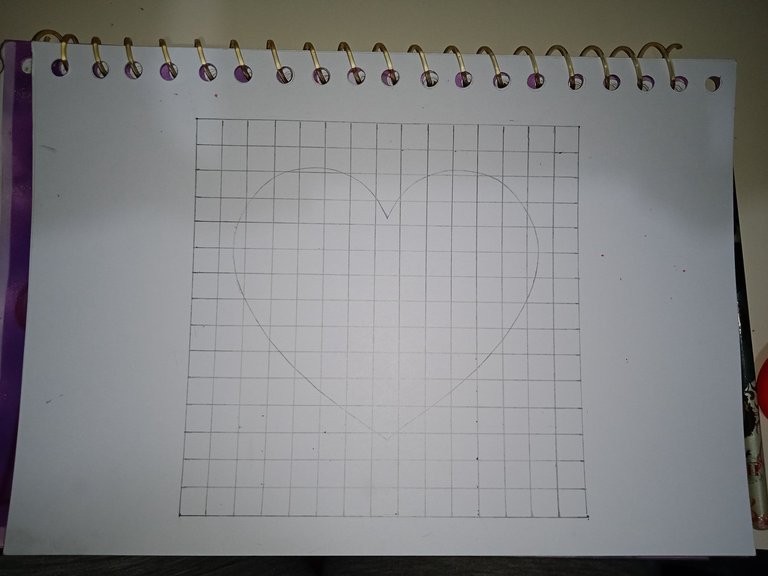
Already after that, I did the horizontal lines tracing, with the same separation measure, 1 CM between each one, making again a total of 14 horizontal lines. This part reminded me of the mathematics notebook 🤣
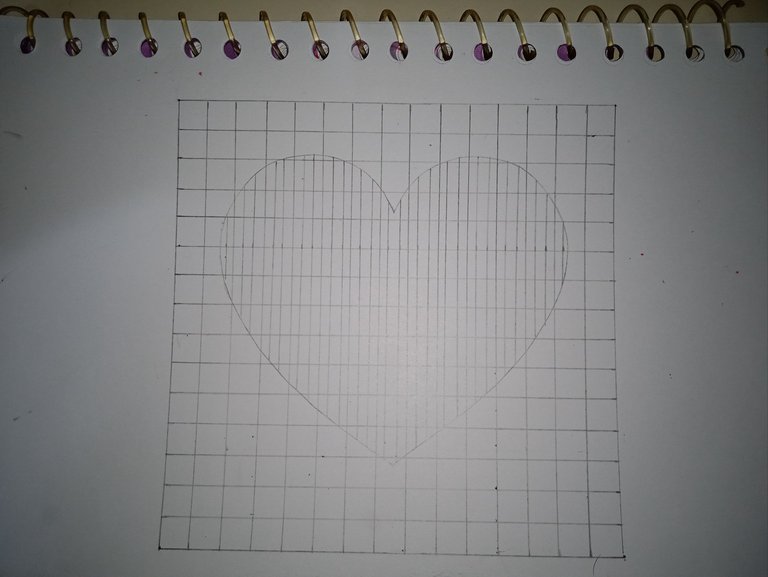
Now to make the heart stand out among the grid, I drew 0.3 mm separations in each square, i.e., each square inside the heart, I divided it into 3 with two lines that have a spacing of 0.3 mm.
𝐂𝐨𝐥𝐨𝐫𝐢𝐧𝐠 𝐏𝐫𝐨𝐜𝐞𝐬𝐬
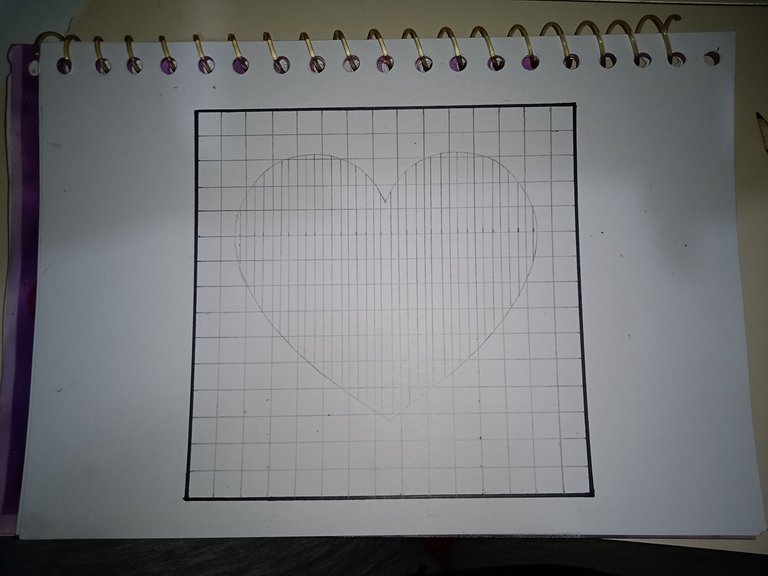
First, I started by outlining the square.
Then I carefully traced the grid lines without touching the heart. This part was a bit difficult for me, and you can see that the points near the heart were a little bit more marked 🤣.
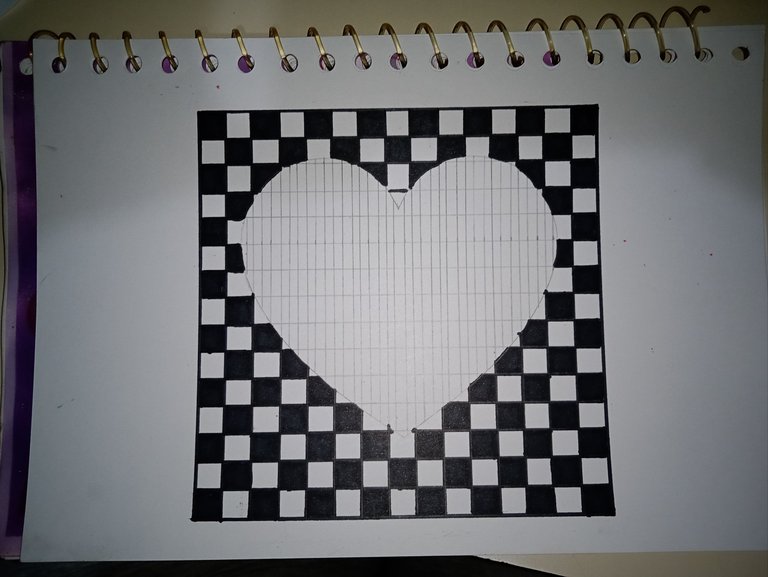
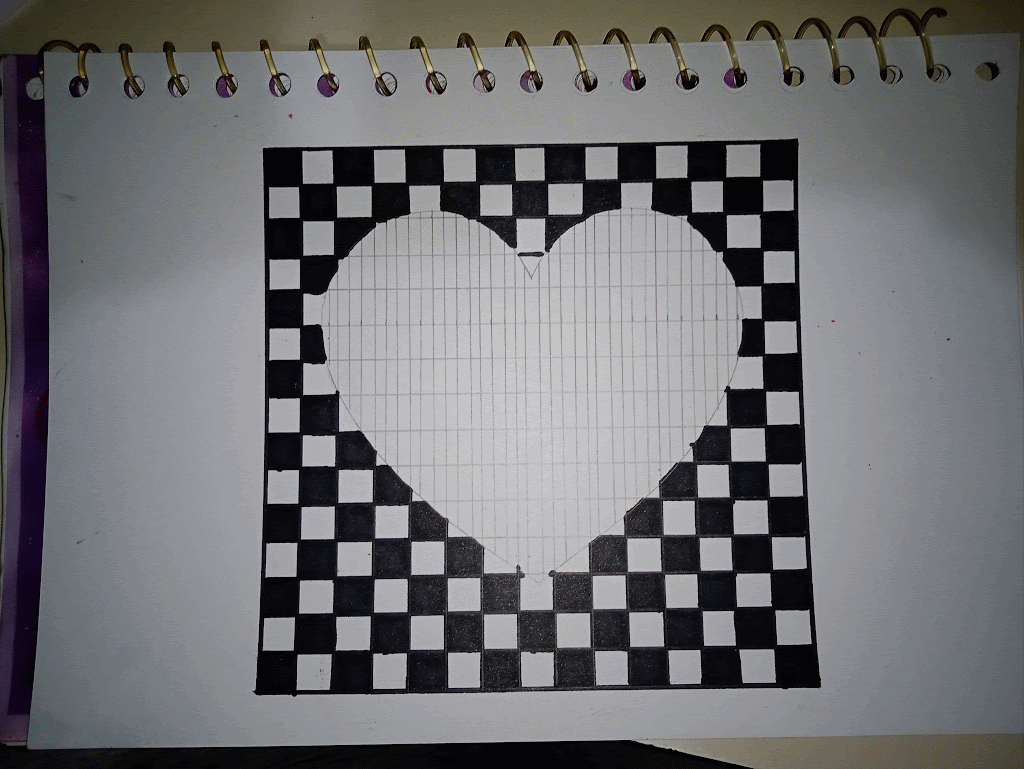
Now it's time to paint the black squares, leaving a blank space as if it were a chessboard. I enjoyed this part, I had to concentrate a lot to paint the corresponding black square.

For the remaining white squares, I used a slightly dark gray, but if you have a lighter shade, it will look better (I think). Maybe this dark gray tone allows the 3D heart to stand out better without making the viewer dizzy 🤣

It is time to start filling in the heart. For this, I took into account a certain number of spaces. I started with black and took as a starting point the second line of the heart, leaving the first space blank, and starting with black. Then 5 white spaces and again black.
For the second line I took as a guide the first black square that I made in the heart and counted 2 spaces, thus coloring the third one, which if you start counting would be the middle one between the two upper squares.
I continued drawing between the lines, taking into account the separations and the previous position to place the black squares correctly.

Then I started using the color red. I used it to paint all the squares that were on the right side of each black square.
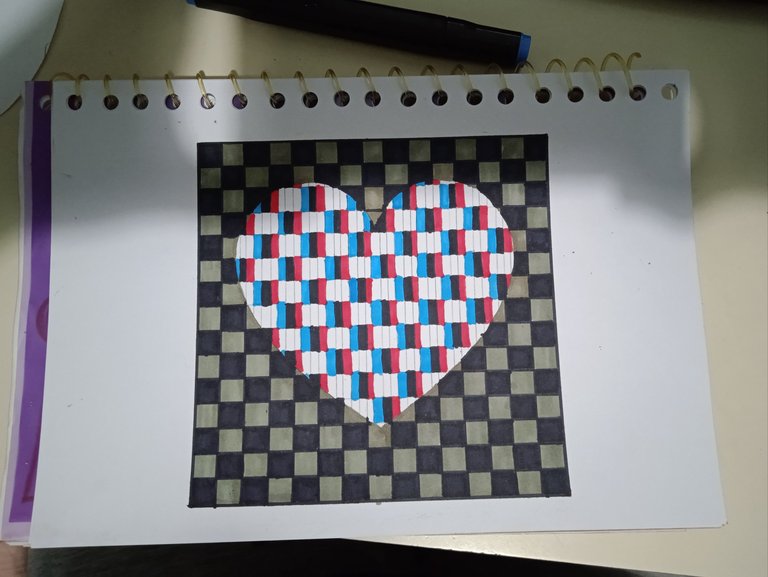
Then I took the light blue color (but you can use a king blue color, which is darker). With this color, I drew the squares that were on the left side of each black block.
Then I used the yellow color. With it, I drew the squares next to each red square. And if you look closely, to guide you better, each square painted in yellow is exactly below the blue ones.
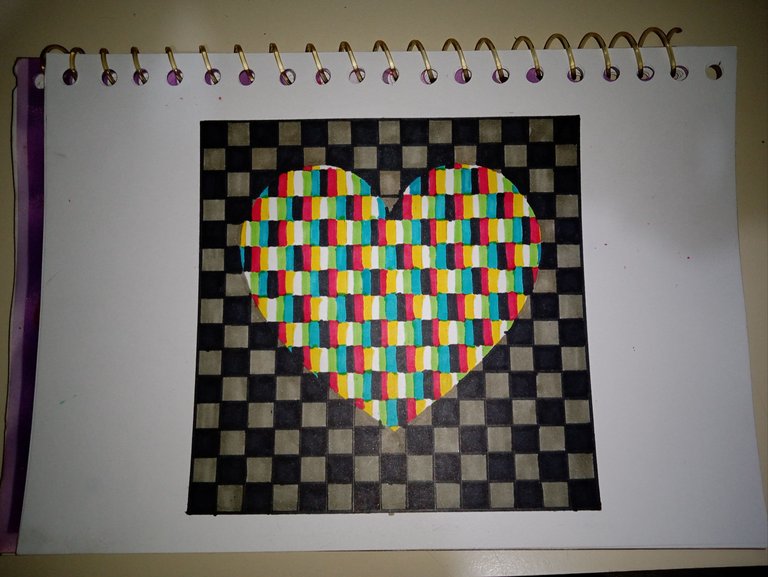
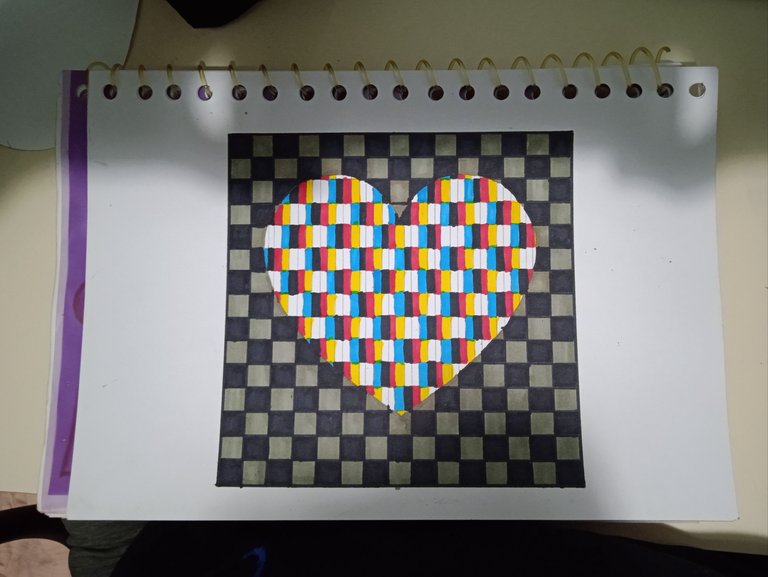
And now to finish, with a light green color, I set out to draw all the squares that were next to the blue squares. And coloring with green, you finish the drawing.
𝐅𝐢𝐧𝐚𝐥 𝐑𝐞𝐬𝐮𝐥𝐭
As an important note, I must add that once you have colored the respective boxes in the heart, you can erase the lines you made with the pencil to give it a better finish.
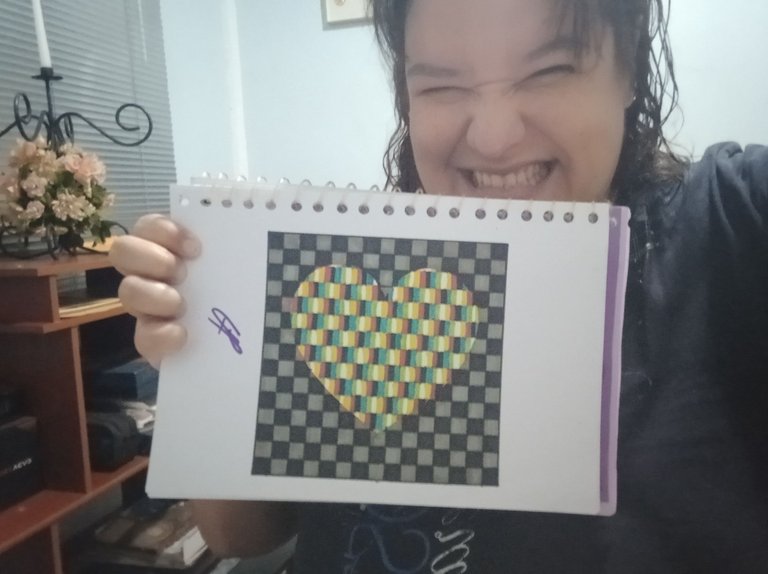
And well, to see the 3D effect you have to use the special glasses, those that they lend in the cinema or those that they sold before that came with a red lens and the other blue. Anyway, that's all for today. Let me know in the comments what you think. I read you! See you next time! 💚
Español
Saludos mi gente de #HiveDIY. Me da gusto poder compartir con ustedes hoy. Así que les traigo algo extra especial. Mi semana ha sido algo estresante y me he tenido que ocupar en otras cosas, así que he bajado el ritmo aquí en Hive pero espero retomarlo de lleno la semana que viene. En fin, ando un poco romántica y buscando alguna forma de desestresarme, decidí hacer algo diferente esta vez. Sigue leyendo para ver el proceso.
𝐏𝐚𝐬𝐨 𝐚 𝐏𝐚𝐬𝐨
Dicen que dibujar sirve como terapia, y desde que vengo practicando más mis dibujos, lo he comprobado, me sirve para desconectar la mente y no pensar en nada más que querer ver el resultado final de mi arte.
Así que hoy pensé, ¿qué tal hacer un Corazón con Efecto 3D?. Y así empecé. Hice un marco cuadrado de 15x15 CM como se muestra en la primera imagen.
Luego dibujé un corazón a mano alzada pero también puedes usar una plantilla para que te salga más derecho y prolijo. La medida del corazón fue al ojo por ciento, sólo quería que quedara centrado lo más posible y un poco más pequeño que el cuadrado.
Luego empecé a hacer líneas verticales y marcando los puntos para luego trazar las horizontales. Cada línea tiene un espacio de 1 CM, haciendo un total de 14 líneas verticales.
Ya después hice el trazado de líneas horizontales, con la misma medida de separación, 1 CM entre cada una, haciendo nuevamente un total de 14 líneas horizontales. Esta parte me recordó al cuaderno de matemáticas 🤣
Ahora para hacer que el corazón resalte entre la cuadrícula, dibujé separaciones de 0.3 mm en cada cuadrito, es decir, cada cuadrito dentro del corazón lo dividí en 3 con dos líneas que tienen un espaciado de 0.3 mm.
𝐏𝐫𝐨𝐜𝐞𝐬𝐨 𝐝𝐞 𝐂𝐨𝐥𝐨𝐫𝐞𝐚𝐝𝐨
Primero empecé delineando el cuadrado.
Luego con mucho cuidado tracé las líneas cuadriculadas sin tocar el corazón. Esta parte se me hizo algo difícil y se nota que se me marcaron un poco más los puntos cercanos al corazón 🤣
Ahora toca pintar los cuadros negros, dejando un espacio en blanco como si fuera un tablero de ajedrez. Esta parte me encantó hacerla, la disfruté bastante ya que me tuve que concentrar mucho para pintar el cuadro correspondiente en negro.
Para los cuadros blancos restantes usé un gris un poco oscuro, pero si tienes un tono más claro, se verá mejor (pienso yo). Igual este tono gris oscuro permite que resalte mejor el corazón 3D sin marear tanto a quien lo ve 🤣
Ya es hora de empezar a rellenar el corazón. Para ello tomé en cuenta cierta cantidad de espacios. Empecé con el color negro y tomé como punto de inicio la segunda línea del corazón, dejando el primer espacio en blanco e iniciando con el negro. Luego 5 espacios blancos y de nuevo el negro.
Para la segunda línea tomé de guía el primer cuadrito negro que hice en el corazón y conté 2 espacios, coloreando así el tercero, que si te pones a contar sería el del medio entre los dos cuadros superiores.
Continué así dibujando entre líneas, tomando en cuenta las separaciones y la posición anterior para ubicar bien los cuadros de color negro.
Luego empecé a usar el color rojo. Este le usé para pintar todos los cuadros que estaban al lado derecho de cada cuadro negro.
Luego tomé el color azul claro (pero puedes usar un color azul rey que es más oscuro). Con este color dibujé los cuadros que estaban al lado izquierdo de cada bloque negro.
Luego usé el color amarillo. Con él dibujé los cuadros que están al lado de cada cuadro rojo. Y si te fijas bien, para que te guíes mejor, cada cuadro pintado de amarillo queda exactamente debajo de los que tienen color azul.
Y ya para terminar, con un color verde claro me dispuse a dibujar todos los recuadros que estaban al lado de los cuadros azules. Y básicamente coloreando con el verde, terminas el dibujo.
𝐑𝐞𝐬𝐮𝐥𝐭𝐚𝐝𝐨 𝐅𝐢𝐧𝐚𝐥
Como nota importante debo agregar que una vez coloreado los respectivos recuadros en el corazón puedes borrar las líneas que hiciste con el lápiz para darle un mejor acabado.
Y bueno, para ver el efecto 3D tienes que usar los lentes especiales, esos que prestan en el cine o los que vendían antes que venía un lente rojo y el otro azul. En fin, esto es todo por hoy, déjame saber en los comentarios ¿qué piensan? Los leo! Hasta la próxima! 💚


| 𝐄𝐥𝐞𝐦𝐞𝐧𝐭𝐨𝐬 (𝐄𝐥𝐞𝐦𝐞𝐧𝐭𝐬) | 𝐇𝐞𝐫𝐫𝐚𝐦𝐢𝐞𝐧𝐭𝐚𝐬 (𝐓𝐨𝐨𝐥𝐬) |
|---|---|
| Las Fotos Utilizadas a lo largo del Post son de mi galería (Photos used throughout the post are from my gallery) | Cámara del Teléfono Redmi Note 9A (Redmi Note 9A Phone Camera) |
| Contenido y Texto Original de mi Autoría (Content and Original Text of my Authorship) | DeepL |
| CANVA | |
| Grammarly |
Posted Using INLEO
Te ha quedado muy bonito este corazón, es cierto lo que dices dibujar te desconecta un rato del mundo real y te lleva a la imaginación, una forma maravillosa para Desestresarse, aparte se requiere mucha paciencia para lograr un dibujo como el tuyo, déjame felicitarte, saludos 🥰
Así es, eso era lo que buscaba con este dibujo precisamente. Muchisimas gracias por tus lindas palabras, lo aprecio un montón! 💚
Hermoso amiga
Hermoso trabajo @pannavi. Me hiciste recordar el arte cinético del maestro Cruz Diez. Lo conoces? Fue quien diseñó los pisos del aeropuerto de Maiquetía. Saludoa
Te quedo hermoso amiga, te cuento que en uno de los pasos sucesivos, me dio como mareo al mirarlo,busca a unirse los colores por lo menos a mi me sucedio, el dibujo relaja es una buena estrategia.
Jajajajaja si, marea al verlo sólo con los dos colores azul y rojo, pero el amarillo y el verde le da un toque extra que resalta más ese detalle. Muchas gracias por pasar y comentar! me alegra que te haya gustado! Un abrazo! 💚