READY! I managed to repair my son's refrigerator; the bimetallic sensor was damaged // ¡LISTO! logré reparar la nevera de mi hijo, el bimetálico estaba dañado
READY! I managed to repair my son's refrigerator; the bimetallic sensor was damaged.
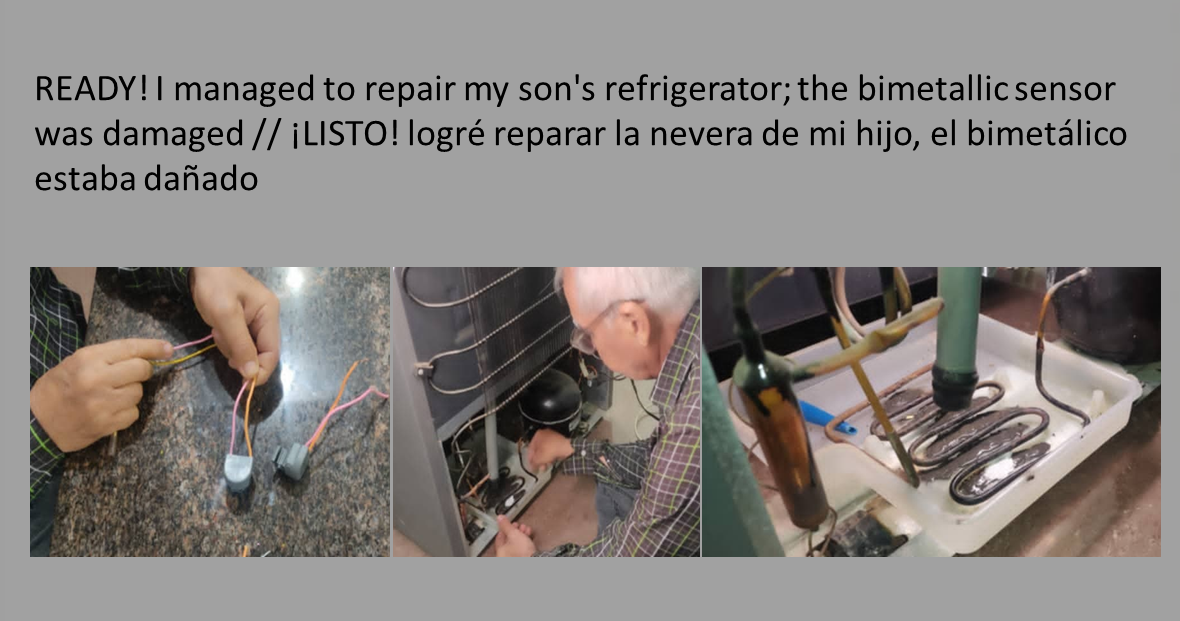
Hi friends, yesterday I told you that my son's refrigerator stopped cooling in the food compartment. There were also flakes of ice on the freezer walls, so I had no doubt that the evaporator was also full of ice. My suspicions were correct, as when I removed the evaporator cover, I noticed that the entire coil was full of ice. This is a very common fault in refrigerators when the "BIMETALLIC" sensor is damaged. This sensor is responsible for allowing current to flow to the defrost heater. When this device is damaged, the heater doesn't turn on, and ice begins to form on the evaporator, preventing cold air from entering the food storage area.
Well friends, to clear up any doubts, yesterday I removed the Bimetallic and performed several tests with which I was able to verify that the "bimetallic of the refrigerator was damaged" for this reason the defrost resistance did not turn on, so today I had to buy a new Bimetallic, thank God I was able to get the original BIMETALLIC with the same nomenclature as the damaged one.
Look, this is the new "bimetallic":
The truth is, we had to go to several stores to find the original bimetallic, because most of them were generic and didn't even have the T60 16A-250V marking like the original, but we were finally able to get the original for $12.


Performing maintenance on the refrigerator's water drain:
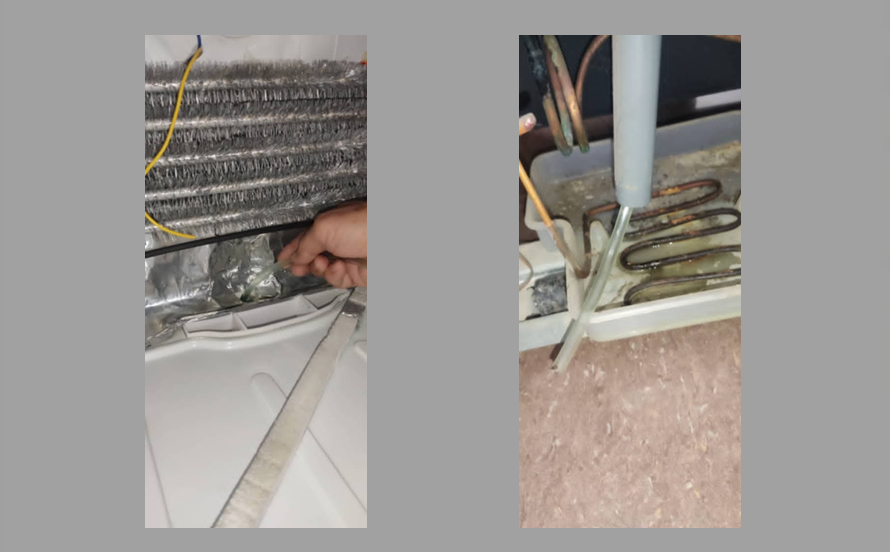
Well friends, after installing the new "bimetallic", I decided to take the opportunity to perform maintenance on the water drain pipe. This pipe collects the water generated in the evaporator when it is in the defrost cycle. This water falls into the upper tray, then drains through the drain pipe until it reaches the lower tray, which collects this water to cool the pipe that comes out of the compressor in order to cool the refrigerant to convert it from a gaseous state to a liquid through the condenser. BUT! While performing maintenance on the drain pipe, I noticed that the lower tray had some cracks, so now something new has emerged. Now I have to repair the cracks in this plastic tray because this also causes serious problems for the cooling system, since the refrigerant's state will not change from "gaseous to liquid".
Cleaning the Drain:
To clean the drain, I used a thin hose, which I inserted into the pipe. Fortunately, there was little debris inside the pipe, which I was able to remove by pouring water through the top drain hole. It was just as the water was falling into the drain pan that I realized the pan was broken, as water was spilling onto the floor.
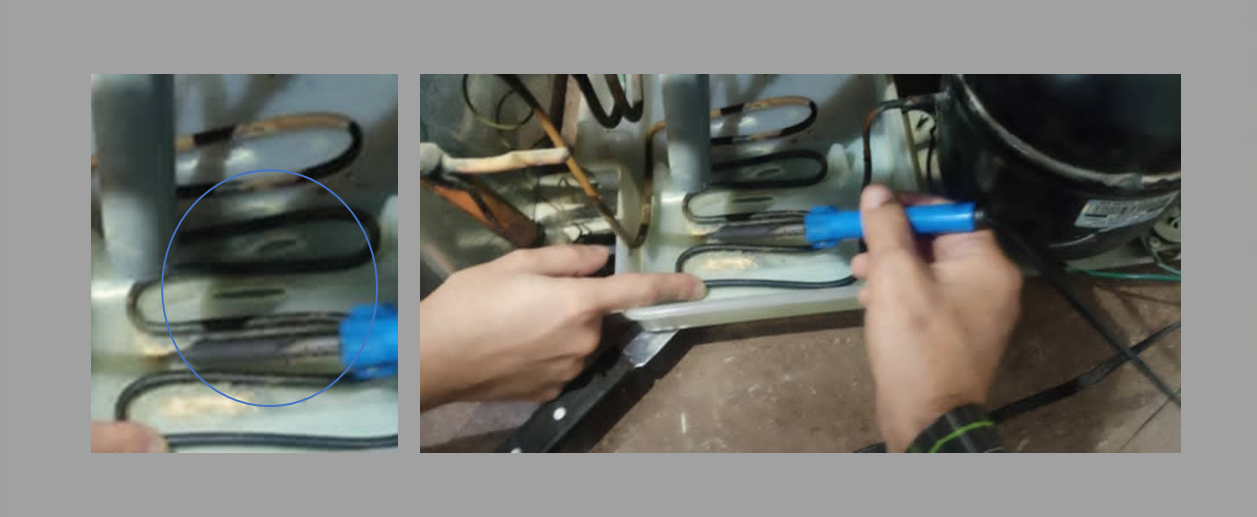
Repairing the Lower Plastic Tray
Well, friends, I decided to try to seal the cracks in this tray by using a soldering iron to melt some plastic rods and then applying a layer of epoxy glue. I thought the ideal solution would be to replace the tray, but due to the urgency of the situation, I decided to repair it while I go through the process of getting this new tray. The truth is, I don't know if this tray can be found in auto parts stores; it's a matter of visiting those stores. But at least I managed to fix the cracks in the tray. The truth is, all the cracks were well sealed.

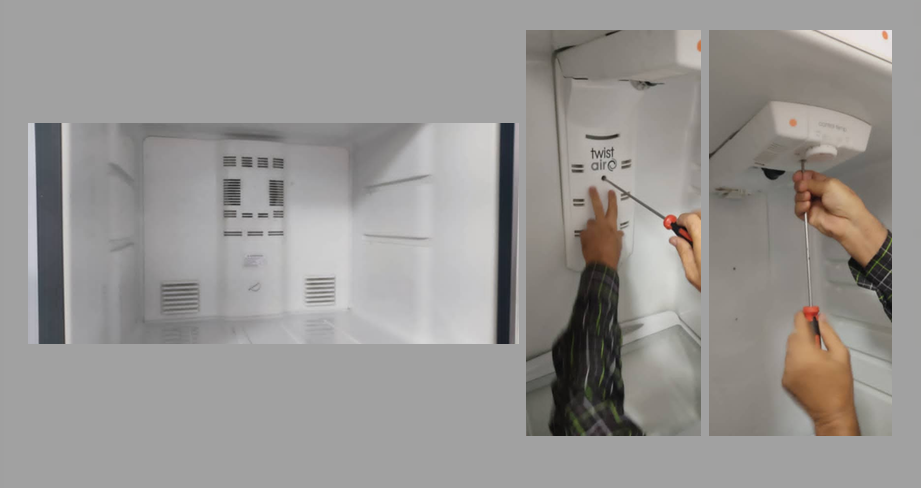
Reinstalling the Various Refrigerator Accessories (Lids)
After installing the new bimetallic seal on the evaporator, as well as cleaning the drain and repairing the cracks in the bottom refrigerator shelf, I will now reinstall the bottom freezer cover and the bottom refrigerator compartment vent cover.
After turning on the refrigerator, I placed a glass of water in the freezer, left it there, and after two hours I could see that the water in the glass had frozen, and in addition to this, the lower compartment of the refrigerator also felt quite cool, so far the refrigerator is working very well.

Well friends, thank God, I was able to repair the refrigerator in my son's house, his wife is very happy because yesterday when she realized that the refrigerator had stopped cooling, she immediately put her hands on her head thinking about the expenses, and it is no wonder, because nowadays any repair is expensive, at least this repair only cost 12 dollars which was what was paid for the bimetallic.
Greetings, God bless you, see you soon...
.

EN ESPAÑOL:
¡LISTO! logré reparar la nevera de mi hijo, el bimetálico estaba dañado
Hola amigos, ayer les decía que la nevera de mi hijo había dejado de enfriar en el compartimiento para la conservación de los alimentos, además de esto, también se observaba escarchas de hielo en las paredes del congelador, por lo que no tuve dudas en pensar que el evaporador también estaba lleno de hielo, mi sospechas fueron ciertas, porque al quitar la tapa que cubre el evaporador, me di cuenta que todo el serpentín estaba lleno de hielo una falla que es muy común en las neveras cuando se les daña el sensor "BIMETÁLICO" el cual es el encargado de darle paso a la corriente para que encienda la resistencia de deshielo, de manera que cuando este dispositivo se daña, la resistencia no se enciende y se comienza a formar hielo en el evaporador al punto de impedir el paso del aire frio hacia el área de la conservación de los alimentos.
Bueno amigos, para salir de dudas, ayer retiré el Bimetálico y le hice varias pruebas con las cuales pude comprobar que el "bimetálico de la nevera estaba dañado" por esta razón no encendía la resistencia para el deshielo, así que hoy tuve que comprar un Bimetálico nuevo, gracias a Dios pude conseguir el BIMETÁLICO original con la misma nomenclatura que el dañado.
Miren, este es el nuevo "bimetálico":
La verdad, es que tuvimos que recorrer varios negocio para encontrar el bimetálico original, porque la mayoría eran genéricos e incluso, no tenían la numeración T60 16A- 250V como lo trae el original, pero al fin pudimos conseguir el original por el precio de 12 dólares.
Realizando el mantenimiento al drenaje de agua de la nevera:
Bueno amigos, después de instalar el nuevo "bimetálico", decidí aprovechar para hacerle un mantenimiento a la tubería del drenaje del agua, esta tubería recoge el agua que se genera en el evaporador cuando se encuentra en el ciclo del descongelamiento, dicha agua cae en la bandeja superior, luego se escurre por la tubería del drenaje hasta llegar a la bandeja inferior que recolecta esta agua para refrescar la tubería que sale del compresor con la finalidad de enfiar el refrigerante para convertirlo de estado gaseoso a liquido a través del condensador, ¡PERO! mientras hacía el mantenimiento de la tubería del drenaje, me di cuenta que la bandeja inferior presentaba alguna fisuras, por lo que ahora ha surgido algo nuevo, ahora tengo que reparar las fisuras en esta bandeja plástica porque esto también ocasiona serios problemas al sistema de enfriamiento, ya que no se va a llevar a cabo el cambio del estado del refrigerante, "de gaseoso a líquido".
Limpiando el drenaje del agua:
Para limpiar el drenaje del agua, utilicé una manguera delgada, la cual introduje por la tubería, afortunadamente habían pocos residuos dentro de esta tubería, los cuales pude eliminar introduciendo agua por el orificio superior del drenaje, y justamente cuando el agua caía en la bandeja fue cuando me di cuenta que la bandeja estaba rota, porque el agua se derramaba por el piso.
Reparando la bandeja plástica inferior
Bueno amigos, decidí intentar sellar las fisuras que presentaba esta bandeja con el uso de un cautín de fundir estaño para derretir unas barras de plástico y luego aplicar una capa de pega epóxica. Considero que lo ideal sería sustituir dicha bandeja, pero por la urgencia del caso, decidí repararla mientras se hace la diligencia de conseguir esta bandeja nueva, la verdad es que no se si se consigue esta bandeja en las ventas de repuestos, es cuestión de visitar esos negocios,pero por lo menos, logré corregir las fisuras de la bandeja, la verdad es que todas las fisuras quedaron bien selladas.
Colocando los diferentes accesorios de la nevera (Tapas)
Después de colocar el nuevo bimetálico en el evaporador, así como la limpieza del drenaje y la reparación de las fisuras de la bandeja inferior de la nevera, ahora voy a colocar nuevamente la tapa del fondo del congelador y la tapa de la ventilación del compartimiento de abajo, para proceder a encender la nevera.
Luego de encender la nevera coloqué un vaso con agua en el congelador, lo dejé allí y luego de transcurrir dos horas pude observar que el agua del vaso se había congelado y además de esto, el compartimiento inferior de la nevera también se sentía bastante fresco, así que hasta el momento la nevera esta funcionando muy bien.