Un encargo un detalle: zarcillos hechos de coco./A detail: tendrils made of coconut.
Versión en español.

Saludos a toda la comunidad de hive diy espero que todos se encuentren bien, me motiva el día de hoy compartir con ustedes un pequeño trabajo que hice por encargo, se trata de unos zarcillos hechos con la concha de coco, este materia que es muy duro y que protege la pulpa de esta deliciosa “drupa”, nombre con el que es conocido este tipo de frutas.
Propio de su estructura las características, color y maleabilidad hacen de la concha del coco un material que se puede utilizar para fabricar un sin números de artesanías, motivo en la cual hoy te enseñaré el proceso que realicé.
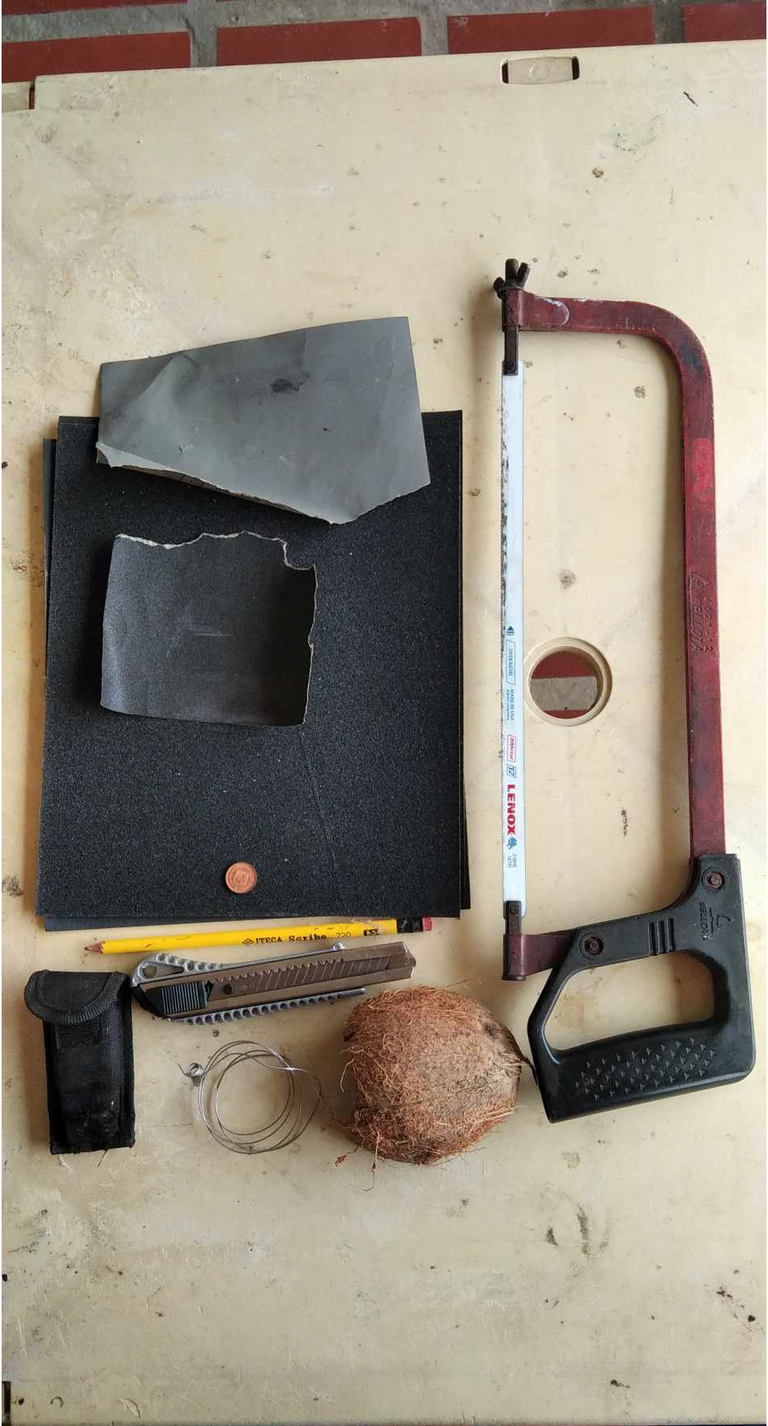
Para llevar a cabo este trabajo necesité los siguientes materiales.
- Hojas de lijas número: 80, 120, 300, 400, 600.
- Cutter.
- Concha de coco.
- Alambre 1mm
- Pega.
- Taladro.
- Mecha 1mm.
- Pinzas.
- Lápiz.
- Segueta.
Paso 1: limpiar el área.
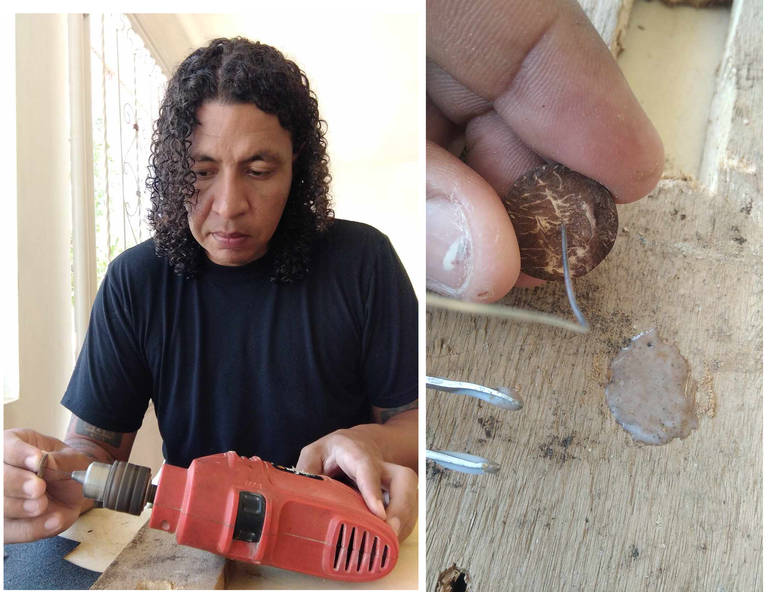
Con la ayuda de un cutter procedí a limpiar el recubrimiento de la concha de coco, ya que este tiende a tener una capa muy fina y suave, remanente de su capa exterior que es fibrosa y tierna, al limpiar esto busco agilizar los próximos pulidos, además marcar el molde sobre la concha.

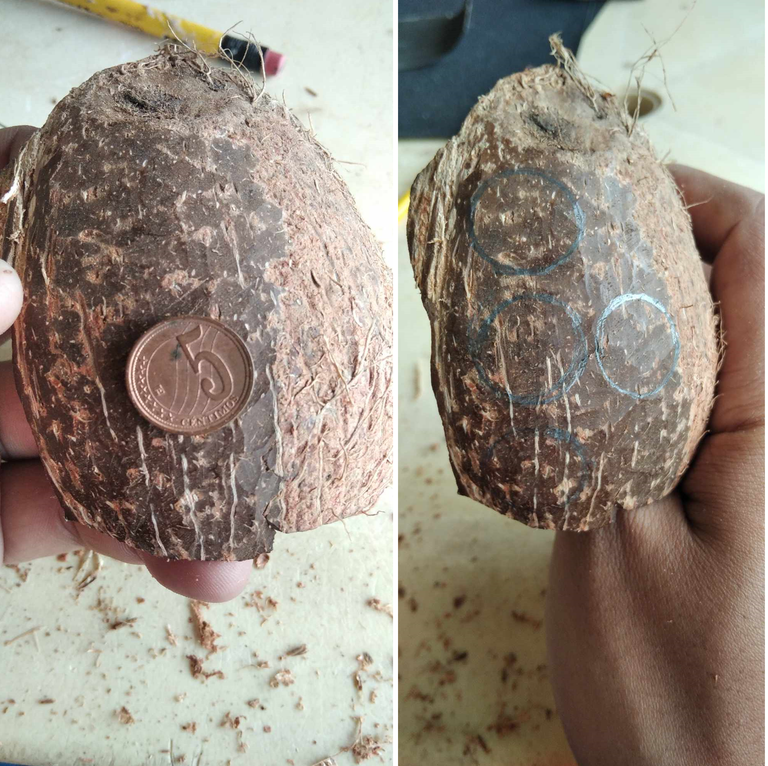
Paso 2: Marcar el molde.
Me refiero a marcar el molde en la concha de coco, para ello me valí de un lápiz y una moneda pequeña, en este caso lo que estaba buscando era poder obtener un diámetro a la medida del lóbulo, marcado el modelo ya puedo realizar el tercer paso.
Paso 3: Sacar los moldes.
Con la ayuda de una segueta fui haciendo cortes rectos entre la separación de los moldes, de esta manera puse sacar varios cuadros, para posteriormente con el cutter poco a poco ir redondeando y buscando las formas que previamente marqué.
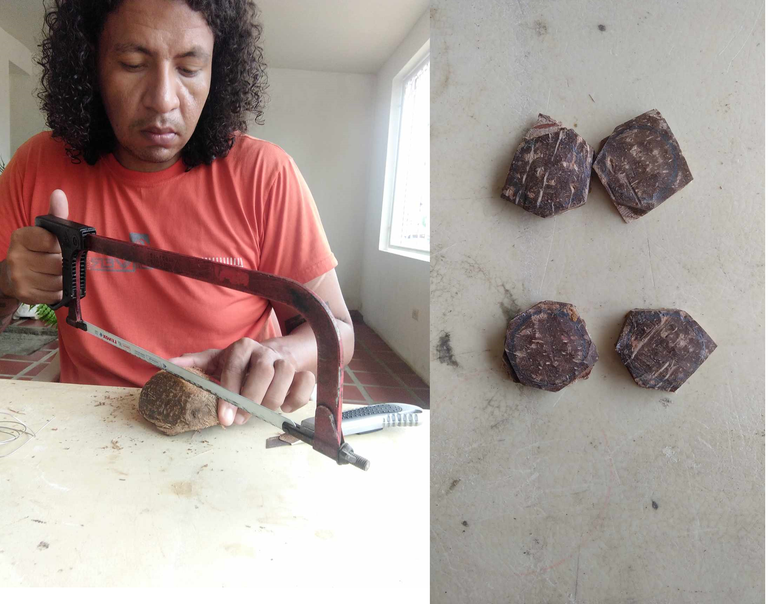
Paso 4: Redondeado de la pieza.
Una vez extraje las piezas, en la imagen se pueden apreciar varias, el motivo fue que si por alguna razón me equivocaba ya iba a tener una pieza de repuesto, pero para mi trabajo solo necesité 2, en este paso tuve que ir removiendo las esquinas propias de la forma de cuadro para darle forma circular, fui alternando un rato tallaba con el cutter y me iba apoyando en una lija 80 para ir alisando las orillas.
Paso 5: Perforación y ensamblado.
Conforme con el diámetro deseado, me toco hacer un pequeño orificio valiéndome del taladro y una mecha de aproximadamente 1mm, en medio de la pieza, con el fin de poder instalar un alambre que sirva como base del zarcillo el cual también mide lo mismo que la mecha usada, con un poco del polvillo resultado del lijado con un poco de cola logré que ambas piezas se fusionaran, la pega en específico es de carpintería, muy resistente y duradera, una realicé el ensamblado dejé reposar cerca de un día para poder pasar al siguiente paso.
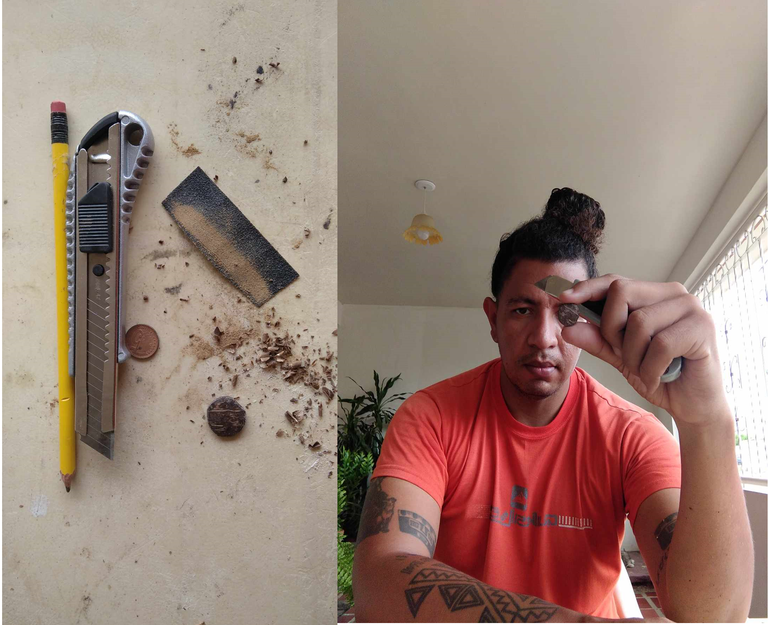
Paso 6: Pulido.
El pulido consta de una serie de pasos que se dividen en realizar procesos de lijados con las hojas que previamente ya tenía preparadas para dicho fin, tanto la 80, 100, 300, 400 Y 600 Cumplen un fin, las de números más bajos tiene un alto grosor, básicamente es para ir quitando de la superficie irregularidades, cuando ya la superficie está plana se procede a subir de numero para que poco a poco vayan desapareciendo los detalles, y el material comience a tener una textura más suave a la vista y al tacto, mi intención es llevarla hasta la número 600 que cumple la función de dar brillo a la pieza, para culminar usé un trozo de jean y un poco de aceite vegetal, mi intención es que quedara lo más pulcra posible.
Paso 7: El resultado.
Después de haber realizado toda esta serie de pasos este fue el producto de varias horas invertidas, una pieza sencilla pero muy hermosa, la retribución por el trabajo no solamente fue placida por devenir una ganancia, también la cliente se mostró muy complacida.
Esto es todo por ahora, espero que la publicación haya sido de su agrado, me gustaría saber su fue así, si tienen algo que acotar también lo puedo hacer, responderé a la brevedad de lo posible, espero que coincidamos en una próxima ocasión.
English Version.
Greetings to all the hive diy community I hope you are all well, today I want to share with you a little work I did on request, it is a few tendrils made with coconut shell, this material is very hard and protects the pulp of this delicious "drupe", the name by which this type of fruit is known.
Due to its structure, characteristics, color and malleability make the coconut shell a material that can be used to make countless handicrafts, which is why today I will show you the process I did.
To carry out this work I needed the following materials.
- Sandpaper sheets number: 80, 120, 300, 400, 600.
- Cutter.
- Coconut shell.
- Wire 1mm
- Glue.
- Drill.
- 1mm bit.
- Tweezers.
- Pencil.
- Saw blade.
Step 1: clean the mold.With the help of a cutter I proceeded to clean the coating of the coconut shell, as this tends to have a very thin and soft layer, remnant of its outer layer which is fibrous and tender, by cleaning this I seek to expedite the next polishing, also mark the mold on the shell.
Step 2: Mark the mold.
I mean to mark the mold on the coconut shell, for this I used a pencil and a small coin, in this case what I was looking for was to obtain a diameter to the size of the lobe, marked the model and I can perform the third step.
Step 3: Remove the molds.
With the help of a segueta I was making straight cuts between the separation of the molds, in this way I put out several squares, and then with the cutter gradually go rounding and looking for the shapes that I previously marked.
Step 4: Rounding the piece.
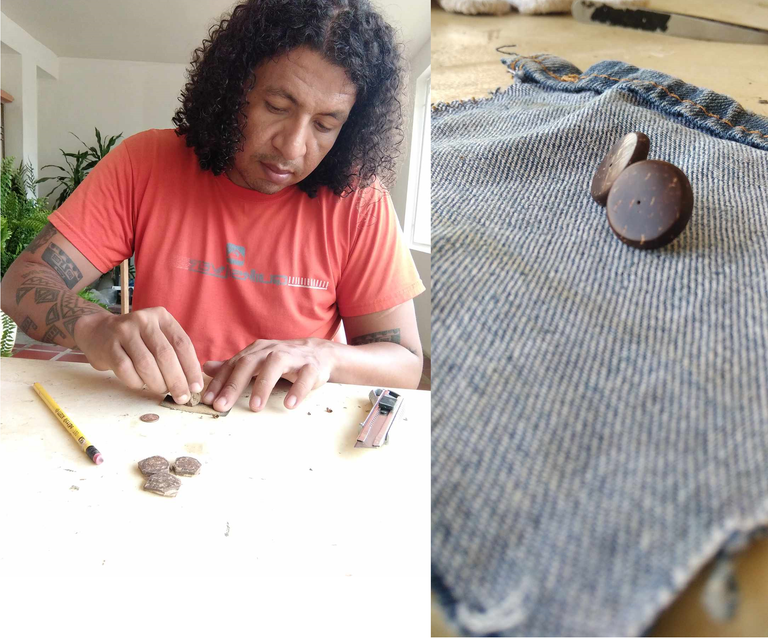
Once I extracted the pieces, in the image you can see several, the reason was that if for some reason I was wrong I would already have a spare piece, but for my work I only needed 2, in this step I had to go removing the corners of the shape of the box to give it a circular shape, I was alternating a while carved with the cutter and I was leaning on a sandpaper 80 to go smoothing the edges.
Step 5: Drilling and assembly.
According to the desired diameter, I had to make a small hole using the drill and a wick of about 1mm, in the middle of the piece, in order to install a wire that serves as the base of the tendril which also measures the same as the wick used, with a little of the dust resulting from sanding with a little glue I managed to fuse both pieces, the specific glue is of carpentry, very strong and durable, once I made the assembly I let it rest for about a day to move to the next step.
Step 6: Polishing.
The polishing consists of a series of steps that are divided into sanding processes with the sheets that I had previously prepared for this purpose, both the 80, 100, 300, 400 and 600, they have a purpose, the lower numbers have a high thickness, basically it is to remove irregularities from the surface, when the surface is already flat we proceed to raise the number so that little by little the details disappear, and the material begins to have a smoother texture to the eye and touch, my intention is to take it up to the number 600 which serves the function of giving shine to the piece, to finish I used a piece of jean and a little vegetable oil, my intention is that it was as neat as possible.
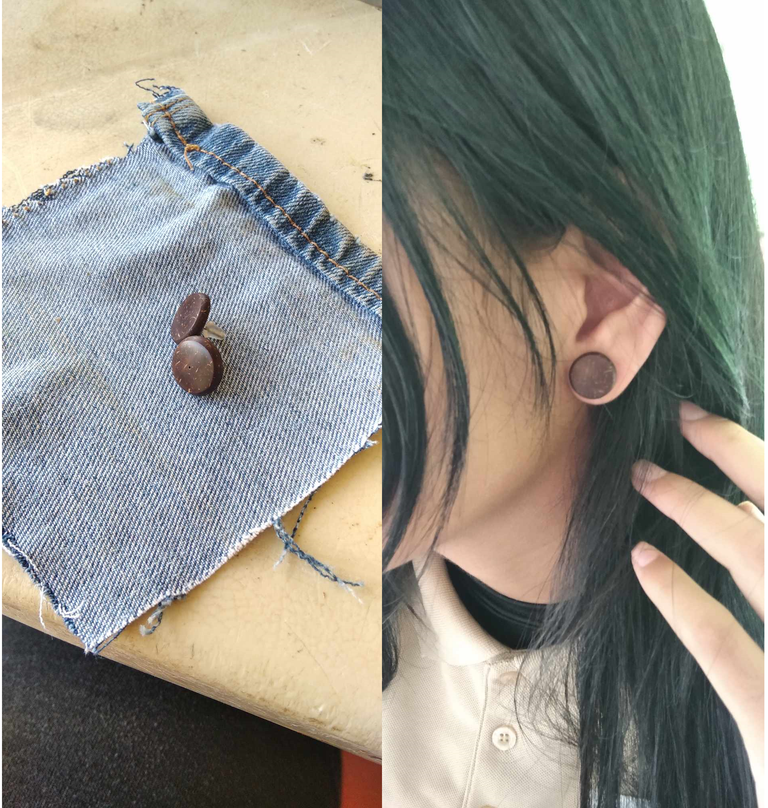
Step 7: The result.
After having done all this series of steps this was the product of several hours invested, a simple but very beautiful piece, the retribution for the work was not only pleasant for becoming a profit, also the client was very pleased.
This is all for now, I hope the publication has been to your liking, I would like to know if it was so, if you have something to comment I can also do it, I will respond as soon as possible, I hope we meet in a next occasion.
Posted Using InLeo Alpha
Que hermosos zarcillos, excelente trabajo y muy detallado el procedimiento. Éxitos 🙌 😊
Gracias por tu apreciación, saludos Irene.
Wou, que bonitos, pequeños y delicados
Muchas gracias, si, esa fue mi intención.
Congratulations @miguelc88! You have completed the following achievement on the Hive blockchain And have been rewarded with New badge(s)
Your next target is to reach 70 posts.
You can view your badges on your board and compare yourself to others in the Ranking
If you no longer want to receive notifications, reply to this comment with the word
STOPCheck out our last posts:
https://x.com/hivediy47901/status/1806532567312543840
Estoy muy contento y agradecido por el apoyo divulgando mi post.
saludos.
Ok. To be honest, I was here because of the photo of the girl at the beginning of this post
Saludos estimado,
No solo el trabajo final te quedo excelente, me llamo la atencion el material que utilizaste, concha de coco, es increible todo lo que se puede hacer con materiales que, por lo menos para mi, son innovadores jaja
Muy buen trabajo, estan divinos 👌
Muchas gracias, esa es la magia de la creatividad para el artesano, y si, el coco es una fruta muy versátil en todos sus sentidos.
Saludos, muchas gracias por comentar.
Por la naturaleza del material serviría pa hacerse túneles ?
Quedaron bellos
Si, se puede, un poco más trabajoso pero bien se puede.
saludos sensei.
Saludos amigo, te quedo muy bien el trabajo, he trabajado con este material y se lo duro que es, hasta que logre tener mi caladora manual de orfebre, la cual usa hoja muy fina para metal.
Sabes que te iría bien usar cianocrilato, he usado una llamada astro glue es económica y buena, se conserva mucho más que la pegaloka.
Saludos, felicidad!
Esos datos no lo sabía, generalmente trabajo con lo que tengo en mano, sin embargo tomo en cuenta tus sugerencias, agradecido ya que con ello seguro mis productos serán muchos mejores.
Este es un espacio en el cual muchas veces uno consigue información de importancia, agradecido con ese dato.
Preciosos zarcillos los amé, una vez tuve unas argollas de este material, me encantaban y las perdí, eran tan bellas como estos zarcillos que te quedaron superlindos e impecables. Gracias por compartir las técnicas para hacerlos.
El material del coco es muy noble, todas sus capas tienen utilidad, sin hablar del agua y la pulpa, espero compartir más elaboración con ustedes.
Gracias por tus palabras @lauracraft
No ni hablar, porque amo tomarme esa agua, y me encanta el coco y todo su esplendor, 😄 solo de tener una mata de coco, me ilusiona esperando la cosecha😂
Me encanta esta idea 😊 quiero un par de esos zarcillos de coco
Gracias por tu apreciación @cirangela los hago por encargo, sin embargo a partir de sus comentarios estoy considerando volver a producir.
Keep up the good work. 👏🎵
Dear beloved Hive creator,
Coding poet Gudasol here to support you sharing your art + life on Hive.
As a fellow creator, I know how hard it is to get the word out there.
I built cXc.world to help creators like us get more support from the blockchain community + beyond.
Share your music on cXc.world, and copy the Markdown for a easy post includes embedded players for Spotify, Youtube, Soundcloud.
That way, you can earn HIVE + stack streams on centralized platforms, as they do still matter.
Not a music creator? No problem. You can still use cXc.world to find + share music you love.
What's next?
Preview the next evolution of cXc, Tetra.earth.
Expose local music from your area!
We're helping grassroots musicians, and you can too by adding their music (no sign up or WAX account required).
Join our community 🐬
Find fellow music lovers in cXc's Discord
Bad news: Saying see you later to Hive! 👋
We didn't get the needed support to continue cXc.world on Hive, as our DHF proposal lacked votes, but [Good News Everyone] cXc.world will add a Markdown copy button, allowing you to easily share your music + music you find on Hive.
For now, we're on WAX, with tools you can use to mint your own Music/Media NFT collection.
Curious about the future of Earth + ET relations? New economic systems?
Find more apps + art from Gudasol
Want to build tools like I used to share this?
I'd love to show you some tips on AI Code generation