Fuente de agua en honor al signo de piscis[Esp/Eng]
Saludos comunidad, hoy estoy aquí, decidí participar con la creación de una fuente de agua en honor al signo de piscis, consideró que mi creación se adapta a la iniciativa. Es sencilla y fácil de realizar, los materiales se consiguen, y la puedes hacer para cualquier evento, sigue leyendo…
Materiales:
- Cartón.
- Cinta adhesiva.
- Tijera.
- Pintura al frío color verde.
- Pintura al frío color blanco.
- Pintura al frío color roja.
- Pintura al frío color negra.
- Pintura al frío color marrón.
- Foami escarchado color anaranjado.
- Foami color rojo.
- Foami color rosado.
- Foami color beige.
- Foami color plateado.
- Foami color blanco.
- Papel crepe color verde.
- Compás.
- Hoja de reciclaje.
- Pincel fino.
- Pincel grueso
- Envase con agua.
- Lápiz de grafito.
- Cartulina negra.
- Sacapuntas.
- Borra.
- Palillo de madera.
- Regla.
- 2 Mostacillas.
- Alambre de cobre.
- Pinza de bisutería.
- Perforador abre huecos.
Procedimiento:
Se agarra el cartón y realiza una circunferencia con el compás de 19 centímetros de diámetro aproximadamente y se recorta el círculo con la tijera.

 |  |
|---|
A los bordes de la circunferencia le coloque cinta adhesiva y pinté con pintura al frío de color blanco la circunferencia, esto es opcional, deje secar.
 |  |
|---|
Luego la base la pinté con pintura al frío de color verde que sería su color definitivo y dejé secar.
 |  |
|---|
Ya teniendo la base de la fuente de agua lista, pegué por todo el borde de la fuente papel, este lo enrolle para que tuviese la forma de piedra. Al principio estaba pegando con pega blanca, pero cambié por silicón caliente para darle resistencia, se hicieron tres hileras de papel.

 |  |
|---|
Seguí pegando papel que haría la función de piedra, hice cinco hileras para dar altura.
 |  |
|---|
Pinte con pintura al frío de color marrón primero por dentro, deje secar y por fuera también.
 |  |
|---|
Por dentro de la fuente de agua vi unas imperfecciones y quise tapar, haciendo con una hoja y un palillo de madera, dos cilindros. Pegué ambos extremos con silicón caliente, pinté y deje secar y coloqué como se observa en la imagen.
 |  |  |
|---|
Realicé movimientos de agua dentro de la fuente con el silicón caliente, con mucho cuidado.

Quería que el agua descendiera desde la parte alta de la fuente, realicé hilos de agua, en una base de cartón que tenía. Agregué vaselina para que sea fácil de despegar, con silicón caliente hice los hilos de agua, dejé secar, despegué y pegué.

 |  |  |
|---|
Ahora, con la fuente lista, faltaba colocar otros elementos para embellecer la obra: algún animal acuático…, me decidí por dos peces que representan al signo piscis. Dibuje el pez en el cartón, luego corte sus partes y las hice en foami (anaranjado, escarchado, plateado, escarchado y beige), este procedimiento lo hice dos veces.
 |  |  |
|---|
Luego se pegó cada parte del pez, los ojos los hice con tira fina de foami blanco, los enrolle en un extremo y pegué con silicón caliente. Le di tres vueltas y pegué y en el centro coloqué una mostacilla de color negro a cada ojo.

Utilice el perforador abre huecos para sacar círculos en el foami que sería las escamas del pescado, ya listo, pegué en la fuente con silicón caliente.
 |  |  |
|---|
 |  |
|---|
Le faltaba algo más a la fuente, pensé en plantas para que se vea más hermosa, lo hice con alambre de cobre, forré con papel crepe verde, utilizando silicón caliente. Elaboré flores con foami (rosado, rojo, anaranjado escarchado), el mismo procedimiento se empleó para el ojo y pegué en la planta.
 |  |  |
|---|
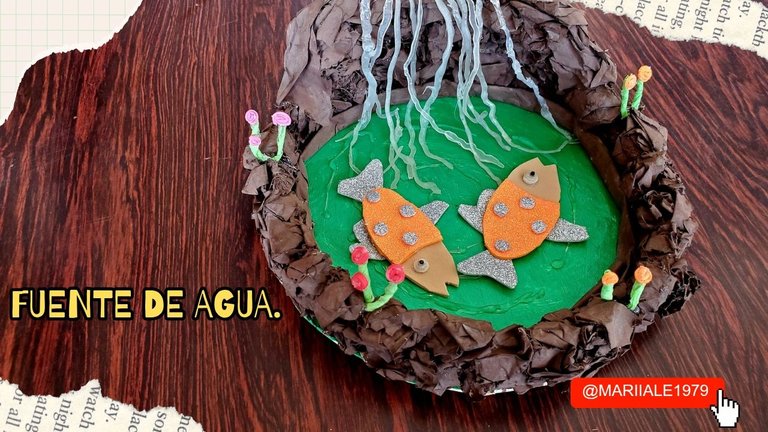
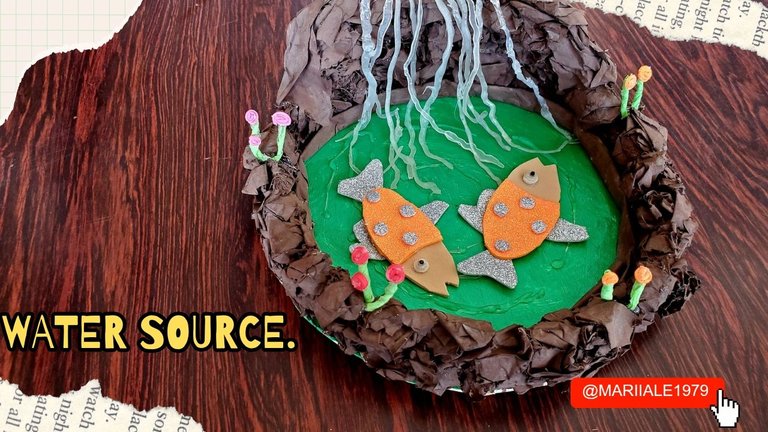
Ya con la planta lista, se pegó en la fuente, siendo este el resultado final. Anímense a realizarlo, es fácil...
 |  |  |
|---|
Me despido de ustedes, hasta un próximo encuentro.

- Todas las fotografías me pertenecen son sacadas del celular Samsung Galaxy S10+.
- Edición, banner y separador realizado con Canva, Meitu, PhotoFrame.
- Traducción con DeepL.com (versión gratuita).
ENGLISH (click AQUI!)
Water fountain in honor of the sign of Pisces.
Greetings community, today I am here, I decided to participate with the creation of a water fountain in honor of the sign of Pisces, considered that my creation fits the initiative. It is simple and easy to make, the materials are available, and you can make it for any event, read on....
Materials:
- Cardboard.
- Adhesive tape.
- Scissors.
- Cold paint green color.
- Cold paint white color.
- Cold paint red color.
- Cold paint black color.
- Cold paint brown color.
- Orange color frosted foami.
- Foami red color.
- Foami pink color.
- Foami beige color.
- Foami silver color.
- Foami white color.
- Green crepe paper.
- Compass.
- Recycling sheet.
- Fine brush.
- Thick brush
- Container with water.
- Graphite pencil.
- Black cardboard.
- Pencil sharpener.
- Eraser.
- Wooden stick.
- Ruler.
- 2 beads.
- Copper wire.
- Jewelry clip.
- Hole punch.
Procedure:
Take the cardboard and make a circle with the compass of approximately 19 centimeters in diameter and cut out the circle with the scissors.
| |
|---|
I applied adhesive tape to the edges of the circumference and painted the circumference with white cold paint, this is optional, let it dry.
| |
|---|
Then I painted the base with green cold paint, which would be its final color, and let it dry.
| |
|---|
Once I had the base of the water fountain ready, I glued paper all around the edge of the fountain, I rolled it up so that it had the shape of a stone. At the beginning I was gluing with white glue, but I changed it to hot silicone to give it resistance, three rows of paper were made.
| |
|---|
I continued gluing paper that would act as a stone, I made five rows to give height.
| |
|---|
Paint with cold brown paint first on the inside, let it dry and on the outside as well.
| |
|---|
I saw some imperfections on the inside of the water fountain and I wanted to cover them, making two cylinders with a leaf and a wooden stick. I glued both ends with hot silicone, painted and let dry and placed as shown in the picture.
| | |
|---|
I made water movements inside the fountain with the hot silicone, very carefully.
I wanted the water to descend from the top of the fountain, so I made water threads on a cardboard base I had. I added Vaseline to make it easy to peel off, with hot silicone I made the water threads, let them dry, peeled them off and glued them.
| | |
|---|
Now, with the fountain ready, I had to place other elements to embellish the work: some aquatic animal..., I decided on two fish that represent the sign of Pisces. I drew the fish on the cardboard, then I cut its parts and made them in foami (orange, frosted, silver, frosted and beige), I did this procedure twice.
| | |
|---|
Then I glued each part of the fish, I made the eyes with a thin strip of white foami, rolled them at one end and glued them with hot silicone. I gave it three turns and glued and in the center I placed a black bead on each eye.
Use the hole punch to make circles in the foami that would be the scales of the fish, then glue them on the fountain with hot silicone.
| | |
|---|
| |
|---|
The fountain was missing something else, I thought of plants to make it look more beautiful, I made it with copper wire, lined it with green crepe paper, using hot silicone. I made flowers with foami (pink, red, frosted orange), the same procedure was used for the eye and glued on the plant.
| | |
|---|
Once the plant was ready, it was glued on the fountain, and this is the final result. We encourage you to do it, it's easy...
| | |
|---|
I bid you farewell, until a future meeting.
- All photographs belonging to me are taken from the Samsung Galaxy S10+ cell phone.
- Editing, banner and separator made with Canva, Meitu, PhotoFrame.
- Translation with DeepL.com (free version).
Posted Using INLEO
https://inleo.io/threads/view/mariiale1979/re-leothreads-29ddtqpuz?referral=mariiale1979
Interesante pieza de arte referida a uno de los signos del Zodiaco como es piscis, gracias por mostrarnos el proceso.
Gracias por apreciarlo.
Quedó genial. Te felicito por ese gran trabajo 😊 Dios bendiga tus manos y tú creatividad 🙏🙏
Gracias por apreciar mi manualidad.🧸
Pero que hermosura y ese paso a paso genial @mariiale1979 una excelente idea, me encantó, tienes madera para las manualidades y su explicación. Éxitos.
Que bueno que te guste, una fuente para decorar los espacios.
Nah excelente jaja, hasta me dieron ganas de bañarme en un rio.
Te inspira ese pensamiento me alegra mucho, un abrazo.
Gracias por asistir a la curación en @Hispapro. @tipu curate 2
Upvoted 👌 (Mana: 35/75) Liquid rewards.
Es un gusto estar ahí
It looks pretty cool. What you did, that's awesome. It shows your creativity. Love it. Thanks!
Thank you for your words.
Saludos cordiales, una excelente manualidad
Un gusto tenerte aquí.
Es una manualidad muy bacana, pronto haré pulseras y crochet, cuando niño me gustaba hacerlas, espero ser muy bueno como tu, que bacano
Seguro que te quedarán hermosas, querer es poder, espero verlas😉
¿Sabías que delegar tu HP a @midnight-studio no solo apoya increíbles proyectos, sino que también te recompensa con Tokens NEON cada semana?
Thanks.
Te quedó genial, muy lindo
Gracias.
Congratulations @mariiale1979! You have completed the following achievement on the Hive blockchain And have been rewarded with New badge(s)
Your next target is to reach 35000 upvotes.
You can view your badges on your board and compare yourself to others in the Ranking
If you no longer want to receive notifications, reply to this comment with the word
STOPCheck out our last posts:
Thanks.
Stay motivated @mariiale1979! You're making excellent progress towards your target. Keep buzzing!
It's so amazing and beautiful at the same time. What you did truly shows your creativity and am impressed, well done and keep it up
Thank you for what you tell me, you also do a very good job.
a very beautiful pair of fish, you are very creative.
Thank you, the mind was blown.
Yes, you're welcome dear.
te quedó cool
Gracias
Es muy hermosa su manualidad, la felicito
Gracias por lo que me dice.
Woow amiga que hermoso 🤗 de verdad una hermosa obra de arte, y también de tomar el paso a paso del proceso, gracias amiga por compartir tú hermoso trabajo, bendiciones para tí y la familia 🙏🌹
Bonitas palabras me dices, puedes hacerlo con paciencia se logra, saludos amiga.
Que post tan bueno, me alegra ver cada detalle de esta creación, tienes mucho talento en tus manos @mariiale1979, gracias por compartir este post.
Gracias amigo por apreciar mi trabajo, paciencia hizo que creará esto.,
Nice 🤩 Me gustaron los colores que elegiste para la fuente y por cierto que me recordó a la que tiene una tía 💜
Muy bueno este paso a paso que nos compartes Mariale 👏🏽
Gracias Heli, una manualidad pudo traerte un recuerdo , eso me agradayy me pone feliz.
un gran trabajo .
te felicito ,feliz inicio de mes...
Gracias, te deceo un Abril lleno de bendiciones.
Congratulations @mariiale1979! You received a personal badge!
Wait until the end of Power Up Day to find out the size of your Power-Bee.
May the Hive Power be with you!
You can view your badges on your board and compare yourself to others in the Ranking
Check out our last posts:
Congratulations @mariiale1979! You received a personal badge!
Participate in the next Power Up Day and try to power-up more HIVE to get a bigger Power-Bee.
May the Hive Power be with you!
You can view your badges on your board and compare yourself to others in the Ranking
Check out our last posts:
Quedó muy bien este homenaje a Piscis.
Un abrazo @mariiale1979.
Un tributo a piscis, me llena de felicidad que mi trabajo gusto un abrazo para ti.