[Esp | Eng] Pulsera Azul de nudo plano | Blue flat knot bracelet
Hola queridos amigos hivers y comunidad de jewelry, en esta oportunidad hice un sencillo tutorial de una pulsera hecha unicamente con nudo plano y tres nudos alondra, el cordón es azul turquesa, es muy brillante la piel de serpiente duradera y quema y es excelente para proyectos de macramé.
Me encanta tejer con macramé de verdad es algo muy gratificante, sirve para desestresarme porque voy como manejando un poco el nerviosismo de las manos, siempre, toda la vida he sido una persona nerviosa, dudo mucho que eso vaya a cambiar aunque ultimamente he logrado estar mas serena, gracias a cosas que he ido haciendo que me han ayudado muchisimo como el arteterapia o simplemente dibujar y la verdad escribir mis post para hive también me ayudado mucho, leer muchas cosas de las que publican en hive en varias comunidades también me ha motivado mucho.
Y bueno sin mas que agregar sigamos con los materiales de este tutorial.
Hello dear friends hivers and jewelry community, in this oportundad I made a simple tutorial of a bracelet made only with flat knot and three lark's knots, the cord is turquoise blue, it is very bright snakeskin durable and burns and is excellent for macramé projects.
I love weaving with macramé, it is really very gratifying, it helps me to de-stress because I manage the nervousness of my hands, always, all my life I have been a nervous person, I doubt that this will change, although lately I have managed to be more serene, thanks to things that I have been doing that have helped me a lot like art therapy or just drawing and the truth writing my posts for hive has also helped me a lot, reading many things that are published in hive in various communities has also motivated me a lot.
And well, without further ado, let's continue with the materials for this tutorial.
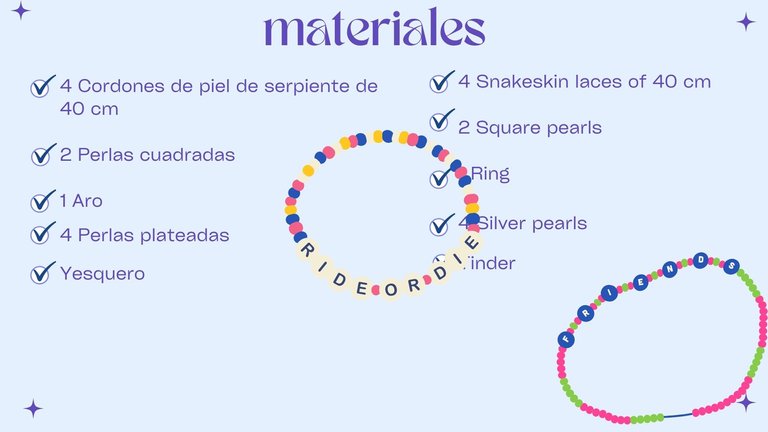
Materiales | Materials
- 4 Cordones de piel de serpiente de 40 cm c/u
- 2 Perlas cuadradas
- 1 Aro
- 4 Perlas plateadas
- Yesquero
- 4 snakeskin laces, 40 cm each
- 2 square pearls
- 1 Ring
- 4 Silver pearls
- Tinder
Procedimiento | Procedure
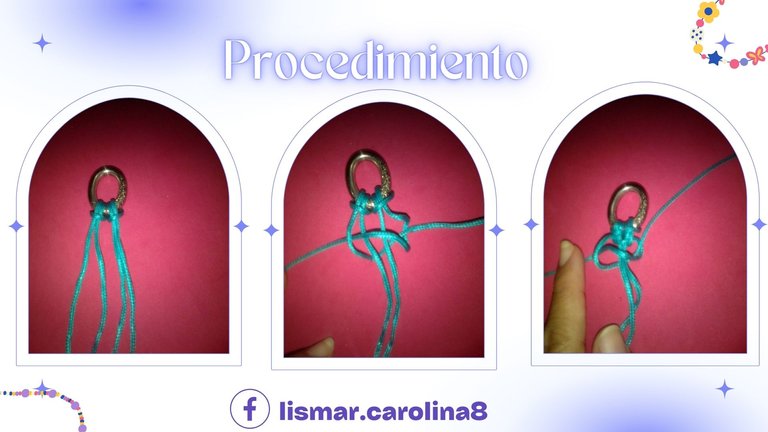
Paso 1 | Step 1
Tomamos dos cordones separados de 40 cm c/u y hacemos un nudo alondra en cada uno los dejamos los dos a la mitad, luego empezamos a tejer el nudo plano, que basicamente trata es de pasar un cordón por delante y otro por detrás. Luego vamos jalando cada nudo para que el tejido vaya tomando forma. Seguimos tejiendo el nudo plano hasta que se termine el cordón que va tejiendo por los extremos. Luego quemamos y pisamos con el yesquero hacia el tejido para que se peguen los cordones.
We take two separate cords of 40 cm each and we make a lark's knot in each one, we leave them both in the middle, then we begin to weave the flat knot, which basically is to pass a cord in front and another in the back. Then we pull each knot so that the fabric takes shape. We continue weaving the flat knot until the cord is finished weaving through the ends. Then we burn and step with the tinder towards the fabric to make the cords stick.

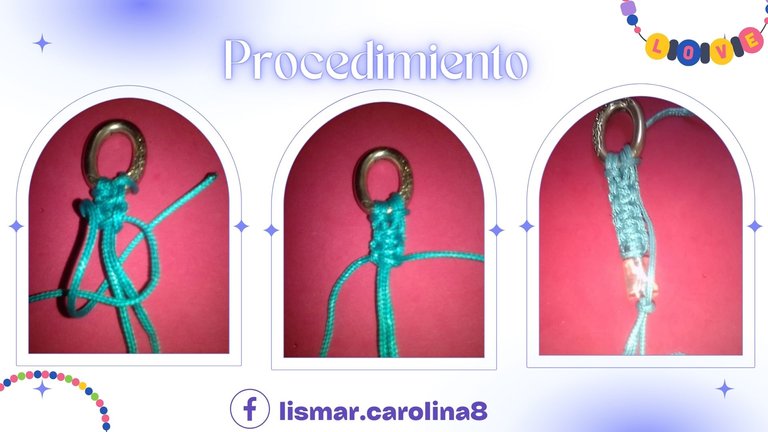
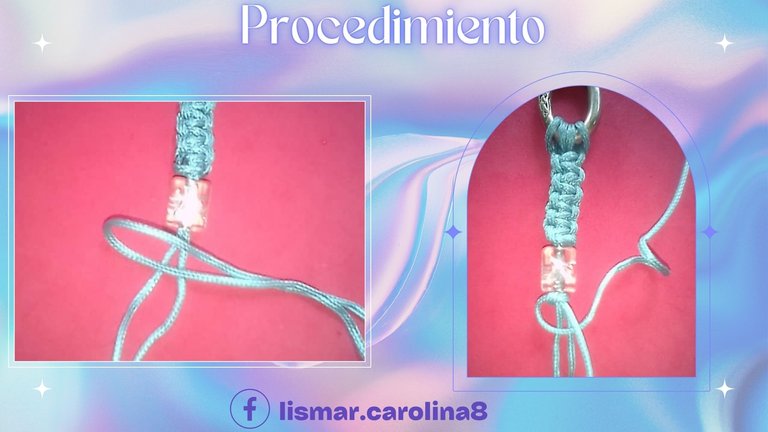
Paso 3 | Step 3
Introducimos una abalorio cuadrado y luego comenzamos otra vez agregando otro cordón de 40 cm haciendo un nudo simple que toma los dos cordones del centro y volvemos a hacer el nudo plano hasta que se termine este cordón y quemamos y empujamos con el yesquero el tejido para que se pegue.
We introduce a square bead and then we start again adding another 40 cm cord making a simple knot that takes the two cords from the center and we make the flat knot again until this cord is finished and we burn and push with the tinder the fabric so that it sticks.
Paso 4 | Step 4
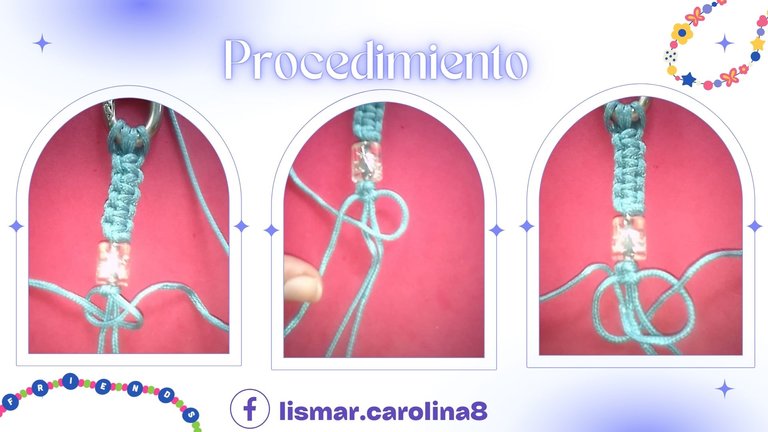
Luego procedemos a hacer el cierre de la pulsera: tomamos otro hilo de 40 cm lo cortamos a la mitad , un extremo lo usamos para hacer un nudo alondra en el aro y el otro lo usamos para tejer un nudo plano que va a servir para deslizar y cerrar la pulsera para hacer ese nudo plano primero debemos colocar los dos extremos de la pulsera un par de cordones hacia arriba y el otro par hacia abajo y sobre esos cordones tejemos el nudo palo y finalmente introducimos las 4 perlas plateadas en cada extremo de cada cordón , los jalamos un poco hacia afuera y quemamos el borde lo presionamos contra la perla con el yesquero.
Then we proceed to make the clasp of the bracelet: we take another 40 cm thread cut it in half, one end we use to make a lark's foot knot in the ring and the other we use to weave a flat knot that will serve to slide and close the bracelet to make this flat knot first we must place the two ends of the bracelet a pair of cords up and the other pair down and on these cords we weave the stick knot and finally we introduce the 4 silver beads at each end of each cord, We pull them a little bit outwards and burn the edge and press it against the bead with the tinder.
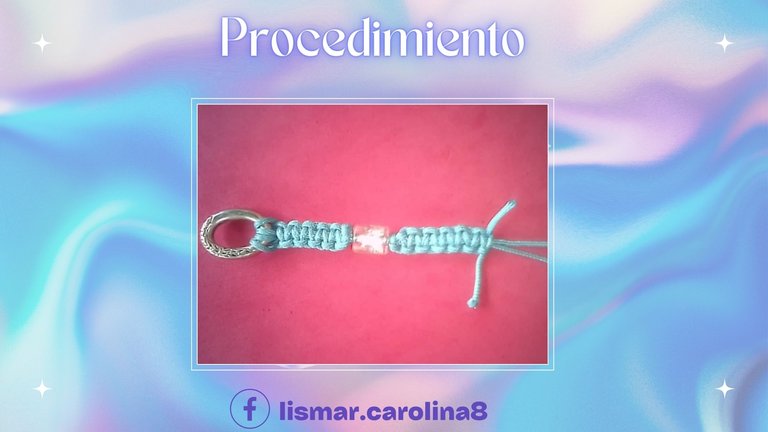
Resultado | Result
Será muy difícil que las perlas que colocamos al final se salgan y no habrá necesidad de hacer un nudo al final, ya que una vez que lo quemamos es muy dificil que el cordón de píel de serpiente se suelte.
Y bueno así es como queda esta sencilla pero preciosa pulserita, es muy facil de hacer y se hace rapido ya que el tejido es muy simple. Lo unico que se me hizo engorroso fue meter las perlitas plateadas porque el cordon de piel de serpiente que compré era un poco grueso, pero aun asi logre hacerla y me gustó mucho. Espero también les haya gustado como quedó ❤️
It will be very difficult for the beads that we place at the end to come off and there will be no need to tie a knot at the end, because once we burn it, it is very difficult for the snake's bead to come off.
And well this is how this simple but beautiful bracelet looks like, it is very easy to make and it is done quickly because the weaving is very simple. The only thing that made me cumbersome was to put the silver beads because the snakeskin cord I bought was a little thick, but I still managed to make it and I liked it a lot. I hope you also liked how it turned out ❤️

Gracias por leer !!!
Thanks for reading!!!

Créditos | Credits
Utilicé Canva para editar imágenes y personalicé un poco una plantilla de Canva.
I used Canva to edit images and customize a Canva template a bit.
Utilicé deepl.com para la traducción
I used deepl.com to traduction.
Todas las imagenes del paso a paso son mías, tomadas con mi telefono Yezz Liv1.
All the step by step images are mine, taken with my Yezz Liv1 phone.
 |
 |
 |
!DIY
Gracias @dayadam
You can query your personal balance by
!DIYSTATSEstá preciosa, excelente trabajo 👍
Gracias
¡Felicidades! Esta publicación obtuvo upvote y fue compartido por @la-colmena, un proyecto de Curación Manual para la comunidad hispana de Hive que cuenta con el respaldo de @curie.
Si te gusta el trabajo que hacemos, te invitamos a darle tu voto a este comentario y a votar como testigo por La Colmena.
Si quieres saber más sobre nuestro proyecto, te invitamos a acompañarnos en nuestro servidor de Discord.
Gracias por el apoyo!
Gracias por el apoyo!
Muy bonita @lismarcarolina2 me gustó el diseño, muy casual y juvenil; saluditos.
Gracias amiga
Congratulations @lismarcarolina2! You have completed the following achievement on the Hive blockchain And have been rewarded with New badge(s)
Your next target is to reach 4000 upvotes.
You can view your badges on your board and compare yourself to others in the Ranking
If you no longer want to receive notifications, reply to this comment with the word
STOPCheck out our last posts:
Te quedó muy bonita. Me gustan mucho las pulseras tejidas. Tierno en ese color.
Gracias. Saludos
Excelente creación amiga te felicito saludos.
Gracias