Another Member of the Clay Charm Added : Mr. Doom Dada aka TOP! Happy Birthday :D

Hello, how are you? Since I posted the clay charm I made a few days ago, I've been inspired to make more, but this time I will make a charm of Choi Seunghyun, aka TOP of BigBang, who made me like K-pop.
It is his birthday today, so it is more special. I have something to revisit in my past post, and the inspiration for the design comes from his iconic song Doom Dada, in which he is dressed in a blue suit with a big bow and the iconic big microphone.
It is my second time making charms, so I can say I am more comfortable doing it, and I've been feeling confident about so if you wanted to see the process, keep scrolling LOL.
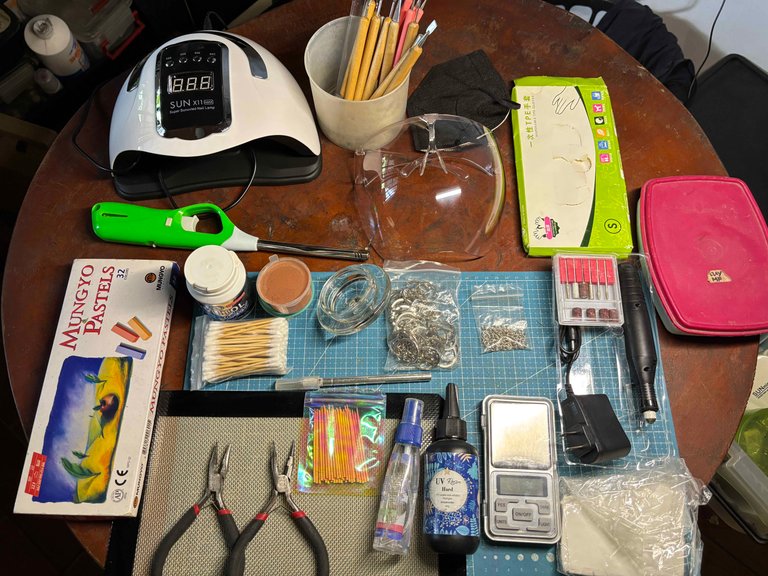
Materials I Used:
- Polymer Clay
- Portable Weighing Scale
- Soft Pastels
- X-Acto Knife
- Wire
- Alcohol
- Qtip
- Makeup Brush
- Eyepin
- Acrylic Rolling Pin
- Jump ring
- Gum Container
- Oven
- Silicone Mat
- Uv Resin
- Face Shield/Facemask
- Disposable Gloves
- Uv Lamp
- Pliers
- Keychain
Craft Time!
Craft Time!
The Sketch:
So I like to sketch the reference in a sketchbook rather than digitalize it, this is less stressful, maybe when I have the time, I will. I was staring at it, something was missing on it, and that's a red beard LOL.
Conditioning the Clay:
These are the colors I am going to use. Then I condition them one by one. I start with the lighter clay first because the blue one leaves a stain on my hand when conditioning it.
Weighing the Clay:
And then I weigh them on their specific weight by parts using this portable weighing scale.
Shaping Each Part:
One thing that I discovered is prepping all the parts that are needed for each part of the body. For example, I do the head first, it contains eyes, nose, lips, eyebrows, and ears, and the hands and legs. And then the bow so bows have a lot of parts, so I divided it into each part.
And then for the mic, I use aluminum foil to save a lot of polymer clay and to lessen the weight of the clay, too.
And last is the clothing.
Sculpting the Face:
Before I start adding the other parts, I clean any lint and dust off the clay using a Q-tip and alcohol.
Then I started to add the eyes, usually the eyes are placed in the middle part of the face.
Next are the eyebrows. I did them thick because TOP has really thick eyebrows.
For the nose, I use this pinkish color, and then I shape it like a triangle, and then I cut the middle of it just like the shape of a heart. Then I added it in the middle of the face.
For the mouth, I cut a tiny piece of black clay and then rolled it into a piece of paper until it became thin, and then I cut it into two lines and then connected them like I do in the photo.
For the hair, I grab black clay and divide it into parts according to how the hair flows. I used to not like doing hair, but when I suddenly learned the technique, I got used to it fast.
When I fill up the head with hair, I am going to blend then using this dotting tool.
This is what it looks like. By the way, I added the beard I forgot to add earlier LOL.
Arranging and Sculpting the Body:
I roll some of the blue clay into a thin shape like this.
And then I wrapped the body with that rolled clay and shaped it like clothes.
And then I added the feet, and then the shoulder part.
Then I connected the head and the body by using a wire with a little hook to make each other stick together.
And then I added the mic strap and bow.
Making the Big Mic:
To make the mic, I first shape aluminum foil into a circle and the handle of the mic.
Using this dark grey clay, I wrap the circle foil until it is fully coated.
I did the same thing with the handle. Then I added details to it, too.
Then I connected the body and the mic. I just pray that the mic will not fall when baking LOL.
Adding the Eyepin:
Before I bake the clay, I added the eyepin in the top middle of the head.
Baking the Polymer Clay:
And then baked in pre preheated oven at the temperature and time on the packaging said. After baking, let it cool down first before proceeding to the next step.
Glazing the Clay:
Before I apply UV Resin, I make sure to tape the back of the clay to prevent it not moving when applying UV Resin. I apply the first coat as thin a possible and then carefully spread it using a brush, and then cure it under UV Light until the stickiness is gone, and then keep layering it with UV Resin, and to completely remove the stickiness, I cure it under the sun for about an hour.
Adding the Keychain:
Then I added the keychain using the two pliers, and this is how it looks.
Mr. Sun Meet His New Friend!
They look cute together!
Photoshoot Time!
Our cat smells Mr. Doom Dada. LOL
Thank you for visiting, see you on my next blog. :D
Please take care of your mental health as well.
I hope you are okay today :))
Please take care of your mental health as well.
I hope you are okay today :))


Dios mío, de verdad admiro muchísimo su creatividad y esa hambre por crear y crear cosas bonitas, tengo la ilusión de iniciar pronto con la porcelana fría, y la verdad usted y otra miembro de esta Blockchain son mis principales referentes, me motiva mucho ver a otros artistas haciendo cosas hermosas, creo que me inspira a crear y a, eventualmente, alcanzar su nivel. Mil gracias por compartir sus creaciones por acá 💙🍁
This creation is too beautiful..