Completed Laundry Room Reno
After many many weekends of working on my laundry room renovation I'm finally finished! In my Part I post I had just completed the outer box of the sink cabinet and next up was to do the cabinet doors. Here we go.

I cut the doors out of some walnut veneer boards I had from another project. I sanded the veneer with a fine grit sandpaper to tighten up the grains and to polish the surface, and then I put on two coats of natural stain.

I was able to cut four of the five doors that I needed out of a single board. My intention was to have the grain line up seamlessly among the upper cabinets. The board I chose had a busy grain pattern so it was a bit of a mistake picking that board. In the end the doors didn't look seamless at all. I also made it worse by accidentally flipping one of doors. When I finished the uppers I absolutely hated how they looked.

To make matters worse the last door had to be cut from a different board and it accepted the stain way differently than the others. Different woods, different cuts and different trees all accept stain differently. Its just the way it goes when working with real wood. The last door was slightly darker to begin with and it went a dark chocolate brown color when I stained it. Putting them all together, it ended up being this ombre color pattern of light brown fading to dark chocolate. It looked so terrible to me that I couldn't keep it that way. It would be changed eventually.

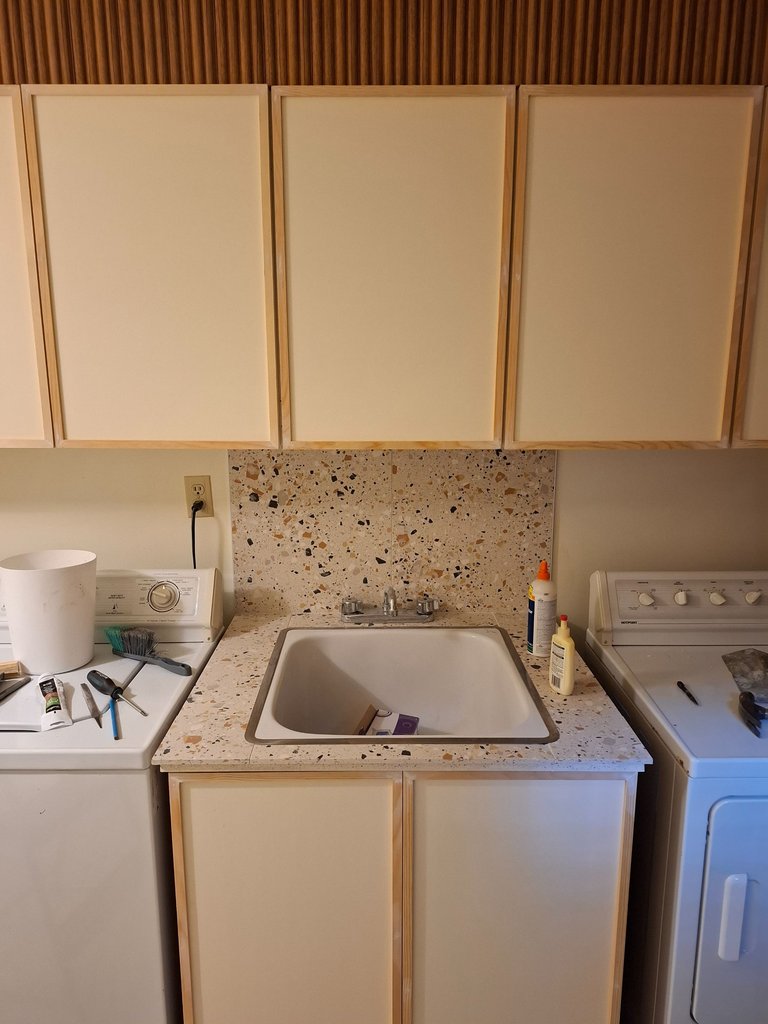
Next was installing the sink and making the counter. We wanted to keep our original sink because its large and vintage and deep and just all around super cool. Cutting the hole and installing it was a huge pain. It took way longer then I would have liked - like most aspects of the project.

For the counter I had all of these off cut offs and scraps of the tiles we used, so I figured I would try and make a mosaic counter out of them. I thought that I would be able to just break them up into pieces but the dam things wouldn't break. I tried dropping them on cement and tried hitting them with a hammer but they mostly just chipped into tiny fragments or super big chunks that were way too big to use. Maybe the tiles don't break well because they are porcelain? I didn't want to spend hours cutting them into small pieces so instead I cut six larger tiles into the shape of the counter. That also took a long time. I basically spent an entire weekend on the sink and counter.

I had two full tiles left over after everything else was complete, so I decided to do a backsplash behind the sink with them.

I like the look of the backsplash but my wife and I both agree that it looks odd with it being so small and not covering the whole space.

We plan on buying a few more tiles and finishing the entire back wall behind the appliances. That will be a little down the road after I finish our ceiling in our living room (my next project).

I installed some shut off valves on the hot and cold water lines to the sink and then reconnected our existing faucet. I also secured the sink to the countertop.

I hit a wall a few times in this project. I mean that figuratively, not literally. It was more of a mental thing. The project just kept dragging on and I was getting over it with every hurdle I had to jump through. The cupboard doors was one of those moments. At first I was going to try again and cut new doors from a different piece of wood but I got so frustrated that I was like "fuck it, I'm painting them white and calling it a day." My wife wasn't happy when I made the unilateral decision without talking to her about it but I was in a mood that day from struggling with the doors so I just went ahead and painted them.

I also reinstalled the original overhead light. The fixture is very vintage looking and actually really suits the space.

I was effectively done at this point but the cupboards were still bothering me. They looked better white then they did the wood color but they still looked pretty cheap and unfinished.

I decided to try and make shakers around the edges to make them look a little more professional.

I did that on all of the upper and lowers using pine trim pieces.

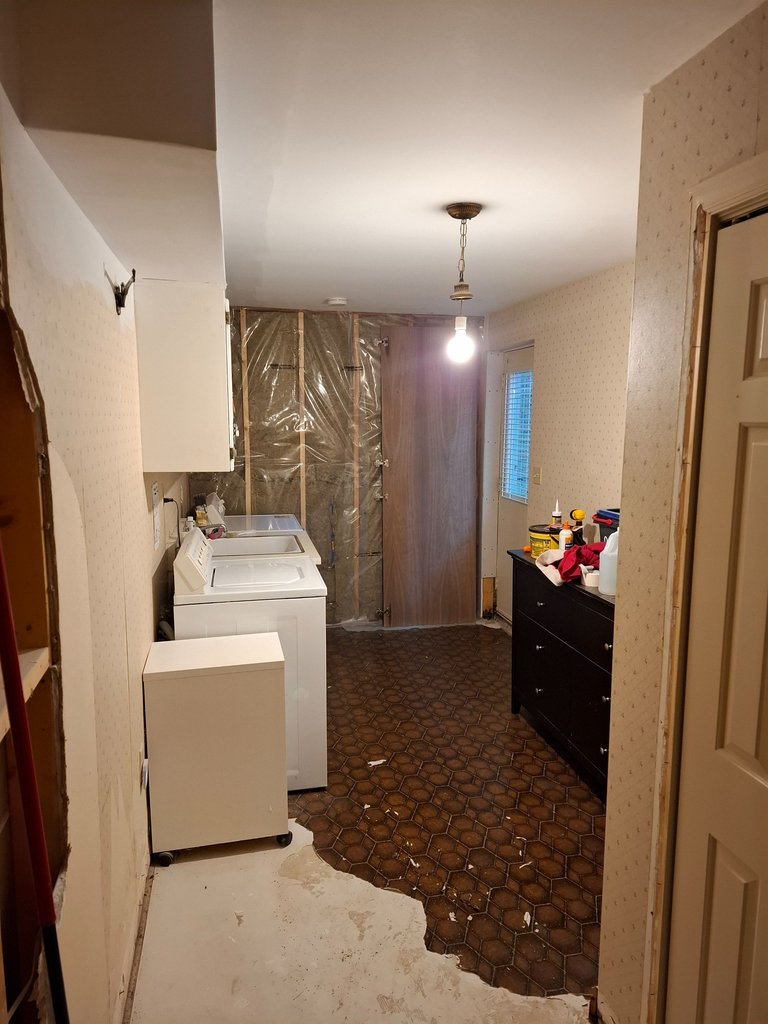
I'm not a cabinet maker by any means and this was my first time attempting to build them. But they looked pretty decent overall once I installed the shakers and painted them white to match. We are getting into the final reveal stages so I think that this is a good place to give a reminder of what the room looked like before I started the renovation. It had brown linoleum floors, outdated wallpaper, country style cupboard doors, and exposed walls because of a basement leak. It was a hot mess basically.
My wife saved some very old cupboard pulls from her parents cottage when they renovated their kitchen. They were dirty and greasy and I didn't really like them but she was adamant that she wanted to install them.

She got me to I look at them more closely and I realized that are actually fully made out of copper, which I've never seen before. Once the grease was scrubbed off them they polished up really nicely and I agree now that they look pretty cool.

A major bonus for us is this additional lighting that I installed. We bought these motion sensor under cupboard lighting strip probably 8 years ago or so and we never used them at our previous house. We have been storing them brand new in the box all of this time and now we finally have a use for them.

The laundry room only has the one overhead light so its pretty dark in there. These lights really brighten it up when we need it. Its a great bonus because it makes more sense then the extra lamp that I put in the room and we didn't need to spend any extra money on lighting strips. Its a small win for the project I'd say.

Here are the final photos of how it all turned out.

Well thats if folks. That's the final project completed. Now I can take a break from it before starting the next.

Until then, thanks for reading!!

Haha, I think we had that light in our kitchen when I was a kid! Very nice job on the remodel. My wife would love to have a space like this for laundry!
Yeah that light is super old school. Definitely popular in the 80s (when our house was built). I kind of like it though. I like the vintage vibe. At least for now until we find something better.
For sure!
Greetings @leaky20 ,
Quite a lovely renovation....the shakers on the cabinetry make all the difference..adding dimension. You have established a harmony that is always welcome.
Well done!
Kind Regards to you and your good lady.
Bleujay
Yes I agree that the shakers make a big difference and were needed. Thanks for the encouragement!