Piñata de Demon Slayer para Cumpleaños
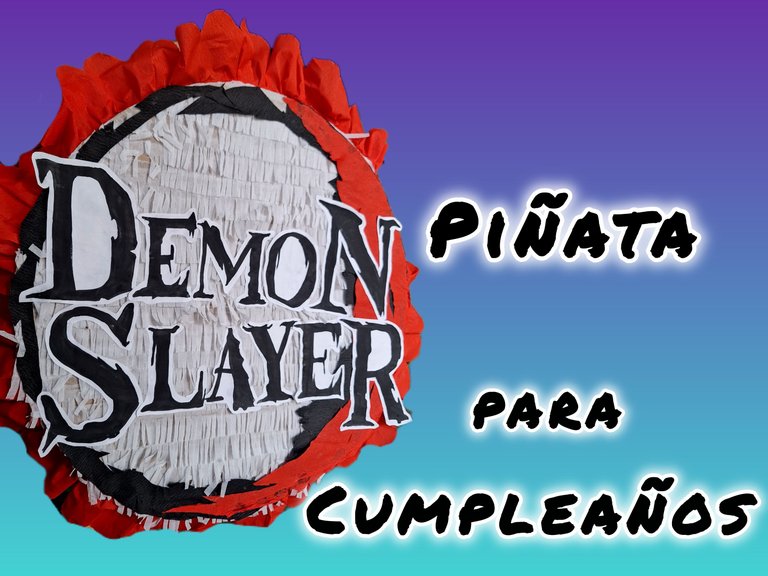
Saludos querida comunidad, pronto será el cumpleaños de mi hijo Rafael y la decoración será del anime Kimetsu no Yaiba también llamado Demon Slayer, estamos muy entusiasmados por esto porque ambos somos fans de la serie, así que por acá le comparto el tutorial de cómo hacer la piñata.
Greetings dear community, my son Rafael's birthday will soon be coming up and the decoration will be from the anime Kimetsu no Yaiba also called Demon Slayer. We are very excited about this because we are both fans of the series, so here I am sharing the tutorial on how to make the piñata.

Materiales / Materials
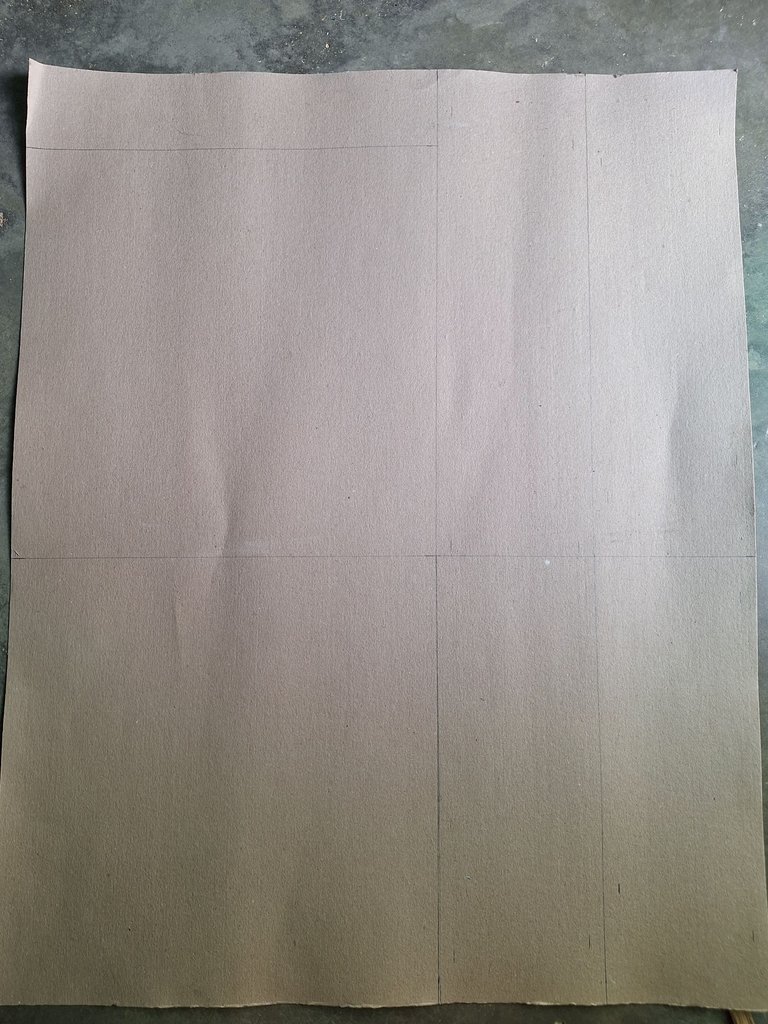
Lámina de cartón de 100x79 cm
Papel crepé: blanco, rojo y negro.
Papel bond
Pintura al frío color negro
Pegamento blanco o silicón
Regla
Lápiz
Cúter
Tijera
Pincel
100 x 79 cm cardboard sheet
- Crepe paper: white, red, and black
- Bond paper
- Black cold-applied paint
- White glue or silicone glue
- Ruler
- Pencil
- Utility knife
- Scissors
- Paintbrush
Proceso / Proccess
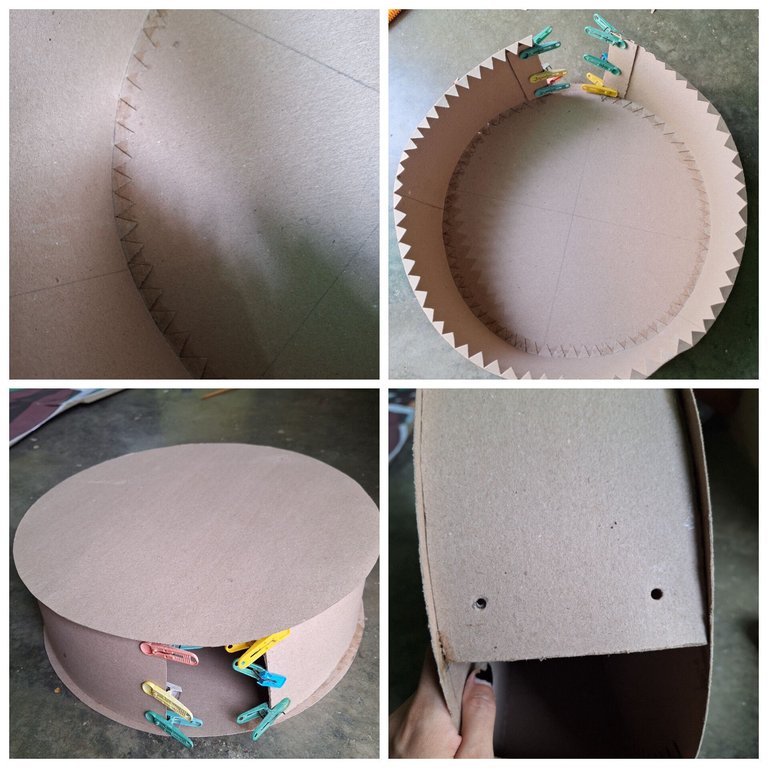
Colocar la lámina en vertical y medir con la regla y el lápiz dos cuadrados de 45 x45 cm, y dos listones de 17 cm de ancho.
Place the sheet vertically and measure with the ruler and pencil two squares measuring 45 x 45 cm, and two strips measuring 17 cm wide.
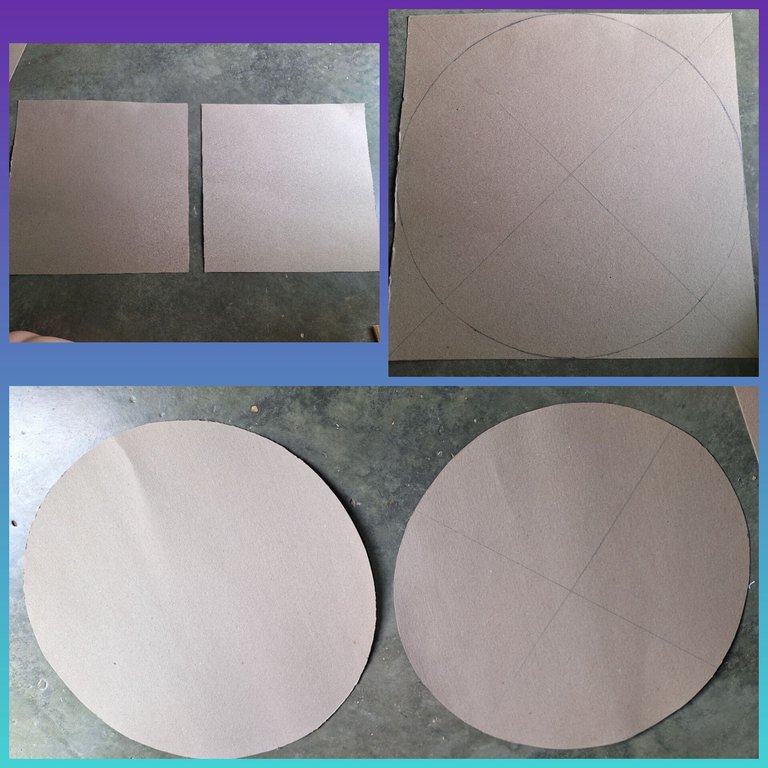
Con el cúter cortar los cuadrados, con la regla y el lápiz trazar líneas diagonales de esquina a esquina para formar una cruz, estas líneas servirán de guía para dibujar dos circunferencias iguales, luego con el cúter cortar los dos círculos.
With the cutter cut the squares, with the ruler and pencil draw diagonal lines from corner to corner to form a cross, these lines will serve as a guide to draw two equal circles, then with the cutter cut the two circles.
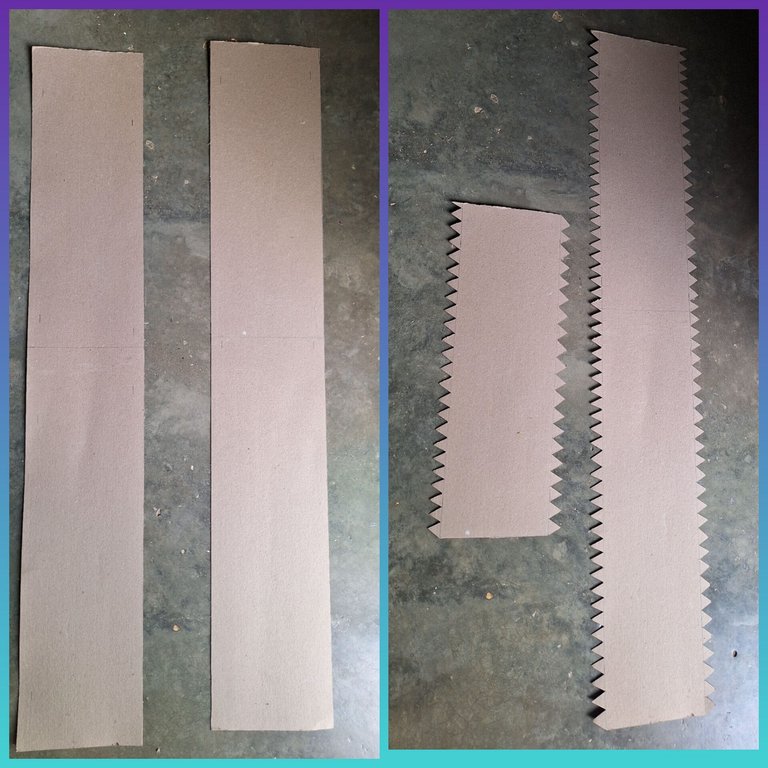
Cortar uno de los listones de 45 cm de largo y el otro dejarlo de 100 cm, ambos de 17 cm de ancho como dije anteriormente. Medir desde los bordes un margen de 1,5cm y dibujar una línea, luego con la tijera cortar pequeños triángulos guiándose por esa como límite, para crear un borde dentado.
Cut one of the strips 45 cm long and the other 100 cm long, both 17 cm wide, as mentioned above. Measure a 1.5 cm margin from the edges and draw a line. Then, using scissors, cut small triangles along this line as a guide, creating a serrated edge.
Doblar el borde dentado y pegar a 1 cm de distancia del borde de la circunferencia dejando un espacio de unos 10 cm, este espacio servirá para introducir los dulces una vez este cerrada la piñata, luego pegar unos pequeños trozos de cartón a los lados de ese agujero para crear un base más sólida, pues en ese espacio de deben hacer los agujeros para el alambre que sujetará la piñata para colgar.
Fold the serrated edge and glue it 1 cm away from the edge of the circumference, leaving a space of about 10 cm. This space will be used to insert the candy once the piñata is closed. Then, glue some small pieces of cardboard to the sides of that hole to create a more solid base, since in that space you must make the holes for the wire that will hold the piñata to hang.
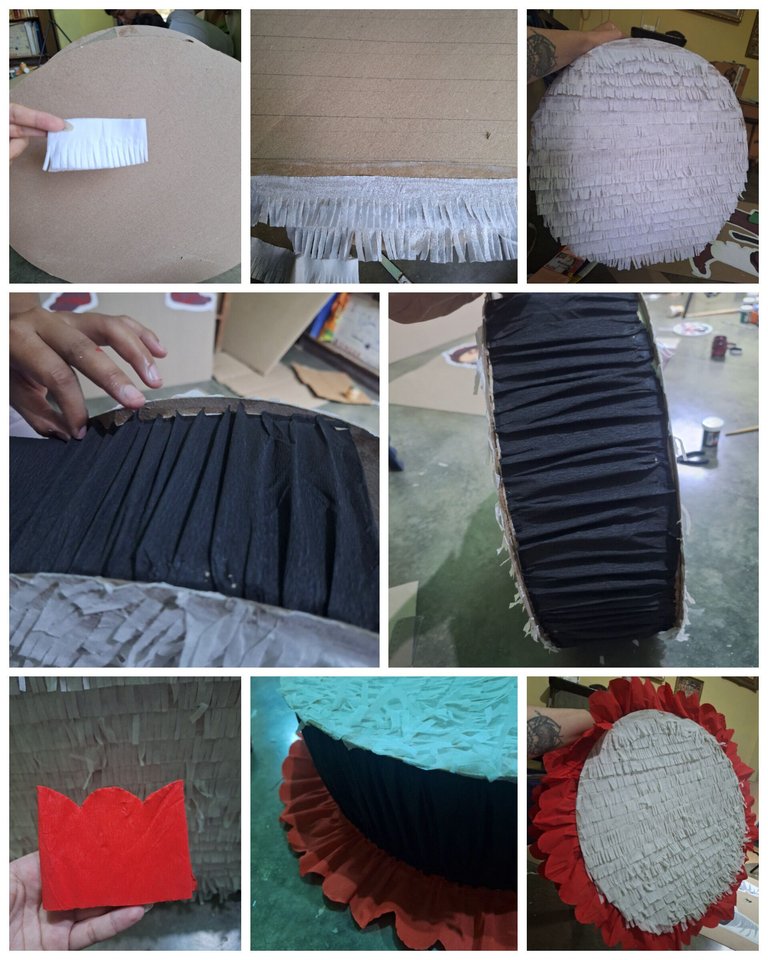
Una vez armada la piñata llegó el monto de decorarla, para ello cortar el papel crepé tal como viene a unos 5cm, luego cortar flecos de 2.5cm, extender el papel e ir pegando de forma ascendente y horizontal en ambas caras de la piñata. Luego con el papel crepé negro cortar a los 14 cm, extender el papel por los laterales e ir pegando de forma arruchada hasta completar. Con el papel crepé rojo hacer un corte de 5 cm pero esta vez haciendo semicírculos, extender el papel y pegar por todo el borde de la piñata.
Once the piñata was assembled, it was time to decorate it. To do this, cut the crepe paper as is to about 5 cm, then cut 2.5 cm fringes, unfold the paper, and glue it in an ascending and horizontal direction on both sides of the piñata. Then, with the black crepe paper, cut at 14 cm, extend the paper to the sides, and glue it in a crumpled manner until complete. With the red crepe paper, make a 5 cm cut, but this time making semicircles. Unfold the paper and glue it all around the edge of the piñata.

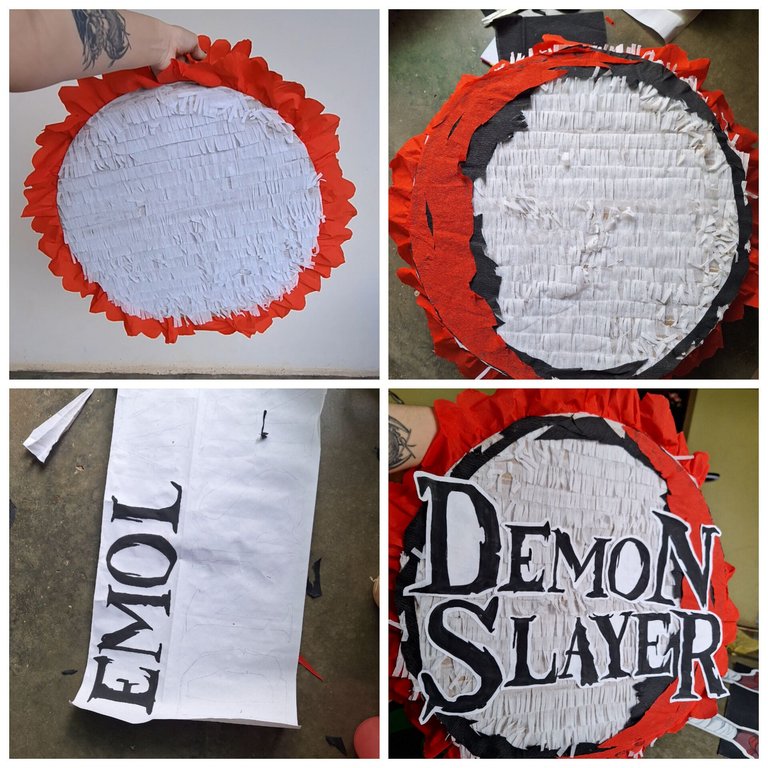
Con el papel crepé rojo y negro cortar y pegar un pequeño borde irregular por la circunferencia, luego sobre papel bond dibujar y pintar las letras con pintura negra, cortar las letras y pegar a la piñata 😊
With the red and black crepe paper, cut and glue a small irregular edge around the circumference, then on bond paper draw and paint the letters with black paint, cut the letters and glue them to the piñata 😊
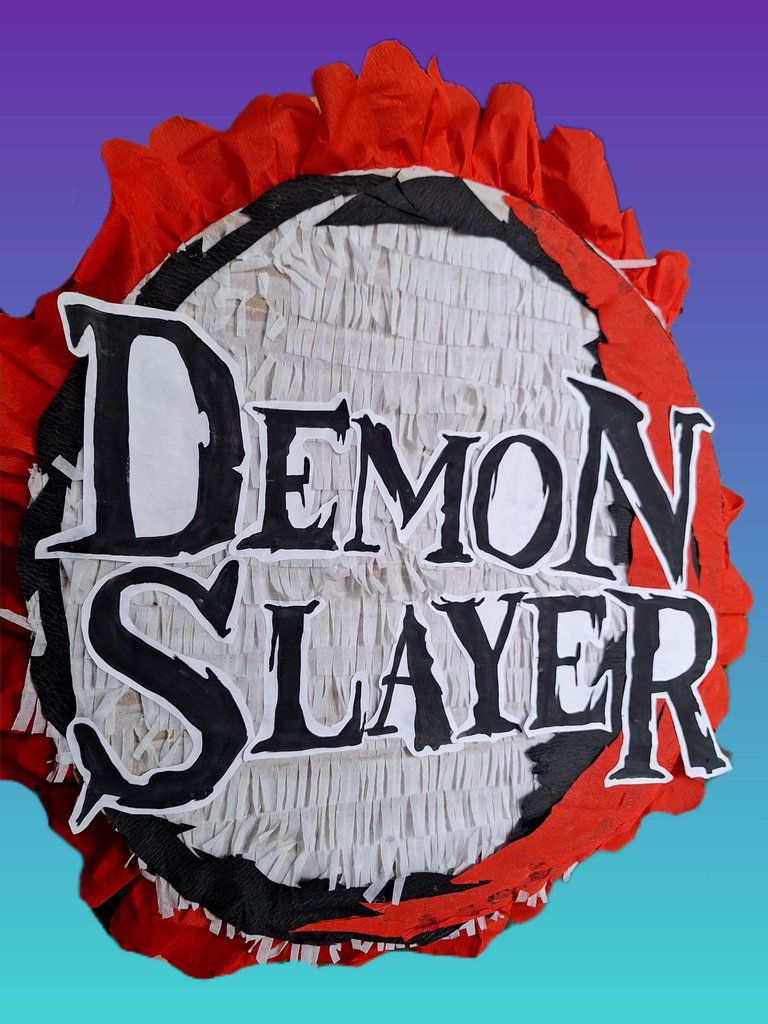
Resultado / Result

Espero les haya gustado. Les invito a leer mis próximas publicaciones y siempre estaré dispuesta a responder sus preguntas y comentarios, también pueden seguirme y contactarme en cualquiera de mis redes sociales. ¡Muchas gracias!
I hope you liked it. I invite you to read my next posts and I will always be willing to answer your questions and comments. You can also follow me and contact me on any of my social networks. Thank you very much!
The only thing i dislike is the name "Demon", the rest, what a good remembrance of our childhood!
Kudo's dear friend you did a fantastic job.
Thank you 😊
Your welcome
What a lovely pinata. You mad Rafael's party a special one with your craft. Thank you for sharing you work
selected by @stevenson7
Thank you very much, Rafael is very excited about his birthday theme 😊
Que bonito que puedas compartir un anime con tu hijo💖 la piñata se ve genial! Gracias por el tutorial✨
Si ya vimos todas la temporadas y pronto veremos la película que se estrena en septiembre, estamos muy contentos de poder disfrutar esto juntos . Saludos 😊
Este post ha sido votado y curado por el equipo Hive Argentina | Participa en nuestro Trail de curación.
Únete a nuestro Trail Aquí.
Puedes hacerlo también en nuestros enlaces preconfigurados de Hivesigner:
| 10 HP | 25 HP | 50 HP | 100 HP | 250 HP | 500 HP | 1000 HP | 1500 HP | 2000 HP |
Muchas gracias por el apoyo 😊
No sabía que hacías piñatas, es un trabajo bastante laborioso por toda la cantidad de cositas que hay que hacer. Me gustó mucho la temática, es un anime bastante genial. Gran trabajo amiga.
Muchas gracias, tu sabes que siempre es bueno aprender de todo 😄. Un abrazo!
Se ve muy bien, gracias por el tutorial lo tendré en cuenta por si algún día me toca hacer una 🥳
Gracias por el apoyo 😊
Un tutorial muy completo y de fácil explicación, siempre realizas la piñata para el cumpleaños de Rafa y he visto que siempre es relacionada con el anime que estén viendo en ese momento. Imagino la emoción de Rafael. Bendiciones 🙏🏾
Muchas gracias Cochanet 😊 ahora vamos viendo poco a poco One Piece, pero Demon Slayer tenemos tiempo esperando la película que se estrena ahorita en septiembre y estamos full emocionados por eso
Tremenda Piñata, quedó impresionable. Es un mensaje subliminal para que vea Demon Slayer de nuevo jajajaj
jajaja siempre es bueno verla de nuevo y estar con los recuerdos aun frescos para disfrutar la película. Saludos!