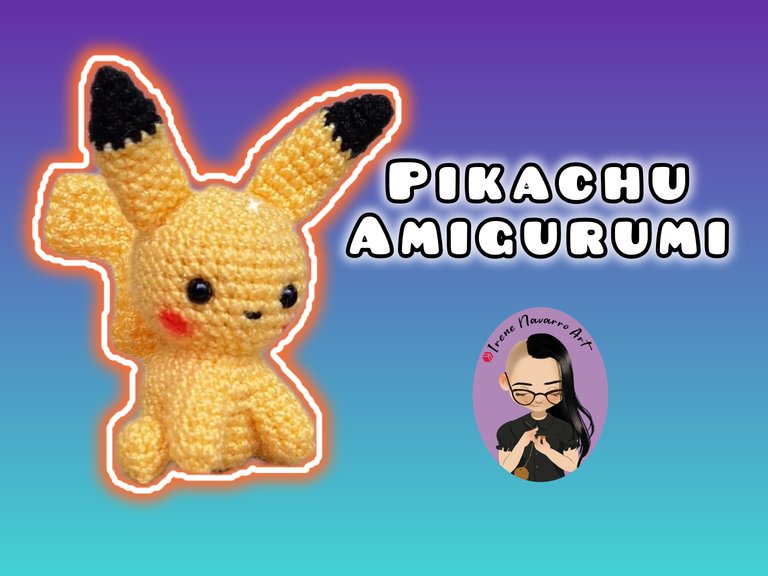
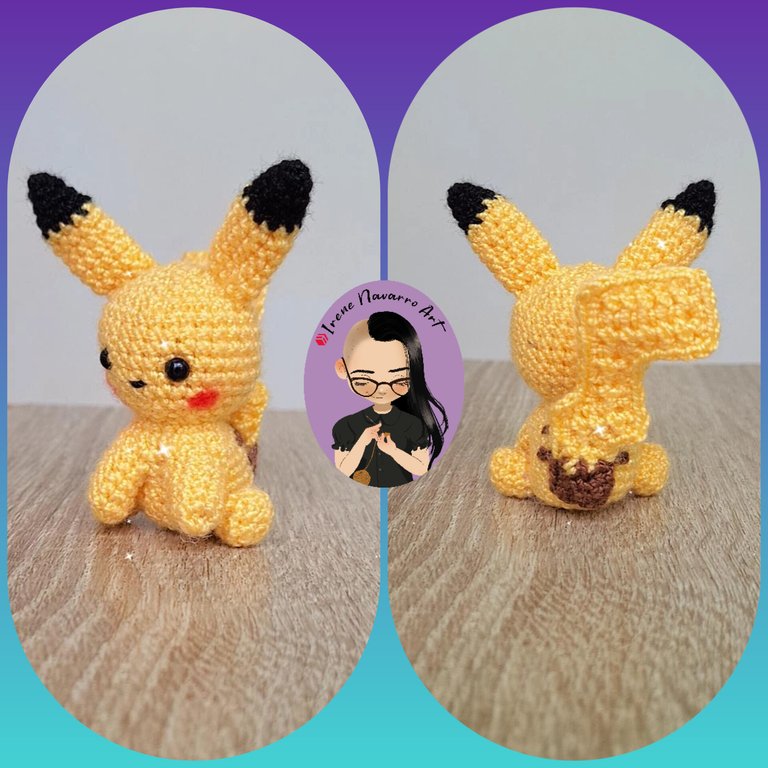
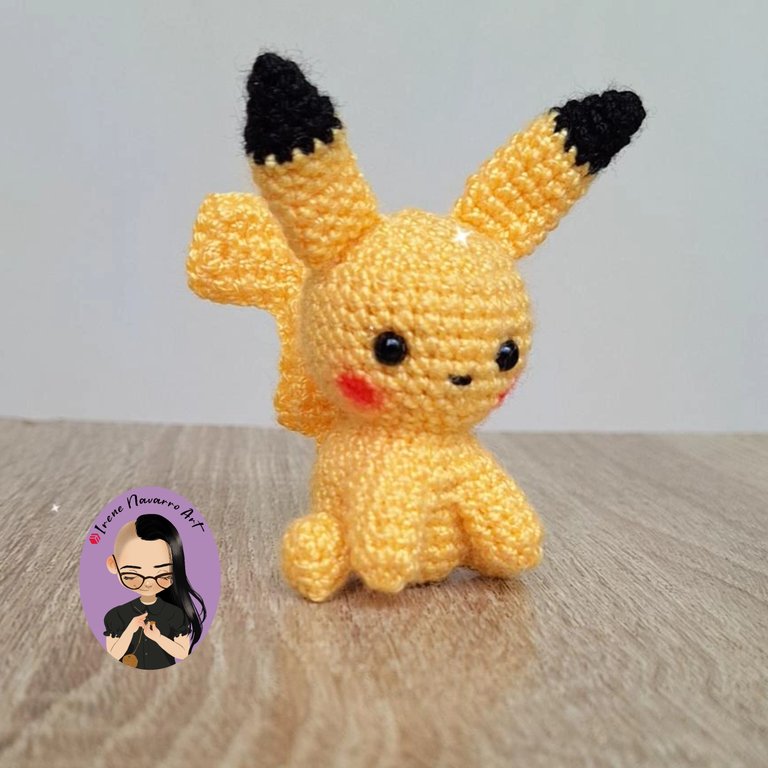
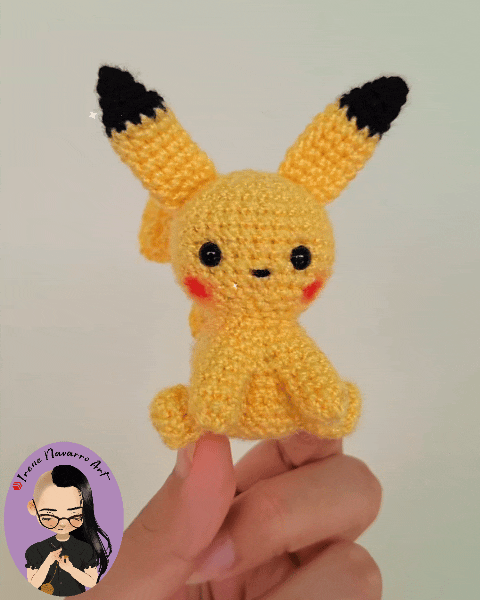
Pikachu Amigurumi
Saludos querida comunidad, los días de lluvia son mis favoritos para tejer siempre que no haya apagones 😄 por esta razón me tomé el fin de semana para hacer un nuevo amigurumi, se trata de un pequeño Pikachu, mi hijo me había sugerido hacer a este personaje así que él se alegró mucho cuando lo vio finalizado, por acá les comparto el tutorial por si desean hacer uno igual ☺️
Greetings dear community, rainy days are my favorites for crochet as long as there are no blackouts 😄 for this reason I took the weekend to make a new amigurumi, it is a little Pikachu, my son had suggested me to make this character so he was very happy when he saw it finished, here I share the tutorial in case you want to make one like it ☺️

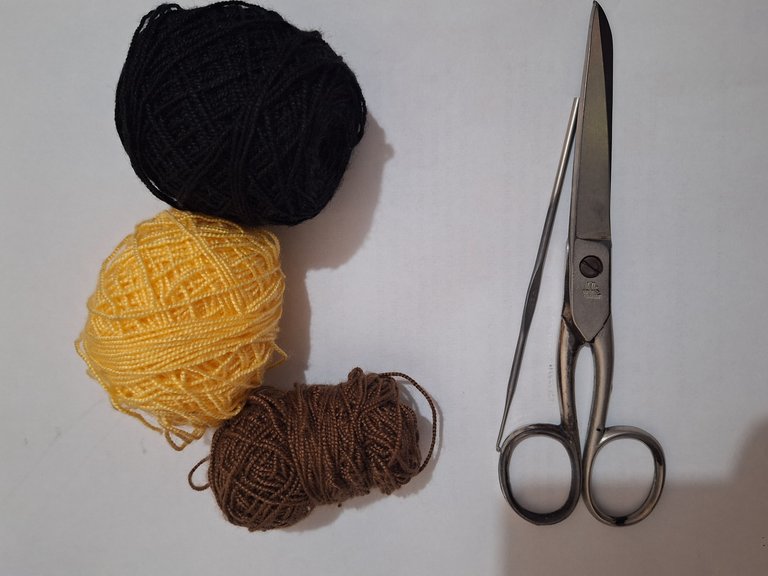
Materiales / Materials
- Hilo acrílico para crochet: Amarillo, marrón, negro
- Ganchillo de 1.25 mm
- Tijera
- Relleno de fibra acrílica antialérgica
- Ojos de plástico
- Aguja de ojal grande
- Hilo negro y aguja de coser
- Acrylic crochet thread: Yellow, brown, black
- 1.25 mm crochet hook
- Scissors
- Anti-allergic acrylic fiber filling
- Plastic eyes
- Large eyelet needle
- Black thread and sewing needle
Proceso / Process
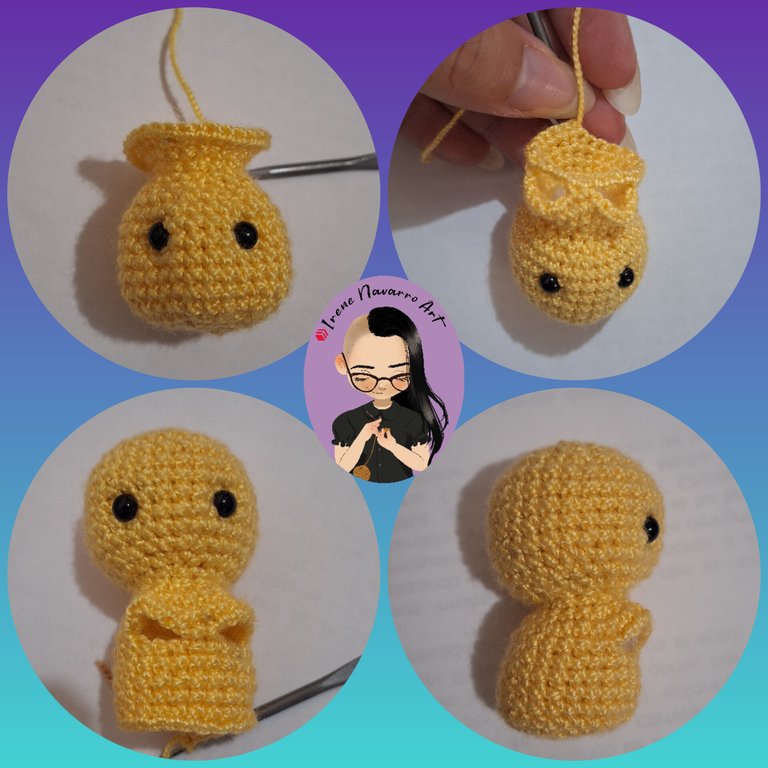
Para la cabeza con hilo amarillo hacer 6 puntos bajos en una anillo
Hilera 1: Hacer 6 aumentos. Total de puntadas (12)
Hilera 2: Hacer (1 punto bajo, 1 aumento) X 6. Total de puntadas (18)
Hilera 3: Hacer (1 punto bajo, 1 aumento, 1 punto bajo) X 6. Total de puntadas (24)
Hilera 4: Hacer (3 puntos bajos, 1 aumento) X 6. Total de puntadas (30)
Hileras 5 - 10: 30 puntos bajos
Hilera 11: Hacer (3 puntos bajos, 1 disminución) X 6. Total de puntadas (24)
Hilera 12: Hacer (1 punto bajo, 1 disminución, 1 punto bajo) X 6. Total de puntadas (18)
Hilera 13: Hacer (1 punto bajo, 1 disminución) X 6. Total de puntadas (12)
Colocar los ojos.
For the head, with yellow yarn, make 6 single crochet stitches in a ring.
Row 1: Make 6 increases. Total stitches (12)
Row 2: Make (1 sc, 1 inc) X 6. Total stitches (18)
Row 3: Make (1 sc, 1 inc, 1 sc) X 6. Total stitches (24)
Row 4: Make (3 sc, 1 inc) X 6. Total stitches (30)
Rows 5 - 10: 30 sc
Row 11: Make (3 sc, 1 dec) X 6. Total stitches (24)
Row 12: Make (1 sc, 1 dec, 1 sc) X 6. Total stitches (18)
Row 13: Make (1 sc, 1 inc) X 6. Total stitches (12)
Place the eyes.

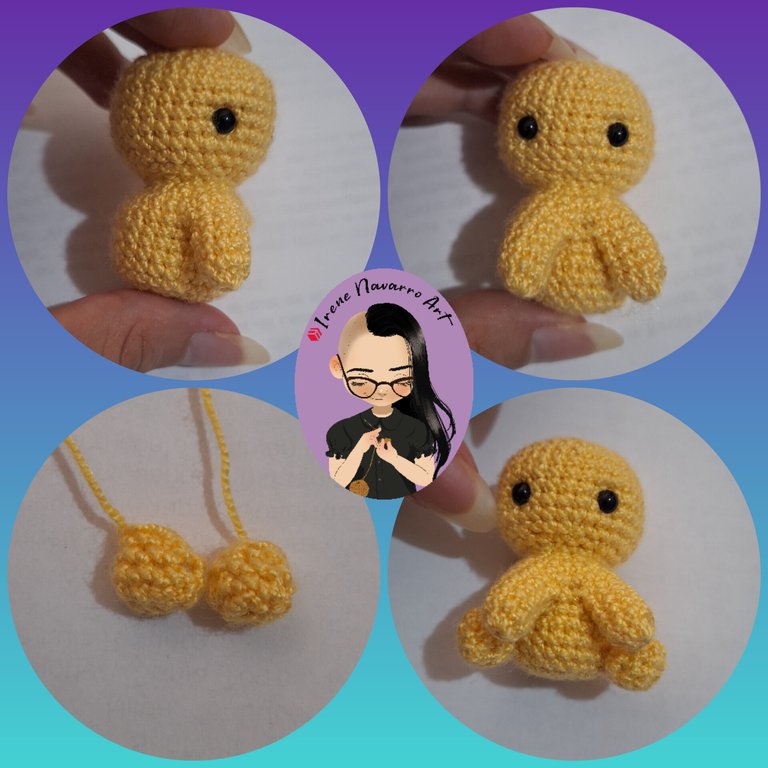
Para el cuerpo se debe continuar desde la cabeza.
Hilera 1: Hacer (1 punto bajo, 1 aumento) X 6. Total de puntadas (18)
Hilera 2: Hacer (1 punto bajo, 1 aumento, 1 punto bajo) X 6. Total de puntadas (24)
Hilera 3: Hacer (3 puntos bajos, 1 aumento) X 6. Total de puntadas (30)
Hilera 4: Hacer 8 puntos bajos, 3 cadenas, saltar 6 puntadas, 2 puntos bajos, 3 cadenas, saltar 6 puntadas, 8 puntos bajos.
Hileras 5 - 10: 24 puntos bajos
Hilera 11: Hacer (1 punto bajo, 1 disminución) X 9. Total de puntadas (18)
Rellenar.
Hilera 12: Hacer 9 disminuciones.
Hacer 1 punto deslizado y cerrar con el hilo, esconder la hebra por dentro.
For the body, continue from the head.
Row 1: Make (1 sc, 1 inc) X 6. Total stitches (18)
Row 2: Make (1 sc, 1 inc, 1 sc) X 6. Total stitches (24)
Row 3: Make (3 sc, 1 inc) X 6. Total stitches (30)
Row 4: Make 8 sc, ch 3, skip 6 stitches, 2 sc, ch 3, skip 6 stitches, 8 sc.
Rows 5 - 10: 24 sc
Row 11: Make (1 sc, 1 dec) X 9. Total stitches (18)
Stuff.
Row 12: Make 9 decreases.
Make 1 slip stitch and close with the yarn, hiding the yarn inside.
Para las patas delanteras levantar los puntos desde el agujero dejado el cuerpo.
Hileras 1 - 5: Hacer 9 puntos bajos.
Rellenar.
Hacer 1 punto deslizado y con la aguja de ojal grande cerrar con el mismo hilo. Repetir el procedimiento para la otra pata delantera.
Para las patas posteriores, con hilo amarillo hacer 3 cadenas de base.
Hilera 1: Hacer (2 puntos bajos, 1 aumento) X 2. Total de puntadas (8)
Hileras 2 - 3: Hacer 8 puntos bajos.
Hilera 4: Hacer 2 puntos bajos, 2 disminuciones, 2 puntos bajos. Total de puntadas (6)
Rellenar. Hacer 1 punto deslizado y cerrar con la aguja de ojal grande y la misma hebra. Hacer dos patas iguales y coser al cuerpo.
For the front legs, pick up the stitches from the hole left in the body.
Rows 1 - 5: Make 9 single crochets.
Stuff.
Make 1 slip stitch and with the large buttonhole needle close with the same thread. Repeat the procedure for the other front leg.For the back legs, with yellow thread make 3 foundation chains.
Row 1: Make (2 single crochets, 1 increase) X 2. Total stitches (8)
Rows 2 - 3: Make 8 single crochets.
Row 4: Make 2 single crochets, 2 decreases, 2 single crochets. Total stitches (6)
Stuff. Make 1 slip stitch and close with the large buttonhole needle and the same thread. Make two identical legs and sew to the body.
Para la cola con hilo amarillo hacer 6 cadenas de base.
Hileras 1 - 3: Hacer 6 puntos bajos
Hileras 4 - 6 : Hacer 2 puntos bajos
Hilera 7: Hacer 2 puntos bajos, 2 cadenas
Hileras 8 - 9: Hacer 4 puntos bajos
Hileras 10 - 11: Hacer 2 puntos bajos
Hileras 12 - 13: Con hilo marrón hacer 2 puntos bajos.
Hacer dos partes iguales. Unir ambas partes con una hilera de puntos bajos por todo el borde.
Bordar las rayas de la espalda y coser la cola al cuerpo.
For the tail, use yellow yarn to make 6 chains.
Rows 1 - 3: Make 6 single crochets
Rows 4 - 6: Make 2 single crochets
Row 7: Make 2 single crochets, 2 chains
Rows 8 - 9: Make 4 single crochets
Rows 10 - 11: Make 2 single crochets
Rows 12 - 13: Make 2 single crochets with brown yarn.
Make two equal parts. Join both parts with a row of single crochets around the entire edge.
Embroider the stripes on the back and sew the tail to the body.

Para las orejas con hilo negro hacer 4 puntos bajos en un anillo.
Hilera 1: Hacer (1 punto bajo, 1 aumento) X 2. Total de puntadas (6)
Hilera 2: Hacer (2 puntos bajos, 1 aumento) X 2. Total de puntadas (8)
Hilera 3: Hacer (3 puntos bajos, 1 aumento) X 2. Total de puntadas (10)
Hileras 4 - 9: Con hilo amarillo hacer 10 puntos bajos
Hilera 10: Hacer (3 puntos bajos, 1 disminución) X 2. Total de puntadas (8)
Hacer un punto deslizado y coser con la aguja de hoja grande y la misma hebra.
For the ears, with black yarn, make 4 sc in a ring.
Row 1: Make (1 sc, 1 inc) X 2. Total stitches (6)
Row 2: Make (2 sc, 1 inc) X 2. Total stitches (8)
Row 3: Make (3 sc, 1 inc) X 2. Total stitches (10)
Rows 4 - 9: With yellow yarn, make 10 sc
Row 10: Make (3 sc, 1 dec) X 2. Total stitches (8)
Make a slip stitch and sew with the large-bladed needle and the same strand.

Resultado / Result
Para finalizar sugiero colocar rubor en las mejillas, yo usé tiza pastel pero pueden usar la pintura de su preferencia, también usé hilo y aguja de coser para bordar la nariz.
To finish, I suggest putting blush on the cheeks. I used pastel chalk but you can use the paint of your choice. I also used thread and a sewing needle to embroider the nose.

Imágenes tomadas con dispositivo Samsung A54. Portada editada en Inshot
Pictures taken with Samsung A54 device. Cover edited in Inshot

Espero les haya gustado. Les invito a leer mis próximas publicaciones y siempre estaré dispuesta a responder sus preguntas y comentarios, también pueden seguirme y contactarme en cualquiera de mis redes sociales. ¡Muchas gracias!
I hope you liked it. I invite you to read my next publications and I will always be willing to answer your questions and comments, you can also follow me and contact me on any of my social networks. Thank you!
Facebook
Twitter
Instagram
Ko-Fi
Discord: irenenavarroart#0361
Posted Using InLeo Alpha
https://www.reddit.com/r/blogger/comments/1fskldv/pikachu_amigurumi/
The rewards earned on this comment will go directly to the people( @irenenavarroart ) sharing the post on Reddit as long as they are registered with @poshtoken. Sign up at https://hiveposh.com. Otherwise, rewards go to the author of the blog post.
veo que para mi eso es complejo, no me hago la idea de hacer uno por mi cuenta, quedo muy bonito
Yo soy de las que piensa que si una persona puede aprender lo básico puede con todo lo demás 😄
Quedo muy bonito. Es uno de mis personajes favoritos. Mi lindo Pikachu
Saludos @irenenavarroart
Muchas gracias ☺️ a mi también me encanta, es una parte importante que conservo en mis recuerdos de niñez
A pretty nice handcraft creation and I like what you have done.
Cute pokemon!
¡Pero que lindura! 😍 Te quedó adorable. Yo también quiero tejer un Pikachu pero por ahora no tengo amarillo. Pronto...
Muchas felicidades y gracias por compartir 💛
So cute! :D
Hola. Te quedó muy bonito. Pikachu, uno de los favoritos de mis hijos. Tal vez un día lo intente hacer. Gracias por compartir.
Realmente lindo y delicado. Me gustó mucho. Saludos!