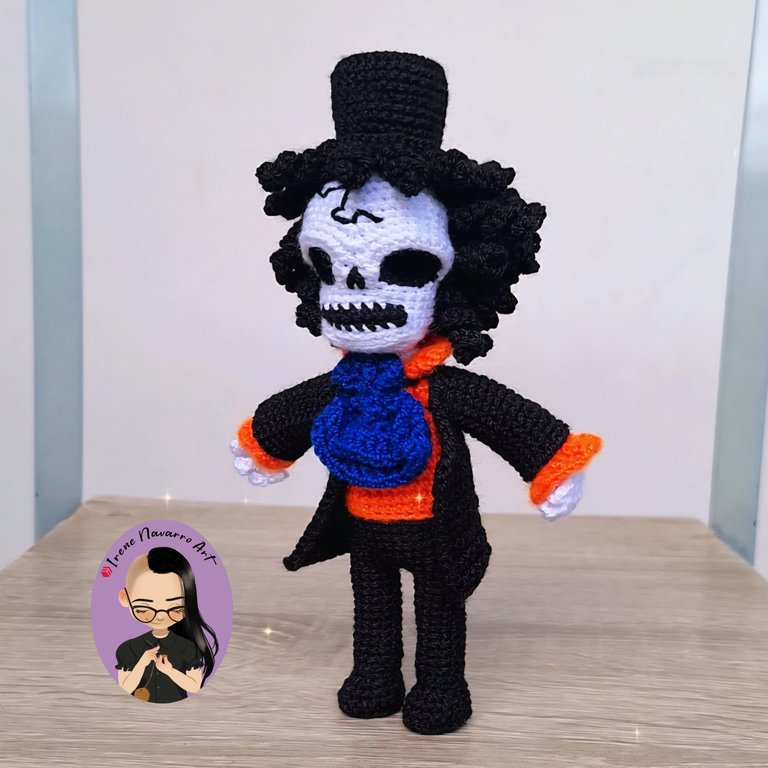
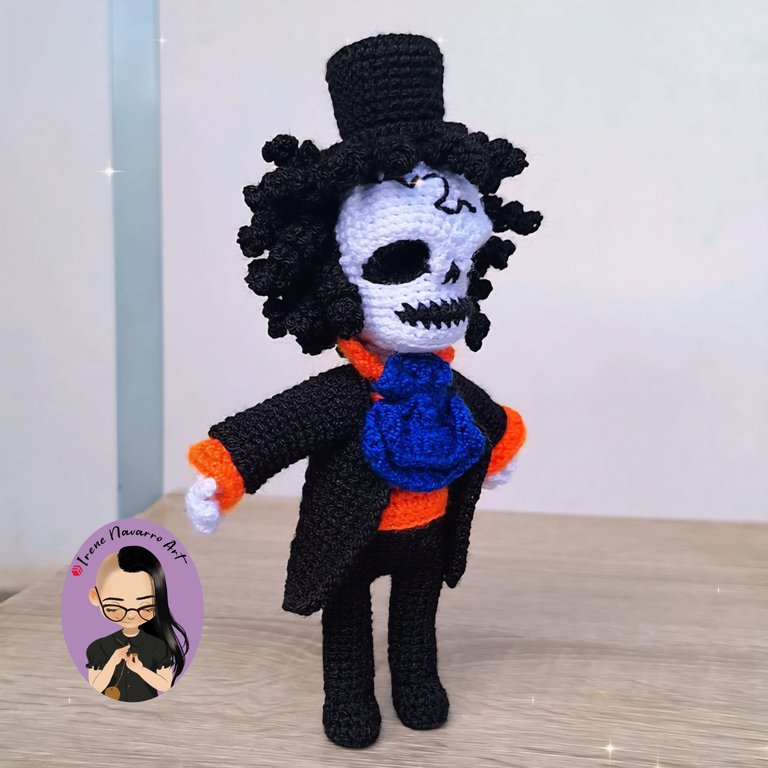
Amigurumi Brook (One Piece)
Saludos querida comunidad, ya siento que estoy siendo repetitiva con las palabras de inicio de cada una de mis publicaciones de amigurumis, pero seriamente siento una gran emoción al compartir un proyecto finalizado, cada uno de estos tienen sus dificultades y es por eso que es tan gratificante haber podido lograr un resultado que cumple con mis expectativas, es este caso de trata de Brook, el músico de la tripulación de los piratas sombrero de paja del anime One Piece, el su apariencia e muy particular y tiene su origen en una anécdota tragicómica, pues él había comido una fruta que le daba el poder de resucitar pero cuando llega el momento de su muerte su alma tarda demasiado en encontrar su cuerpo así que cuando finalmente lo hace este no es más que huesos y cabello, además este personaje tiene una risa bastante icónica en el anime. Este es el octavo amigurumi que hago y ya solo me faltan dos para completar a los 10 tripulantes 😊
Greetings dear community, I feel like I'm being repetitive with the opening words of each of my amigurumi posts, but I seriously feel great excitement when sharing a finished project, each of these have their difficulties and that is why it is so gratifying to have been able to achieve a result that meets my expectations, in this case it is about Brook, the musician of the Straw Hat pirates crew from the anime One Piece, his appearance is very particular and has its origin in a tragicomic anecdote, because he had eaten a fruit that gave him the power to resurrect but when the time of his death comes his soul takes too long to find his body so when it finally does it is nothing more than bones and hair, also this character has a quite iconic laugh in the anime. This is the eighth amigurumi that I make and I only have two more to complete the 10 crew members 😊

Proceso / Process
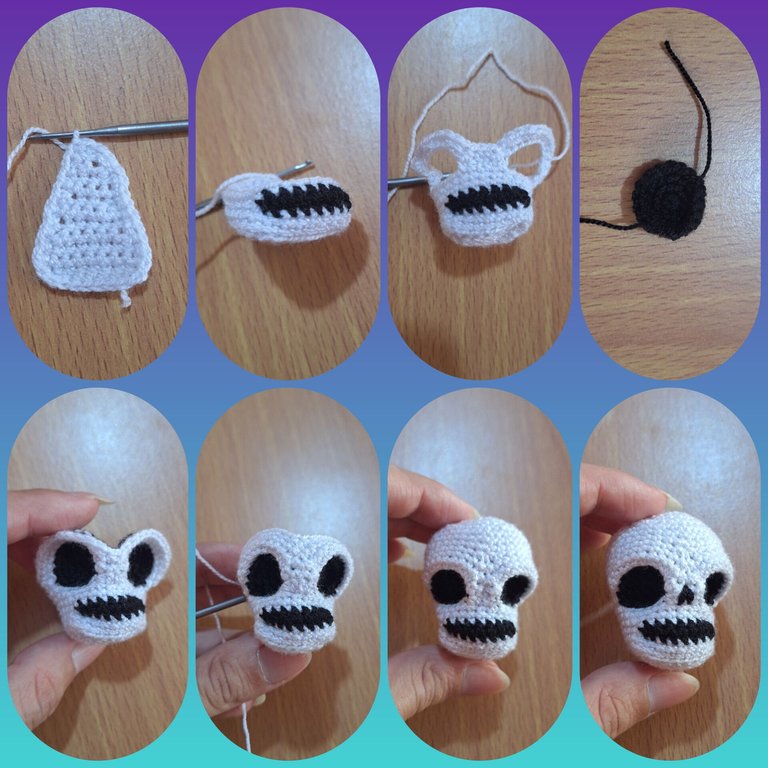
Para empezar me centré primero en la cabeza, siendo esta la parte mas importante del amigurumi, pues garantizar el aspecto de calavera era lo prioritario, yo no quería optar por una apariencia simple, quería que la calavera no fuera una esfera sino que se asemejara a una apariencia más realista, por otro lado su cuerpo al estar vestido no era tanto problema, ahí es donde me doy cuenta que gracias a mi experiencia de haber tejido muchos amigurumis los aprendizajes se van integrando y lo que hoy es un reto mañana se convierte en una solución a otro problema, en este caso tomé el patrón que hice para otro amigurumi con características parecidas hace mucho tiempo, procedí del mismo modo pero cambiando las proporciones y algunos detalles, comencé creando un triángulo invertido como base de la mandíbula, luego de unas hileras de puntos bajos, con el color negro hice dos hileras solamente en los puntos centrales para que fuese la boca, luego para crear los agujeros de los ojos hice cadenas y salte puntadas, después con el hilo negro hice un círculo cóncavo para coserlo a las cuencas de los ojos de cada lado, el resto sería retomar las puntadas con el hilo blanco y completar la forma superior del cráneo.
To start I focused first on the head, this being the most important part of the amigurumi, since ensuring the skull look was the priority, I did not want to opt for a simple appearance, I wanted the skull not to be a sphere but to resemble a more realistic appearance, on the other hand, its body being dressed was not so much of a problem, that is where I realize that thanks to my experience of having knitted many amigurumis the lessons are integrated and what today is a challenge tomorrow becomes a solution to another problem, in this case I took the pattern I made for another amigurumi with similar characteristics a long time ago, I proceeded in the same way but changing the proportions and some details, I started by creating an inverted triangle as the base of the jaw, then a few rows of single crochet stitches, with the black color I made two rows only in the central stitches to be the mouth, then to create the eye holes I made chains and skipped stitches, then with the black yarn I made a concave circle to sew it to the eye sockets on each side, the rest would be resume the stitches with the white thread and complete the upper shape of the skull.
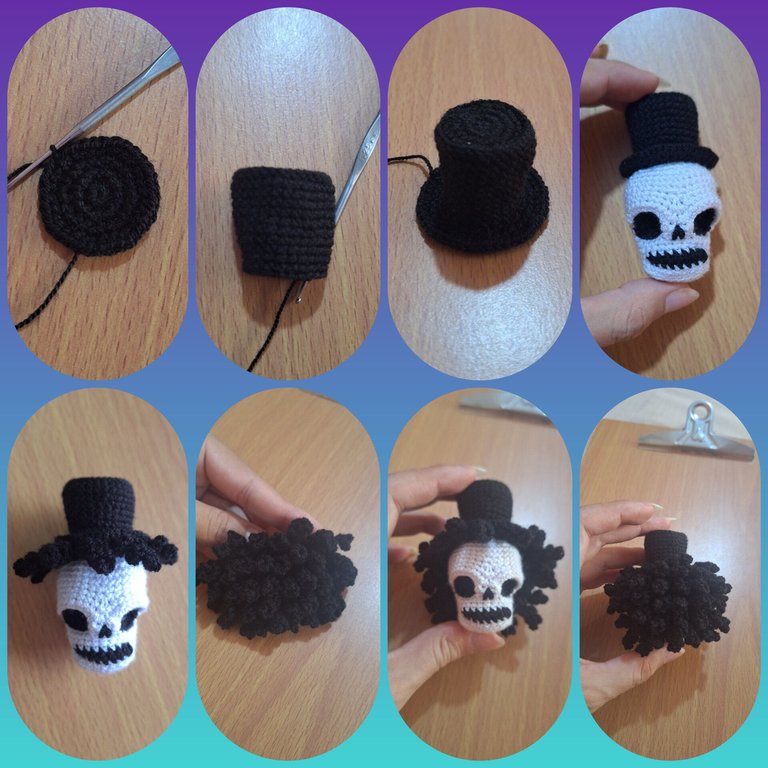
Para el sombrero hice 8 puntos bajos en un anillo, luego tres hileras de 8 aumentos para obtener 32 puntadas, luego hice dos hileras sin aumentos, intercalé hileras de 2 disminuciones con hileras sin disminuciones hasta obtener 24 puntadas, luego hice dos hileras de puntos bajos, tomando solo el lado del frente hice la solapa del sombrero con tres hileras de 12 aumentos.
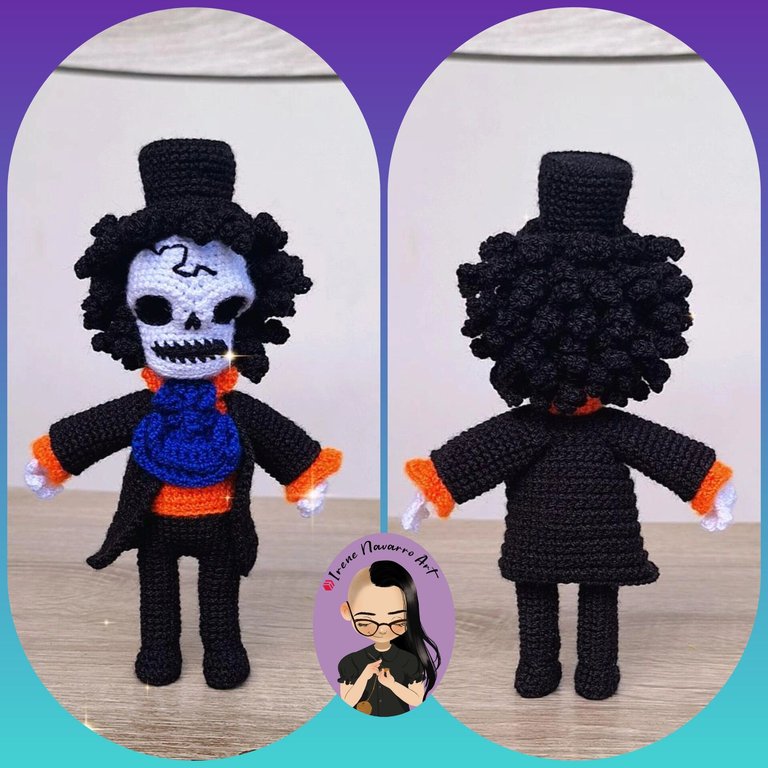
Cosí el sombrero a la cabeza y por alrededor hice una hilera de rizos, cada uno con 10 cadenas y un aumentos de puntos ajos en cada una de las cadenas, aparte hice un triángulo sobre el cual hice 5 hileras de rizos para coserlos a la parte posterior de la cabeza, debo decir que esta fue la parte mas retadora del amigurumi, hacer tal cantidad de rizos para garantizar el aspecto de cabello afro del persona es un trabajo bastante difícil pues el hilo negro es difícil de distinguir cuando se trabaja con hilo delgado y aguja de 1.25 mm.
For the hat, I made 8 single crochet stitches in a ring, then three rows of 8 increases for 32 stitches. Then, I made two rows without increases, alternating rows of 2 decreases with rows without decreases for 24 stitches. Then, I made two rows of single crochet stitches. Working only the front side, I made the flap of the hat with three rows of 12 increases.
I sewed the hat to the head and around it, I made a row of curls, each with 10 chains and a single crochet increase in each of the chains. I also made a triangle, over which I made 5 rows of curls to sew them to the back of the head. I must say that this was the most challenging part of the amigurumi. Making such a large number of curls to ensure the character's afro hair look is quite difficult because black yarn is difficult to distinguish when working with thin yarn and a 1.25 mm needle.
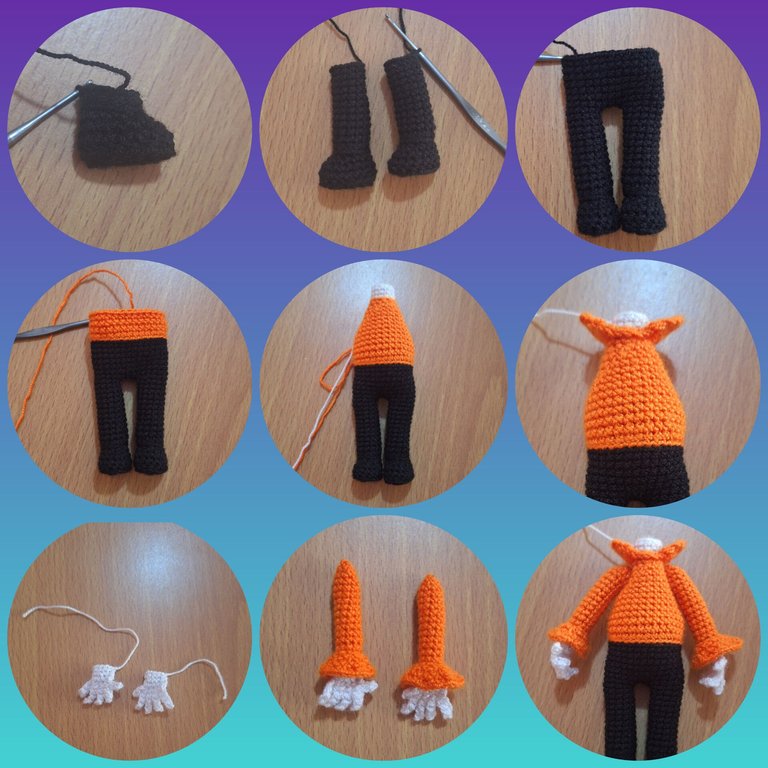
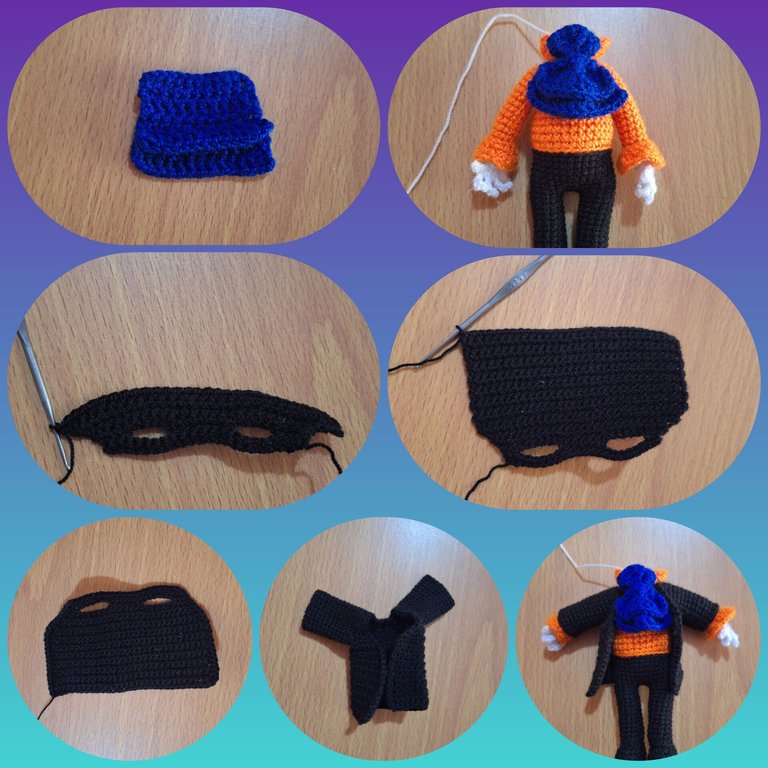
La parte más divertida y fácil de hacer para mi es el cuerpo, comenzando con los pies con una base de 4 cadenas, hice 4 aumentos por dos hileras para obtener 16 puntadas, luego dos hileras de puntos bajos, una hilera con 4 disminuciones en la punta para crear el zapato, luego continúe con la pierna con doce hileras de puntos bajos. Hice dos piernas iguales y las uní por 3 cadenas, hice ocho hileras de 30 puntos bajos, cambié a hilo naranja e hice cuatro hileras, luego hice nueve hileras de 2 disminuciones para obtener 12 puntadas, tomando solo el lado del frente de las puntadas con puntos altos hice el cuello de la camisa, mientras que con hilo blanco tomando el lado de atrás de las puntadas hice el cuello.
Con hilo blanco hice las manos, en este caso por ser solo huesos hice los dedos con cadenas y puntos bajos sobre las cadenas, luego hice la mano uniendo los dedos, para el brazo hice el borde acampanado de la manga de camisa con hilo naranja y luego uní a la mano por dentro, para continuar con trece hileras de 9 puntos bajos, luego hice una hilera con 3 disminuciones para cerrar, hice los dos brazos iguales y los cosí al cuerpo.
The most fun and easy part for me to make is the body. Starting with the feet, I made 4 increases for two rows to get 16 stitches, then two rows of single crochets, one row with 4 decreases at the toe to create the shoe. Then, I continued with the leg with 12 rows of single crochets. I made two identical legs and joined them with 3 chains. I made eight rows of 30 single crochets. I switched to orange yarn and made four rows, then made nine rows of 2 decreases to get 12 stitches. I used only the front side of the stitches with double crochets to make the collar of the shirt, while using white yarn to make the back side of the stitches.
With white yarn, I made the hands. In this case, since they were just bones, I made the fingers with chains and single crochets over the chains. Then, I made the hand by joining the fingers together. For the arm, I made the flared edge of the shirtsleeve with orange yarn and then joined it to the hand on the inside. I continued with thirteen rows of nine single crochets. Then, I made a row with three decreases to close. I made both arms the same size and sewed them to the body.
Para la corbata tipo pañuelo usé hilo azul, con una base 11 cadenas hice tres hileras de puntos altos, luego solo tomando el lado del frente hice una hilera con 3 aumentos, retomando el lado de tras hice los mismo, luego hice una hilera adicional de puntos altos, al coser la corbata hice un fruncido para que se viera como volados.
Para el saco con una base de 22 cadenas hice una hilera de puntos bajos, para los agujeros de las mangas hice 6 cadenas y salté 6 puntadas, continué haciendo un aumento en cada orilla por 4 hileras para obtener 30 puntadas, luego hice 15 hileras de puntos bajos además de una hilera de puntos bajos por todo el borde del saco, luego para las mangas levanté 18 puntadas e hice 13 hileras de puntos bajos.
For the handkerchief tie, I used blue yarn. With a base of 11 chains, I made three rows of double crochet stitches. Then, just on the front side, I made a row with 3 increases. On the back side, I did the same. Then, I made an additional row of double crochet stitches. When sewing the tie, I made a gather to give it a ruffled look.
For the jacket, with a base of 22 chains, I made a row of single crochet stitches. For the sleeve holes, I made 6 chains and skipped 6 stitches. I continued making an increase on each edge for 4 rows to get 30 stitches. Then, I made 15 rows of single crochet stitches plus a row of single crochet stitches around the entire edge of the jacket. Then, for the sleeves, I picked up 18 stitches and made 13 rows of single crochet stitches.
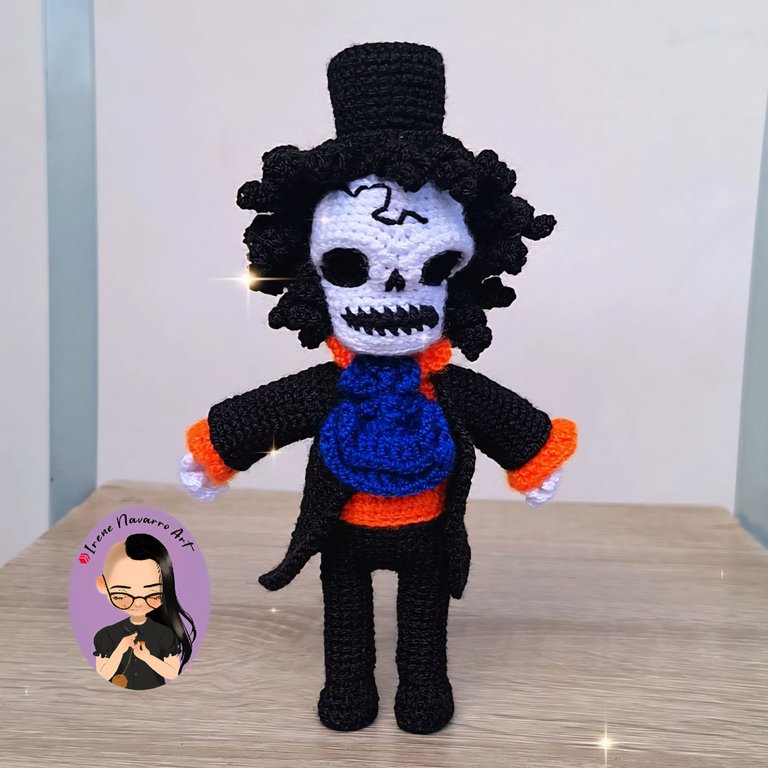
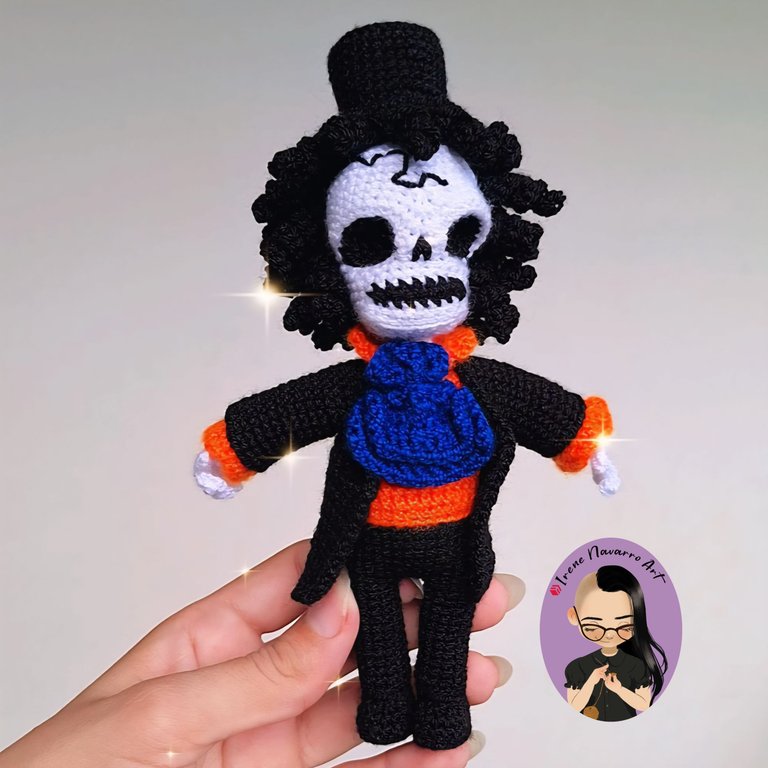
Resultado / Result
Imágenes tomadas con dispositivo Samsung A54. Portada editada en Inshot
Pictures taken with Samsung A54 device. Cover edited in Inshot

Espero les haya gustado. Les invito a leer mis próximas publicaciones y siempre estaré dispuesta a responder sus preguntas y comentarios, también pueden seguirme y contactarme en cualquiera de mis redes sociales. ¡Muchas gracias!
I hope you liked it. I invite you to read my next publications and I will always be willing to answer your questions and comments, you can also follow me and contact me on any of my social networks. Thank you!
Facebook
Twitter
Instagram
Ko-Fi
Discord: irenenavarroart#0361
Qué genial... Me encantó. Veo estás figuras tan complejas, todo su cuerpo, ropa, rostro. Admirable tu habilidad o mejor dicho, tu don.
Muchísimas gracias por tu apoyo 😊
Es impresionante la habilidad que tienes para crear estos amigurumis! Yo no puedo hacer siquiera un mantelito! 😆
Me encanta tu arte! 💞
!LADY
!INDEED
!BRN
View or trade
LOHtokens.@ladyaryastark, you successfully shared 0.1000 LOH with @irenenavarroart and you earned 0.1000 LOH as tips. (1/4 calls)
Use !LADY command to share LOH! More details available in this post.
Todo es poquito a poco, lo mejor es hacer cositas sencillas e ir avanzando sin miedo al fracaso porque el tejido cada equivocación es un aprendizaje. Abrazos!
Buen consejo, gracias, lo seguiré y a ver qué surge 😊
!PIZZA
!INDEED
@irenenavarroart Simplemente hermoso! , me fascinan tus creaciones , Saludos 😊
Muchísimas gracias 💜 Saludos
It was spectacular like everything you do, my friend!
Thank you very much 😁
https://www.reddit.com/r/Brochet/comments/1m69lod/amigurumi_brook/
This post has been shared on Reddit by @dr-amira through the HivePosh initiative.
I must say you are a professional one, what a beautiful work, I love your skill, thanks for sharing
El resultado es realmente genial, me encantó lo detallado que quedó y la pasión que le pusiste, eso se nota. Crear con agujas e hilos es todo un arte.
Muchas gracias, de verdad le pongo todo mi corazón, sudor y lágrimas a veces a cada cosita que hago y me emociona mucho poder compartirlo con ustedes. Un abrazo!
Me imagino tu hemosion amiga,se ven que son trabajos bien elaborados, la cabeza sin duda es lo mejor que se, me gusto el sombrero y las manos también.
Siiii amé cada una de esas partes tan peculiares del personaje, ademas me da risa que solo le haya quedado el cabello y los huesos 😁. Un abrazo
The excitement that comes with completing a project against all odds is next to none and we totally understand your excitement. Your Amigurumi Brook looks amazing, well done.
selected by @ibbtammy
Thank you very much 💜
Compartó tu emoción, tú elaborando y yo de espectadora, ame cada detalle, de verdad que con Brook también te luciste, no esperaba menos de tu talento. Felicidades querida amiga @irenenavarroart. Dios bendiga tu talento.
Muchísimas gracias amiga, siempre poniéndole amor a cada puntada. Un abrazo 🤗
Eso se nota al ver tus trabajos, que no solo le pones dedicción y esmero, también le pones mucho amor. Te envío un abrazo a la distancia.
This is really amazing and creative
Right colours in it right places
Thank you 🥰
Wow, this your Amigurumi Brook is Dem beautiful. you really took your time, put in your energy and skills in making each parts.and it really came out beautiful Weldon.