🎮🎮Guide #1 Horizon Forbidden West {esp-eng}📹📽️


Screenshot

Aiming for the Stars is the first story mission in Horizon Forbidden West. As soon as you have control of Aloy, the game tutorials will begin, nothing particularly complicated. We'll start by collecting herbs, jumping and going to some ruins

Screenshot

Follow the marker to reach a machine to examine and learn how to craft arrows. Then, shoot the ladder lock to climb up and continue exploring. When you reach the facility, head downriver to the right to find the path to advance. Once you reach the bottom, the tutorial will begin. Combat
Screenshot

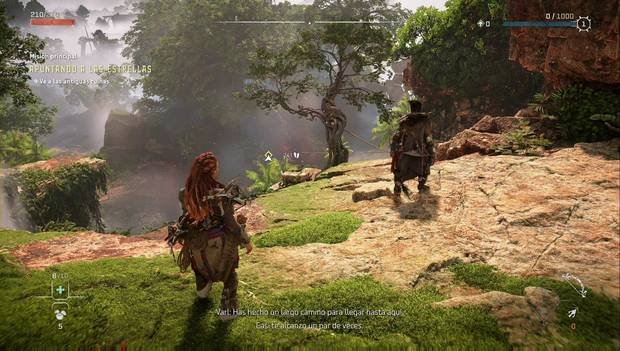
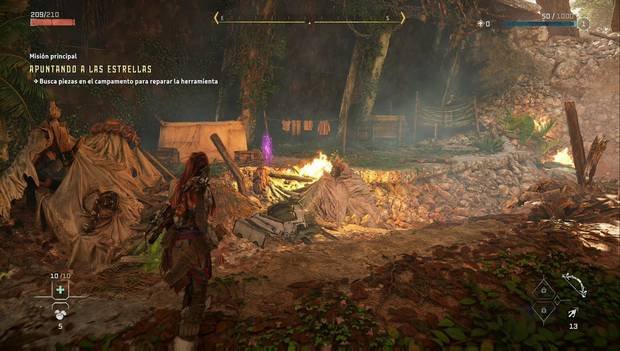
You'll be taught how to scan and locate weak spots. Defeat two Diggers, loot their bodies, and continue up the hill. Once in the "reception," follow the signs and then head towards the marker. Keep an eye out for loot boxes along the way. Check the rubble and, after talking to your partner, look for the tools in the camp. There's one next to the campfire and another. in the background

Screenshot

Varl will now tell you to go to the workbench to create the Grappling Hook, which you can use to remove the debris. Remember to hold down the R2 button to attach the tool to the metal parts. After examining another terminal, notice that there is a point where you can attach your Grappling Hook at the top of a cliff. Just jump and press X to reach it. Automatically
Screenshot

At this point, the climbing tutorial will take place. You will be shown how to climb, move, do long jumps, and do the usual. After going down the ladder, open the door in front of you. After finishing the sequence, go up the hill and remove more debris to advance. It won't be long before you face more machines, and the tutorial will take place. Stealth

Screenshot

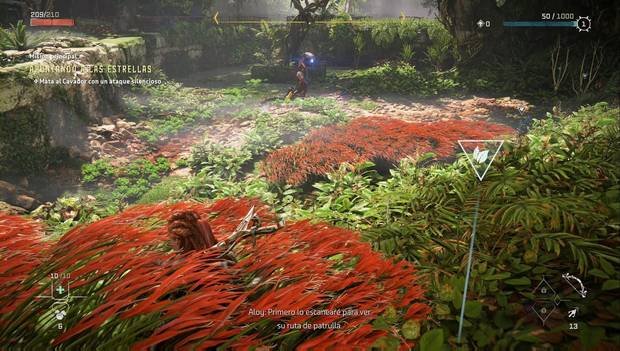
After taking out one, you'll have to climb a cliff and eliminate a few more; they still aren't a threat. After eliminating three more Diggers, continue through the cave, where you'll have to deactivate some traps. Shortly after, you'll be taught how to make booby traps, and you'll be able to continue climbing. Upon exiting, you'll see new enemies that you can eliminate. Stealth with traps or however you prefer. Then, go up a slope and climb to a new door. Follow the marker. When a ledge breaks while climbing, climb to the right and you'll reach a holographic projector, where you'll see a new sequence.

Screenshot

Once the sequence is over, Varl will give you an Explosive Freeze Slingshot. You can then continue exploring upriver following the machine. that you've already seen a couple of times and eliminating minor enemies along the way. When you reach the rooftop, you'll see the machines you've been following.

Screenshot

Once down, you'll encounter three Diggers. Defeat them before exploring the area, collecting resources, and continuing towards the objective. You'll have to climb a tower and use the boost with the Grappling Hook to continue upwards. Once you're done climbing, you'll have to use the boost with the Grappling Hook to continue upwards. and you're on solid ground, start by eliminating the Diggers. Then use the console and you'll see a sequence. At the end of it, you can see the area you'll be exploring.
Screenshot

When you reach the base of the tower, use the spotlight and you'll see a point you can pull from with the Grappling Hook. Do so. The elevator cabin will go down, you can climb up and continue your ascent. They will mark the anchor point of the cable that you must destroy before going up the stairs next to you towards the next point to destroy. After the sequence, you will have to eliminate Reptivora.
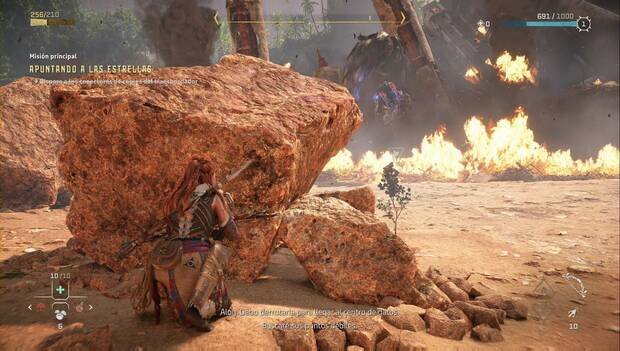
Use the spotlight to locate its weak points, especially the sack under its throat. Once destroyed, it leaves Reptivora unable to spit acid and "finish it off" when it falls to the ground. You will still have to deal with it freed. Throw the ice bombs at its throat to maximize damage and end the fight quickly. After victory, climb the ledge and go to the data center.
After the sequences, we will go to the tip of the lance

Screenshot
Apuntando a las estrellas es la primera mision de la historia de Horizon Forbidden West En cuanto tengas el control de Aloy comenzaran los tutoriales del juego nada especialmente complicado Comenzaremos recolectando hierbas saltando y yendo a unas ruinas
Screenshot
Sigue el marcador para llegar hasta una maquina a examinar y asi te ensenaran a fabricar flechas Despues dispara al seguro de la escalera para trepar y seguir la exploracion Cuando llegues a la instalacion ve rio abajo hacia la derecha para dar con el camino por el que avanzar Al llegar abajo comenzara el tutorial de combate
Screenshot
Te ensenaran a escanear y localizar puntos debiles Derrota a dos Cavadores saquea sus cuerpos y sigue colina arriba Una vez en la "recepcion" tienes que seguir las indicaciones y luego ir hacia el marcador Ojo a las cajas de botin por el camino Comprueba los escombros y tras hablar con tu companero busca las herramientas en el campamento hay una junto a la hoguera y otra al fondo
Screenshot
Ahora Varl te indicara que vayas al banco de trabajo para crear el Garfio con el que podras retirar los escombros Recuerda que debes mantener pulsado el boton R2 para enganchar la herramienta a las partes de metal Tras examinar otro terminal fijate en que hay un punto al que puedes enganchar tu Garfio en lo alto de un risco Basta con saltar y pulsar X para llegar a el automaticamente
Screenshot
En este punto tendra lugar el tutorial de escalada Te mostraran como trepar moverte hacer saltos largos lo normal Tras bajar la escalera abre la puerta que tienes delante Al terminar la secuencia ve colina arriba y retira mas escombros para avanzar No tardaras en vertelas con mas maquinas y tendra lugar el tutorial de sigilo
Screenshot
Tras acabar con una tendras que subir un risco y eliminar a algunas mas siguen sin ser una amenaza Despues de eliminar a tres Cavadores mas continua y cruza la cueva donde tendras que desactivar unas trampas Poco despues te ensenaran a fabricar trampas explosivas y podras seguir subiendo Al salir veras nuevos enemigos a los que puedes eliminar en sigilo con trampas o como prefieras Despues sube una pendiente y trepa hasta una nueva puerta ve siguiendo el marcador Cuando un saliente se rompa al escalar trepa por la derecha y llegaras a un proyector holografico con lo que veras una nueva secuencia
Screenshot
Una vez termine la secuencia Varl te dara una Honda explosiva de congelacion Luego podras seguir explorando rio arriba siguiendo a la maquina que ya has visto un par de veces y eliminando a enemigos menores por el camino Al llegar a la azotea veras a las maquinas que has estado siguiendo
Screenshot
Una vez abajo te encontraras con tres Cavadores Acaba con ellos antes de ponerte a explorar la zona recoger recursos y seguir hacia el objetivo Tendras que subir a una torre y usar el impulso con el Garfio para seguir hacia arriba Cuando termines de trepar y estes en tierra firme empieza por eliminar a los Cavadores Despues usa la consola y veras una secuencia Al final de ella puedes ver la zona por la que iras explorando
Screenshot
Al llegar a la base de la torre usa el foco y veras que hay un punto del que puedes tirar con el Garfio hazlo Bajaras la cabina del ascensor podras trepar y continuar con el ascenso Te marcaran el punto de anclaje del cable que debes destruir antes de subir por las escaleras que tienes al lado en direccion hacia el siguiente punto a destruir Tras la secuencia tendras que eliminar a Reptivora
Usa el Foco para localizar sus puntos debiles en especial el Saco que tiene bajo la garganta y que una vez destruido deja a Reptivora sin poder escupir acido y "rematarla" cuando caiga al suelo Aun te las veras con ella liberada lanza las bombas de hielo a su garganta para maximizar el daño y poner fin rapido al combate Tras la victoria sube por el saliente y ve al centro de datos
Despues de las secuencias pasaremos a La punta de la lanza


The images were taken from my PS4
The gifs were created on the blog gif ,page, you can use it, it's totally free
the translation into english was in google translator

Las imágenes fueron sacadas de mi PS4
Los gifs fueron creados en la página blog gif, pueden usarlos, son totalmente gratis
La traducción al inglés fue en google translate
Ohhh how great that you just shared this post, I'm thinking of starting this game, I know it's long but I also have no doubt that it will catch me so much as to devote many hours, I'm very interested in the universe of this game, the story and the creatures that you face.
Such a beautiful game, I will be playing this once I finish Ghost of Tsushima.
The formatting of the post can be improved. You can try putting the images in the 'center' tag, which looks better in my opinion. Also, justifying text would look good too. Here is a helpful post formatting guide from a friend. Give this a read and see how you can improve your post formating. https://peakd.com/hive-101265/@yaziris/ultimate-hive-html-post-formatting-guide
Congratulations @infinitelove14k! You have completed the following achievement on the Hive blockchain And have been rewarded with New badge(s)
Your next target is to reach 1750 upvotes.
You can view your badges on your board and compare yourself to others in the Ranking
If you no longer want to receive notifications, reply to this comment with the word
STOP