Mis Tips de Maquetado para crear en Hive


Pues bien, la mayoría cuando empiezan, suelen estancarse un poco en la parte del maquetado, tantos códigos, lineamientos, suelen confundirlos, sobre todo, a aquellas personas que nunca han manejado un blog, y no tiene ningún tipo de conocimiento tecnológico, de programación, e incluso redacción.
He escuchado comentarios como: "es que yo no se nada de códigos", "no tengo problemas para escribir, pero me cuesta sentarme a maquetar el post", y cosas asi.
Y se les entiende, recuerdo cuando comencé en este mundo de la creación de contenido, no tenía ni la menor idea del manejo de un blog, si sabía algo de los códigos, pero nunca había llegado a implementarlos, sin embargo, con el tiempo, y gracias al apoyo y guía de algunas personas, logre aprender, ha sido un proceso, todo en esta vida toma tiempo, queda parte de uno buscar aprender, ser constante, y poner en práctica todo lo adquirido.
Sé que existen muchas guías, tutoriales sobre como crear contenido dentro de la plataforma de Hive, para que no se sientan tan perdidos, sin embargo, aun asi, a muchos les cuesta, y es que tanta información abruma, y las personas suelen confundirse más, es allí donde deciden abandonar, tirar la toalla, porque sienten que es demasiada presión, y no creen poder tener esa paciencia, calma, tiempo, para aprender e ir creando su contenido.
Sobre todo si colocan toda esta información en un solo post, con tantos códigos, lineamientos, link, claro la gente se confunde aún más, tienen que leer todo eso con calma, y bueno, bien sabemos que a muchos les da flojera leer, ustedes saben que es asi.😅
¿ Y Por dónde empezar?
Esta es una de tantas preguntas que se hacen muchos, ¿cómo empiezo?, ¿qué debo hacer?, ¿Qué contenido puedo publicar? ¿Cómo redacto mi post?.
No deben complicarse tanto, lo primero es empezar por lo básico, al momento de empezar con nuestro maquetado, el crear nuestro primer post, siempre genera algo de nervios, incertidumbre, es normal, pero como dije, empecemos con lo básico, aquí les muestro un código sencillo, el primero que debe tener en cuenta al momento de empezar armar su post.
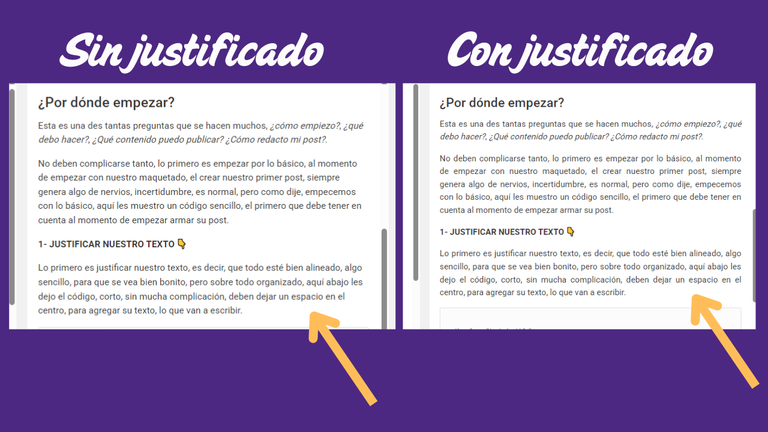
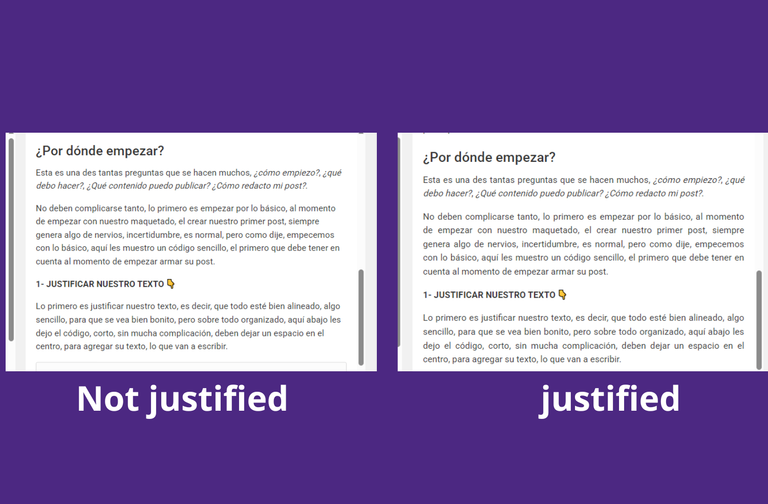
1- JUSTIFICAR NUESTRO TEXTO 👇
Lo primero es justificar nuestro texto, es decir, que todo esté bien alineado, algo sencillo, para que se vea bien bonito, pero sobre todo organizado, aquí abajo les dejo el código, corto, sin mucha complicación, deben dejar un espacio en el centro, para agregar su texto, es decir, lo que van a escribir.
<div class="text-justify">

<Texto>

</div>
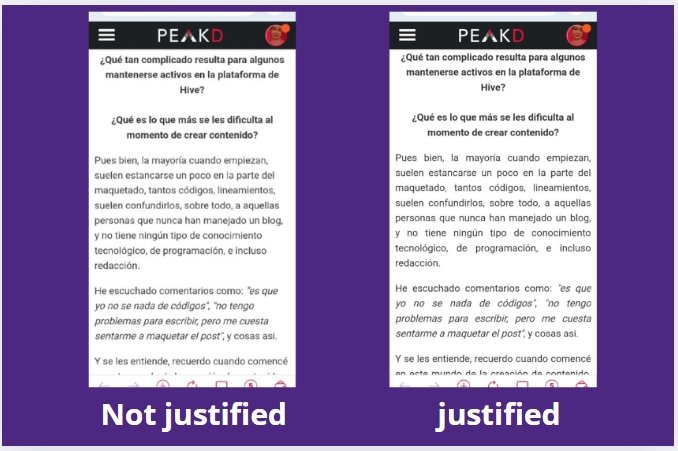
Ahora Les muestro como se verá su texto sin este código vs con el código:
Ven la diferencia, qué bonito se ve, asi bien organizado, centrado, justificado, como debe de ser, he visto muchos post que no se lo ponen, es cosa de cada quien, quizás se les olvide, o no saben como ponérselo, bueno, amigos, aquí se los dejo, úsalo y notaran la diferencia. 😉
Seguimos...
Ya justifiqué mi texto, ¿ahora que hago?, pues simple, comienza a escribir,😂 quizás suene odioso, pero es la verdad, como dije, no te compliques, empieza a escribir, deja volar tu imaginación, que las palabras salgan solas, a través de tus lindos dedos, mediante el teclado de tu computadora, o del teléfono, lo que estés usando. 😜
EPA 😳
Eso es otra cosa, no muchos usan una computadora, la mayoría solo cuentan con su teléfono, y es aquí donde puedo decirles, es el doble de trabajo😣, cuesta un poco más, agregar estos códigos, escribir correctamente, en fin, pero como dicen por allí, cuestión de paciencia y práctica, incluso a algunos se les da mejor por teléfono, hay casos de casos.
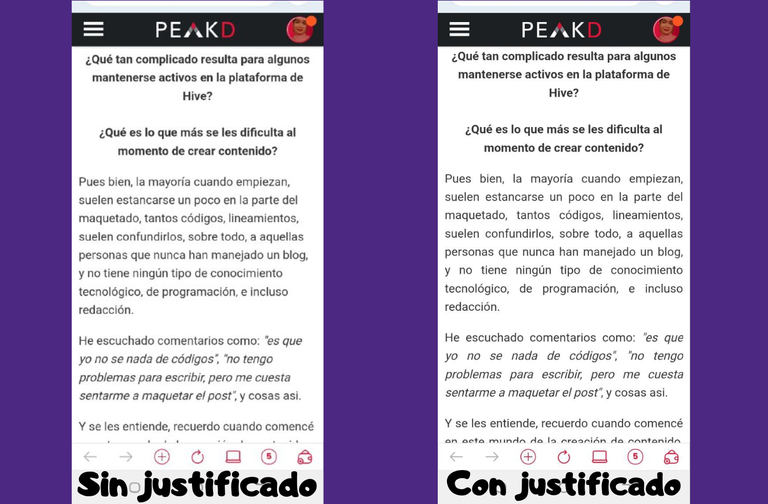
Aquí también les dejo un capture, de como se vería empezar tu maquetado, desde el teléfono:
Ya tengo mi redacción, ¿ahora que hago?
Como bien sabemos, dentro de la plataforma hay muchas personas suscritas, de varios países, algunos de habla hispana, otros ingleses, y asi; entonces debemos buscar la manera de captar a todos, por lo que es recomendable redactar nuestro post en dos idiomas, el tuyo propio, y el inglés, el cual es el más usado.
¿Pero como lo muestro? ¿Cómo separo los dos idiomas?
Pues aquí hay muchas formas de hacerlo, en esta parte les mostraré un segundo código, que les podría ayudar con esta separación, sin embargo, no es obligatorio, ustedes pueden hacerlo como mejor les funcione, por eso les dejaré estas dos formas.
1. Código para separar idiomas 👇
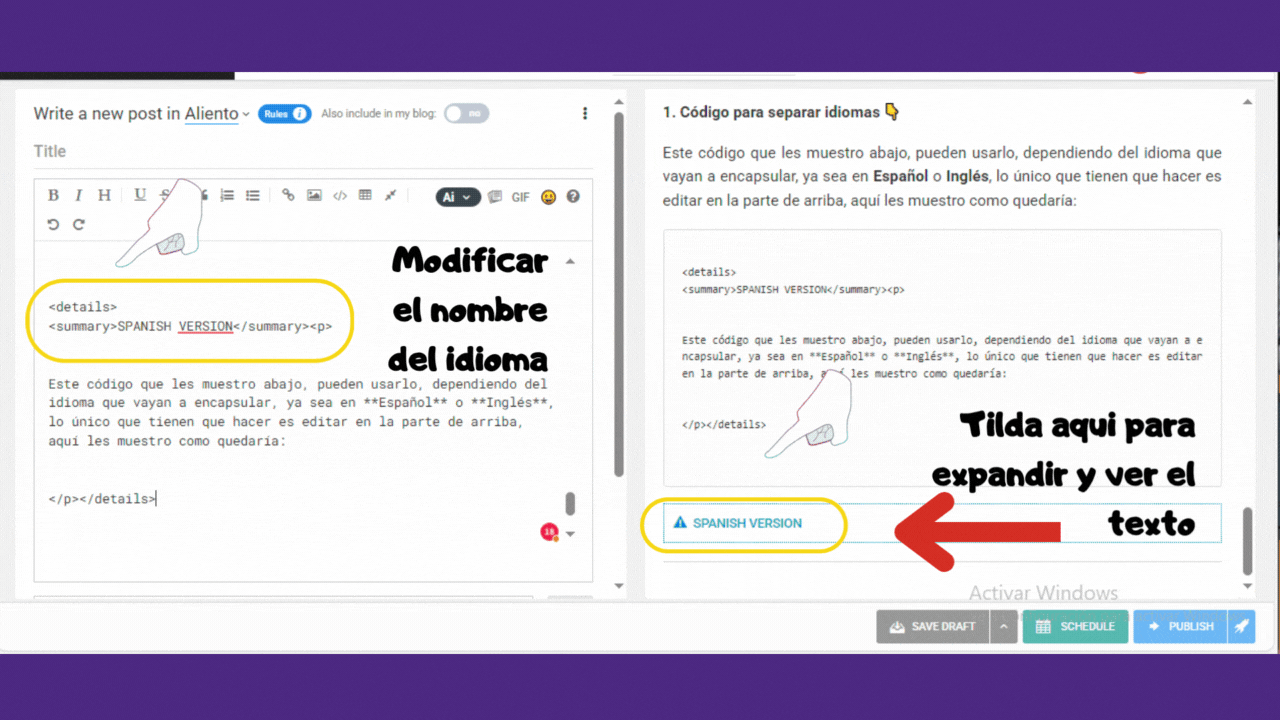
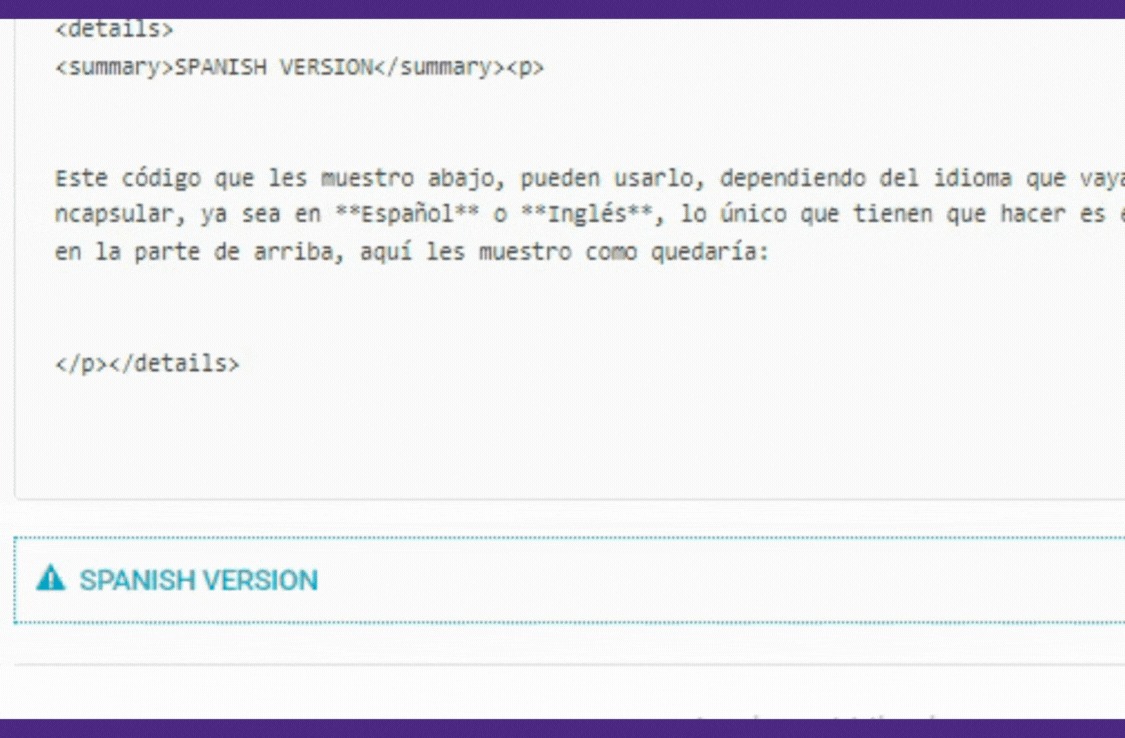
Este código que les muestro abajo, pueden usarlo, dependiendo del idioma que vayan a encapsular, ya sea en Español o Inglés, lo único que tienen que hacer es editar en la parte de arriba, aquí les muestro como quedaría:
<details>
<summary>SPANISH VERSION</summary><p>


</p></details>
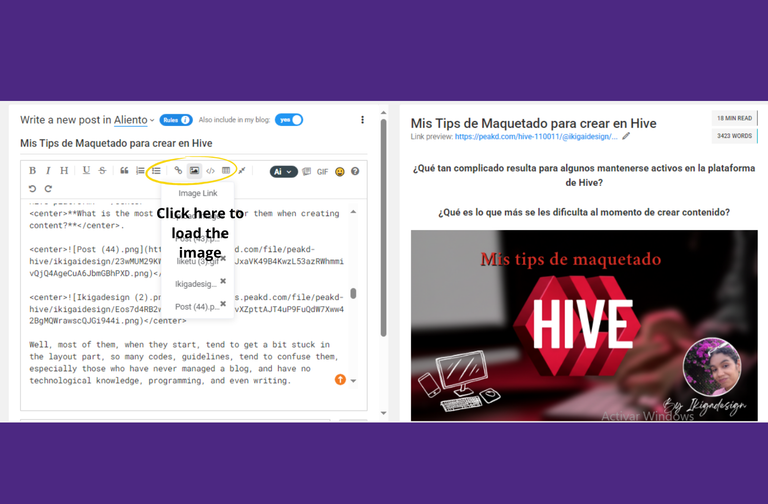
Fíjense en la Imagen (1), del lado izquierdo, van a modificar, dependiendo del idioma, si es Español o English, y en la parte derecha, verán como saldría reflejado; y en el video pueden notar que al darle click a ese cuadrito azul, se expande su texto.
Es allí donde le darían las personas para leerlo, según su idioma, como dije, el inglés es el más usado, pero hay personas de habla portugués, ruso, entre otros.
Quiero señalar otra cosita, y es que este código también lo podemos encontrar en el propio maquetado, al darle clic para escribir un post, pueden ver en la parte de arriba unas letras, símbolos, y cada uno de esto tiene una funcionalidad, este código se le llama Spoiler, y lo pueden encontrar en este símbolo.👇

>! [Hidden Spoiler Text] This is the spoiler content.

> Optionally with more lines
Ahora bien, pero "como podemos colocar esta separación", bueno, puede ser debajo de cada párrafo, o separarlo por completo, es decir; colocando un idioma primero completo, y debajo encapsular el otro, es cuestión de cada quien, para algunos les resulta más cómodo de esta forma, asi solo tienen que traducir completo todo el texto, copiar y pegar dentro del código.
Como vamos, van captando, ¿o aún se siente perdidos?😊...

Ah pero les comenté, que existe otra forma, asi es, ahora les muestro otra forma de separar los idiomas.
1.2 Código alternativo para separar idiomas
Este es mucho más sencillo y práctico, sin tantas complicaciones ni códigos, y para los que están comenzando, definitivamente, este es el más indicado, aquí les muestro:
Este es mucho más sencillo y práctico, sin tantas complicaciones ni códigos, y para los que están comenzando, definitivamente, este es el más indicado, aquí les muestro:

>This is much simpler and practical, without so many complications or codes, and for those who are just starting out, this is definitely the most appropriate, here I show you:
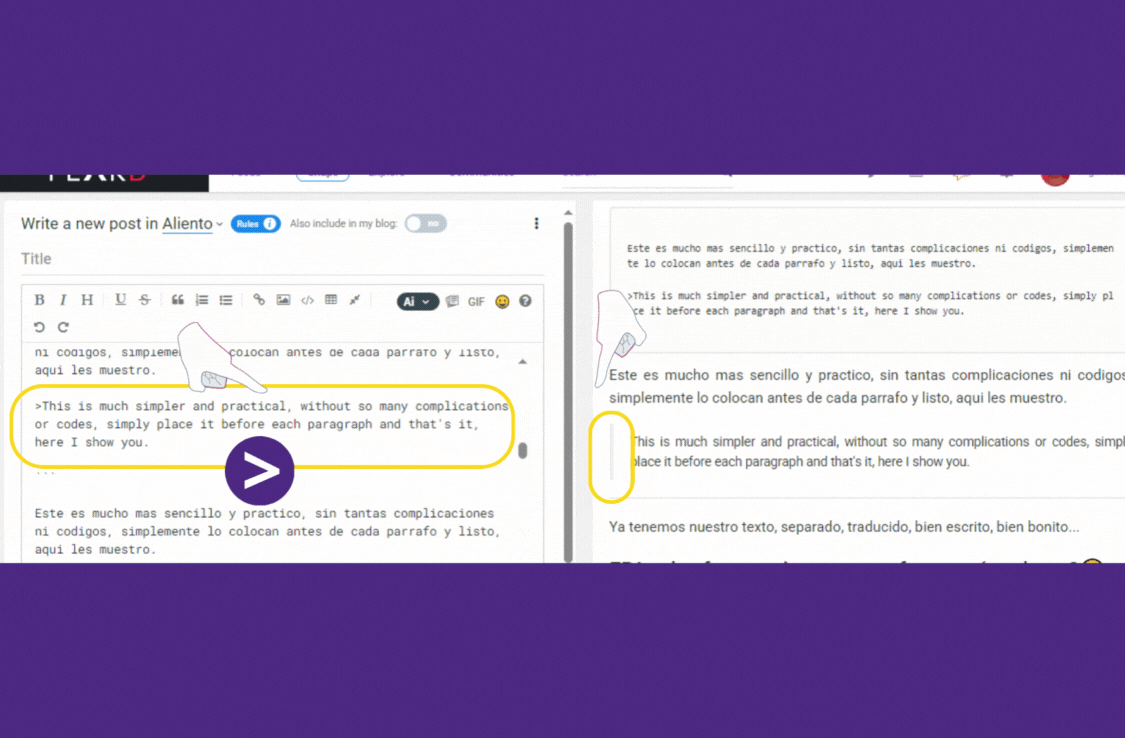
Solo le agregan ese simbolo a su texto y listo, esto separaria cada parrafo traducido.
Ya tenemos nuestro texto, separado, traducido, bien escrito, bien bonito...
EPA, y las fotos, quiero agregar fotos, ¿cómo hago?😏
Ohh si las fotos, son las que les dan un plus a nuestro post, para hacerlo aún más atractivo, pues bien, que les digo, para esto solo necesitaran un código, siguiendo el lineamiento del orden, aquí solo deben centrar sus imágenes, y como lo hacemos, colocando un sencillo código, el cual lo que hará, sera centrar su imagen: 👇
<center>

</center>

Nada del otro mundo, verdad, sin embargo, esto aplicaría para fotos propias, pero si vamos a colocar fotos sacadas de internet, hay que indicar de donde las sacaron, es decir, darle los créditos, esta parte es delicada, porque no podemos usar imágenes de cualquier página, aquí debemos ser un poco más cuidadoso, al usar imágenes de internet, debemos hacerlo desde un banco de imágenes, preferiblemente de páginas sin derechos de autor, libres de uso.
Pero me gustaría dejar esa parte, para otro post, mientras dejaré esto hasta aquí, porque como dije, cuando colocamos todo en un solo artículo, la gente se aburre, se confunde, no leen, y vez de entender, suelen enredarse más.
Finalmente:
Ya con nuestro post redactado, y anexado las fotos, es importante resaltar, que como todo artículo, necesitamos de un buen título, ustedes pueden ponerle el que quieran, dependiendo del tema, el cual también dependerá de la comunidad donde vayan a publicar...
Ohhh las comunidades ¿Y eso que es?😳
Pues bien, como todo espacio, dentro de la blockchain, está comprendida por diferentes comunidades, con distintos temas, para crear contenido, ya sea de cocina, arte, deportes, música, estilo de vida, fotos, en fin, hay una gran variedad. Ustedes indagarán, escogerán su comunidad, y allí lanzan su post, eso sí, primero deben leer las reglas de cada una, para cumplir con sus lineamientos.
Nota Importante:
Seguramente al hablarles de la blockchain, si vienen recomendados, les dirán que Hive está compuesto por diferentes dapps, entre ellas: ECENCY, LIKETU, 3SPEAK, LEOFINANCE, que son las más usadas para crear contenido; quiero señalar que cada una les mostrara la opción de maquetado de diferentes formas, sin embargo, la recomendada para usar es PEAKD, con ella puede redactar sus post, haciendo uso de sus respectivos códigos, y luego copiarlo en las otras dapps.
En el caso de Ecency, pueden redactar desde ella directamente, ya que también tiene sus propios códigos, pero como les mencione, se verán diferentes, en todas las dapps.
Hay mucha información sobre Hive al momento de crear, muchos tips, quizás se me paso alguno, pero como les mencione, no quiero abrumarlos con tanto, por eso lo dejaré hasta aquí, es mi pequeño resumen, para los que estén comenzando, si tienen alguna duda, déjenme saberlo en los comentarios.
ENGLISH VERSION
Well, most of them, when they start, tend to get a bit stuck in the layout part, so many codes, guidelines, tend to confuse them, especially those who have never managed a blog, and have no technological knowledge, programming, and even writing.
I have heard comments like: "I don't know anything about coding ", "I don't have problems writing, but it's hard for me to sit down to layout the post ", and things like that.
And they are understood, I remember when I started in this world of content creation, I had no idea of how to manage a blog, if I knew something about the codes, but I had never implemented them, however, over time, and thanks to the support and guidance of some people, I managed to learn, it has been a process, everything in this life takes time, it is part of one seeks to learn, be consistent, and put into practice everything acquired.
I know there are many guides, tutorials on how to create content within the Hive platform, so they do not feel so lost, however, even so, many find it difficult, and so much information overwhelms, and people tend to get more confused, that's where they decide to give up, throw in the towel, because they feel it is too much pressure, and do not believe they can have the patience, calm, time, to learn and go creating their content.
Especially if you put all this information in a single post, with so many codes, guidelines, links, of course people get even more confused, they have to read all that calmly, and well, we know that many people are lazy to read, you know it's like that.
And where to start?
This is one of the many questions that many people ask themselves, How do I start?, What should I do?, What content can I publish? How do I write my post?.
You should not get so complicated, the first thing is to start with the basics, when we start with our layout, creating our first post, always generates some nerves, uncertainty, it is normal, but as I said, let's start with the basics, here I show you a simple code, the first you should take into account when you start building your post.
1- JUSTIFYING OUR TEXT 👇
The first thing is to justify our text, that is, that everything is well aligned, something simple, so that it looks nice, but above all organized, here below I leave the code, short, without much complication, you must leave a space in the center, to add your text, that is, what you are going to write.
<div class="text-justify">

<Texto>

</div>
Now I show you how your text will look like without this code vs. with the code:
See the difference, how nice it looks, so well organized, centered, justified, as it should be, I have seen many posts that do not put it, it is up to each one, maybe they forget, or do not know how to put it, well, friends, here it is, use it and you will notice the difference 😉.
We go on.......
I already justified my text, now what do I do?, well simple, start writing,😂 maybe it sounds hateful, but it's the truth, as I said, don't complicate yourself, start writing, let your imagination fly, let the words come out by themselves, through your nice fingers, through the keyboard of your computer, or the phone, whatever you are using. 😜
EPA 😳
That's another thing, not many use a computer, most only count with their phone, and this is where I can tell you, it's twice the work😣, it costs a little more, adding these codes, writing correctly, anyway, but as they say over there, a matter of patience and practice, even some are better at it by phone, there are cases of cases.
Here I also leave you a capture, of how it would look like to start your layout, from the phone:
I have already written my essay, now what do I do?
As we well know, within the platform there are many subscribers, from several countries, some of them Spanish speaking, others English, and so on; then we must find a way to capture everyone, so it is advisable to write our post in two languages, your own, and English, which is the most used.
But how do I show it? How do I separate the two languages?
Well here are many ways to do it, in this part I will show you a second code, which could help you with this separation, however, it is not mandatory, you can do it as it works best for you, so I will leave you these two ways.
1. Code for separating languages 👇
This code that I show you below, you can use it, depending on the language that you are going to encapsulate, either in Spanish or English, the only thing you have to do is to edit at the top, here I show you how it would look like:
<details>
<summary>SPANISH VERSION</summary><p>


</p></details>
Look at the Image (1), on the left side, you are going to modify, depending on the language, if it is Spanish or English, and on the right side, you will see how it would be reflected; and in the video you can notice that when you click on that little blue square, your text expands.
It is there where people would give you to read it, according to their language, as I said, English is the most used, but there are people who speak Portuguese, Russian, among others.
I want to point out another little thing, and is that this code can also be found in the layout itself, when you click to write a post, you can see at the top some letters, symbols, and each of these has a functionality, this code is called Spoiler, and you can find it in this symbol.👇
>! [Hidden Spoiler Text] This is the spoiler content.

> Optionally with more lines
Now, but “how can we place this separation”, well, it can be under each paragraph, or separate it completely, that is to say; placing a complete language first, and below encapsulate the other, it is a matter of each one, for some it is more comfortable this way, so they only have to translate the whole text, copy and paste inside the code.
As we go, are you getting the hang of it, or do you still feel lost?
Ah but I told you, that there is another way, that's right, now I show you another way to separate the languages.
1.2 Alternative code for separating languages
This is much simpler and practical, without so many complications or codes, and for those who are just starting out, this is definitely the most appropriate, here I show you:
Este es mucho más sencillo y práctico, sin tantas complicaciones ni códigos, y para los que están comenzando, definitivamente, este es el más indicado, aquí les muestro:

>This is much simpler and practical, without so many complications or codes, and for those who are just starting out, this is definitely the most appropriate, here I show you:.
Just add that symbol to your text and that's it, this would separate each translated paragraph.
We already have our text, separated, translated, well written, nice?
EPA, and the photos, I want to add photos, how do I do it?
Ohh yes, the photos are the ones that give a plus to our post, to make it even more attractive, well, what can I tell you, for this you will only need a code, following the guidelines of the order, here you only have to center your images, and how do we do it, placing a simple code, which what it will do, is to center your image: 👇
<center>

</center>
Nothing big deal, right, however, this would apply for own photos, but if we are going to place photos taken from the internet, we must indicate where they were taken from, that is, give the credits, this part is tricky, because we can not use images from any page, here we must be a little more careful, when using images from the internet, we must do it from an image bank, preferably from pages without copyright, free to use.
But I would like to leave that part, for another post, meanwhile I will leave this up to here, because as I said, when we put everything in one article, people get bored, confused, they do not read, and instead of understanding, they tend to get more entangled.
Finally:
Already with our post written, and attached the photos, it is important to emphasize, that like any article, we need a good title, you put the one you want, depending on the topic, which also depends on the community where you are going to publish ...
Ohhhh the communities, what's that ?
Well, like any space, within the blockchain, it is comprised of different communities, with different themes, to create content, whether it is cooking, art, sports, music, lifestyle, photos, in short, there is a great variety. You will search, choose your community, and there you launch your post, that if, first you must read the rules of each one, to comply with their guidelines.
Important Note:
Surely when talking to them about blockchain, if they come recommended, they will tell them that Hive is composed of different dapps,among them: ECENCY, LIKETU, 3SPEAK, LEOFINANCE, which are the most used to create content; I want to point out that each one will show you the layout option in different ways,however, the recommended one to use is PEAKD, with it you can draft your post, making use of their respective codes, and then copy it to the other dapps.
In the case of Ecency, you can compose from it directly, since it also has its own codes, but as I mentioned, they will look different, in all the dapps.
There is a lot of information about Hive when creating, many tips, maybe I missed some, but as I mentioned, I do not want to overwhelm you with so much, so I'll leave it here, it's my little summary, for those who are starting, if you have any questions, let me know in the comments.
Por cierto, aquí verán como separe los idiomas, para que decidan, cuál opción les gusta más...😜
Seguro la segunda verdad, pero quizás mas adelante les guste la primera. 😍
By the way, here you will see how I separated the languages, so you can decide, which option you like the most...😜
Surely the second one is true, but maybe later you will like the first one.😂

Edición Banner y Portada con CANVA/ Banner and Cover Edition with CANVA
Me gustó la explicación, es bastante completa para alguien principiante. Recuerdo que, cuando yo inicié, una de las cosas que más me facilitó la vida, fue empezar a utilizar las plantillas (templates) en PEAKD. Normalmente, suelo usar PEAKD porque es la frontend cuyo editor más me gusta, pero uso ecency para navegar porque la app es bastante cómoda... En fin, tomando lo mejor de cada mundo, supongo 🤭
Abrí el post porque estaba buscando ideas para separar mi post por idiomas, ya que siento que al no ocultar uno de los dos idiomas, da la impresión de que es demasiado largo. También utilizo un código de salto para pasar al idioma deseado rapidamente, pero solo funciona en PEAKD... Siento que esto de los códigos es emocionante, aunque no sé mucho sobre eso.
En fin, hoy aprendí algo nuevo, hay otro código para los spoilers, lo estaré probando quizá. ✨
Si sé cual es el código de salto, pero como dices, solo funciona en peakd y muy rara vez, porque ya lo he probado, este código también es sencillo y visible por peakd, como dije, no todas las fronted o dapps son iguales, pero es a gusto de cada quien, espero te sirva este nuevo código jjij, igual, y como dice Hive es todo un mundo, hay de todo un poco, solo queda aprender de cada parte y seguir avanzando, gracias por leerme, saludos.😍
Definitivamente el mantenerse activa en hive es complicado,en especial cuando quieres hacer post organizados, bien presentados, he visto post que no usan nada de maquetado y creo esto del maquetado es algo que no es obligatorio pero suma muchísimo a la presentación de nuestras publicaciones, tu sabes soy súper quisquillosa con mis cosas jejejeje creo soy "no tengo problemas para escribir, pero me cuesta sentarme a maquetar el post" 🤭🤭🤭 aunque como ahorita ando más desde el tlf he tratado de simpligicar un poco los códigos que uso.
Está súper completa la información nohe creo me voy a robar un código que no recuerdo tener jajaja o bueno no así simplificado,porque mi estrategia inicial era copiarme el codigo de mi post maquetado e ir desde allí borrando y cambiando para actualizar con lo nuevo pero este método desde el tlf es difícil de usar y ando tratando de tener códigos así a mano en blanco para solo pegarlos, aprendí a usar los snippes (creo así se llaman 🫣)y bueno por allí uso para las fotos sobre todo porque el seleccionar texto en el tlf para borrar es una tarea difícil de controlar, Pero bueno paso a paso se va aprendiendo, al principio es difícil Pero luego uno se da cuenta que no era para tanto, si quita tiempo Pero hay opciones también para simplificar, en fin Hive es lo máximo y quién se da la oportunidad de aprender y conocer la plataforma se enamora, las posibilidades son infinitas 💪
Como dices suma mucho a una buena presentación, y debería de ser obligatorio, pero es cuestión de cada quien, el tener un buen maquetado, asi no te lo valoren mucho, es fundamental, porque a final de cuentas es tu blog, es tu presentación, y eso habla bien de uno, espero este post les sirva mucho a los que estén iniciando, pero sobre todo se mantengan activos, lo bonito que es estar aquí, crear contenido, y recibir ingresos por ello, eso no lo consigues en ninguna otra parte jjij, gracias por leerme y el apoyo, saludos.😍🤗
Empezar a maquetar no siempre es sencillo, pero basta con explicaciones más amenas cómo estás para uno ir aprendiendo y atreviéndose a probar. Gracias por tan buena guía. Muy buen post. Saludos 🌷
Asi es amiga, de eso se trata, de no sobresaturar a las personas con tantos códigos e información, porque se abruman, espero esta guía les sirva a los nuevos, y se atrevan a seguir creando contenido, gracias por el apoyo, saludos.
Te felicito por la gran dedicación que le diste a este post, esta bastante completa, y bueno en términos generales, como siempre todo al principio es con incertidumbre de saber si lo hiciste bien o no, pero eso la practica lo hace mas facil con el tiempo, esta excelente el post. Muy completo.
Asi mismo es, de eso se trata que pierdan el miedo, que no se enreden con tantos códigos, lo sencillo, lo básico ya después con el tiempo, van mejorando, gracias por leerme, saludos.
A couple of months ago I was racking my brains thinking HOW TO MAKE THAT BEAUTIFUL HIDDEN TEXT FORMAT? In PeakD is the button with the almost automated format but that day I wanted adrenaline and I wanted to investigate from scratch... but here it is, this beautiful post with nice animations included and well explained, bless you Nohelys dear 🥂 😎
There can never be enough educational posts about formats, NUNCAAAAA! 🔥
Ohhh how cute, you don't know how happy this makes me, I made it with much affection, especially to teach many who still feel lost, and as you say, there will never be enough guides, we will always learn something new in some, thanks for reading and support, I promise to make a second part, a hug, greetings.😍