Tactical way to use Archer Koi in Battles
Archer Koi is one of the new released monsters in splinterlands, it is a conclave arcana monster with wonderful ability.
Though it is not a legendary monster that every one wants in splinterlands; it is a rare monster. I have used level one of Archer Koi in battles, and I know how useful it is if it is used in an effective way.
Archer Koi can be used in ‘lost magic rule'. In a lost magic rule, magic monsters cannot be used, melee and ranged monsters are allowed to use in the battle. Archer Koi will be one of the best monsters to use especially when the friendly monsters have armor. This is the reason it is good to use a monster or summoner that gives armor to friendly monsters. We all know that, when magic is lost in the battle, ranged and melee monsters attack the armor before health, that is how such a battle will be difficult for the opponent. There was a battle which I played some days ago; I was looking for the battle to share today because I love how Archer was repairing all the damaged armor, which made it difficult for opponent monsters to destroy my monsters. Unfortunately, I played more than 20 battles, which cannot be found in my battle history; it was what I intended to share today! At the end of that battle, there were only two monsters that were eliminated from my lineup.
I will not say ‘going the distance rule’ is the one of the best because it depends on the summoner a player uses. All what I know about going the distance is that, only range monsters can be used; and if a player is very skillful,he can use Archer Koi, especially when it is a little league. There were times I was using Armorsmith whenever little league, lost magic and supersneak is given in battles, and I was winning. Sometimes I used Archer Koi in ‘Going the distance’ battles; whenever, I used Archer Koi. I always used an armor monster which gave armor to all friendly monsters. With this lineup, it is hard to destroy my monsters. Note: players that use summoner that gives close range ability to ally have advantage over other players that did not use such a summoner. Therefore, whenever I was paired up with such a player, it was always a tough battle for me.
Fire and Regret is one of the rules that is not good for range monsters including Archer Koi. Though, I have seen many players that use ranged attack monsters; and I have encountered battles where going the distance, fire and regret were the ruleset. This simply means that only ranged monsters can be used in this kind of a battle. Using Archer Koi can be of advantage in this kind of battle, because I have used it in different battles, and I was victorious.
Archer Koi can be of benefit to weak magic rules. We all know that magic attacks can not damage the health of a monster directly when there is armor in a targeted monster. The presence of **Archer Koi will keep on repairing the damaged armor in each round which can make it last longer in battle
I want to remind you that there are many rules that Archer Koi can be used. Once you realize that your opponent is coming with melee and range monsters, one can use Archer Koi Look at the link below and watch my battle, my opponent did not use a magic monster. I was very certain that my opponent would not use a magic monster or he would use 1 or 2 magic monsters. After I checked all the splinters - Fire, Earth, life and Dragon, I realized that few magic monsters were given in this battle; that was the reason I used Archer Koi in this battle despite being a heavy metal and born again rules.

Click here to watch the battle
Rules of the battle “Born Again* All units have rebirth (Self resurrects once per battle with 1 health and 100 percent of armor; all magic debuffs are removed, and all magic buffs are reapplied; skips turn).
Heavy Metal You can only summon armored units.
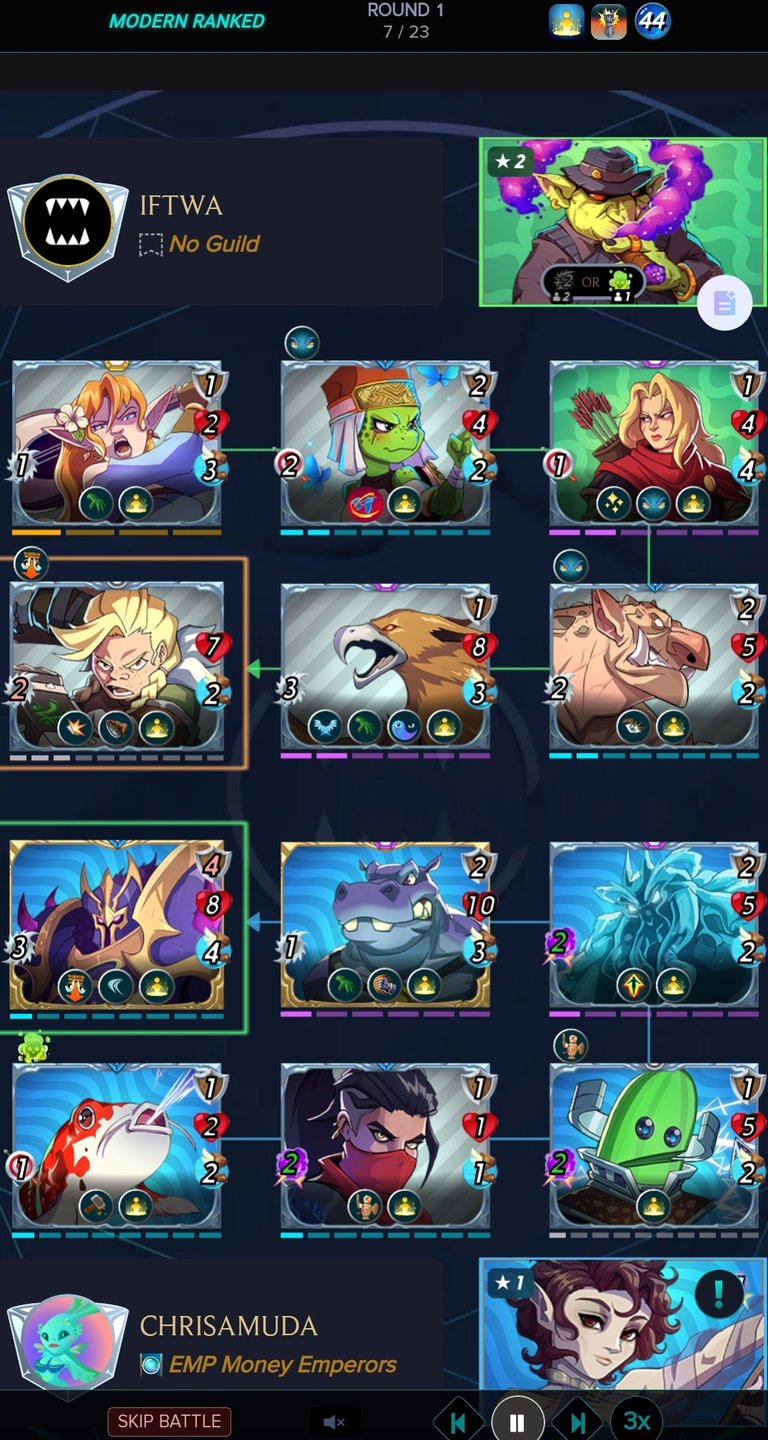
Monsters Arrangement
Commander Slade
Splinter: Water
Level: 1 ⭐
Ability: Enfeeble and Dodge
Speed: 4 ⚡⚡⚡⚡
Health: 8 ❤️❤️❤️❤️❤️❤️❤️❤️
Armor: 5 🪖🪖🪖🪖🪖
Attack: Melee
Mana: 10
Commander Slade's health made me to place it in first position. With 8 units of health and 5 units of armor, I knew it would last in the battle. The best position for ”Commander Slade is the first position; there was no best position for the monster except first position. This is because, in this kind of rule, Commander Slade can only attack in first position, except in situation a monster with flank ability is used in first position while Commander Slade is used in second position. Commander Slade was eliminated in the fourth round; then, resurrected back life. Commander Slade could not be eliminated in the second round of the battle.

Warwall Juggernaut
Splinter: Water
Level: 1 ⭐
Ability: Reach and Armored Strike
Speed: 3 ⚡⚡⚡
Health: 10 ♥️♥️♥️♥️♥️♥️♥️♥️♥️♥️
Armor: 2 🪖🪖
Attack: Melee
Mana: 9
Warwall Juggernaut only fits in second position due to reach ability. I did not choose it because of the armor strike, I selected it because of the reach ability; and also knew it could lead the lineup if Commander Slade is eliminated.

Abyssal Elemental
Splinter: Water
Level: 1 ⭐
Ability: Resurgence
Speed: 2 ⚡⚡
Health: 5 ❤️❤️❤️❤️❤️
Armor: 2 🪖🪖
Attack: Melee
Mana: 6
Abyssal Elemental was in third position in case Warwall Juggernaut is eliminated. I knew Abyssal Elemental would delay opponent's monsters due to resurgence ability. One thing I love about this monster is that, when it resurrects, it comes back with 100% of health units, and 100% of armor.

Yaba's Pickle
Splinter: Water
Level: 1 ⭐
Ability: None
Speed: 2 ⚡⚡
Health: 5 ❤️❤️❤️❤️♥️
Armor: 1 🪖
Attack: Magic
Mana: 4
Without Moxian Rebel, Yaba's Pickle would not have had a magic attack. The presence of Moxian Rebel gave Yaba's Pickle magic attack. The contribution of Yaba's Pickle was tremendous in this battle.
Moxian Rebel
Splinter: Neutral
Level: 1 ⭐
Ability: Weapon Training
Speed: 1 ⚡
Health: 1 ❤️
Armor: 1 🪖
Attack: Magic
Mana: 4
It was necessary for me to add Moxian Rebel so that might get more magic monsters in the battle. Moxian Rebel was eliminated by Mad Ogre Anarchist in the second round of the battle. It was resurrected, and became an integral part of my lineup. I knew that magic monsters is very important in this battles, that was the reason I brought Moxian Rebel into the battle.

Archer Koi
Splinter: Water
Level: 1 ⭐
Ability: Repair
Speed: 2 ⚡⚡
Health: 2 ❤️❤️
Armor: 1 🪖
Attack: Ranged
Mana: 4
Archer Koi was the last monster in my lineup; got damaged and destroyed by poison in round 2, resurrected back and could not be destroyed again. Kept on repairing the armor of Commander Slade which made it difficult for the opponent monster to destroy it. If not Archer Koi, Commander Slade would have been eliminated in this battle which would have exposed the other monsters in my lineup.
What are you waiting for friends! Whoever wants to earn passive income, can get the details of the @play2earn game from @splinterlands blog. checking #splinterlands will give information that will make you understand the game.
click My Referral Link to register @splinterlands. It is a game that provides passive income and changed the lives of many gamers: and I am one of them. @Splinterlands have saved me from debt, borrowing money from banks and cooperatives. Register today, and you will thank me later. Do you want to win cards, SPS, subscribe to Splinterlands TV . Many programs are going on in the SplinterlandsTV. You can also join Splinterlands Discord Channel where you can ask anything about Splinterlands.
I stand up for success, and success is not achieved by merely making mouth, No room for laziness, no room for idleness. Success comes to the people who are desperately and consciously searching for it. When it seems unsuccessful or you smell failure around you, never discourage yourself from being successful. “Discouragement and failure are the two surest stepping stones to success.” - Dale
The pictures in this post are taken from Splinterlands
Credits to canva: cover photo created by canva

Obrigado por promover a comunidade Hive-BR em suas postagens.
Vamos seguir fortalecendo a Hive
R
Sending Love and Ecency Curation Vote!
 Please Vote for our New Proposal! 🙏
Thanks for sharing! - @libertycrypto27
