Diseña y crea conmigo flores de papel higiénico. ESP/ENGDesign and create toilet paper flowers with me.
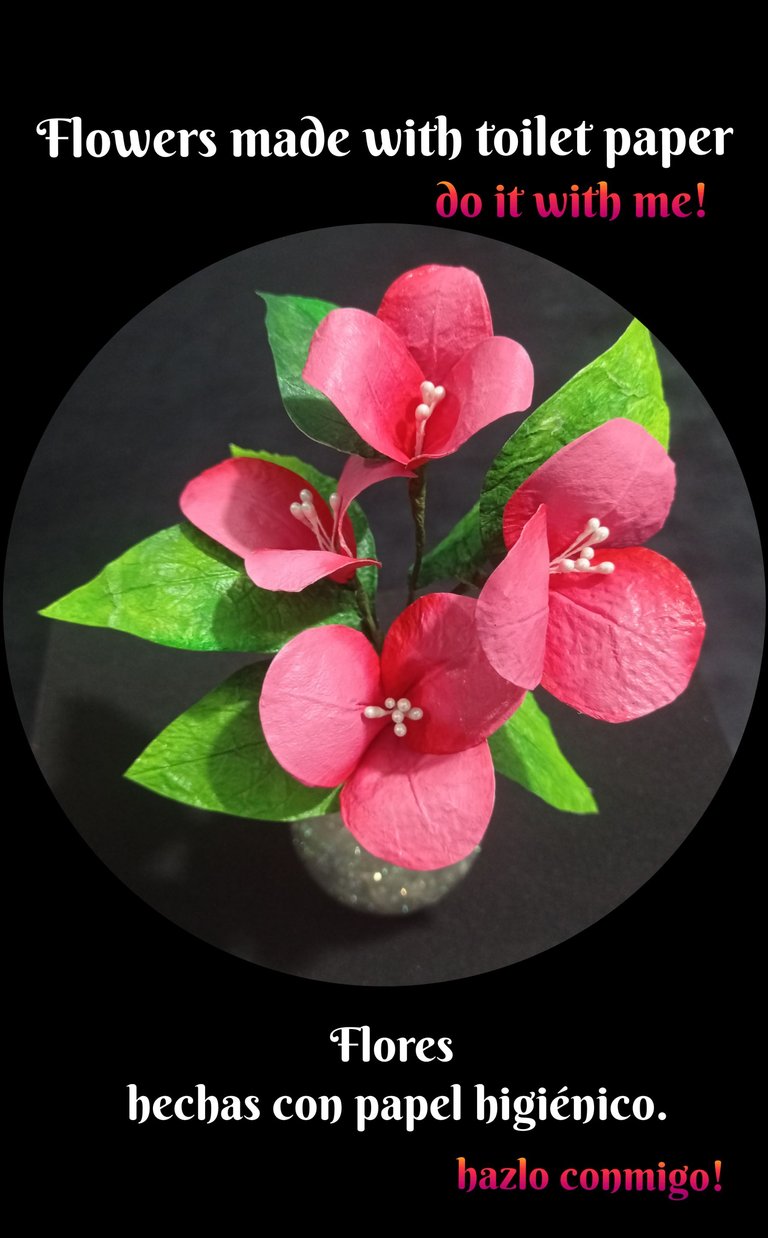
Hola queridos creadores y amigos que hoy visitan mi Blog.
Como están?
Así que quiero compartirte mi experiencia y por eso te invito a que me acompañes a ver como se hacen.
Los materiales que usarás son los siguientes:
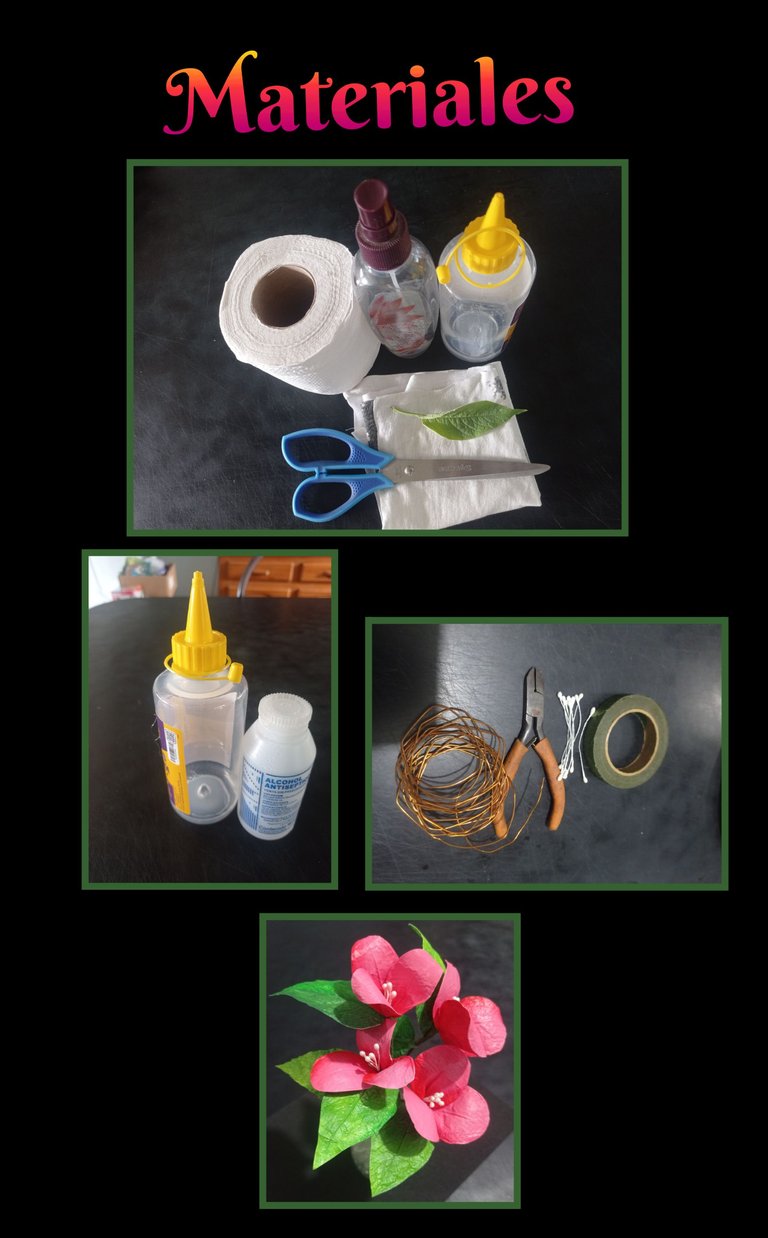
Papel higiénico o de cocina
Hojas naturales con y sin nervaduras
Alcohol y silicón
Tijera, tenaza
Alambre, Teipe floral
Pistilos, tela de franela o paño
Rociador, pincel suave.
Comencemos:
Paso 1:
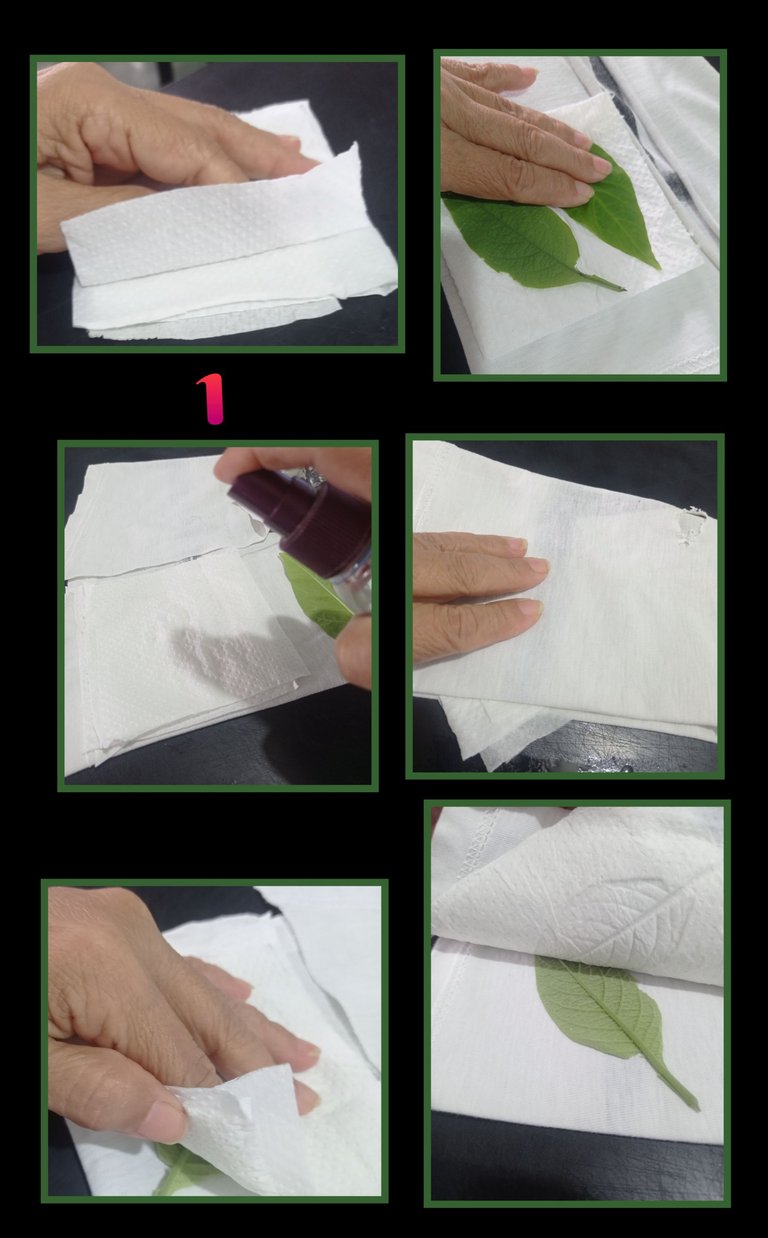
- Desprende tres hojas de papel y coloca una encima de la otra, luego coloca las hojas para cuadrar que te queden separadas una de otra.
- Ahora coloca el paño y encima las hojas con las nervaduras hacia arriba, cubre con las hojas de papel y rocía un poco hasta humedecer bien y coloca encima la tela o paño y presiona toda la hoja, puedes levantar un poco para asegurar que se haya marcado bien la forma de la hoja y nervaduras.
- Luego con cuidado levanta y pon a secar, si quieres puedes colocar de dos en dos y así será más rápido.
Paso 2:
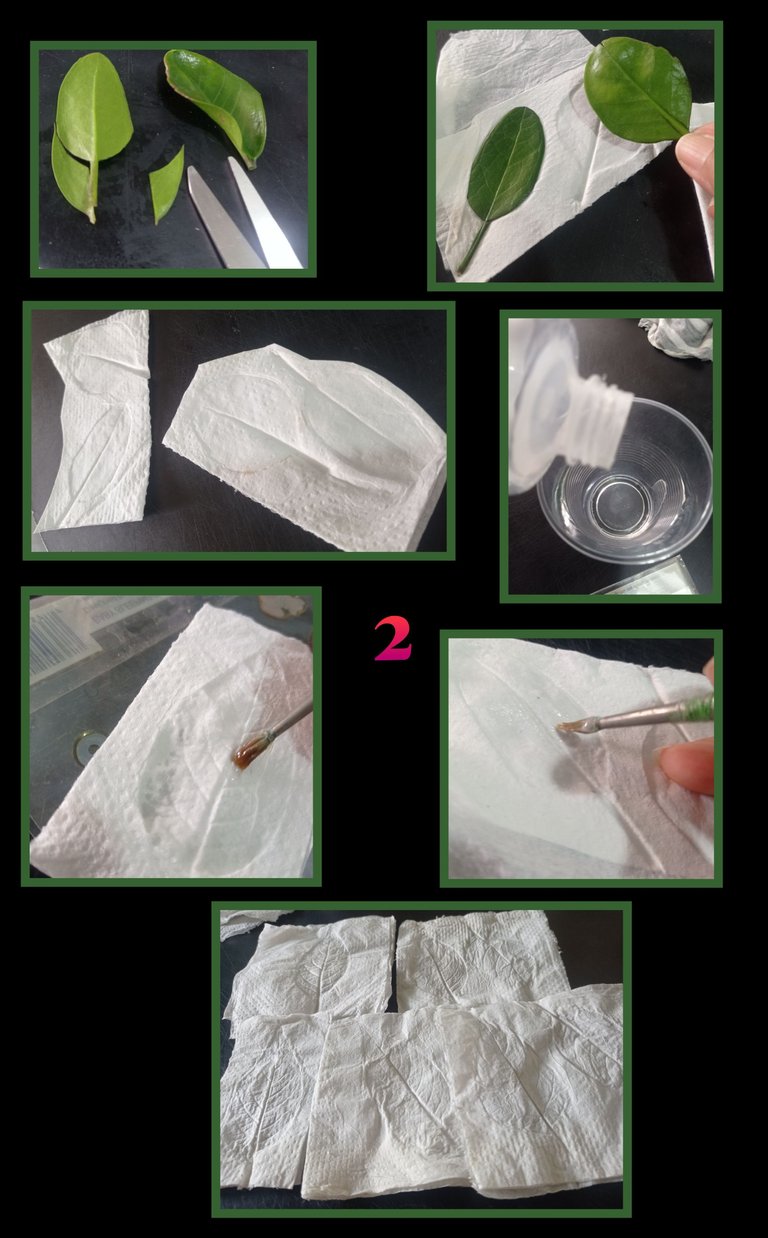
Para los pétalos de las flores, busqué una hoja que no se le notaran mucho las nervaduras y recorté una redonda y otra alargada pero, tu los puedes hacer a tu gusto y repite el paso anterior.
Debes dejar secar bien, por lo menos 2 ó 3 horas.
Pasado este tiempo debes hacer un barniz uniendo silicón y alcohol en iguales cantidades y revuelve sin agitar rápido para que no se formen tantas burbujas.
Ahora aplica con un pincel suave una capa sin repasar y deja secar, repite este procedimiento por ambos lados dejando secar bien cada uno, para mayor firmeza puedes aplicar 2 capas de este barníz.
Paso 3:
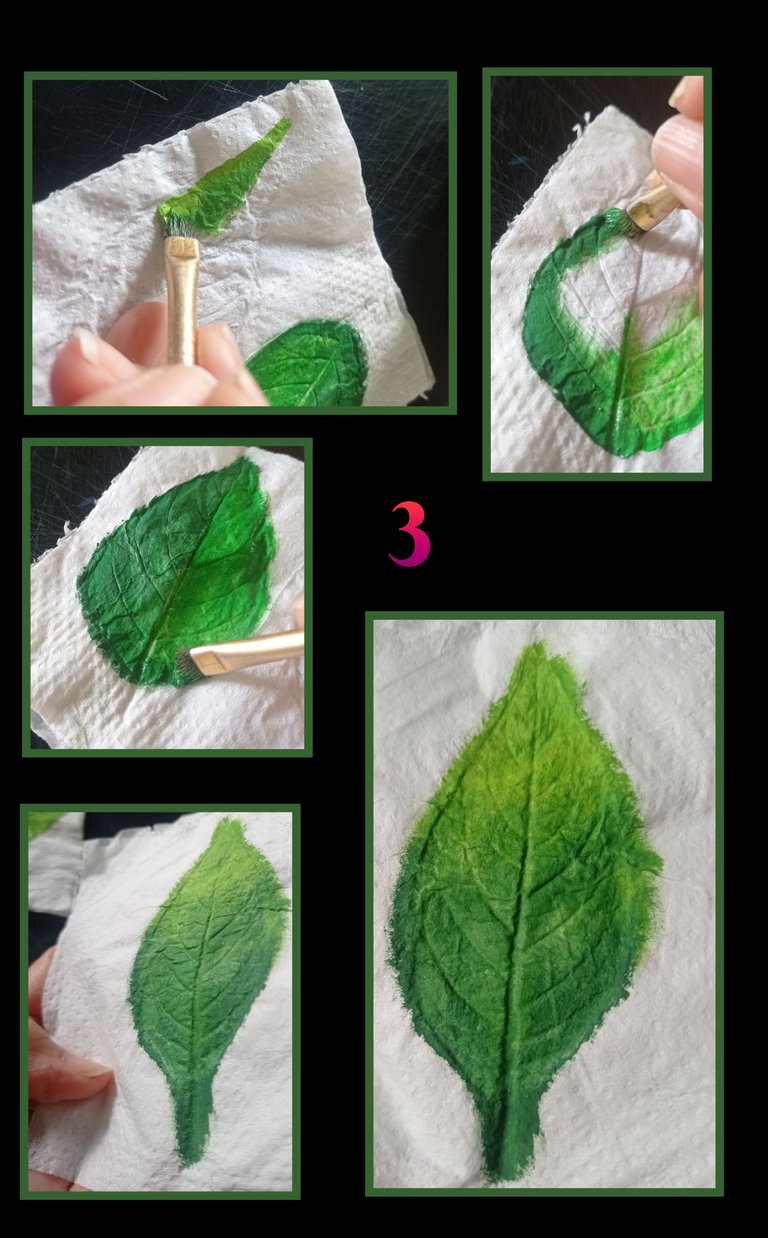
- A las hojas aplica desde la parte de arriba (punta) pintura verde manzana hasta la mitad la mitad y aún húmeda moja el pincel sin limpiar en verde navidad o verde oscuro y aplica desde abajo hacia arriba para unir los colores y que quede difuminado.
- También puedes pintar de un solo color y pasar pincel al seco con colores claros, puede ser amarillo o el color de tu preferencia.
La técnica del pincel al seco consiste en usar un pincel de cerdas duras, mojar en pintura y pasar por un cartón o tela hasta que no suelte pintura y luego se pasa frontando haciendo un poco de presión sobre las piezas en este caso para que se noten las nervaduras.
Paso 4:
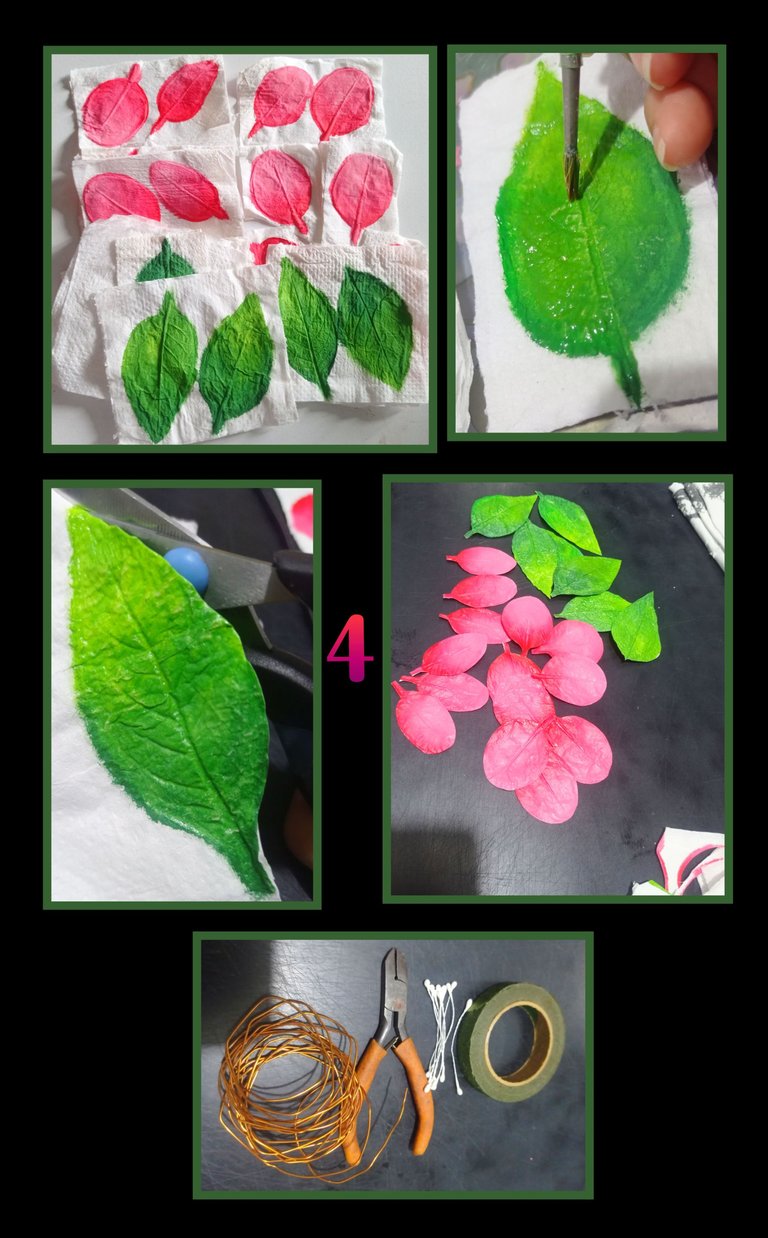
Pinta los pétalos de la misma forma que las hojas.
Secas las piezas, ahora procederemos a dar una o dos manos de barniz, claro está, entre una y otra dejar secar bien.
Luego recorta por el contorno, siempre habrá una que no haya pegado bien, entonces aplica silicón o cola blanca y presiona.
Ahora utilizaremos alambre, tenaza pistilos y teipe floral o papel crepé verde.
Paso 5:
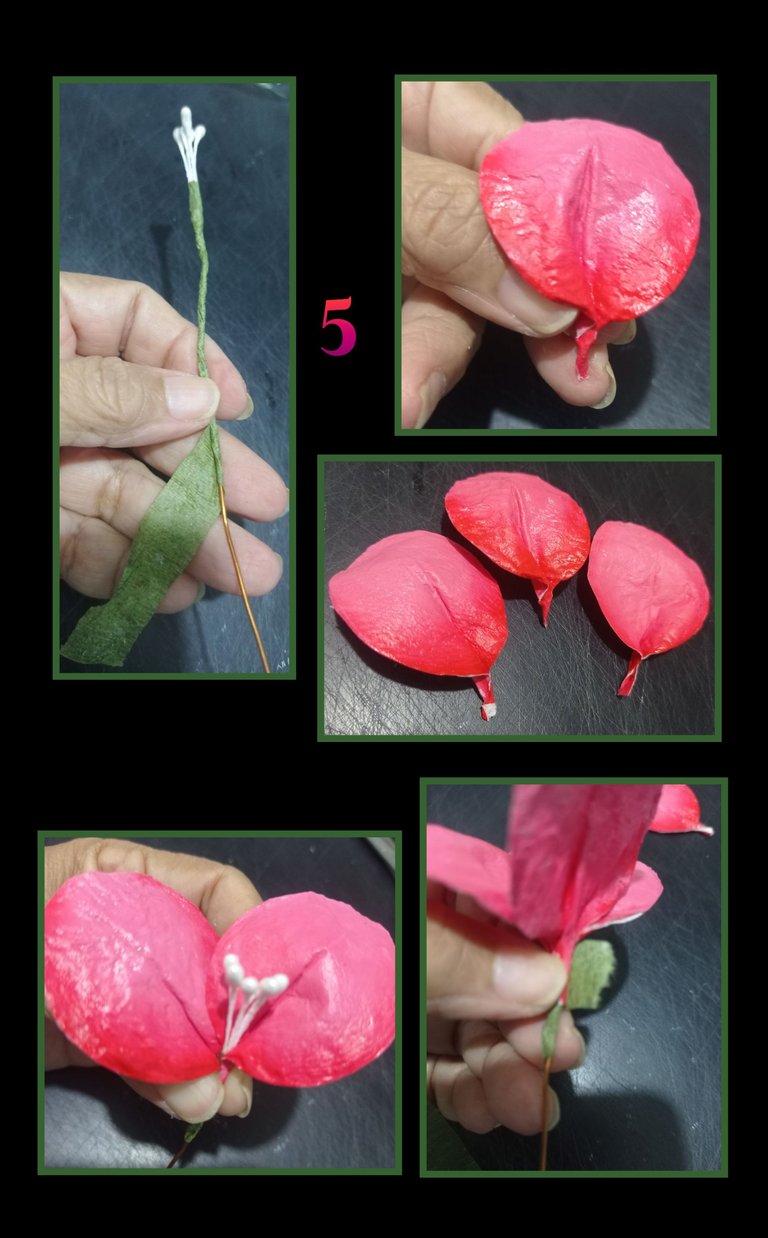
- Toma dos o tres pistilos y une al alambre con teipe floral, armas los que necesites.
- Ahora aplica silicón en la parte baja de los pétalos y aprieta para que el pétalo tome forma redondeada, luego toma el alambre con los pistilos y coloca primero un pétalo y fijalo con silicón y después forra con el teipe, así harás con los tres (3) pétalos para formar la flor.
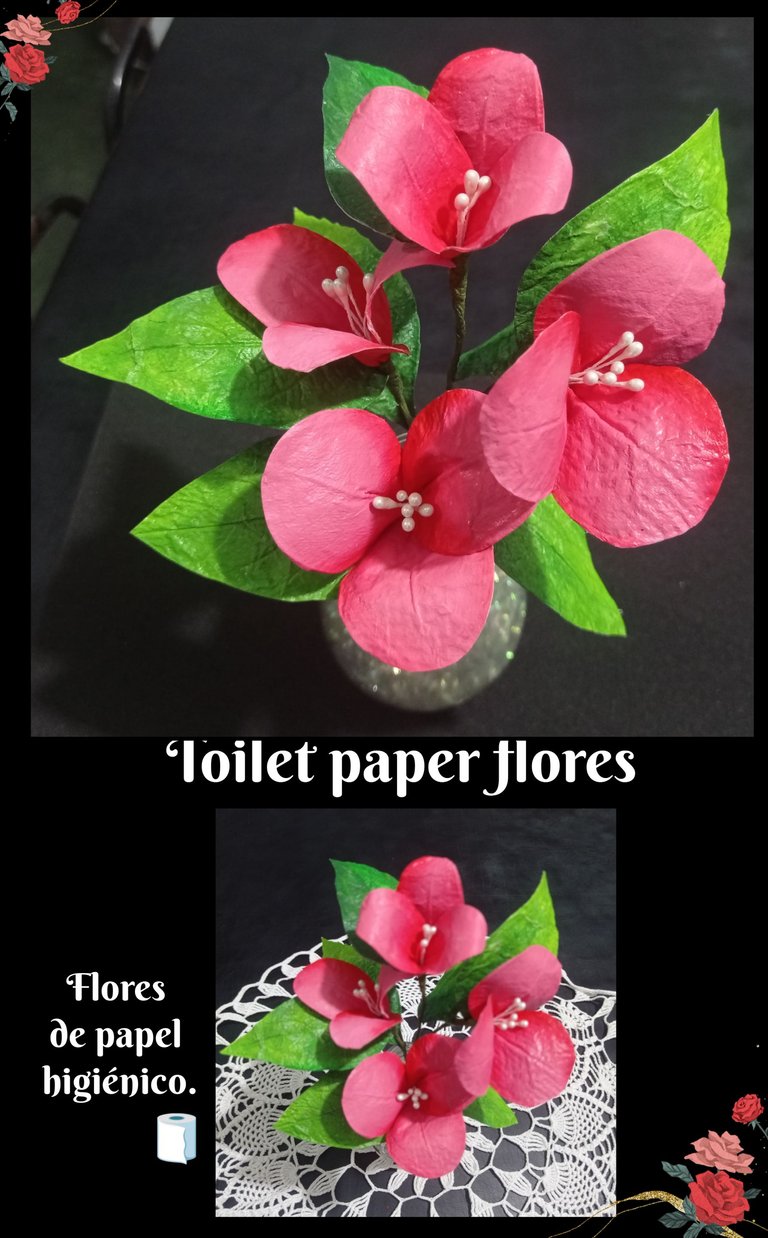
Paso 6:

- Ahora pega una hoja en el tallo de la flor y así sigue armando cada flor colocando las hojas a tu gusto.
- Así quedarán listas para usar y decorar como quieras y donde quieras.
Fuente: https://www.youtube.com/shorts/BuO4RaBHUtg
Traductor DeepL
Las fotos las edité con GridArt y usé mi Teléfono Redmi Note 9
Ahora te mostraré como se ven.
Terminado el tutorial, solo me queda desear que te haya gustado y estoy agradecerte por tu visita y apoyo.
Espero sea útil y de tu agrado, hasta un nuevo tutorial.
English:
Hello dear creators and friends who visit my Blog today.
How are you?
So I want to share my experience with you and I invite you to join me to see how to make them.
The materials you will use are the following:
Toilet paper or kitchen paper
Natural leaves with and without ribs
Alcohol and silicone
Scissors, pliers
Wire, floral tape
Pistils, flannel cloth or cloth
Spray bottle, soft brush.
Let's get started:
Step 1:
- Peel off three sheets of paper and place one on top of the other, then arrange the sheets so that they are spaced apart from each other.
- Now place the cloth and on top of the leaves with the ribs facing up, cover with the sheets of paper and spray a little to moisten well and place on top of the cloth or cloth and press the entire sheet, you can lift a little to ensure that it has been well marked the shape of the leaf and ribs.
- Then carefully lift and put to dry, if you want you can place two by two and so it will be faster.
Step 2:
For the petals of the flowers, I looked for a leaf that the ribs were not very noticeable and cut one round and one elongated, but you can make them to your liking and repeat the previous step.
You must let it dry well, at least 2 or 3 hours.
After this time you should make a varnish by joining silicone and alcohol in equal amounts and stir without shaking quickly so that not so many bubbles are formed.
Now apply with a soft brush a layer without going over it and let it dry, repeat this procedure on both sides letting each one dry well, for greater firmness you can apply 2 layers of this varnish.
Step 3:
- To the leaves apply from the top (tip) apple green paint to the middle and still wet wet the brush without cleaning in Christmas green or dark green and apply from the bottom up to unite the colors and that is blurred.
- You can also paint a single color and dry brush with light colors, it can be yellow or the color of your choice.
The dry brush technique is to use a stiff bristle brush, dip it in paint and pass it through a cardboard or cloth until it does not release paint and then pass it in front making a little pressure on the pieces in this case so that the ribs are noticed.
Step 4:
Paint the petals in the same way as the leaves.
Once the pieces are dry, we will now proceed to give one or two coats of varnish, of course, between one and the other let dry well.
Then cut along the contour, there will always be one that has not stuck well, then apply silicone or white glue and press.
Now we will use wire, pliers, pistils and floral teipe or green crepe paper.
Step 5:
- Take two or three pistils and attach them to the wire with floral tape, make as many as you need.
- Now apply silicone on the lower part of the petals and press so that the petal takes a rounded shape, then take the wire with the pistils and place first one petal and fix it with silicone and then line it with the teipe, so you will do with the three (3) petals to form the flower.
Step 6:
- Now glue a leaf on the stem of the flower and continue assembling each flower by placing the leaves as you like.
- This way they will be ready to use and decorate as you want and where you want.
Source: https://www.youtube.com/shorts/BuO4RaBHUtg
Translator DeepL
I edited the photos with GridArt and used my Redmi Note 9
Now I will show you how they look like.
Finished the tutorial, it only remains for me to hope you liked it and I thank you for your visit and support.
I hope it will be useful and to your liking, until a new tutorial.
Qué bellas, quedan como con aspecto natural, me alegra que ese video te haya permitido experimentar una nueva y creativa idea artística. Felicidades,🌹 gracias por compartir amiga.🤗🌷
Hola, si amiga así quedan!
Sí gracias a la creadora del video aprendí como se hace y bueno pude crear esos pétalos para armar mis flores.
Muchas gracias por tus palabras y para mi es grato compartir con ustedes lo que sé y voy aprendiendo.
Feliz tarde.
Nos enorgullece todo lo bueno y lindo que comparten con nosotros. Muchos abrazos. 🤗
Guao amiga, muchas gracias por tanto apoyo y cariño que me brindan ustedes, de verdad agradecida 1000%.
Igualmente para ti!🙏❤️
❣️Es un honor, amiga querida 💞
Guao maestra! Pero qué espectacular, soy muy fan de sus trabajos. Estas flores y esta técnicas quiero aprenderlas, son muy bellas.
Hola amiga, muchas gracias porque siempre tiene palabras que llegan al alma, un agradecimiento por su apoyo invalorable.
Demás está decir que también admiro sus trabajos.
Claro amiga, estoy segura que las hará y que le quedarán hermosas...Estoy a la orden para cualquier duda.
Bendecida tarde.
Gracias por tanto.
Me llamo la atencion el material que usaste jeje le diste un aspecto muy encantador, ni siquiera parece que usaste papel higienico, que genialidad 😍 te quedaron muy lindas ❤️ me atrevo a decir que parecen reales 😲
Si amiga, a mi también cuando vi el video! es increíble como se puede realizar pero como siempre lo digo, todos los días aprendemos algo.
Muchas gracias amiga por tu comentario, me alegro que te hayan gustado!
Y sí quedan muy bonitas.
Feliz tarde.
Es increible! que utlizando papel higienico obtengas este encantador resultado🌸🌿, @elmundodebetty es evidente el esmero y la delicadeza con que trabajo esta maravillosa tecnica que brindo una apariencia natural en el ramo🌺 Saludos ✨️🌈✨️
Sí amiga, quedaron bonitas y lo mejor que puedes usarlas para decorar.
Muchas gracias y que bueno que te gustó!
Saludos.
Han quedado increíbles, parecen reales. Excelente trabajo 👍
Muchas gracias por tus palabras y me alegra que te hayan gustado.
Feliz tarde.
Un hermoso adorno y me impresionó la técnica que empleaste para las hojas y pétalos.
https://x.com/hivediy47901/status/1820985905701687547
Muchas gracias amiga por pasar por aquí apoyándome y me alegra mucho que te haya gustado.
saludos.