Stitch in 3D Decorative Figure Quilling Technique [Eng-Esp]

Hello everyone...✨
Hello to my dear Hivers and the dear community of artists #HiveDIY, as always very pleased and excited to be here again, showing you my work made with love and especially for you.
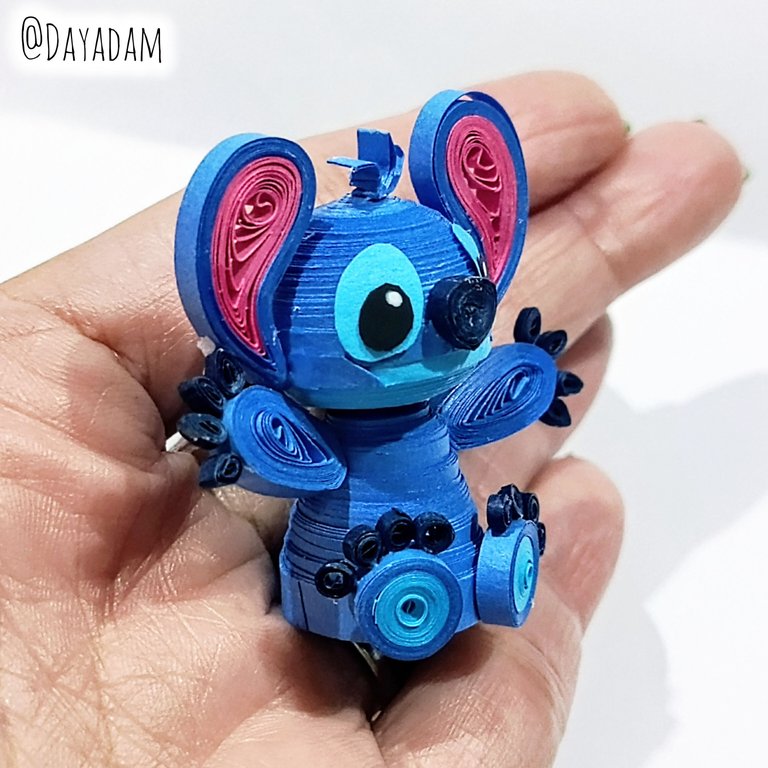
A few months ago, I went to the movies with my daughter, and we enjoyed the beautiful film Lilo & Stitch. Of course, I had already seen the cartoon years ago with my baby.
When I got home, I immediately said to myself, “I have to make Stitch, he's so cute.” Although I felt it would be a little difficult and I kept putting it off, I finally made up my mind and got to work. Here you have this beautiful character that was a challenge, but I managed to do it so I could share it with all of you.
Hoping you like it, I leave you my creative process:
Let's get started:😃

Hola a Todos...✨
Hola a mis queridos Hivers y a la querida comunidad de artistas #HiveDIY, como siempre muy complacida y emocionada de encontrarme por acá nuevamente, mostrándole mi trabajo hecho con mucho amor y especialmente para ustedes.
Hace unos meses fui al cine con mi hija, disfrutamos de la bella película de Lilo y Stitch, por supuesto ya había visto el dibujo animado hace años también con mi bebé.
Al llegar a casa enseguida me dije tengo que hacer a Stitch es tan cuchi, aunque sentí que se me iba a hacer un poco difícil y fui posponiendo hacerlo, me decidí y manos a la obra, aquí tienen a este bello personaje que fue un reto, pero si lo logre para compartirlo con todos ustedes.
Esperando que sea de su agrado, les dejo mi proceso creativo:
Comencemos:😃
 |
 |
 |

• Cintas para quilling.
• Aguja para quilling.
• Plantilla para moldear círculos.
• Pega blanca extra fuerte (de carpintería).
• Tijera.
• Quilling strips.
• Quilling needle.
• Circle template.
• Extra-strong white glue (carpentry glue).
• Scissors.

• Take some dark blue and light blue quilling tape, 3 mm wide, and use the quilling needle to make two closed circles.
• We will shape both circles using a circle shaping template, the dark blue one measuring 20 mm and the light blue one measuring 25 mm. We will remove them from the mold and press glue onto their inner sides to prevent them from deforming. We will then glue both circles together to form the character's head.
• For the body, we will roll a closed circle with dark blue tape 5 mm wide, shape it into a cone, and attach it to the head with white glue.

• Vamos a tomar cinta para quilling de 3 mm de ancho azul oscuro y azul claro, con la aguja para quilling realizaremos 2 círculos cerrados.
• Moldearemos ambos círculos en una plantilla para moldear círculos, el azul oscuro en la medida número 20 mm y el claro en la medida número 25 mm, sacamos del molde apretamos pega por su parte interna para evitar que los mismos se deformen. Procedemos a pegar ambos círculos para formar la cabeza del personaje.
• Para el cuerpo regresaremos un círculo cerrado con cinta de color azul oscuro de 5 mm de ancho, moldearemos en forma de cono, uniremos con pega blanca a la cabeza.
 |  |
 |  |
• To make the lower legs, we will make two closed circles combined with light blue and dark blue ribbons 3 mm wide.
• With 1 mm wide navy blue ribbon, we will make 8 tiny closed circles, gluing four on each piece to form the legs.
• For the arms, we will make 2 open circles in dark blue, shaping them into an elongated leaf. Then, as we did with the lower legs, we will make eight more navy blue circles, but this time we will shape them into drops and glue 4 onto each arm.
• Para realizar las patas de abajo, haremos dos círculos cerrados combinados con cintas de color azul claro y azul oscuro de 3mm de ancho.
• Con cinta de un milímetro de ancho de color azul marino, realizaremos 8 diminutos círculos cerrados, pegaremos cuatro en cada pieza para formar las patas.
• Para los brazos realizaremos 2 círculos abiertos de color azul oscuro, moldearemos en forma de una hoja alargada, luego como hicimos con las patas de abajo realizaremos ocho círculos azul marino más, pero estos los moldearemos en forma de gotas pegaremos 4 en cada bracito.
 |  |
 |  |
• For the ears, we will make two circles combining dark blue and pink, shaping them into a slanted leaf shape.
• At this point, we will form our character by gluing each of the pieces in the corresponding place.
• For the nose, make a small navy blue circle with a slight bite at the tip. With dark blue tape, make a small zigzag for the hair and glue it to the face and head, respectively.
• Finally, to make the eyes, I cut out light blue and dark blue tape, glued it to the face, and made a small white light with an embossing tool and white paint.
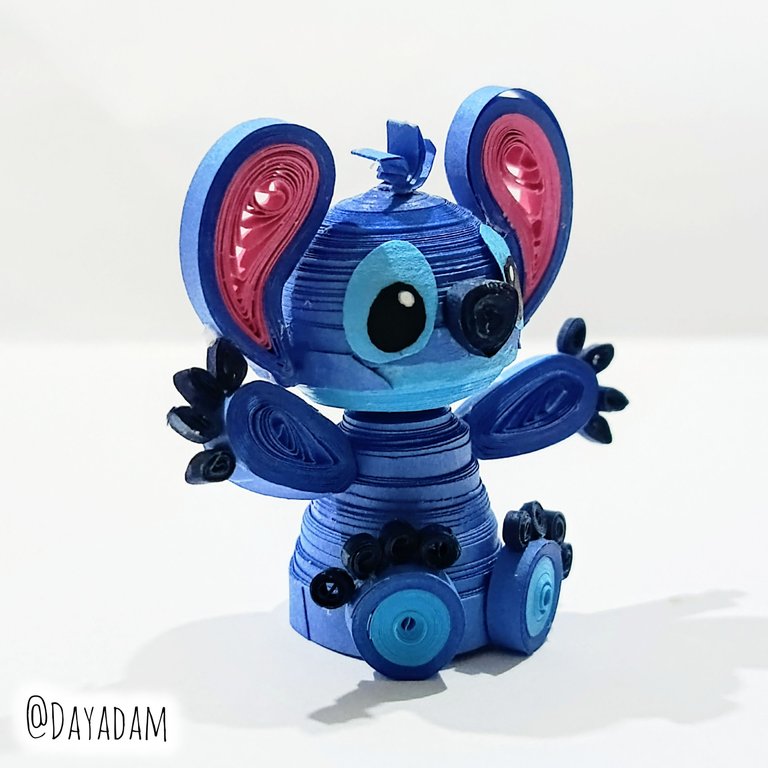
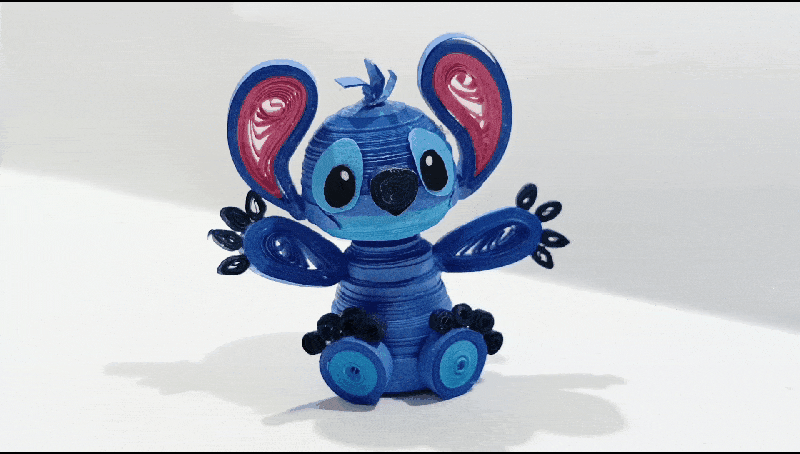
This is how I finished this cute 3D Stitch character using the quilling technique.
• Para las orejas realizaremos 2 círculos combinados con azul oscuro y color rosa, los moldearemos en forma de hoja inclinada.
• Llegado a este punto iremos formando nuestro personaje, pegando cada una de las piezas en el sitio correspondiente.
• Para la nariz realiza un pequeño círculo de color azul marino el cual mordió un poco en la punta, con cinta azul oscuro realicé un pequeño zigzag para el cabello, pegué en la cara y cabeza respectivamente.
• Por último para realizar los ojos, recorte cinta de color azul claro y azul oscuro, pegué de la cara e hice una pequeña luz de color blanco con un repujador, y pintura de color blanca.
De esta manera finalice este tierno personaje de Stitch en 3D, en la técnica de técnica de quilling.
 |  |  |

|
 |  |
|
 |  |
 |
 |
 |
What did you think, did you like it?
I hope you did, I hope you liked my explanation, procedure and photos, I made them with love for you.
"Let out that muse that inspires you, and let your imagination fly".
Thank you all, see you next time ✨.
¿Qué les pareció, les gustó?
Espero que sí, que les haya gustado mi explicación, procedimiento y fotos, los hice con mucho cariño por y para ustedes.
"Deja salir esa musa que te inspira, y deja volar tu imaginación".
Gracias a todos, nos vemos en la próxima✨

Ayyy que precioso te quedó 🥹 me encantó el resultado, saludos ✨
Tan bella, gracias... Me alegra mucho que te haya gustado 😊💖
Te quedó muy hermoso, pero especialmente muy detallado. <3
Gracias amigo 🥰💞
Realmente quedó muy lindo, cuidaste cada detalle, me encanta el resultado, 😀
Gracias bella, por tus palabras un placer que te haya gustado 💕
Wow! This is a masterpiece, it looks so real friend. Your stitch in 3D is superb. Well done friend and thanks for sharing.
selected by @ibbtammy
Thanks for the support 💞
I think 🤔 I like 😍 the efforts you put into making it, this looks pretty good 🌟 well done
Conozco a alguien que amaría tener tu creación <3
Te quedó bellísimo!!! Perfecto maestra <3
Mi reina muchas gracias por tus palabras 💖
Quien será esa persona? 🤔 jajajjaa.
@dayadam Saludos reina, bellisimo, muy elaborado, esmerado y hecho con mucho amor , Bendiciones a ti y a tu niña..un fuerte abrazo.
!HUG
!LADY
Muchísimas gracias, bendiciones de vuelta para ti ✨
Wow Como siempre sorprendiendo haciendolo parecer fácil, un buen trabajo. 🙂 Y tener mucha paciencia para enrrollar esos pequeños rollitos. Hermoso! 🌻🌻
Bastante paciencia, ya que tiene un grado de dificultad alto por los diminutos de las piezas, pero lo importante es que se logró.
Muchas gracias por apreciar mi trabajo 💕
Qué gracioso y tierno a la vez es este Stitch, es simplemente adorable. Te felicito amiga.
Gracias mi hermosa 💞
Tremenda creación. Te quedó súper lindo 😍 Apenas he visto una sola película de ese personaje y ahora que lo veo en cualquier diseño me enternece. Me encanta como se ve 😃
Es que es un personaje súper tierno, echa bastante varilla en las película, pero es amoroso, tierno y cuchi.
Gracias 💖
Ha quedado bellísimo, uno de mis perritos favoritos. Hermoso trabajo 👍🏻
Gracias mi corazón, por apreciar mi trabajo 🌸