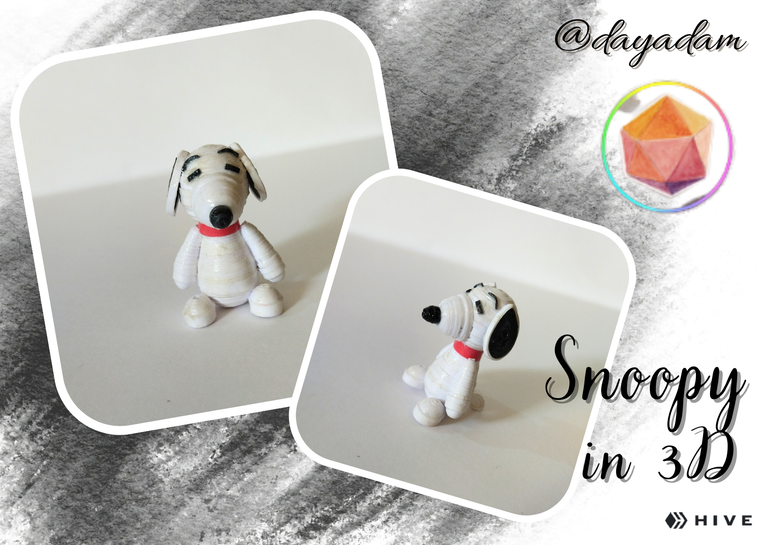
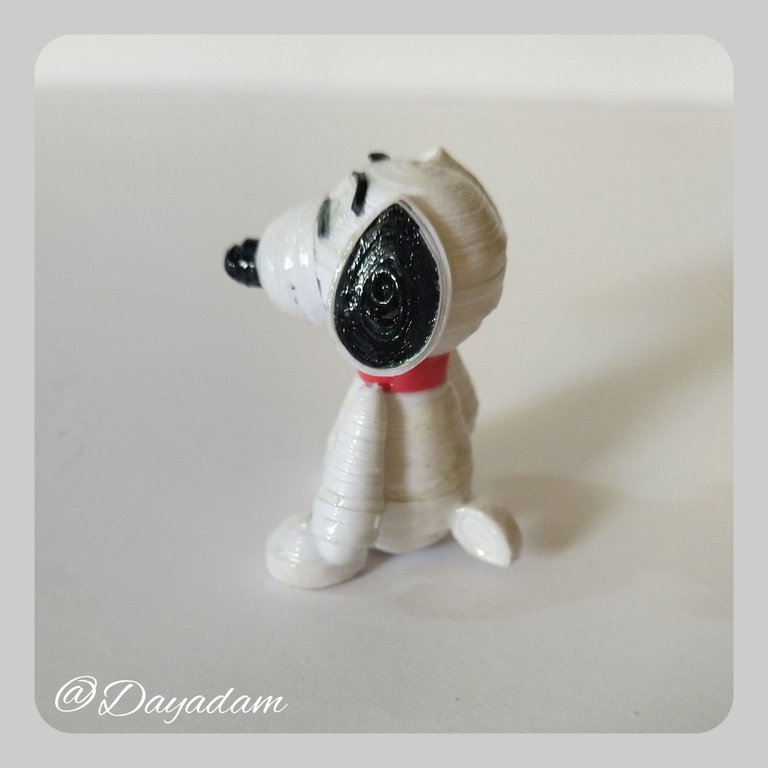
Snoopy in 3D // Quilling Technique [Eng-Esp]
Hello everyone... 🐾
Hello to my dear Hivers and the beloved community of artists #DIYHub, as always very pleased and excited to be here again, showing you my work made with love and especially for you.
I have continued with the theme of making 3D figurines, I have really enjoyed this new challenge and even more the process of having to imagine how to carry out each piece, mold it and attach it properly to get the desired result.
For today I come again with a request from a very special person, (look that I have a queue of figures to make, I will be gradually pleasing those interested parties), and for this I bring you a small "Snoopy in 3D" in the quilling technique.
Hoping that you like this little present, without further ado I leave here my creative process....
Let's get started:😃

Hola a Todos... 🐾
Hola a mis queridos Hivers y a la querida comunidad de artistas #DIYHub, como siempre muy complacida y emocionada de encontrarme por acá nuevamente, mostrándole mi trabajo hecho con mucho amor y especialmente para ustedes.
He seguido con la temática de elaborar figuritas en 3D, realmente he disfrutado mucho este nuevo reto y aun mas el proceso de tener que imaginar como llevar a cabo cada pieza, moldearla y acoplarla adecuadamente para poder obtener el resultado deseado.
Para hoy vengo nuevamente con una petición de una persona muy especial, (miren que tengo una cola de figuras que elaborar, ya iré poco a poco complaciendo a esas partes interesadas), y por esto les traigo un pequeño Snoopy en 3D en la técnica de quilling.
Esperando que sea de su agrado este pequeño presente, sin más preámbulos les dejo por acá mi proceso creativo.
Comencemos:😃

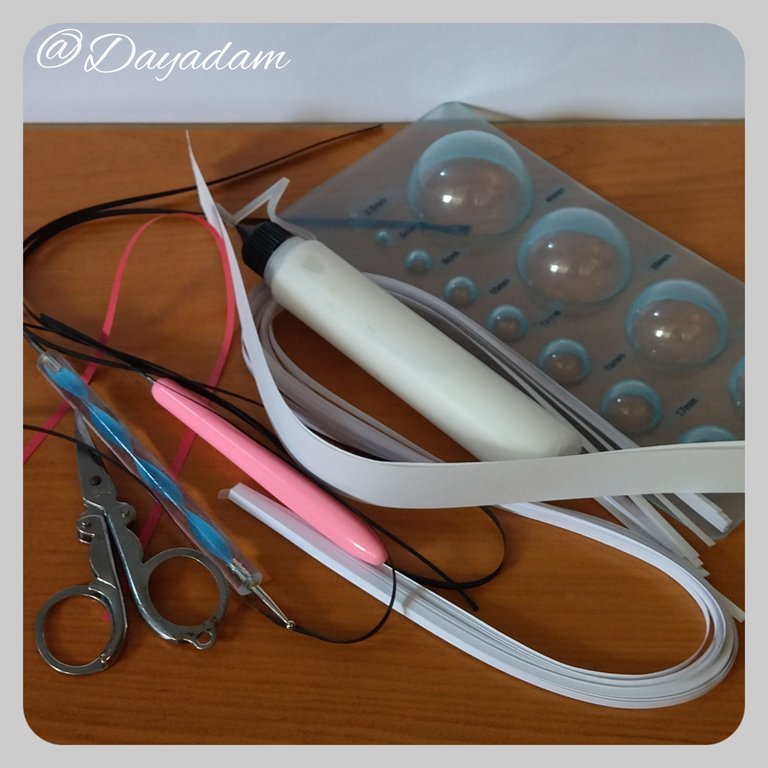
• Cintas de quilling de diversos mm de ancho blancas, negras y rojas.
• Aguja para quilling.
• Pega blanca extra fuerte (de carpintería).
• Tijera.
• Palito de altura.
• Pincel.
• Alicate punta fina.
- White, black and red quilling ribbons of different widths.
- Quilling needle.
- Extra strong white glue (woodworking glue).
- Scissors.
- Height stick.
- Paintbrush.
- Fine-nosed pliers.

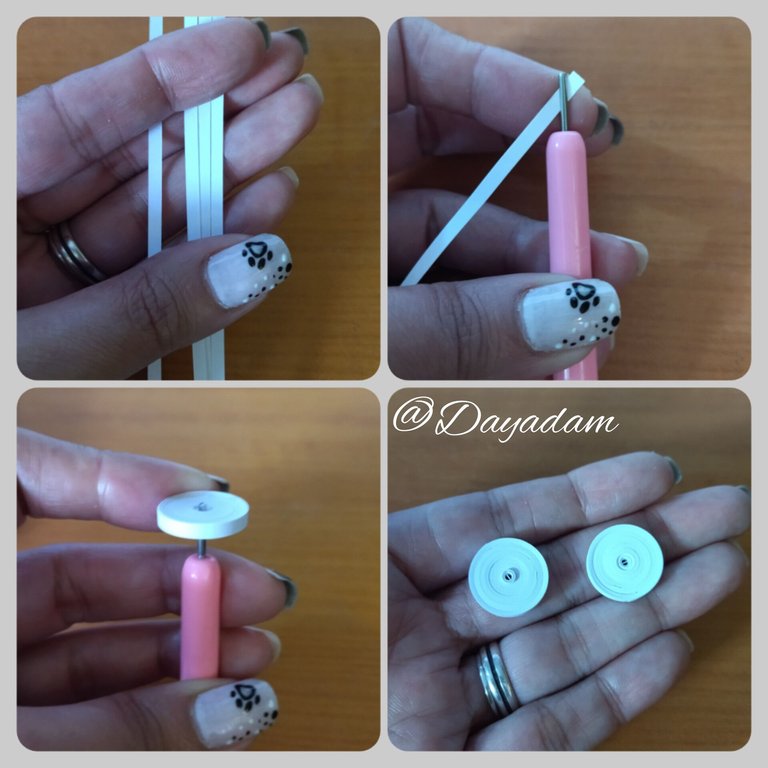
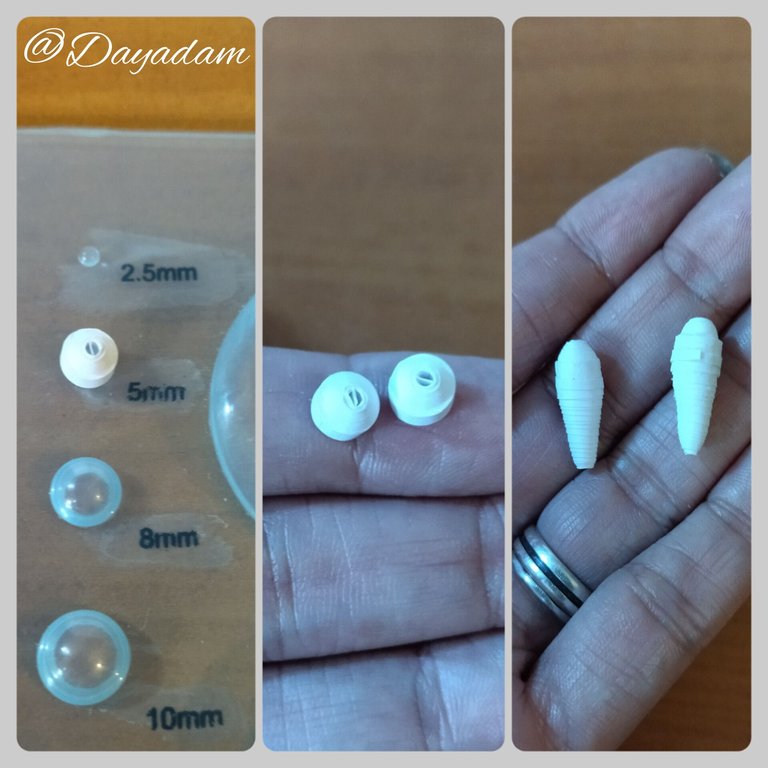
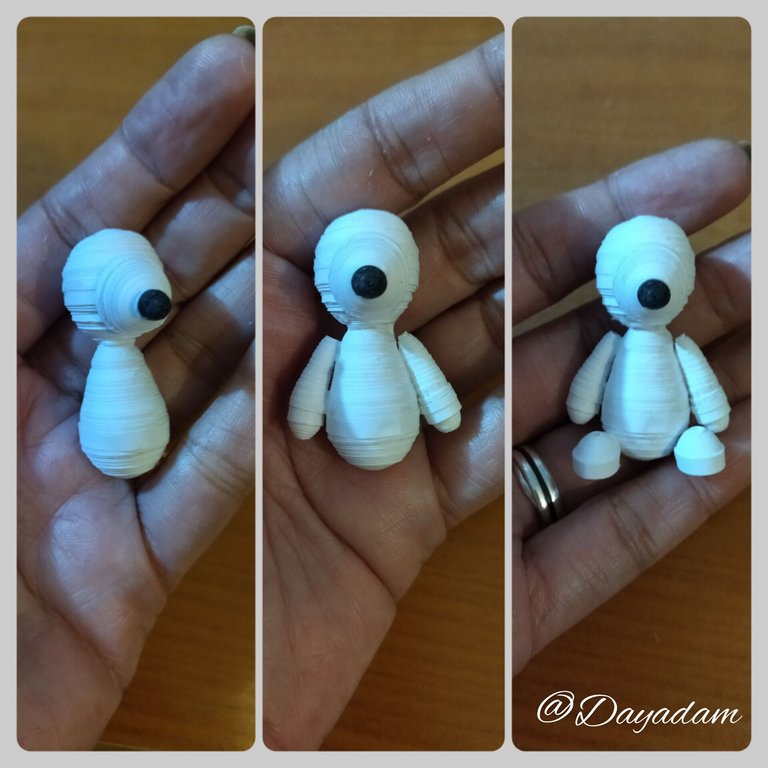
Head:
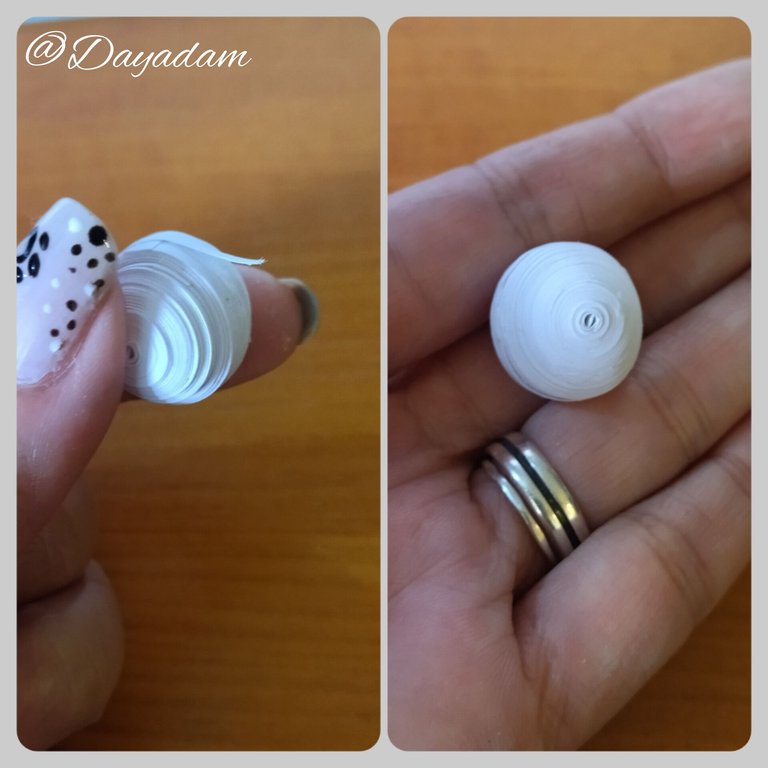
- We start by taking white color quilling ribbons 3mm wide x 200cms long, we roll with the quilling needle until we reach the end of the ribbon, we seal with extra strong white glue, we take out of the needle, we will get a closed circle, we will need another one just like it.
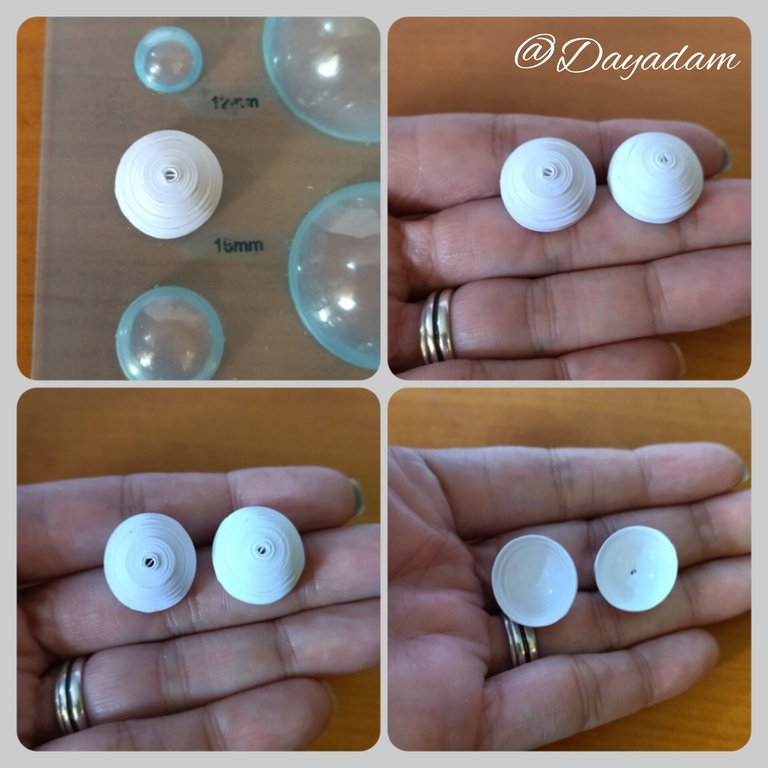
- We are going to mold the circles, place them in a circle mold until you get the shape you want, take it out and flatten it a little, add a little glue on the inside and let it dry to prevent the pieces from moving.
- We are going to take a small piece of white quilling tape, about 1mm wide to join the pieces we made, we coupled both passing the tape through the middle with extra strong white glue (reserve).

Cabeza:
• Comenzamos tomando cintas de quilling color blancas de 3mm de ancho x 200cms de largo, enrollamos con la aguja para quilling hasta llegar al final de la cinta, sellamos con pega blanca extra fuerte, sacamos de la aguja, obtendremos un círculo cerrado, vamos a necesitar otro igual.
• Vamos a moldear los círculos, coloque en un molde para círculos hasta conseguir la forma que deseaba, saque y aplane un poco, en la parte de adentro agregamos un poco de pega y dejamos secar para evitar que se muevan las piezas.
• Vamos a tomar un pequeño trozo de cinta de quilling blanca, de aproximadamente 1mm de ancho para unir las piezas que elaboramos, acoplamos ambas pasando la cinta por el medio con pega blanca extra fuerte (reservamos).
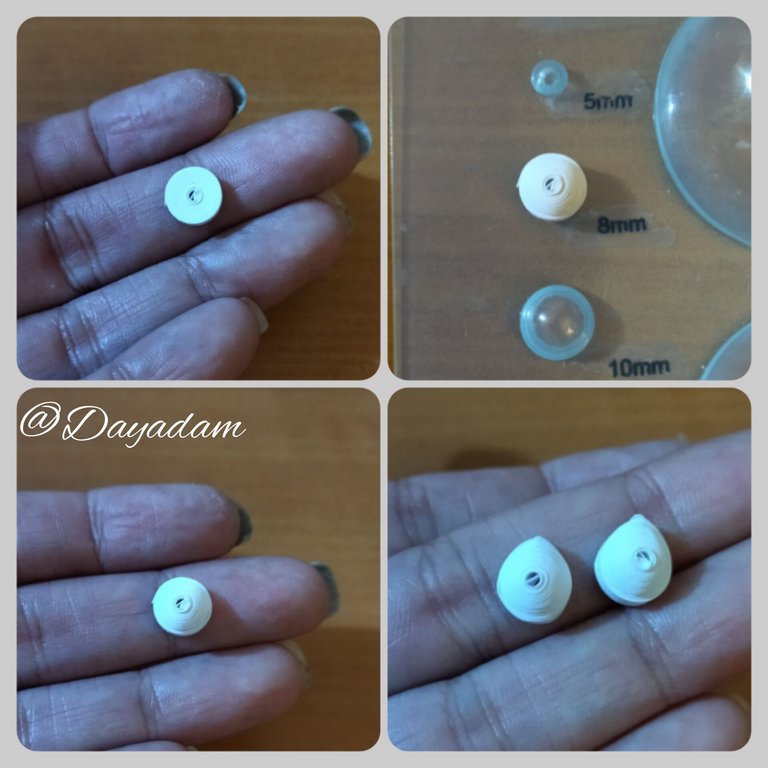
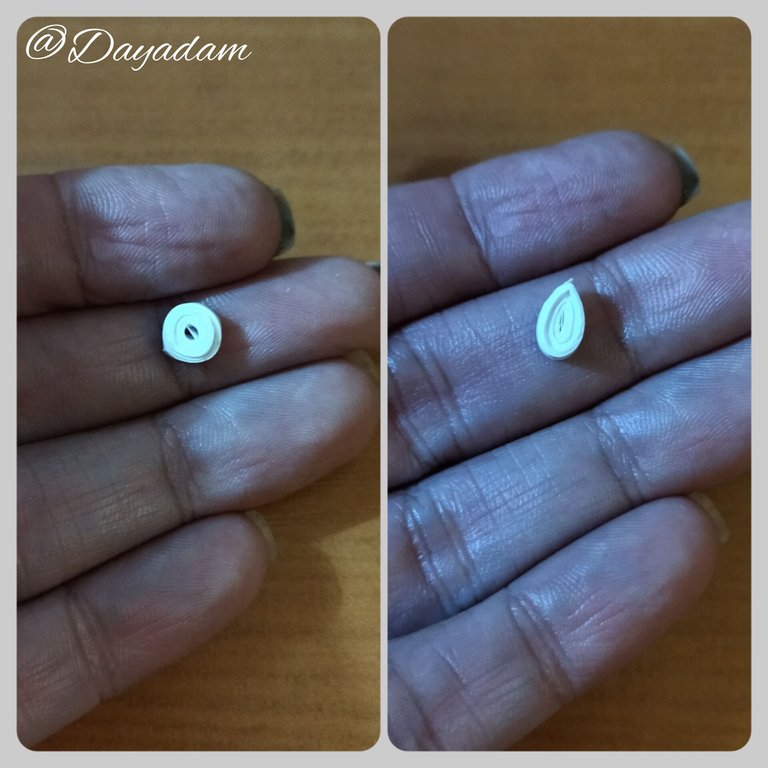
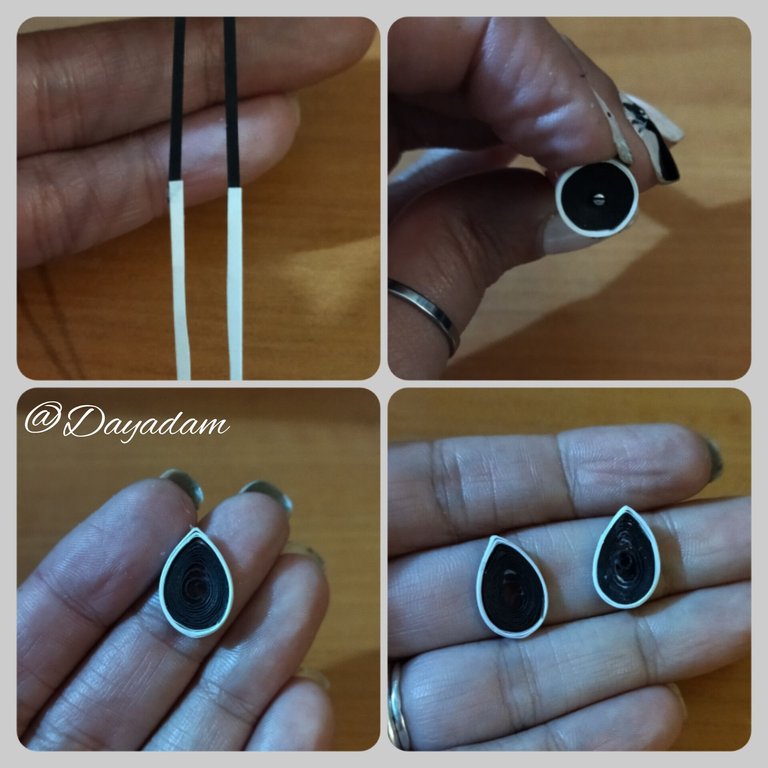
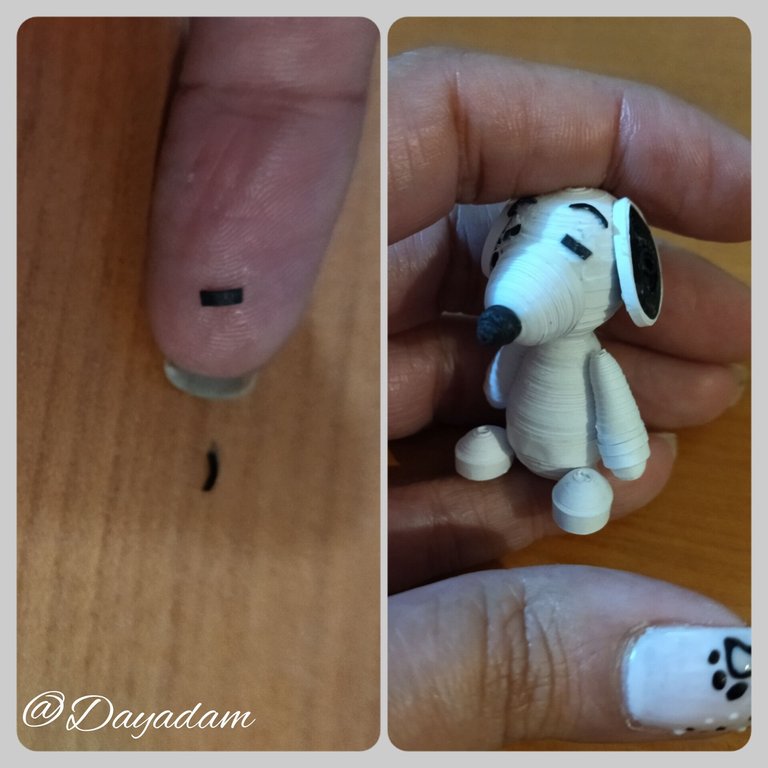
Nose:
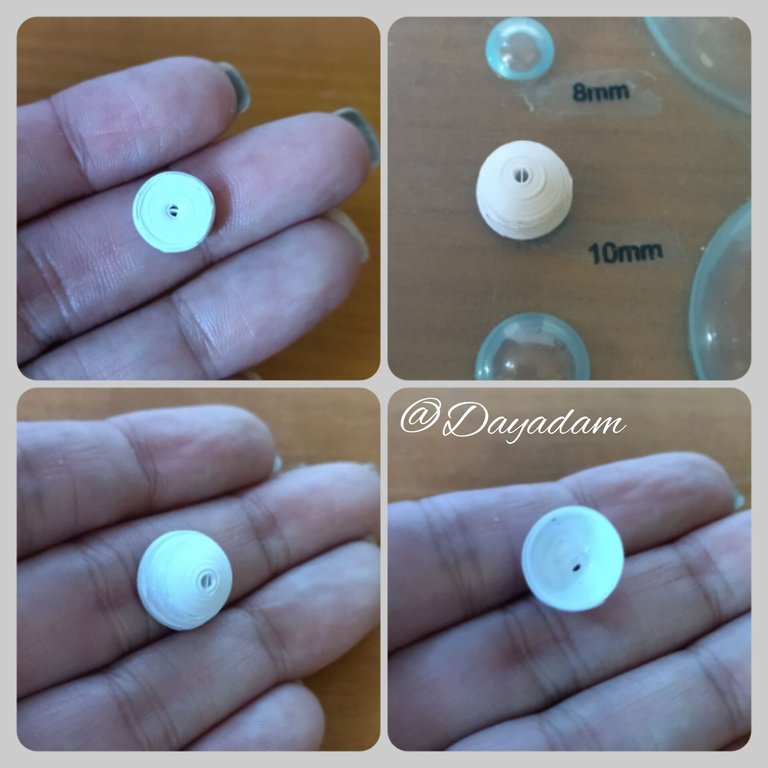
- We take a white ribbon 3mm wide x 100cms long, we work we go the same parameters as above, finished the circle we will measure on the template and finish molding to our liking, we apply glue on the inside let dry.
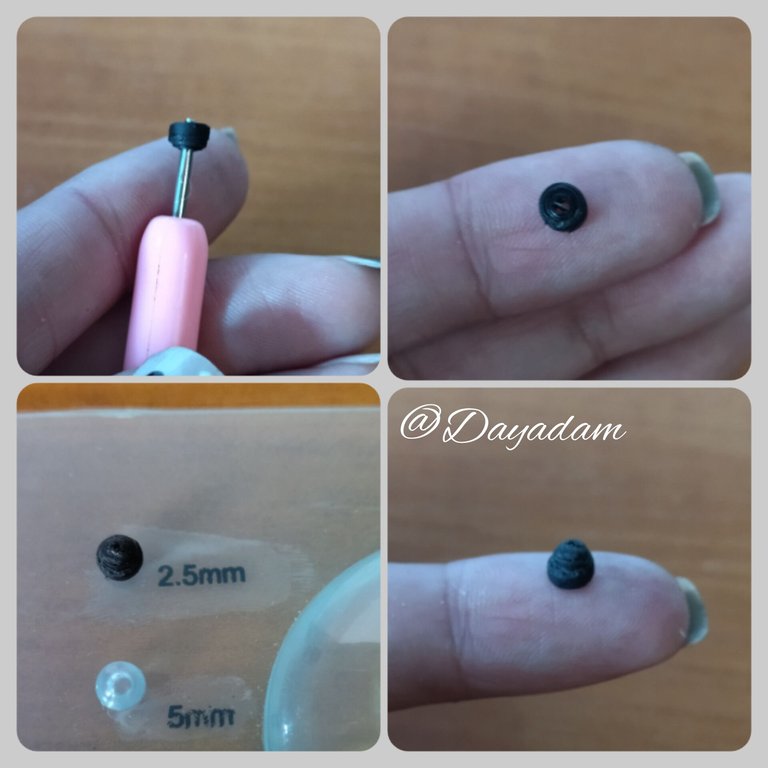
- With a small piece of black tape 1mm wide we will make a closed circle which will mold in the template circles in the smallest.
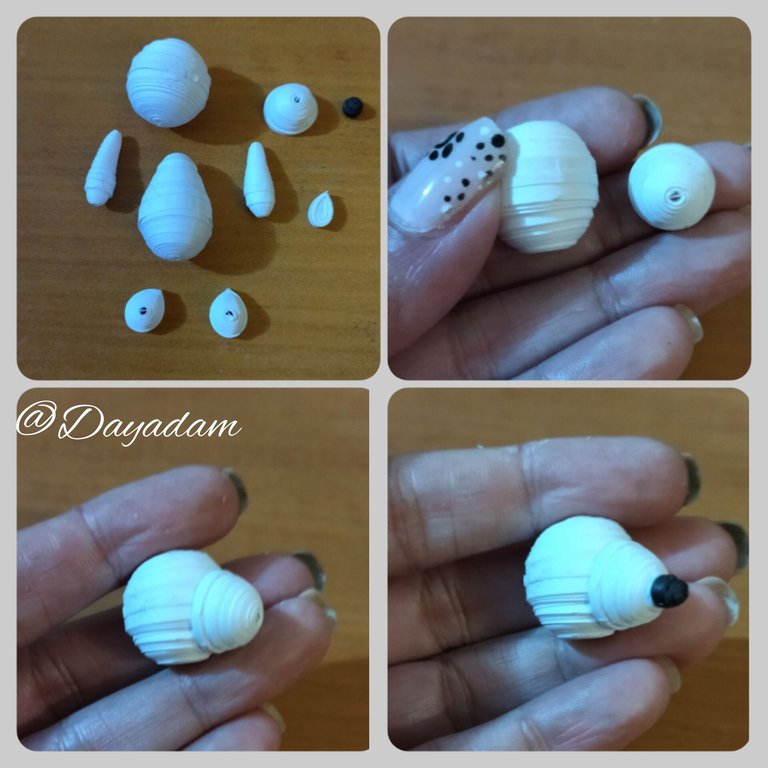
Body:
- We will take 3mm and 6mm wide white ribbon, 150cms long, with the quilling needle we will make 2 closed circles, then mold both circles as we want the body, apply white glue in the hollow part so that the pieces are not deformed and join both with a piece of white ribbon 3mm wide.
Nariz:
• Tomamos una cinta blanca de 3mm de ancho x 100cms de largo, trabajamos vamos los mismos parámetros anteriores, finalizado el circulo mediremos en la plantilla y terminamos de moldear a nuestro gusto, aplicamos pega en la parte interna dejamos secar.
• Con un pequeño trozo de cinta negra de 1mm de ancho haremos un círculo cerrado el cual moldearemos en la plantilla de círculos en el más pequeño.
Cuerpo:
• Vamos a tomar cinta de 3mm y 6mm de ancho blanca, de 150cms de largo, con la aguja para quilling vamos a realizar 2 círculos cerrados, luego moldearemos ambos círculos según como queramos que quede el cuerpo, aplicamos pega blanca en la parte hueca para que no se deformen las piezas y uniremos ambas con un trozo de cinta blanca de 3mm de ancho.

Arms:
- We will take a piece of white quilling tape 3mm wide x 25cms long we will roll with the quilling needle to form a closed circle, we seal at the end with glue, we will mold in the shape of a cone taking outwards with a brush or stick high, on the inside we will also place glue so that the piece is not deformed. We will need 2 pieces like this one.
- We will make another closed circle just like the previous one we will mold in a circular way and attach to the piece we made in the shape of a cone.
Legs:
- For these we will take a white ribbon 3mm wide x 50cms long, we roll with the needle, but try not to squeeze excessively, when we finish we seal with glue, we take out of the needle and pinch the tip to give it a drop shape, then with the help of the fingers we will mold taking a little outward, we add a little glue to the hollow part so that it does not deform.
Tail:
- Make a closed circle with white ribbon 3mm wide x 25cms long and mold it in the shape of a drop.
Brazos:
• Tomaremos un trozo de cinta de quilling blanca de 3mm de ancho x 25cms de largo enrollaremos con la aguja para quilling para formar un círculo cerrado, sellamos al finalizar con pega, moldearemos en forma de cono sacando hacia afuera con un pincel o palito de altura, en la parte de adentro también colocaremos pega para que la pieza no se deforme. Necesitaremos 2 piezas como esta.
• Realizaremos otro círculo cerrado igual que el anterior moldearemos de manera circular y acoplaremos a la pieza que realizamos en forma de cono.
Patas:
• Para estas tomaremos una cinta blanca de 3mm de ancho x 50cms de largo, enrollamos con la aguja, pero tratamos de no apretar en exceso, al culminar sellamos con pega, sacamos de la aguja y pellizcaremos la punta para darle forma de gota, luego con la ayuda de los dedos moldearemos sacando un poco hacia afuera, agregamos un poco de pega a la parte hueca para que no se deforme.
Cola:
• Realice un círculo cerrado con cinta blanca de 3mm de ancho x 25cms de largo y la moldee en forma de gota.
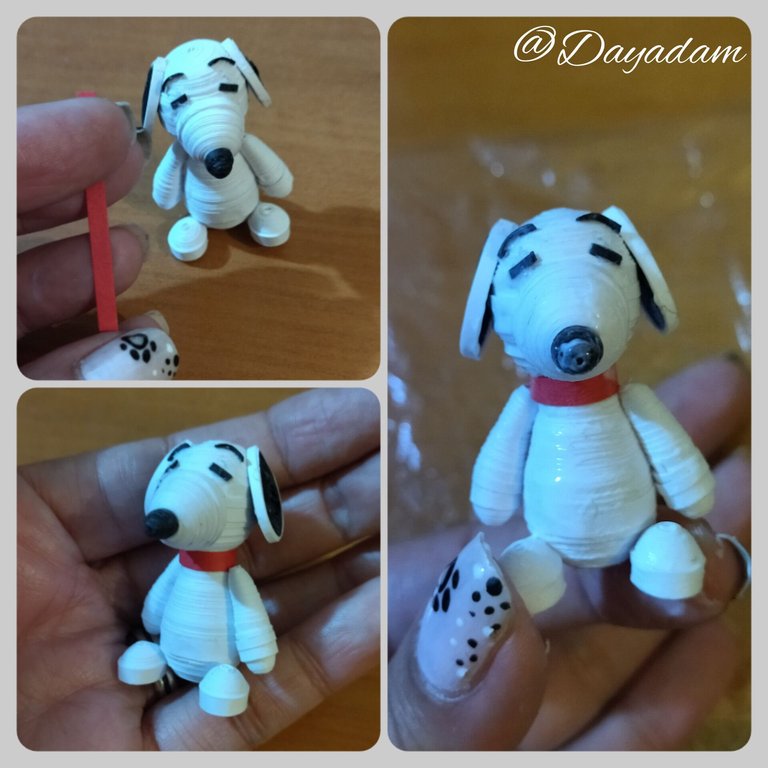
- At this point I decided to glue the pieces I have ready, so I can detail more clearly the way I will make the ears.
• Llegado a este punto decidí pegar las piezas que tengo ya listas, para poder detallar más claramente la manera en las que hare las orejas.
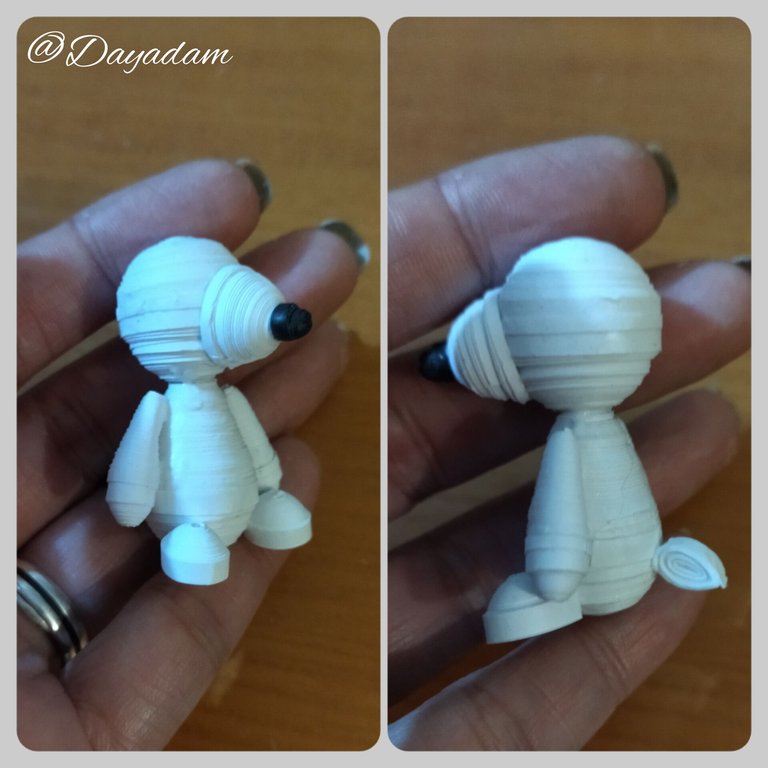
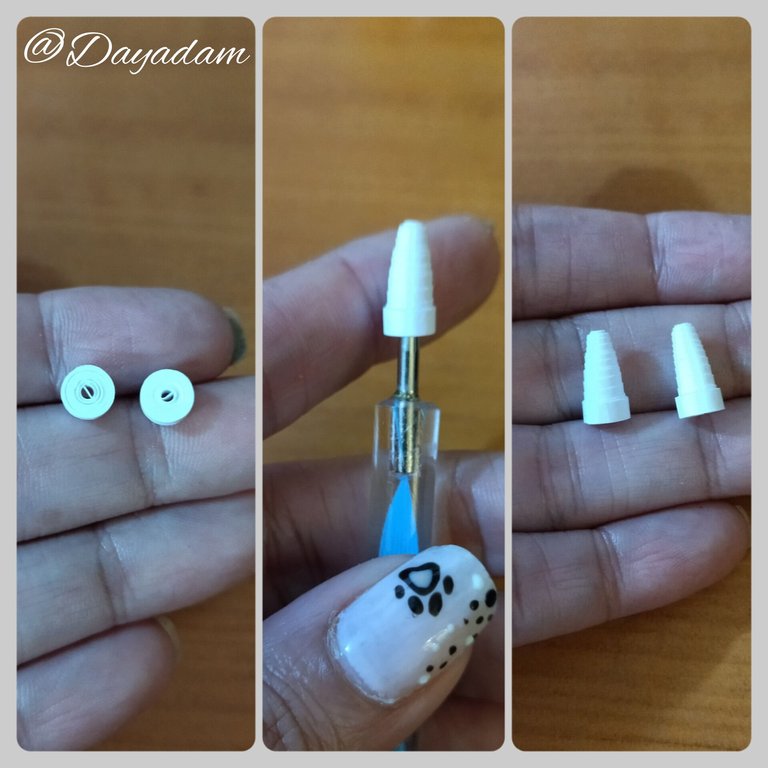
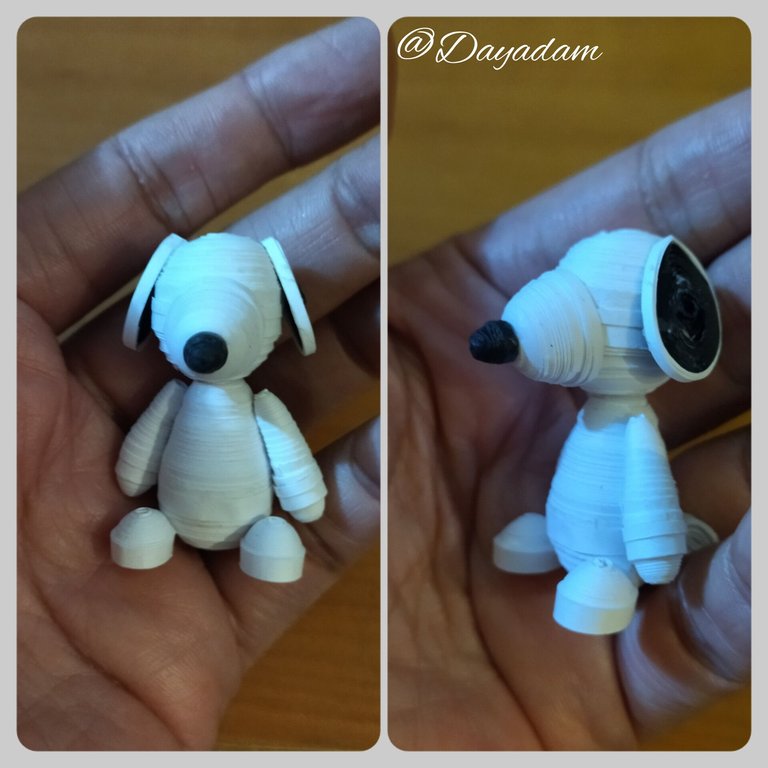
Ears:
- We take a piece of black ribbon 1mm wide x 25cms long and a white 1mm wide x 15cms long, we join both to form a single one, we roll starting with the black part until culminating in the white part, we remove from the needle we loosen a little and seal with glue, then we mold in the shape of a leaf. As this one we will need 2, we glue them on both sides of the head.
- For the eyes we cut small pieces of black ribbon 1mm wide and place them as we like.
- To finish we apply with a brush, some extra strong white carpentry glue to protect the piece.
Orejas:
• Tomamos un trozo de cinta negra de 1mm de ancho x 25cms de largo y una blanca de 1mm de ancho x 15cms de largo, unimos ambas para formar una sola, enrollamos empezando por la parte negra hasta culminar en la parte blanca, sacamos de la aguja soltamos un poco y sellamos con pega, luego moldeamos en forma de hoja. Como esta necesitaremos 2, las pegamos en ambos lados de la cabeza.
• Para los ojos cortamos pequeños trozos de cinta negra de 1mm de ancho y colocamos a nuestro gusto.
• Para finalizar aplicamos con un pincel, un poco de pega blanca extra fuerte de carpintería para proteger la pieza.

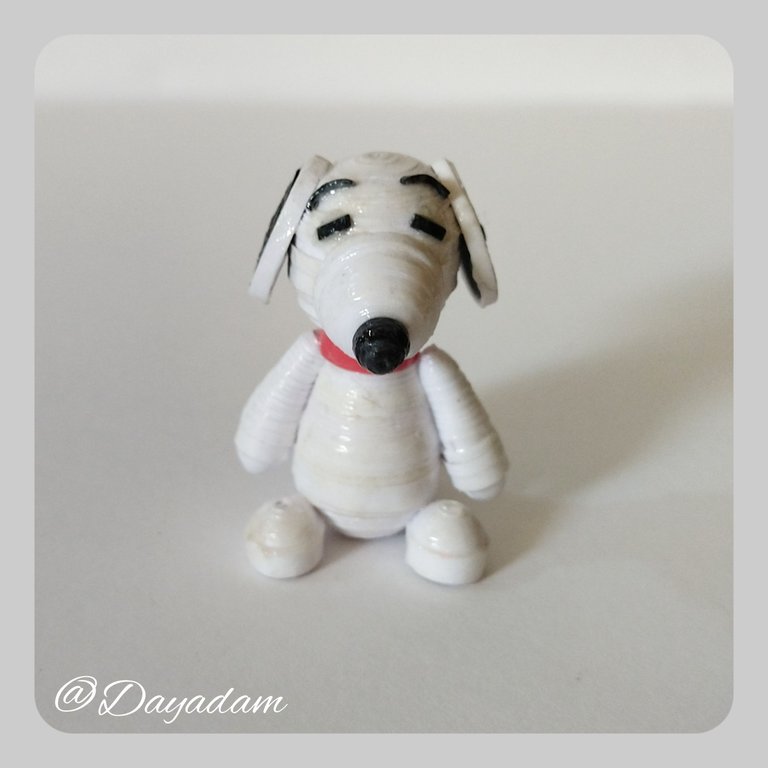
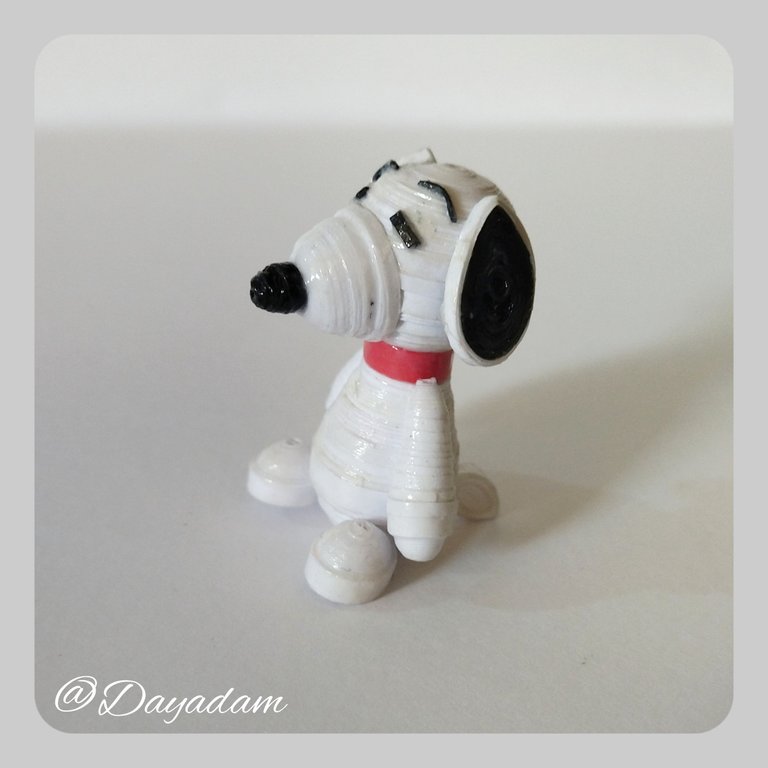


What did you think, did you like it?
I hope you did, I hope you liked my explanation, procedure and photos, I made them with love for you.
"Let out that muse that inspires you, and let your imagination fly".
Thank you all, see you next time.
¿Que les pareció, les gustó?
Espero que sí, que les haya gustado mi explicación, procedimiento y fotos, los hice con mucho cariño por y para ustedes.
"Deja salir esa musa que te inspira, y deja volar tu imaginación".
Gracias a todos, nos vemos en la próxima.
Todas las fotos usadas en este post son de mi autoría y han sido sacadas en mi celular personal un Redmi 9T y editadas en Canva y en Inshot Banner y separador hecho por mí en Canva Traducido con la ayuda de DeepL

Reconocí ese personaje de verlo. Increíble trabajo, todo al detalle. Lleva cantidad de pasos. Se nota la pasión y el entusiasmo en cada parte que compone la obra, lo que la hace genial. Gracias por regalarnos tus técnicas. Gracias por apoyar mi trabajo.
Mil gracias a ti por pasar, y por también apoyar mi trabajo, me alegra leer tus palabras. Muchos éxitos @viltredeltoro ✨
Apoyo mutuo. Tu trabajo es una delicia visual.😁
Your quilling work is absolutely adorable. I love how you've detailed each step with clear instructions and photos. Thank you for sharing your creative process with the DIY community. Keep up the great work.
Thank you very much for your support and for your words towards my work @diyhub ✨
Excelente tu Snoopy noto que tuviste dedicación en cada detalles en tus pasos a pasos te quedó muy bonito gracias por compartir tu proyecto.
Gracias cariño por pasar, por tu comentario. Me alegra que te haya gustado. Saludos @lexim ✨
esos ojitos te quedaron re bn se ve tan tierno el snopy =^^=
Ainsss gracias @daddydog, me alegra mucho que te gustara. Saluditos ✨
Me encanta Snoopy y este quedo supera hermoso, de verdad que esta técnica es maravillosa amiga, puedes hacer cosas increíbles, bellísimo 😍👏
Gracias mi linda @yolimarag, de verdad me alegran mucho tus palabras hacia mi trabajo y tu visita. Me alegra mucho que te haya gustado. Abrazos... ✨
Solo hay una palabra para describir tu talento: Excepcional. Muchas gracias por compartir tu arte y talento con nosotros. Saludos cordiales.
!BBH
@dayadam! Your Content Is Awesome so I just sent 1 $BBH (Bitcoin Backed Hive) to your account on behalf of @bulkathos. (4/5)
Ohhh Wouuu, muchísimas gracias por tan bellas palabras para describir mi trabajo, realmente me honran y es muy gratificante para mi. Bienvenido a mi humilde blog, por aquí siempre a la orden...
Que tengas un bello día @bulkathos ✨
!PIZZA
!HUG
I sent 1.0 HUG on behalf of @dayadam.
(3/3)
Amiga quedó espectacular! Esa técnica es todo un arte.
Debe ser muy divertido crear este tipo de figuritas.
Admiro mucho tus creaciones.
Gracias por compartir.💕
Gracias hermosa, si es un reto y es bastante divertido insistir hasta obtener el resultado deseado. Me alegra mucho que te gustara. Gracias por tus palabras.
Que tengas un hermoso día @valenpba ✨
Ahhhhhh! Que ternurita!! quedo precioso!
Muchisimas gracias. Que comentario tan cuchi. Saluditos @nobunaga-san 💕
Este trabano está precioso @dayadam
Me sorprende tanto el diminuto tamaño que tienen las piezas comonla nariz y la cola. Me encantó 😊😊😊 amo a snoopy
!VSC
!HUG
@chacald.dcymt has sent VSC to @dayadam
This post was rewarded with 0.1 VSC to support your work.
Join our photography communityVisual Shots
Check here to view or trade VSC Tokens
Be part of our Curation Trail
@chacald.dcymt ha enviado VSC a @dayadam
Éste post fue recompensado con 0.1 VSC para apoyar tu trabajo.
Únete a nuestra comunidad de fotografía Visual Shots
Consulte aquí para ver o intercambiar VSC Tokens
Se parte de nuestro Trail de Curación
Gracias @chacald.dcymt y @visualbot ✨
I sent 1.0 HUG on behalf of @chacald.dcymt.
(1/3)
Thanks @hug.bot ✨
En efecto es bastante pequeñito el personaje, y hecho con muchísimo amor. Gracias por tu apoyo y presencia. Abrazos @chacald.dcymt ✨
!discovery 40
Muchísimas gracias por el apoyo hermosa @mili2801. Infinitas bendiciones ✨
This post was shared and voted inside the discord by the curators team of discovery-it
Join our Community and follow our Curation Trail
Discovery-it is also a Witness, vote for us here
Delegate to us for passive income. Check our 80% fee-back Program
Thanks @mili2801 and @discovery-it ✨
Sigue, contacta y se parte del testigo en: // Follow, contact and be part of the witness in:
Keychan - Hive.blog - Ecency - Peakd
Gracias por el apoyo @hispapro ✨
Siempre me ha encantado este personaje de snoopy, me gusto como quedo, se ve mucha dedicacion y paciencia a realizar cada pieza, la felicito, feliz dia.
Gracias amiga por pasar, y por tus palabras. Se trata de hacer lo que se pueda y ofrecer lo mejor de mi. Saluditos @eylis ✨
Aww es una ternura ese Snoopy 😍 te quedo identico y es una miniatura ❤️❤️ me acabas de dar una dosis de ternura jejeje me encantan tus trabajos, siempre complacida viendo tus tutoriales ❤️
🌹 Tome la florcita de Buhito por la dosis de ternura por tan lindo trabajo.
Honor que me hacen tus palabras mi linda. Siempre serás bienvenida por estos lares, y a la orden.
Abrazos hermosa @elbuhito ✨
Maravilloso @dayadam como siempre a mi me encanta esa comiquita jajaja te quedo bellisimo amiga.
Gracias mi princesa, me alegra mucho que te haya gustado mi trabajo. Y quien que es conocedor de Snoopy no le puede gustar y recordar ese lindo personaje.
Abrazos mi @karelysk89 ✨
Like play like play you created the beautiful finish work. First i was thinking you use computer to design it but supprise you use you hand to make it. Well done i love it
Thank you very much for your comment, I'm glad you liked my work. You are not the only person who has thought that they are a type of computer 3D printing and has been shocked to see that it is pape and I do it little by little with my own hands.
Welcome to my blog and here I am at your service. Greetings @mosupholstery ✨
To be honest, your quilling works are inspiring me to give it a try and I'm really thinking of giving this technique a try.
Keep up the great work. @tipu curate 8
Upvoted 👌 (Mana: 0/75) Liquid rewards.
Thanks @tipu and @ashikstd ✨
A pleasure.
How can i make use of tipu tips
That's up to the tipu owner. I'm not sure if new curators are being recruited right now but you can try asking in the tipu discord server.
Thanks
Wowwww thank you very much @ashikstd, it is an honor for me that my work is a source of inspiration for you, I do my best to do a good job and show a step by step so that others can carry out the figure.
I hope you are encouraged to do it, but you have to show it to me, you have ways to do it hahaha.
If you have any questions I am at your service. Thank you for your presence in my humble blog.
And once again very grateful for the support to my work, infinite blessings for you... ✨
!HUG
@dayadam, sorry!
You are out of hugs for today.
You can call the HUG bot a maximum of 3 per day.
The current call limits are:
Sounds great. Keep up your great work, mam.
Que ternura tu versión de Snoopy 🥰. Feliz día.
Muchísimas gracias @mdrguez. Que tengas un hermoso dia ✨
$PIZZA slices delivered:
@dayadam(2/5) tipped @bulkathos
Wow! little Snoopy looks so cute . I love this .
Thank you very much. I'm very glad you like it. Regards @ladyfoth ✨
You are most welcome dear.
Congratulations @dayadam! You have completed the following achievement on the Hive blockchain And have been rewarded with New badge(s)
Your next target is to reach 10500 replies.
You can view your badges on your board and compare yourself to others in the Ranking
If you no longer want to receive notifications, reply to this comment with the word
STOPCheck out our last posts:
Increíble, cada vez que veo sus creaciones pienso que puede llegar a hacer cualquier cosa, es impresionante, siento que incluso este arte tan hermoso tiene parecido con el crochet. Realmente la admiro por ser tan paciente y hacer bellas obras de arte. Saluditos, feliz día :3
Por cierto me encantaron sus uñas que van totalmente a juego con Snoopy jaja.
Muchísimas gracias por tu lindo comentario.
Todo trabajo tiene sus méritos el crochet es maravilloso, trabajar con tiras de papel hay que tener un cuidado inmenso ya que si se rompe o daña la cinta no hay vuelta atrás.
Saluditos y gracias de nuevo por tu linda apreciación a mi trabajo @wuildariablox ✨
Que hermosa figura, la primera caricatura que vi en mi vida <3
Gracias mi querido artista @fixie, un placer que te gustará ✨
Que hemeoso Snoopy me encantó
Gracias mi bella @irenenavarroart ✨😘
Wow, espectacular, muy creativa la manera de arma a Snoopy, además de una pieza con un acabo impecable y prolijo. Dios bendiga tus manos, saludos.
Gracias hermosa @hylene74, por tu visita y comentario tan lindo. Amén amén. Un abrazo y bendiciones 😘
Congratulations @dayadam! You received a personal badge!
Wait until the end of Power Up Day to find out the size of your Power-Bee.
May the Hive Power be with you!
You can view your badges on your board and compare yourself to others in the Ranking
Check out our last posts: