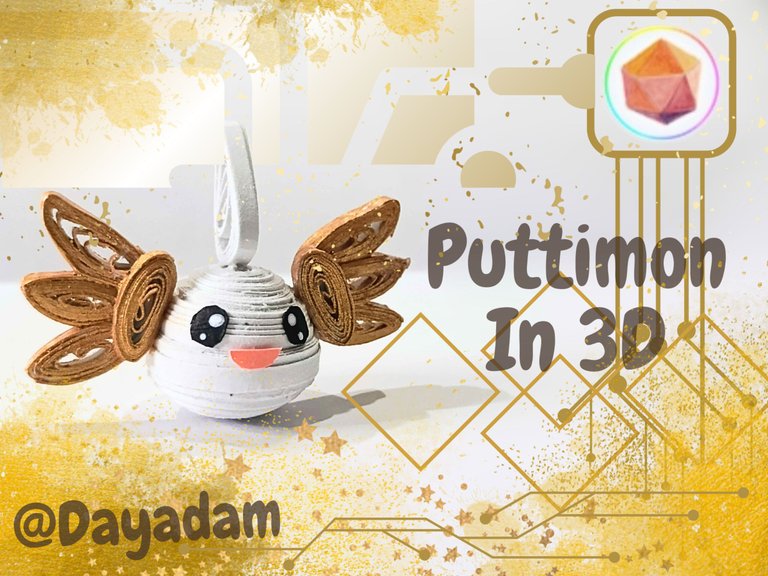
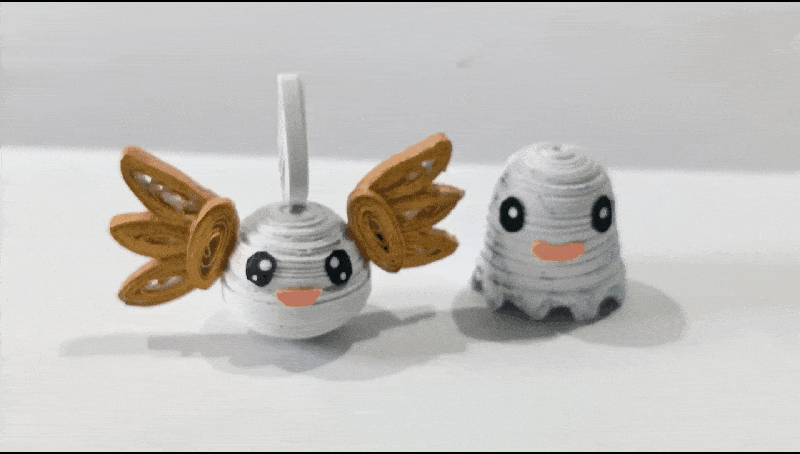
Puttimon in 3D Quilling Technique [Eng-Esp]
Hello everyone...✨
Hello to my dear Hivers and the dear community of artists Diyhub, as always very pleased and excited to be here again, showing you my work made with love and especially for you.
Today, I decided to make the Digimon character Puttimon in 3D using the quilling technique.
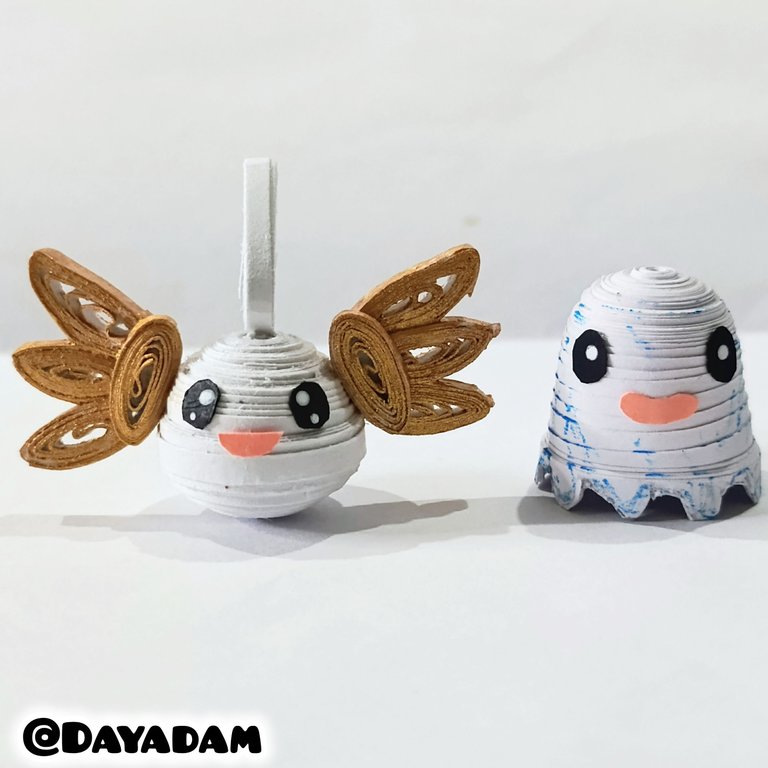
I already started this collection with the character Poyomon. I plan to make some babies and later on, given the technique I use, I will make as many evolutions as I can. If you want to see my first work, here it is: https://peakd.com/hive-130560/@dayadam/poyomon-in-3d-quilling-technique.
Hoping you like it, I leave you my creative process:
Let's get started:😃

Hola a Todos...✨
Hola a mis queridos Hivers y a la querida comunidad de artistas Diyhub, como siempre muy complacida y emocionada de encontrarme por acá, mostrándole mi trabajo hecho con mucho amor y especialmente para ustedes.
Para hoy decidí hacer a el personaje de Digimon Puttimon en 3D, en la técnica de quilling.
Ya en una oportunidad inicié está colección con el personaje Poyomon, tengo pensado hacer algunos bebés y más adelante hacer las evoluciones que pueda dada la técnica que utilizo. Si desean ver mi primer trabajo por acá se los dejo: https://peakd.com/hive-130560/@dayadam/poyomon-in-3d-quilling-technique.
Esperando que sea de su agrado, les dejo mi proceso creativo:
Comencemos:😃
 |
 |
 |
 |

• Cintas para quilling.
• Cartulina blanca.
• Guillotina para cortar papel.
• Pintura metalizada color dorada y blanca.
• Plantilla para moldear círculos.
• Repujador.
• Cartulina.
• Pega blanca extra fuerte (de carpintería).
• Tijera.
• Pincel.
• Quilling strips.
• White cardstock.
• Paper cutter.
• Gold and white metallic paint.
• Circle template.
• Embossing tool.
• Cardstock.
• Extra-strong white glue (carpentry glue).
• Scissors.
• Paintbrush.

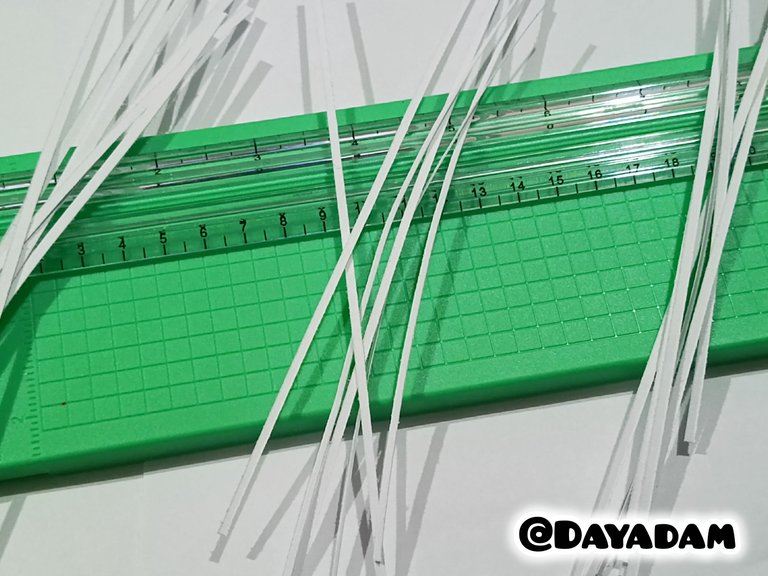
• To begin this project, use a paper cutter to cut several strips from a sheet of white cardstock.
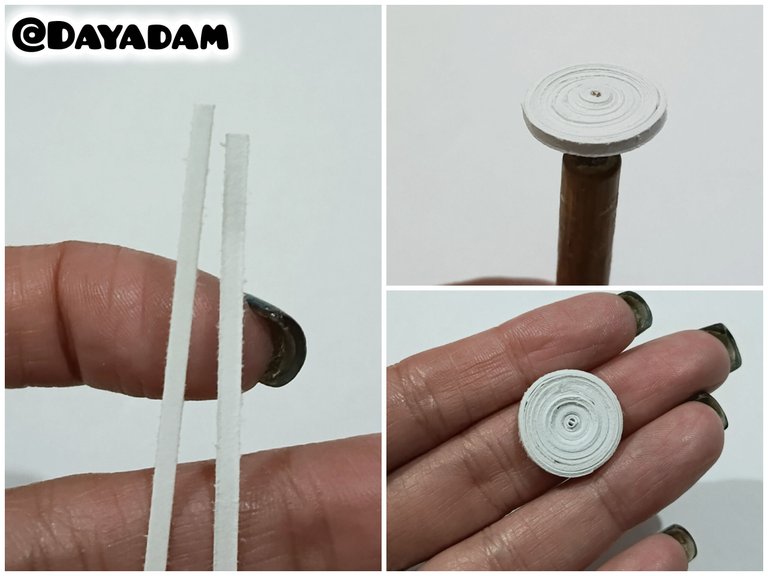
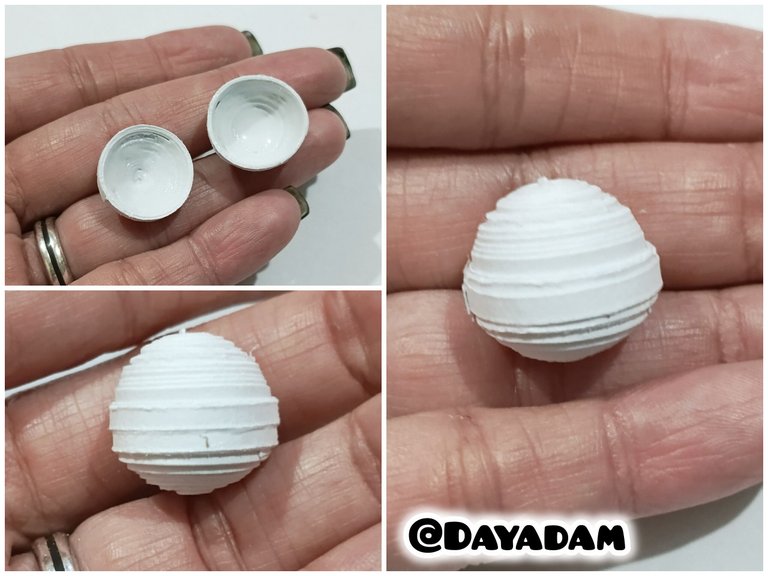
• Take a long white strip, roll it up with a needle until you reach the end, seal it with extra-strong white glue, and pull it out until you have a closed circle. To make the body of the character, you will need two identical circles.
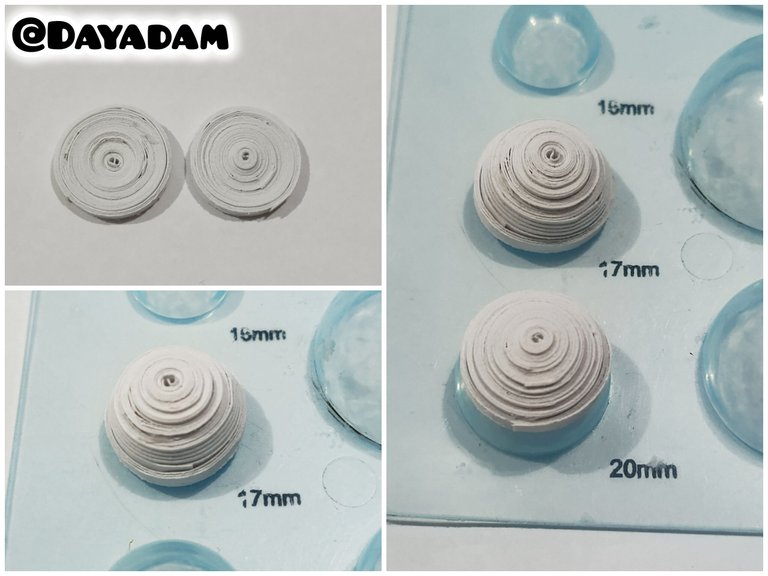
• We will mold the circles using a circle mold, one measuring 20 mm and the other measuring 17 mm. We will remove them from the mold and apply extra-strong white glue to the inside to prevent them from moving or deforming, and we will let them dry thoroughly.
• Join both pieces together using extra-strong white glue, then place a ribbon in the middle of them.

• Para iniciar esté trabajo corte con una guillotina para cortar papel algunas tiras de una cartulina color blanco.
• Tomé una tira larga de color blanco, enrollé con la aguja hasta llegar al final de la misma selle con pega blanca extra fuerte, saqué de la misma hasta conseguir un círculo cerrado. Para realizar el cuerpo del personaje necesitaremos dos círculos iguales.
• Moldearemos los círculos en una plantilla para moldear círculos uno en la medida número 20 mm, y el otro en la medida número 17 mm, sacamos del molde y aplicaremos pega blanca extra fuerte por su parte interna para evitar que los mismos se muevan o se deformen, dejaremos secar muy bien.
• Uniremos ambas piezas aplicando pega blanca extra fuerte, y luego colocando una cinta en el medio de los mismos.
 |  |
 |  |
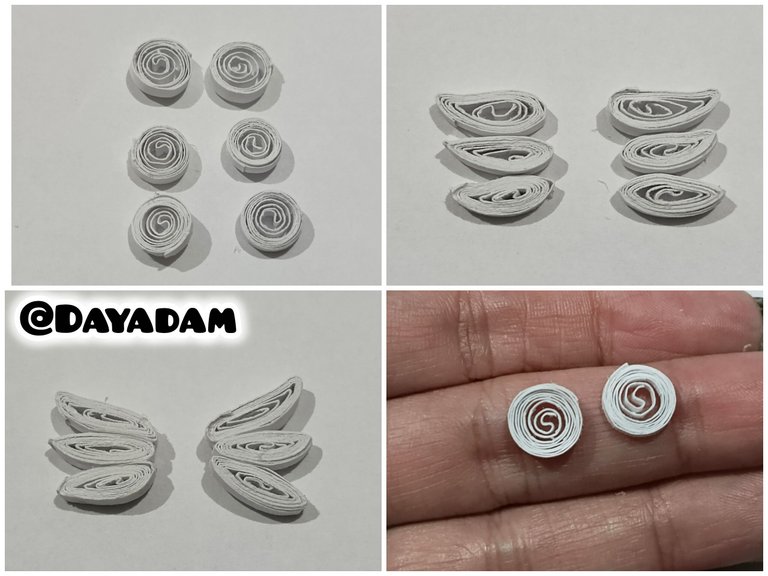
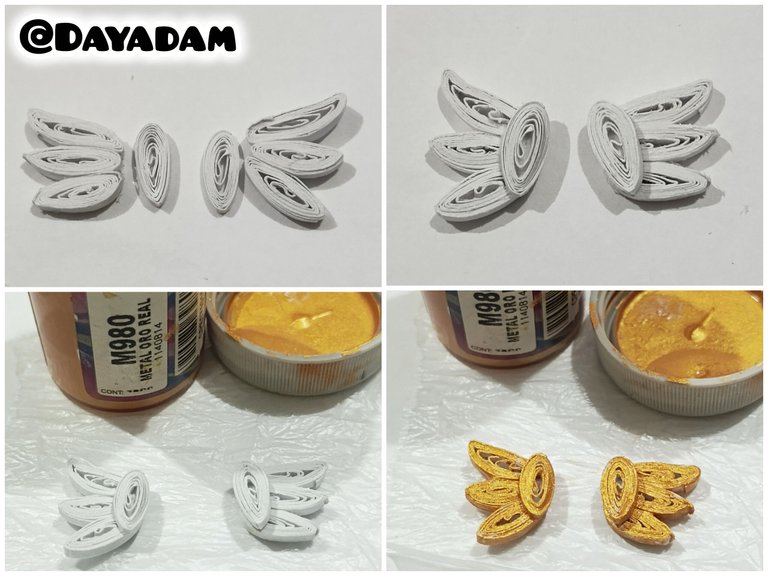
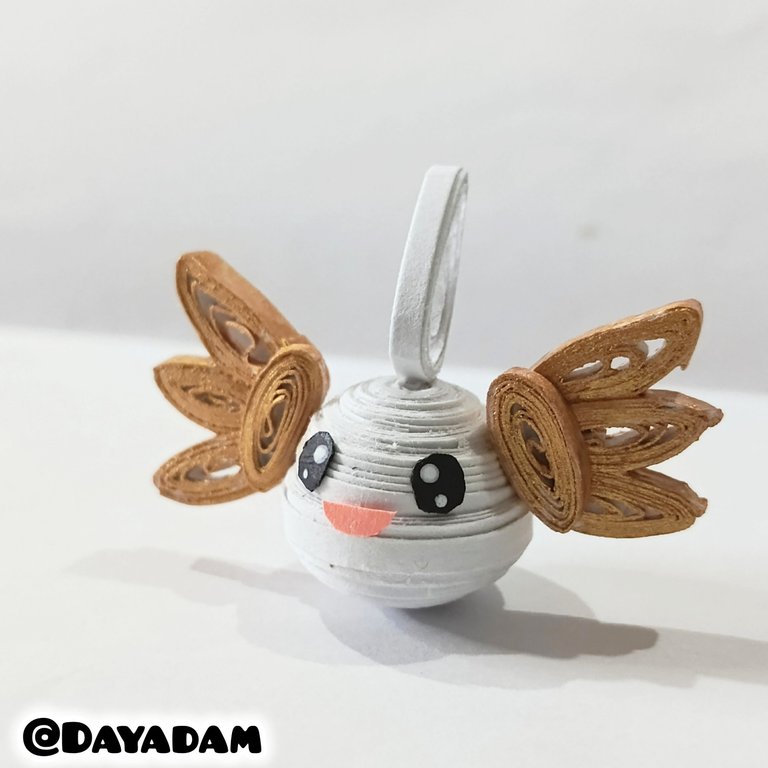
• To make the wings, we will make six small open circles, which we will shape into semi-inclined leaves, then glue them in groups of three as you can see in the image.
• To complete the wings, we will make two more open circles, which we will shape into flat circles and glue to one end of the wing.
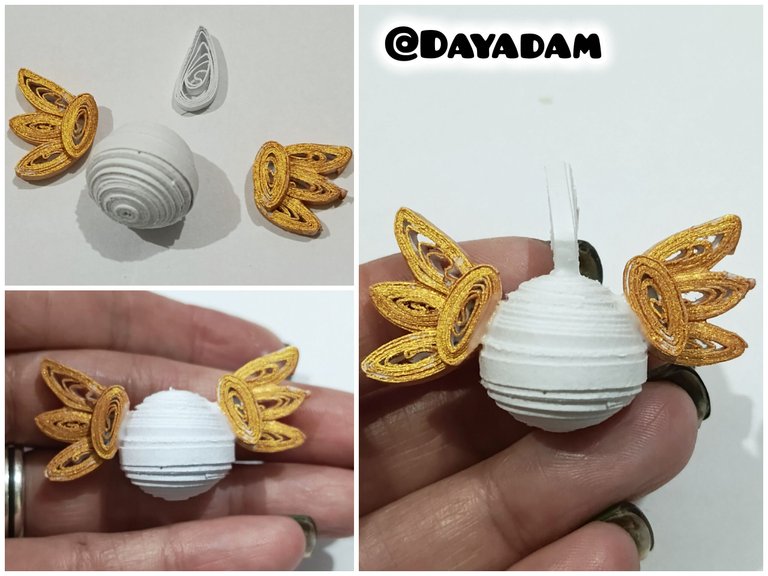
• Once the wings are ready, we will apply gold paint and let them dry thoroughly.
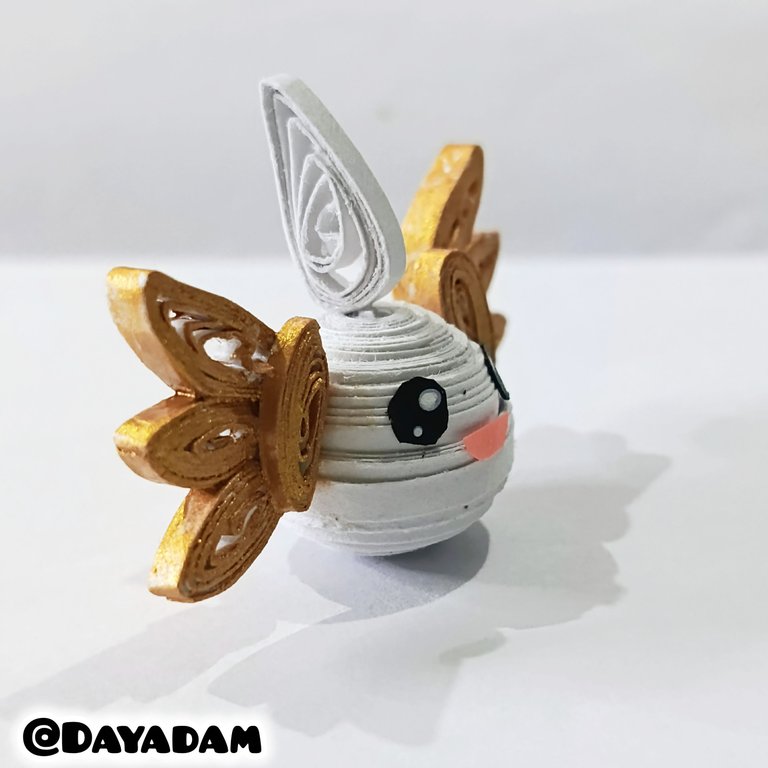
• To make a kind of horn on the head, we will make an open circle with white tape, shape it into a leaf, and glue it to the character's head.
• To finish, cut out the eyes from black cardstock, glue them to the face, and add two lights with white paint. For the mouth, cut a piece of pink ribbon and glue it to the character's face.
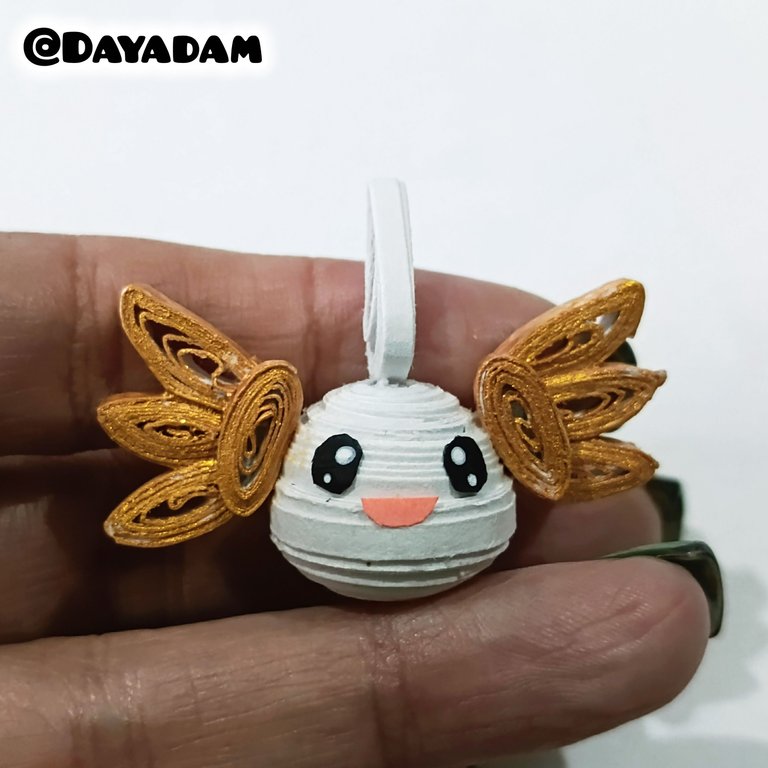
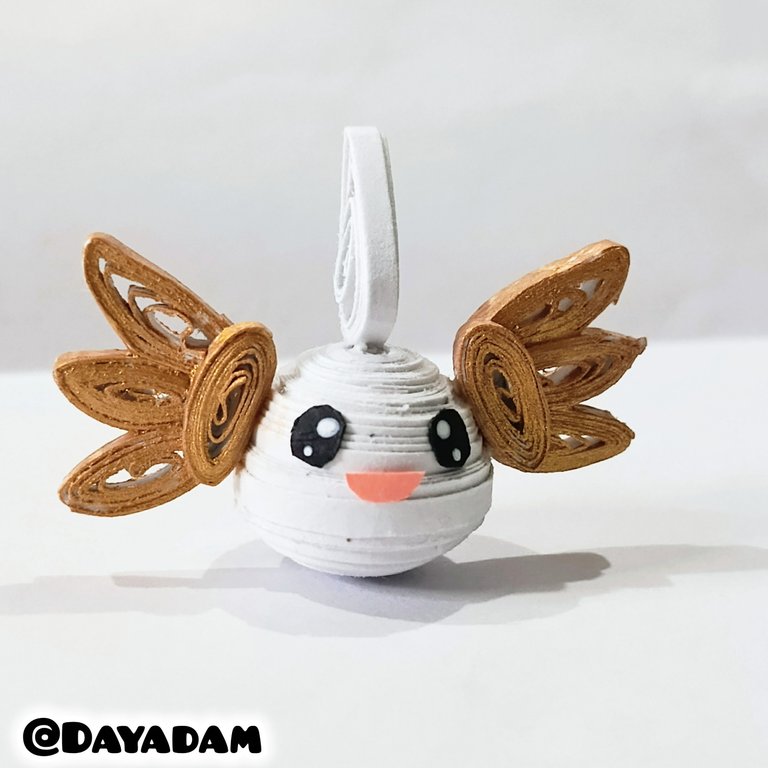
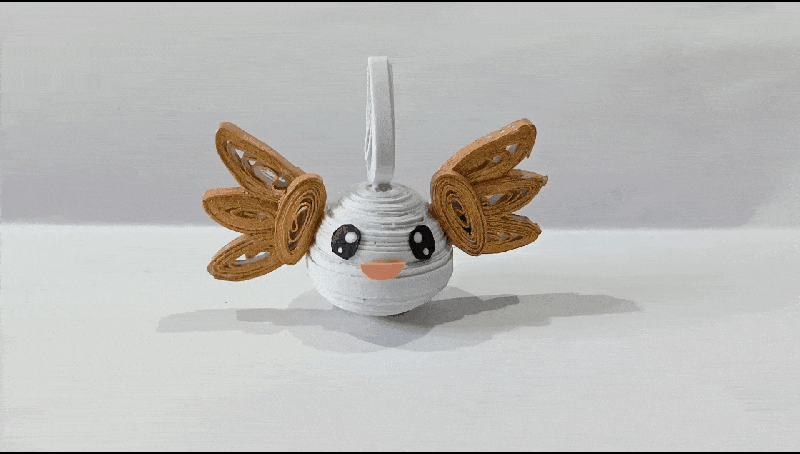
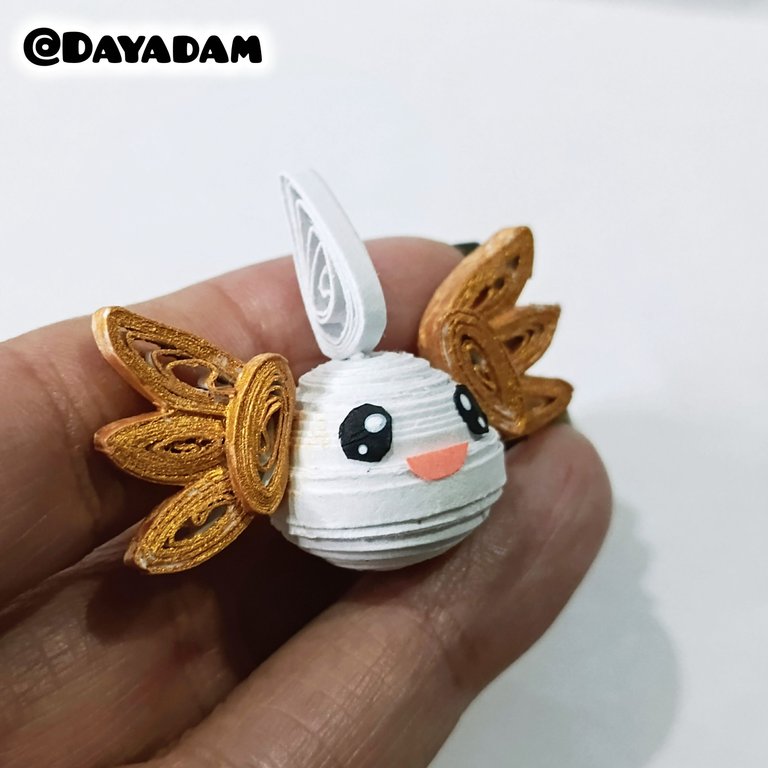
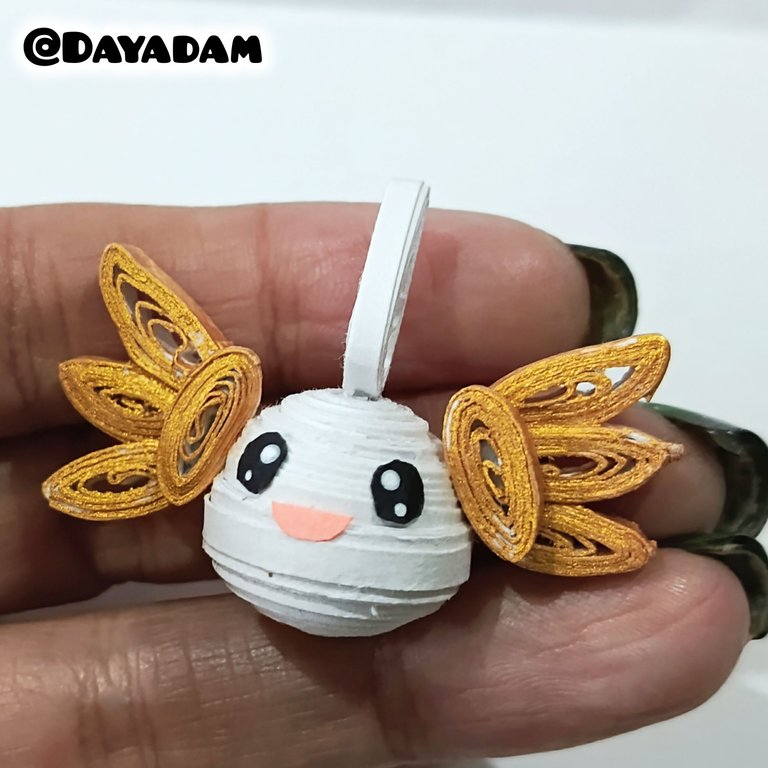
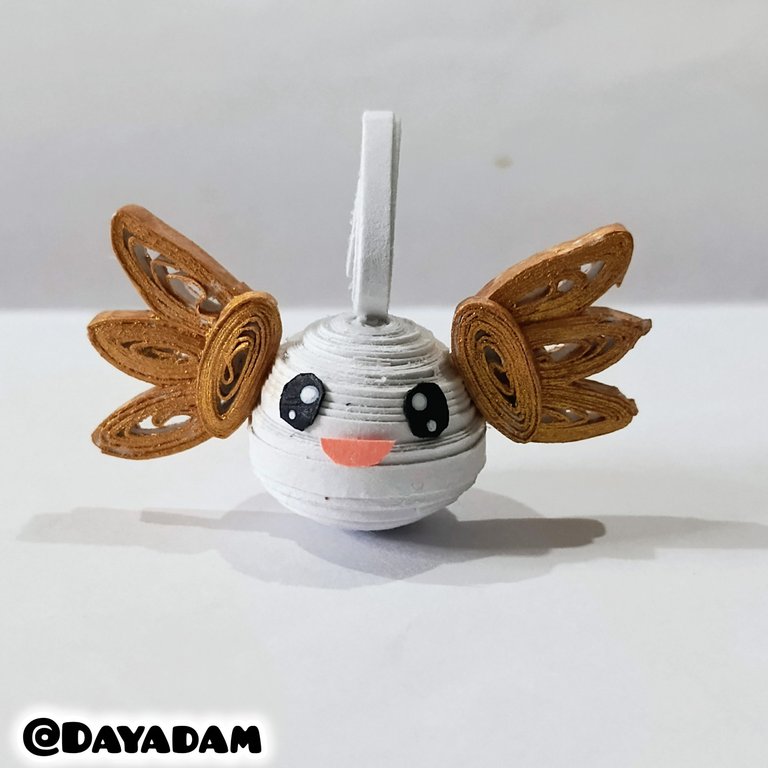
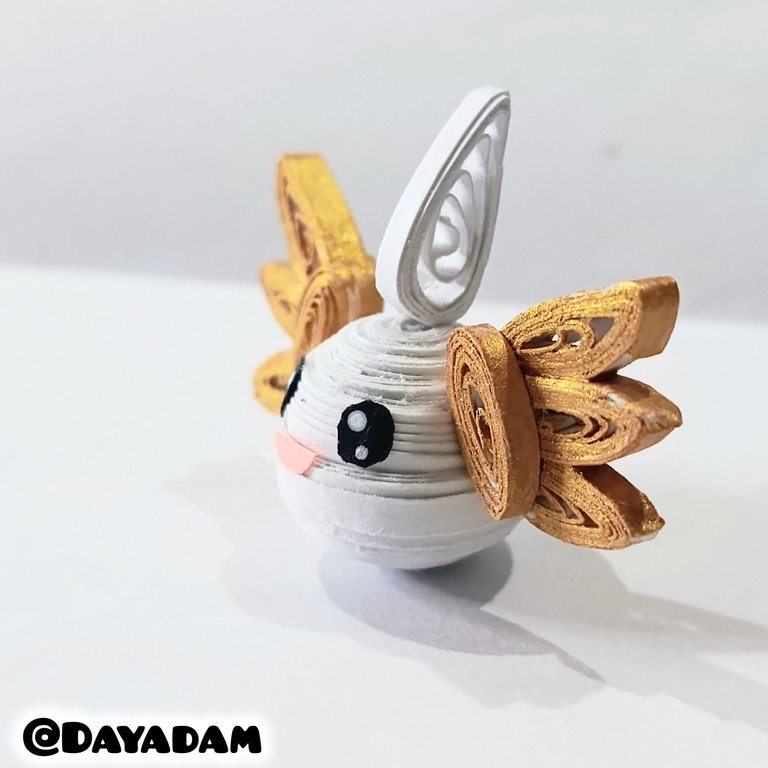
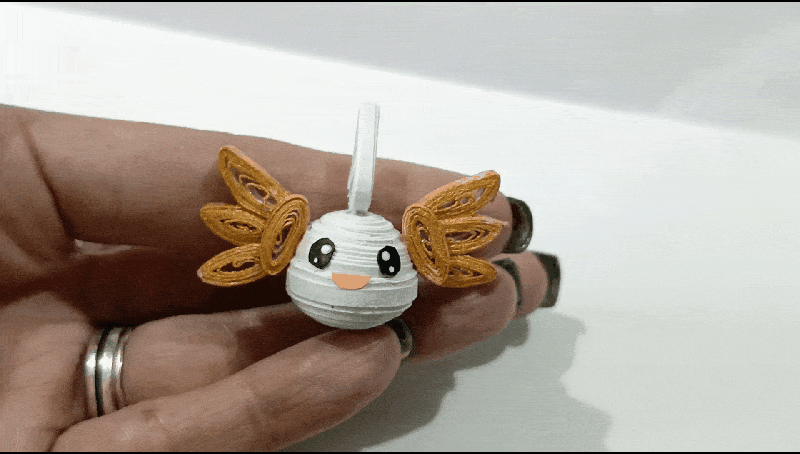
This completes the 3D Digimon character called Puttimon, using the quilling technique.
• Para realizar las alas haremos seis pequeños círculos abiertos, estos los moldearemos en forma de hoja semi inclinadas, luego pegaremos en grupos de tres tal y como pueden ver en la imagen.
• Para completar las alas realizaremos dos círculos más abiertos estos los moldearemos de forma aplanada y pegaremos en un extremo del ala.
• Listas las alas aplicaremos pintura de color oro, dejaremos secar muy bien.
• Para realizar una especie de cuerno que lleva en la cabeza, realizaremos un círculo abierto con cinta de color blanco, este lo moldearemos en forma de hoja lo pegamos en la cabeza del personaje.
• Para finalizar con cartulina de color negro recortamos los ojos, los pegaremos en la cara y le haremos dos luces con pintura blanca, para la boca cortaremos un trozo de cinta rosada, pegamos en la carita del personaje.
De esta manera finalice este personaje de Digimon llamado Puttimon en 3D, en la técnica de técnica de quilling.
 |  |
 |  |

|
 |  |
 |
 |  |
 |
 |
 |
What did you think, did you like it?
I hope you did, I hope you liked my explanation, procedure and photos, I made them with love for you.
"Let out that muse that inspires you, and let your imagination fly".
Thank you all, see you next time ✨.
¿Que les pareció, les gustó?
Espero que sí, que les haya gustado mi explicación, procedimiento y fotos, los hice con mucho cariño por y para ustedes.
"Deja salir esa musa que te inspira, y deja volar tu imaginación".
Gracias a todos, nos vemos en la próxima✨
What a beautiful creation! Your 3D quilling Puttimon is truly stunning—full of precision and elegance. The way you brought the character to life with delicate paper art shows real skill and passion. Thanks so much for sharing your work with love and care—it’s inspiring! ✂️🌸✨
How beautiful 😍 Thank you so much for your lovely appreciation and rating of my work. Welcome to my blog. Blessings 💖
You really did put in great work and effort to create this beautiful art.
I believe the process and explanation will help anyone who wants to make it too.
Good job. 👍
!BBH
Thank you so much, my dear, for your kind words about my work. It's a pleasure to read yours. Blessings 💞
Hermoso trabajo 🥰 ... Me encantó cada detalle tan bien explicado. Lo amé
!discovery 35
Gracias mi reina hermosa por tu apreciación y valoracion tan bonita. Me alegra muchísimo que te gustará.
Mil bendiciones.
!LUV
!LADY
This post was shared and voted inside the discord by the curators team of discovery-it
Join our Community and follow our Curation Trail
Discovery-it is also a Witness, vote for us here
Delegate to us for passive income. Check our 80% fee-back Program
Thanks for the support @discovery-it 💕
Wow, this is truly a heart-melting handiwork, the expression is so cute.
Thank you very much, my friend, for your words 🤩
!PIZZA
@dayadam, sorry! You need more to stake more $PIZZA to use this command.
The minimum requirement is 20.0 PIZZA staked.
More $PIZZA is available from Hive-Engine or Tribaldex
We admire you greatly. This creation is charming, and many of us who know this character feel nostalgic. Thank you for presenting only the best and being a role model in the DIYHub Community. We are happy to have you as part of our big family.
selected by @jesuslnrs
Thank you so much for the support ✨
que hermosura, muy genuino
what a beauty, very genuine
Gracias corazón ❤️
Muy bello este personaje, tiene su encanto y ternura, te felicito @dayadam
Gracias mi linda 😘
Te quedó muy bonita esta pieza amiga, igual como todo lo que haces siempre. Saludos y siempre es un gusto mirar tu paso a paso.
Un placer para mí que te guste mi trabajo. Un abrazo para ti 🤗
Congratulations @dayadam! You have completed the following achievement on the Hive blockchain And have been rewarded with New badge(s)
Your next payout target is 17000 HP.
The unit is Hive Power equivalent because post and comment rewards can be split into HP and HBD
You can view your badges on your board and compare yourself to others in the Ranking
If you no longer want to receive notifications, reply to this comment with the word
STOPCheck out our last posts:
Muchísimas gracias @hivebuzz 😊
¡Eso es genial @dayadam! ¡Estamos emocionados de ver tus logros en Hive! ¡Seguimos animándote para tu próxima meta!
https://www.reddit.com/r/digimon/comments/1p1t857/puttimon_in_3d_quilling_technique/
This post has been shared on Reddit by @dayadam through the HivePosh initiative.