[ESP/ENG] Entorno de desarrollo Arch Linux en Windows con WSL2
AI generated image
¡Hola, Hivers! 👋 Los desarrolladores a menudo nos encontramos en la encrucijada de elegir el sistema operativo perfecto para nuestra productividad. Mientras que Windows 🪟 "domina" el mercado de los PCs, la robustez, la flexibilidad y la potencia de la línea de comandos de Linux 🐧 son inigualables para tareas de desarrollo.
Cuando no se quiere o no se puede migrar directamente a Linux, por las razones que sean, esto significaba aplicar dual-booting o máquinas virtuales pesadas. Pero, ¿y si te dijera que puedes tener lo mejor de ambos mundos, con una integración fluida y un rendimiento casi nativo? ✨
Aquí es donde entra en juego WSL 2 (Windows Subsystem for Linux 2).
¿Qué es WSL 2 y cómo funciona? 💻🐧
WSL 2 es una característica de Windows que te permite ejecutar un entorno de Linux completo directamente en Windows, sin la sobrecarga de una máquina virtual tradicional. A diferencia de su predecesor (WSL 1, que era una capa de compatibilidad), WSL 2 ejecuta un kernel de Linux real dentro de una máquina virtual ligera y optimizada que se inicia en cuestión de segundos. 🚀
Esta arquitectura ofrece varias ventajas clave:
- Rendimiento excepcional: Gracias al kernel de Linux real y la virtualización ligera, WSL 2 proporciona un rendimiento de I/O (entrada/salida de disco) significativamente mejor, acercándose al rendimiento nativo. Esto es crucial para operaciones de compilación, instalación de paquetes y tareas intensivas en disco. ⚡
- Compatibilidad total del sistema de llamadas: Puedes ejecutar todas tus aplicaciones y herramientas de línea de comandos de Linux sin problemas. ✅
- Integración fluida con Windows:
- Acceso nativo a los archivos de Windows desde Linux (
/mnt/c/). 📂 - Ejecuta comandos de Windows desde tu terminal Linux. ➡️
- Lanza aplicaciones GUI de Linux directamente en tu escritorio de Windows (gracias a WSLg). 🖼️
- Comparte el portapapeles y los recursos de red de forma transparente. 🔗
- Acceso nativo a los archivos de Windows desde Linux (
- Consumo de recursos optimizado: A diferencia de una VM completa, WSL 2 ajusta dinámicamente el uso de RAM, liberándola de nuevo a Windows cuando no la necesitas, lo que lo hace más eficiente para tu sistema. 🧠
¿Por qué Arch Linux en WSL 2? 🎯
Si eres un entusiasta de Linux como yo, sabes que Arch Linux ofrece un control inigualable, un sistema "rolling release" con el software más reciente y una base limpia y mínima. Combinar la flexibilidad de Arch con la eficiencia de WSL 2 te permite crear un entorno de desarrollo personalizado y potente, sin la sobrecarga de un entorno de escritorio completo. ¡Ideal para desarrolladores que viven en la terminal! 👨💻
En este post iremos paso a paso configurando nuestro propio entorno de desarrollo Arch Linux en WSL 2, optimizado para desarrollo. ¡Prepárate para llevar tu productividad al siguiente nivel! 📈
Preparando Tu Sistema Windows ⚙️
Antes de sumergirnos en la instalación de Arch Linux, necesitamos preparar nuestro sistema Windows para que todo funcione a la perfección. Aquí te detallo los pasos para asegurarte de que tu entorno Windows esté listo para WSL 2:
1. Habilitar las Características de WSL2 y la Plataforma de Máquina Virtual:
Para empezar, necesitamos activar las funcionalidades de Windows que permiten la ejecución de WSL 2:
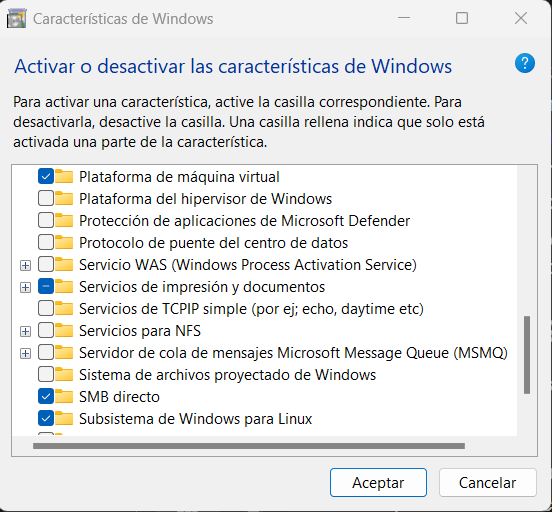
- Abre el "Panel de control" y navega a "Programas" > "Activar o desactivar las características de Windows".
- En la ventana que aparece, busca y marca las casillas para:
- Subsistema de Windows para Linux
- Plataforma de máquina virtual
- Haz clic en "Aceptar" y reinicia tu equipo si se te solicita. ¡Es importante para que los cambios surtan efecto! 🔄
2. Actualizar a WSL 2:
Asegúrate de que WSL esté configurado para usar la versión 2 por defecto, lo que garantiza un rendimiento óptimo:
Abre PowerShell como Administrador. (Puedes buscar "PowerShell" en el menú de inicio, hacer clic derecho y seleccionar "Ejecutar como administrador").
Una vez abierto, ejecuta el siguiente comando para establecer WSL 2 como la versión predeterminada:
wsl --set-default-version 2(Si recibes un error sobre el componente del kernel, no te preocupes. Visita https://aka.ms/wsl2kernel para descargar e instalar el paquete de actualización del kernel de Linux para WSL 2. Después de instalarlo, vuelve a ejecutar el comando
wsl --set-default-version 2).También puedes verificar la versión de tus distribuciones existentes (si ya tienes alguna instalada) con este comando:
wsl --list --verbose
3. Instalar Windows Terminal:
Para una experiencia de línea de comandos moderna y altamente personalizable, te recomiendo encarecidamente instalar Windows Terminal. Es la herramienta ideal para interactuar con WSL 2 de forma óptima:
- Dirígete a la Microsoft Store y busca "Windows Terminal" para instalarla. ¡Es gratuita y marca una gran diferencia! ✨
- Puedes ir directamente al enlace Windows Terminal

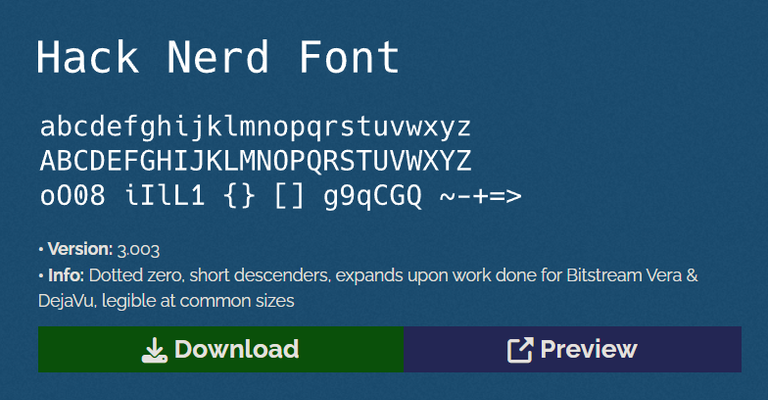
4. Instalar Nerd Fonts en Windows:
Para que tu terminal luzca increíble con iconos y símbolos especiales (cruciales para muchos temas de shell y herramientas de desarrollo), necesitarás una Nerd Font:
- Descarga tus Nerd Fonts preferidas (por ejemplo, Hack Nerd Font o JetBrains Mono Nerd Font) desde https://www.nerdfonts.com/font-downloads.
- Una vez descargado, descomprime el archivo.
- Haz clic derecho en los archivos
.ttfo.otfque encuentres y selecciona "Instalar". Repite este proceso para todas las versiones que desees (Regular, Bold, Italic, etc.). 🎨
¡Con estos pasos, tu sistema Windows estará perfectamente preparado para la instalación de Arch Linux en WSL 2! Ahora vamos a instalar Arch Linux en tu entorno WSL 2 y a darle los toques finales para que esté listo para la acción.
Instalando Arch Linux en WSL 2 🐧➡️🪟
Ahora que nuestro sistema Windows está perfectamente preparado para la instalación de Arch Linux en WSL 2 Procederemos con la instalación.
Para ver la lista completa de distribuciones de Linux disponibles para instalar desde la Microsoft Store, abre PowerShell y ejecuta:
wsl --list --online
Esto te mostrará opciones como Ubuntu, Debian, Kali Linux, etc., que normalmente puedes instalar con:
wsl --install -d <NombreDeLaDistro>
Para ver las distribuciones que ya tienes instaladas en tu sistema y su estado (si están en ejecución y qué versión de WSL están usando), ejecuta:
wsl --list --verbose
Dado que Arch Linux no está directamente en esta lista oficial, utilizaremos una versión no oficial disponible en la Microsoft Store.
Instalación desde la Microsoft Store: 🏢
- Abre la Microsoft Store y busca "Winch WSL" o accede directamente desde este enlace: https://apps.microsoft.com/detail/9mznmnksm73x
- Haz clic en "Obtener" (o "Instalar") y espera a que la descarga e instalación finalicen. ⏳
- Una vez instalado, haz clic en "Abrir" (o "Iniciar") desde la Microsoft Store, o búscalo en el menú de inicio de Windows. ▶️

Una vez que la instalación termine, se te pedirá que crees un nombre de usuario y una contraseña para tu nueva instalación de Linux. ¡Recuerda bien estos datos! Los necesitarás para iniciar sesión y ejecutar comandos con privilegios (sudo). 🔑
Iniciando tu nueva instancia de Arch Linux: ▶️
Ahora, hay varias formas de iniciar Arch Linux, pero para aprovechar al máximo Windows Terminal, es preferible hacerlo desde allí.
- Abre Windows Terminal.
- Haz clic en la flecha hacia abajo (🔻) en la barra de título para abrir el menú desplegable.
- En el menú, verás todas tus distribuciones WSL listadas. Simplemente haz clic en Arch.
Windows Terminal te permite tener múltiples pestañas para diferentes shells (CMD, PowerShell, varias distribuciones WSL) en una sola ventana, ¡lo cual es súper útil! 🤩
Actualizar el sistema: 🔄
Llegados a este punto, es buena idea actualizar nuestro sistema antes de continuar con la personalización:
sudo pacman -Syu
Instalar paquetes necesarios: 🛠️
Vamos a instalar algunas herramientas que nos harán la vida más fácil:
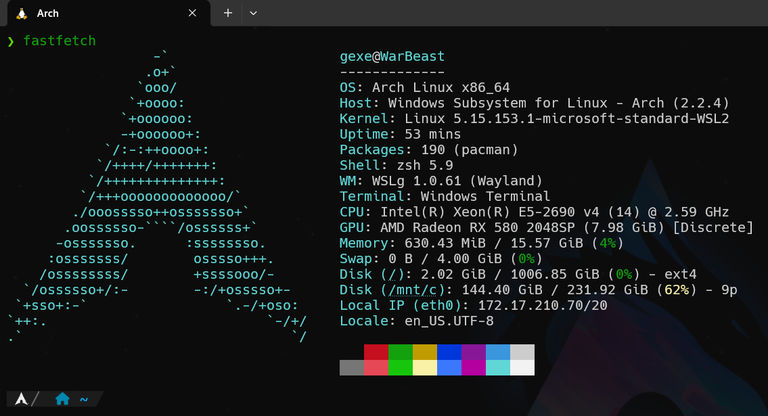
sudo pacman -S git bat lsd curl fzf neovim zsh zsh-autosuggestions zsh-syntax-highlighting fastfetch python nodejs
Configurar Zsh: 🐚
Establece Zsh como tu shell predeterminado:
chsh -s /bin/zshCierra y vuelve a abrir tu terminal para que el cambio surta efecto.
Instalamos Powerlevel10k (un tema genial para Zsh): ✨
git clone --depth=1 [https://github.com/romkatv/powerlevel10k.git] https://github.com/romkatv/powerlevel10k.git) ~/powerlevel10k echo 'source ~/powerlevel10k/powerlevel10k.zsh-theme' >>~/.zshrcCopiamos tu configuración personalizada de
.zshrc:curl -o ~/.zshrc [https://github.com/DarthGexe/dotfiles/raw/main/.zshrc](https://github.com/DarthGexe/dotfiles/raw/main/.zshrc)Reinicia la terminal y ejecuta
p10k configurepara personalizar tu tema.p10k configure
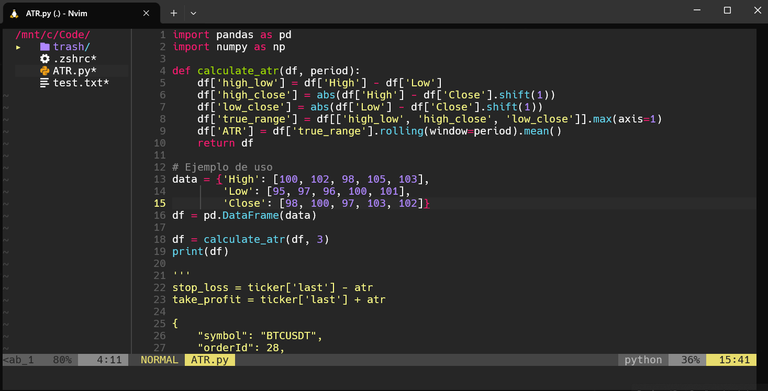
Configurar Neovim (nuestro editor de codigo): 📝
- Instalamos vim-plug (un gestor de plugins para Vim/Neovim):
sh -c 'curl -fLo "${XDG_DATA_HOME:-$HOME/.local/share}"/nvim/site/autoload/plug.vim --create-dirs \ https://raw.githubusercontent.com/junegunn/vim-plug/master/plug.vim' - Creamos el directorio de configuración de Neovim:
mkdir -p ~/.config/nvim - Descargamos y copiamos la configuración inicial de Neovim:
curl -o ~/.config/nvim/init.vim https://github.com/DarthGexe/dotfiles/raw/main/init.vim - Abre Neovim:
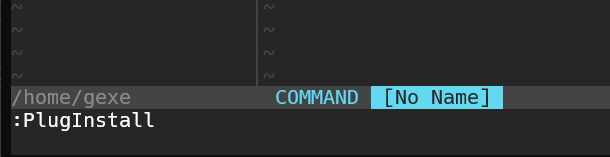
nvim - Ejecuta
:PlugInstallpara instalar los plugins definidos en init.vim.
Configurar Windows Terminal para tu perfil de Arch Linux: ⚙️
- Abre Windows Terminal.
- Ve a "Configuración" (Ctrl + , o haciendo clic en la flecha hacia abajo 🔻 y seleccionando "Configuración").
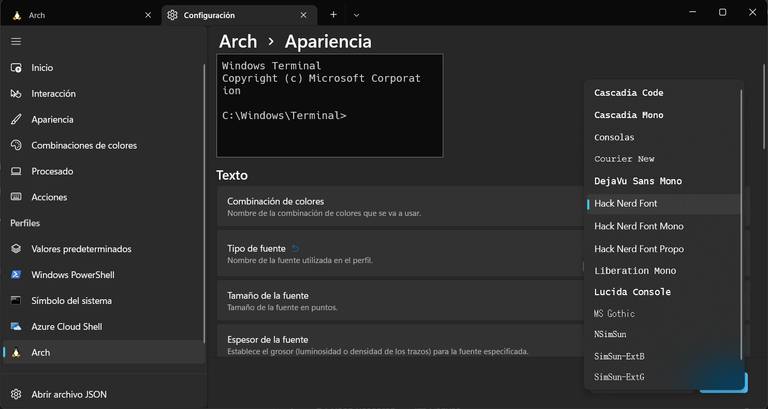
- En la pestaña de tu perfil de Arch, ve a "Configuración adicional" > "Apariencia" > "Tipo de fuente" y elige la Nerd Font que instalaste anteriormente.
- Personaliza los colores, la transparencia y otros ajustes a tu gusto. 🎨
Tu Nuevo Entorno, Tu Máxima Productividad 🎉
¡Felicidades! 🎉 Ahora tienes un entorno de desarrollo Arch Linux robusto y eficiente corriendo en Windows con WSL 2. Has conseguido lo mejor de ambos mundos: la flexibilidad y el control de Linux para tu línea de comandos y herramientas de desarrollo, y la comodidad de Windows para el escritorio, la suite de Office y los juegos. 🚀
Con esta configuración, las tareas de desarrollo, compilación y prueba serán más rápidas y fluidas. ¡Disfruta de la productividad que este nuevo entorno te ofrece y no dudes en seguir explorando y personalizándolo a tu gusto! ¡A codear! 👨💻
Nota: Para realizar este post me he asistido con herramientas de IA para dar formato al texto, agregar emoticones, traducir y realizar correcciones.

English Version
AI generated image
Hello, Hivers! 👋 Developers often find themselves at the crossroads of choosing the perfect operating system for their productivity. While Windows 🪟 "dominates" the PC market, the robustness, flexibility, and command-line power of Linux 🐧 are unmatched for development tasks.
When you don't want to or can't migrate directly to Linux, for whatever reasons, this meant applying dual-booting or heavy virtual machines. But what if I told you that you can have the best of both worlds, with seamless integration and near-native performance? ✨
This is where WSL 2 (Windows Subsystem for Linux 2) comes in.
What is WSL 2 and how does it work? 💻🐧
WSL 2 is a Windows feature that allows you to run a full Linux environment directly on Windows, without the overhead of a traditional virtual machine. Unlike its predecessor (WSL 1, which was a compatibility layer), WSL 2 runs a real Linux kernel inside a lightweight and optimized virtual machine that starts in seconds. 🚀
This architecture offers several key advantages:
- Exceptional performance: Thanks to the real Linux kernel and lightweight virtualization, WSL 2 provides significantly better I/O (disk input/output) performance, approaching native performance. This is crucial for compilation operations, package installation, and disk-intensive tasks. ⚡
- Full system call compatibility: You can run all your Linux command-line applications and tools without issues. ✅
- Seamless integration with Windows:
- Native access to Windows files from Linux (
/mnt/c/). 📂 - Run Windows commands from your Linux terminal. ➡️
- Launch Linux GUI applications directly on your Windows desktop (thanks to WSLg). 🖼️
- Share the clipboard and network resources transparently. 🔗
- Native access to Windows files from Linux (
- Optimized resource consumption: Unlike a full VM, WSL 2 dynamically adjusts RAM usage, freeing it back to Windows when you don't need it, making it more efficient for your system. 🧠
Why Arch Linux on WSL 2? 🎯
If you're a Linux enthusiast like me, you know that Arch Linux offers unparalleled control, a "rolling release" system with the latest software, and a clean, minimal base. Combining the flexibility of Arch with the efficiency of WSL 2 allows you to create a personalized and powerful development environment, without the overhead of a full desktop environment. Ideal for developers who live in the terminal! 👨💻
In this post, we will go step by step configuring our own Arch Linux development environment in WSL 2, optimized for development. Get ready to take your productivity to the next level! 📈
Preparing Your Windows System ⚙️
Before we dive into the Arch Linux installation, we need to prepare our Windows system so that everything works perfectly. Here I detail the steps to ensure your Windows environment is ready for WSL 2:
1. Enable WSL2 Features and the Virtual Machine Platform:
To begin, we need to activate the Windows functionalities that allow the execution of WSL 2:
- Open the "Control Panel" and navigate to "Programs" > "Turn Windows features on or off".
- In the window that appears, find and check the boxes for:
- Windows Subsystem for Linux
- Virtual Machine Platform
- Click "OK" and restart your computer if prompted. This is important for the changes to take effect! 🔄
2. Update to WSL 2:
Make sure WSL is configured to use version 2 by default, which ensures optimal performance:
Open PowerShell as Administrator. (You can search for "PowerShell" in the start menu, right-click, and select "Run as administrator").
Once open, run the following command to set WSL 2 as the default version:
wsl --set-default-version 2(If you receive an error about the kernel component, don't worry. Visit https://aka.ms/wsl2kernel to download and install the Linux kernel update package for WSL 2. After installing it, run the
wsl --set-default-version 2command again).You can also check the version of your existing distributions (if you already have any installed) with this command:
wsl --list --verbose
3. Install Windows Terminal:
For a modern and highly customizable command-line experience, I highly recommend installing Windows Terminal. It's the ideal tool for interacting with WSL 2 optimally:
- Go to the Microsoft Store and search for "Windows Terminal" to install it. It's free and makes a big difference! ✨
- You can go directly to the link Windows Terminal
4. Install Nerd Fonts on Windows:
To make your terminal look amazing with special icons and symbols (crucial for many shell themes and development tools), you'll need a Nerd Font:
- Download your preferred Nerd Fonts (for example, Hack Nerd Font or JetBrains Mono Nerd Font) from https://www.nerdfonts.com/font-downloads.
- Once downloaded, unzip the file.
- Right-click on the
.ttfor.otffiles you find and select "Install". Repeat this process for all the versions you want (Regular, Bold, Italic, etc.). 🎨
With these steps, your Windows system will be perfectly prepared for the installation of Arch Linux in WSL 2! Now we are going to install Arch Linux in your WSL 2 environment and give it the finishing touches to get it ready for action.
Installing Arch Linux on WSL 2 🐧➡️🪟
Now that our Windows system is perfectly prepared for the installation of Arch Linux in WSL 2, we will proceed with the installation.
To see the complete list of Linux distributions available to install from the Microsoft Store, open PowerShell and run:
wsl --list --online
This will show you options like Ubuntu, Debian, Kali Linux, etc., which you can normally install with:
wsl --install -d <DistributionName>
To see the distributions you already have installed on your system and their status (whether they are running and which version of WSL they are using), run:
wsl --list --verbose
Since Arch Linux is not directly in this official list, we will use an unofficial version available in the Microsoft Store.
Installation from the Microsoft Store: 🏢
- Open the Microsoft Store and search for "Winch WSL" or access it directly from this link: https://apps.microsoft.com/detail/9mznmnksm73x
- Click "Get" (or "Install") and wait for the download and installation to finish. ⏳
- Once installed, click "Open" (or "Launch") from the Microsoft Store, or find it in the Windows start menu. ▶️
Once the installation is complete, you will be prompted to create a username and password for your new Linux installation. Remember this information well! You will need it to log in and run commands with privileges (sudo). 🔑
Starting your new Arch Linux instance: ▶️
Now, there are several ways to start Arch Linux, but to get the most out of Windows Terminal, it's preferable to do it from there.
- Open Windows Terminal.
- Click the down arrow (🔻) in the title bar to open the dropdown menu.
- In the menu, you will see all your WSL distributions listed. Simply click on Arch.
Windows Terminal allows you to have multiple tabs for different shells (CMD, PowerShell, various WSL distributions) in a single window, which is super useful! 🤩
Update the system: 🔄
At this point, it's a good idea to update our system before continuing with customization:
sudo pacman -Syu
Install necessary packages: 🛠️
Let's install some tools that will make our lives easier:
sudo pacman -S git bat lsd curl fzf neovim zsh zsh-autosuggestions zsh-syntax-highlighting fastfetch python nodejs
Configure Zsh: 🐚
Set Zsh as your default shell:
chsh -s /bin/zshClose and reopen your terminal for the change to take effect.
We install Powerlevel10k (a great theme for Zsh): ✨
git clone --depth=1 https://github.com/romkatv/powerlevel10k.git ~/powerlevel10k echo 'source ~/powerlevel10k/powerlevel10k.zsh-theme' >>~/.zshrcWe copy your custom
.zshrcconfiguration:curl -o ~/.zshrc [https://github.com/DarthGexe/dotfiles/raw/main/.zshrc](https://github.com/DarthGexe/dotfiles/raw/main/.zshrc)Restart the terminal and run
p10k configureto customize your theme.p10k configure
Configure Neovim (our code editor): 📝
- We install vim-plug (a plugin manager for Vim/Neovim):
sh -c 'curl -fLo "${XDG_DATA_HOME:-$HOME/.local/share}"/nvim/site/autoload/plug.vim --create-dirs \ [https://raw.githubusercontent.com/junegunn/vim-plug/master/plug.vim](https://raw.githubusercontent.com/junegunn/vim-plug/master/plug.vim)' - We create the Neovim configuration directory:
mkdir -p ~/.config/nvim - We download and copy the initial Neovim configuration:
curl -o ~/.config/nvim/init.vim [https://github.com/DarthGexe/dotfiles/raw/main/init.vim](https://github.com/DarthGexe/dotfiles/raw/main/init.vim) - Open Neovim:
nvim - Run
:PlugInstallto install the plugins defined in init.vim.
Configure Windows Terminal for your Arch Linux profile: ⚙️
- Open Windows Terminal.
- Go to "Settings" (Ctrl + , or by clicking the down arrow 🔻 and selecting "Settings").
- In your Arch profile tab, go to "Additional settings" > "Appearance" > "Font face" and choose the Nerd Font you installed earlier.
- Customize the colors, transparency, and other settings to your liking. 🎨
Your New Environment, Your Maximum Productivity 🎉
Congratulations! 🎉 You now have a robust and efficient Arch Linux development environment running on Windows with WSL 2. You've got the best of both worlds: the flexibility and control of Linux for your command line and development tools, and the convenience of Windows for the desktop, Office suite, and games. 🚀
With this configuration, development, compilation, and testing tasks will be faster and smoother. Enjoy the productivity that this new environment offers you, and don't hesitate to continue exploring and customizing it to your liking! Happy coding! 👨💻
Note: For this post, I used AI tools to format the text, add emoticons, translate, and make corrections.
Congratulations @darthgexe! You have completed the following achievement on the Hive blockchain And have been rewarded with New badge(s)
Your next target is to reach 69000 upvotes.
You can view your badges on your board and compare yourself to others in the Ranking
If you no longer want to receive notifications, reply to this comment with the word
STOP