(EN-PT) Splinterlands Challenge

We are all #hive and #hivebr!
This post has been formatted for best viewing in the Ecency darkmode frontend! It's a submission to the Weekly Challenge Splinterlands!
The season is over, the reset knocked us out, and now we need to climb the rankings again. The only thing that doesn't shake is our participation in the team splinterlands challenges! It's been a while since I stopped making posts analyzing cards individually, and I started to analyze complete teams and their strategies! This was before the challenge changes.
Now with the end of the weekly battle challenge, I've verified that it's still explicitly valid to share battles within the media challenge. I think it's very productive, and serves the purpose of getting the game into the trending topics.
So I'm going to present a battle that took place now on the last day of the season that ended.
Facing a well-prepared opponent, this time with my friend @bugor, who was my opponent in the battle. Thanks for the fair fight! Leave a comment and get a token tip and an upvote with all my PGM might!
CRAZY'S STRATEGIC ROADMAP
1. BATTLE HISTORY ANALYSIS
In every battle I suggest as the first point to be analyzed, and this is the basic strategy for Splinterlands lovers, to check the opponent's history of previous battles.
When I received information from the opponent bugor I ended up not saving the screen. However, I remember very well that nothing called my attention, but that was my tiredness. So I played on automatic, which is a serious problem for #Splinterlands players when they launch a team without much analysis.
It is necessary to invest time in analyzing the opponent's match history, and having failed in this regard is a bad example.
Knowing the opponent's strategies and being able to anticipate, as well as noticing other little things, can help you win the match!
2. RULESET ANALYSIS
The second point I suggest you analyze is regarding RuleSet. This will vary from game to game and there is no easy recipe, you'll just learn by doing.
This "Close Range" battle rule until a while ago almost always indicated the use of General Sloam and a classic Ranged team. But times changed, bots came, and humans needed to vary their lineups a lot more to stay competitive.
The "Earthquake" rule can be a problem for long games. When you think about high damage and quick elimination, it can be overlooked. I don't do that, so I always look to protect a card with Fly so that it's an eventual untouched underdog on the way to victory.
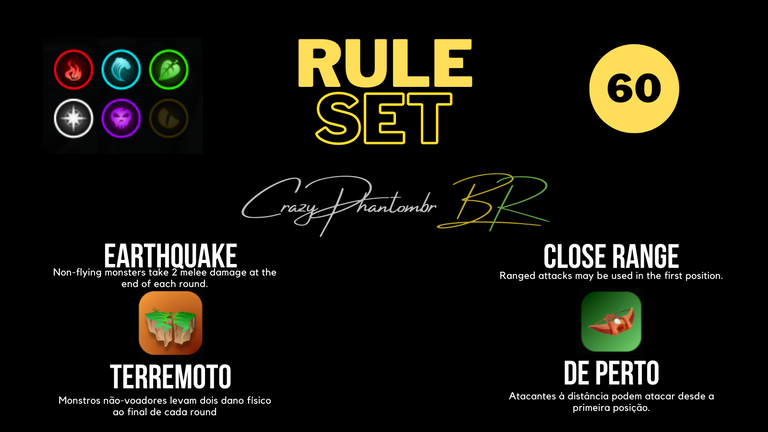
The amount of Mana was abundant, allowing me to build a cohesive team with chances of victory. It's good when we are not restricted by the amount of mana, it means heavy monsters in battle!
3. SUMMON AVAILABILITY
My main invokers are:
Kelya Frendul water level 5, my own.
My main investment in the game so far.Thaddius Brood death level 5, rented.
My favorite, because this element is what I've dedicated the most to since launch.Lobb Lowland level 4, my own.
A very nice surprise to have managed to get this summoner to level 4 in such a short time! It's my best Earth summoner so far and now it's starting to be better used in the Gold league, which is where I intend to play!Octavia ShadowmeldGF death, level 4, my own.
A very nice surprise to have managed to get this summoner to level 4 in such a short time! It's my best Earth summoner so far and now it's starting to be better used in the Gold league, which is where I intend to play!Eternan Brune fire level 4, my own.
Practically unused, because I have few cards evolved in splinter fire.Obsidian earth level 3, located.
It's been enough to sustain the Earth element battles, considering that it's not my goal to acquire cards from this element at the moment.Possibilus the Wise water level 3, leased.
First season I leveled up this summoner. The intention is to assess whether the benefitThe cost of unlocking card abilities outweighs the cost.Pembrook Nymph water GF level 3, my own.
Thanks so much Splinterlands! I loved this summoner!Yodin Zaku fire level 1, located.
Every season restart I've been trying to get this summoner for a fair price. However, after the first few days renters end up canceling. This was the first time I managed to reach the end of the season without being cancelled!
My other available summoners are at level 2, being unsuitable for use in the Gold League. Since I only play in Modern mode, keep in mind that some summoners and cards are not available.
The ruleset analysis is linked to the availability of invokers. What the opponent will use, and what I have available.
My decision was already made, and today is Magic baby day!
4. YOUR STRATEGIES
The fourth point I recommend looking at is exploring your game strategies. Do you have any?
In this set of rules, there is a great possibility of becoming archers. This means that ranged damage resistance would be appropriate. Shields can also help. A few supports, and we would have the perfect team to win.
But not today. I'm going to take advantage of the fact that I have several active locations, and I'm going to do "beans and rice". This expression here in Brazil means "to do the basics".
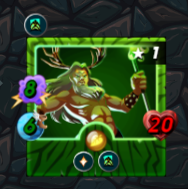
Right now, the basics are Llama Kron.
COMPOSING THE TIME
Sacrifice Strategy
Source: [The Art of War](https://ecency.com/hive-140217/@crazyphantombr/en-en-a-arte- da), by CrazyPhantomBR
The assembly of this team had as a guideline the literal sacrifice of a card in order to upgrade the status of another card. In fact, we will have double sacrifice, and a triple buff potential. Potential no! It's a guaranteed triple buff. One only has to look at the composition of the team to see this.
The choice of the appropriate card to occupy the first position was not difficult, being chosen Unicorn Mustang level 2 leased, for its attack power, resistance to magic and acceptable speed.
In second position we have a decent reach, followed by a Fly card to take no damage. In fourth position appears the first sacrifice through the Venari Marksrat, which should succumb at the latest in round 3 due to earthquake damage.
Kron needs no introduction and finally Fungus Flinger, who should succumb at the latest in the third round.
The plan is based on pumping Kron and running into the victory embrace. There's no small talk. It has no romance. It's magic punch and end of story. Sorry for the excess of native expressions :)
I went into battle expecting victory...
ADVERSARY TEAM
The opponent chose the level 3 General Sloam summoner, which was peace of mind! Already expected a ranged team.
On the front line Arkemis the Bear at level 1, followed by Gargoya Lion at level 4. War Pegasus level 2 comes to eliminate shields, while Gargoya Devil level 3 aims to avoid damage **earthquake **. Adelade Brightwing level 1 comes with shield replacement support and...
Who is that guy in the last position?
New card? I never even saw it. I don't even know what it does.
I notice the Double Strike double strike icon, I see the attack power and ignore the rest.
Too weak to do damage.
It will be?
I went into battle expecting victory...
BATTLE
This match took place in the Gold 2 league, and can be watched through the link:
R O U N D
1
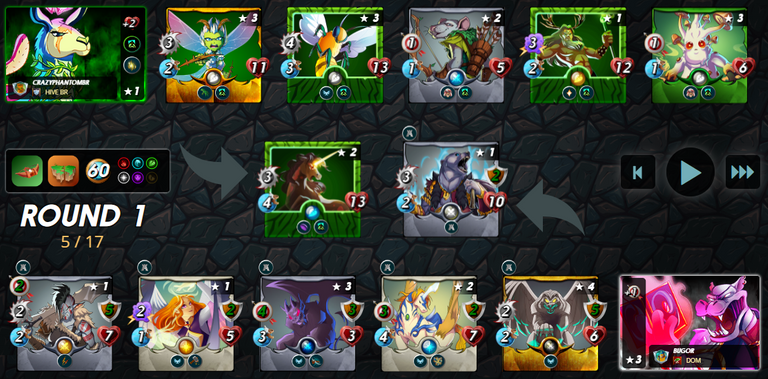
The image above shows the opening of Round 1, after the buffs and debuffs of summoners and monsters.
One thing I like to do at this point in the battle is tally up the sum of attack powers. The opponent has 16 points of attack power this round, while I have only 11. The difference is dangerous, and it lies in the fact that I prioritized cards with sacrifices to the detriment of "appropriate" cards, so to speak.
R O U N D
2
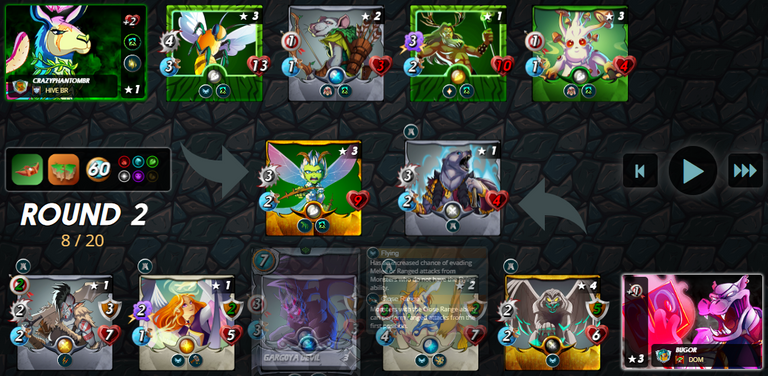
The second round opens with my first casualty.
The opponent's 16 point attack power holds, while in my case nowa is only 8 points of damage! The situation became critical, considering that I haven't eliminated any cards yet.
R O U N D
3
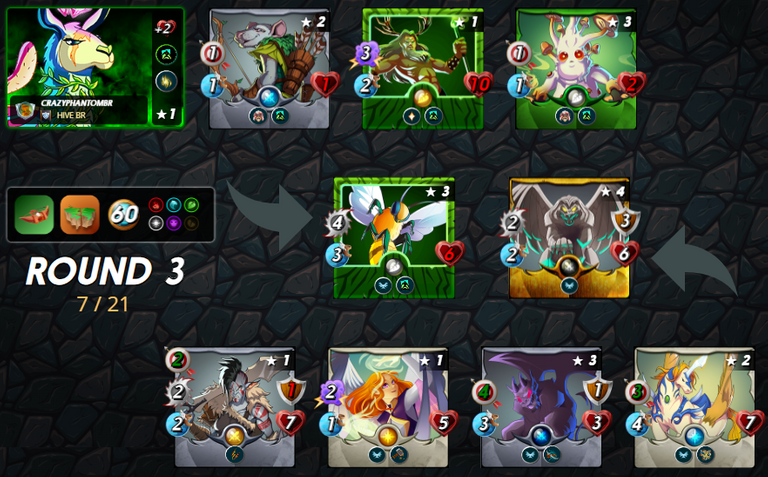
The third round opens with my second down. Now my earthquake resistant card is on the frontline and takes direct damage.
The opponent's attack power is at 15 points while in my case it's now only 9 damage points! But it is in this round that Martyr will be activated. And it comes with Last Stand!
R O U N D
4
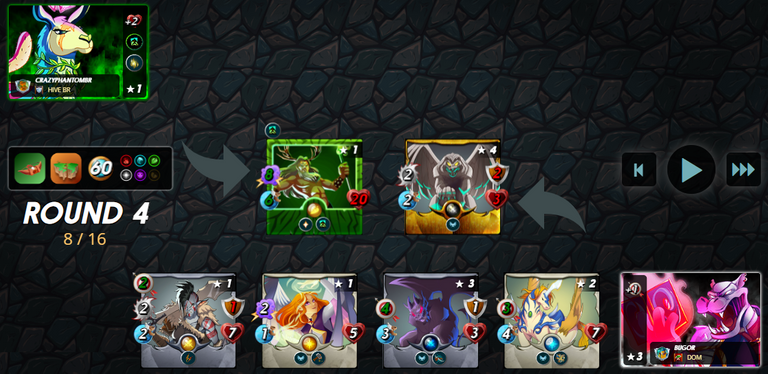
The fourth round opens with my last card on the field, fully tuned! Now the analysis I do is different: The opponent's 15 damage points will be reduced round by round, because with each attack I will eliminate. I need 5 rounds to eliminate 5 opponents.
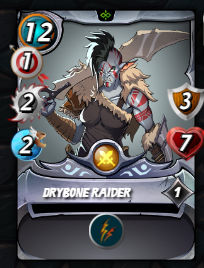
What worries me is the unknown card.
The legendary Drybone Raider at level 1 is an atypical card because it has two attack modes: ranged and melee. In addition, it has the double strike ability, which means that it can perform four attacks under ideal conditions.
The melee attack will only be activated when he occupies the first position. Until then, there are two ranged attacks per round.
Will I survive?
R O U N D
7
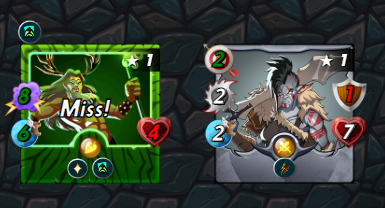
Of the four attacks, one was evaded. Thus, upon receiving earthquake damage, two life points remained on my Kron, which eliminated the nameless legendary.
The strategy of ignorance prevailed.
By little, luckily, but prevailed.
POSTER ANALYSIS
The opponent did not commit a strategic error. In fact, his team was very cohesive and had impressive attack power. This just goes to show that summoner level is no excuse for gameplay!
What allowed me to achieve victory was the fact that I evaded an attack.
Just this! Was the only difference between my victory or the opponent's a matter of "luck"?
Luck, no. Strategy.
As a rule, magic attack does not evade. When choosing to buff Kron we have to take this into account.
When opting for a ranged team, the chance of losing an attack at some point is great, and it actually happened.
So I conclude that my strategy has overcome the opponent, and I am very happy for the points I gained for the daily mission. Despite this victory, I could not reach the Gold 1 league this season!
In this way I was victorious in this application of the Sacrifice Strategy!
Follow me to follow my reviews.
What do you think of my composition?
If you liked it, leave a comment about the fight.
If you still don't play Splinterlands come join the community!!! If you want, use my recommendation link:
https://splinterlands.com?ref=crazyphantombr
Thank you all so much and see you next time!!!

CrazyPhantomBR supports the PGM project
The gamer community is looking for you!
The divider and logo / image above belong to the PGM project.

CrazyPhantomBR supports Brazilian curators
@Hive-BR and @Brazilians
@Hive-BR and @Brazilians
1% of funds raised from this post go to @Hive-br
1% of the funds raised from this post go to @Brazilians
The divider and logo / image belong to CrazyPhantomBR.
CrazyPhantomBR plays #Splinterlands!
If you still don't play Splinterlands come join the community!!! If you want, use my recommendation link:
https://splinterlands.com?ref=crazyphantombr
Thank you all so much and see you next time!!!

Somos todos #hive e #hivebr!
Esta postagem foi formatada para melhor visualização no frontend Ecency darkmode! É uma submissão ao Desafio Semanal Splinterlands!
A temporada acabou, o reset derrubou a gente, e agora precisamos subir no ranking novamente. A única coisa que não se abala é nossa participação nos desafios do team splinterlands! Faz um certo tempo que parei de fazer postagens analisando cards individualmente, sendo que passei a analizar equipes completas e suas estratégias! Isso foi antes das alterações dos desafios.
Agora com o fim do desafio de batalha semanal, verifiquei que explicitamente ainda é válido compartilhar batalhas dentro do desafio de mídia. Eu acredito que é bem produtivo, e serve ao propósito de colocar o game nos trending topics.
Então eu vou apresentar uma batalha que ocorreu agora no último dia da temporada que findou.
Enfrentar um adversário bem preparado, desta vez com o amigo @bugor, que foi meu adversário na batalha. Obrigado pela luta justa! Deixe um comentário e receba um token gorjeta e um upvote com toda minha força PGM!
ROTEIRO ESTRATÉGICO DO CRAZY
1. ANÁLISE DO HISTÓRICO DE BATALHAS
Em toda batalha sugiro como primeiro ponto a ser analisado, e trata-se da estratégia básica para amantes de Splinterlands, verificar o histórico de batalhas anteriores do adversário.
Quando recebi as informações do adversário bugor acabei não salvando a tela. Contudo me lembro muito bem de nada ter me chamado atenção, mas isso era meu cansaço mesmo. Então joguei no automático, que é um problema sério para jogadores #Splinterlands, quando lançam um time sem muita análise.
É necessário investir tempo analisando o histórico de partidas do adversário, e ter falhado neste quesito é um mau exemplo.
Conhecer as estratégias adversárias e poder se antecipar, assim como perceber outras pequenas coisas, podem te ajudar a vencer a partida!
2. ANÁLISE DO RULESET
O segundo ponto cuja análise sugiro que você faça é quanto ao RuleSet. Isso vai variar em cada partida e não tem uma receita fácil, você só vai aprender fazendo mesmo.
Esta regra de batalha "Close Range" até um tempo atrás indicava quase sempre o uso do General Sloam e uma equipe clássica Ranged. Mas os tempos mudaram, os bots vieram, e os humanos precisaram variar muito mais suas escalações para se manter competitivos.
Já a regra "Earthquake" pode ser um problema para partidas longas. Quando você pensa em alto dano e eliminação rápida, pode ser deixada de lado. Eu não faço isso, então procuro sempre proteger um card com Fly para que seja um eventual azarão intocado rumo a vitória.
Já a quantidade de Mana se mostrou abundante, permitindo que eu escalasse uma equipe coesa e com chances de vitória. É bom quando não somos restringidos pela quantidade de manda, significa monstros pesados em batalha!
3. DISPONIBILIDADE DE INVOCADORES
Meus principais invocadores são:
Kelya Frendul water level 5, meu próprio.
Meu principal investimento no jogo até o momento.Thaddius Brood death level 5, alugado.
Meu preferido, pois este elemento é o que mais me dediquei desde o lançamento.Lobb Lowland level 4, meu próprio.
Uma surpresa muito boa ter conseguido colocar este invocador em level 4 em tão pouco tempo! É meu melhor invocador Earth até o momento e agora começa a ser melhor aproveitado na liga Ouro, que é onde pretendo jogar!Octavia ShadowmeldGF death, level 4, meu próprio.
Uma surpresa muito boa ter conseguido colocar este invocador em level 4 em tão pouco tempo! É meu melhor invocador Earth até o momento e agora começa a ser melhor aproveitado na liga Ouro, que é onde pretendo jogar!Eternan Brune fire level 4, meu próprio.
Praticamente sem uso, pois tenho poucos cards evoluídos no splinter fire.Obsidian earth level 3, locado.
Tem sido suficiente para sustentar as batalhas do elemento Earth, tendo em vista que não é meu objetivo adquirir cards deste elemento no momento.Possibilus the Wise water level 3, locado.
Primeira temporada que eu aumento o level desse invocador. A intenção é avaliar se o benefício em desbloquear habilidades dos cards supera o custo.Pembrook Nymph water GF level 3, meu próprio.
Muito Obrigado Splinterlands! Eu adorei essa invocadora!Yodin Zaku fire level 1, locado.
Todo reinício de temporada tenho tentando pegar este invocador mediante um preço justo. Porém, depois dos primeiros dias os locatários acabam cancelando. Esta foi a primeira vez que consegui chegar o fim da temporada sem cancelarem!
Meus demais invocadores disponíveis estão em level 2, sendo inadequados para o uso na Liga Gold. Como eu jogo apenas no modo Modern, lembre-se que alguns invocadores e cards não estão disponíveis.
A análise do ruleset é ligada a disponibilidade dos invocadores. O que o adversário vai utilizar, e o que eu tenho a disposição.
Minha decisão já estava tomada, e hoje é dia de Magic baby!
4. SUAS ESTRATÉGIAS
O quarto ponto ponto que eu recomendo analisar é explorar as suas estratégias de jogo. Você tem alguma?
Neste conjunto de regras, existe uma grande possibilidade de virem arqueiros. Isso significa que uma resistência ao dano ranged seria apropriada. Escudos também podem ajudar. Alguns suportes, e teríamos a equipe perfeita para vitória.
Mas hoje não. Vou aproveitar que tenho diversas locações ativas, e vou fazer o "feijão com arroz". Essa expressão aqui no Brasil significa "fazer o básico".
Neste momento, o básico é Llama Kron.
COMPONDO O TIME
Estratégia Sacrifício
Fonte: A arte da Guerra, por CrazyPhantomBR
A montagem deste time teve como diretriz o sacrifício literal de um card visando o upgrade dos status de outro card. Na verdade, teremos sacrifício duplo, e um potencial de buff triplo. Potencial não! É um buff triplo garantido. Basta olhar para a composição da equipe para perceber.
A escolha do card apropriado para ocupar a primeira posição não foi difícil, sendo eleito o Unicorn Mustang level 2 locado, pelo seu poder de ataque, resistência à magia e velocidade aceitável.
Na segunda posição temos um reach decente, seguido de um card Fly para não sofrer dano. Na quarta posição aparece o primeiro sacrifício através do Venari Marksrat, que deve sucumbir no máximo no round 3 devido aos danos earthquake.
Kron dispensa apresentações e por último Fungus Flinger, que deve sucumbir no máximo no terceiro round.
O plano é baseado em bombar o Kron e correr pro abraço da vitória. Não tem conversinha fiada. Não tem romance. É porrada mágica e fim de papo. Desculpem pelo excesso de expressões nativas :)
Fui para a batalha esperando a vitória...
TIME ADVERSÁRIO
O adversário escolheu o invocador General Sloam level 3, o que foi uma tranquilidade! Já esperava por uma equipe ranged.
Na linha de frente Arkemis the Bear em level 1, seguido do Gargoya Lion em level 4. War Pegasus level 2 vem para eliminar escudos, enquanto Gargoya Devil level 3 visa evitar os danos earthquake. Adelade Brightwing level 1 vem como suporte para reposição de escudos e...
Quem é esse cara na última posição?
Card novo? Nunca nem vi. Não sei nem o que faz.
Percebo o ícone de ataque duplo Double Strike, vejo o poder de ataque e ignoro o resto.
Muito fraco para fazer estrago.
Será?
Fui para batalha esperando a vitória...
BATALHA
Esta partida ocorreu na liga Gold 2, e pode ser assistida através do link:
R O U N D
1
A imagem acima mostra a abertura do Round 1, após os buffs e debuffs dos invocadores e monstros.
Um coisa que gosto de fazer nesta altura da batalha é contabilizar a soma dos poderes de ataque. O adversário tem 16 pontos de poder de ataque neste round, enquanto eu tenho apenas 11. A diferença é perigosa, e está no fato de eu ter priorizado os cards com sacrifício em detrimento de cards "apropriados" assim posso dizer.
R O U N D
2
O segundo round abre com minha primeira baixa.
O poder de ataque de 16 pontos do adversário se mantém, enquanto no meu caso agora são apenas 8 pontos de dano! A situação ficou crítica, considerando que não eliminei nenhum card ainda.
R O U N D
3
O terceiro round abre com minha segunda baixa. Agora meu card resistente ao earthquake está na linha de frente e passa a receber dano direto.
O poder de ataque do adversário está em 15 pontos enquanto no meu caso agora são apenas 9 pontos de dano! Mas é neste round que será ativado o Martyr. E ele vem acompanhado de Last Stand!
R O U N D
4
O quarto round abre com meu último card em campo, completamente tunado! Agora a análise que faço é outra: Os 15 pontos de dano do adversário serão reduzidos round a round, pois a cada ataque farei uma eliminação. Preciso de 5 rounds para eliminar 5 adversários.
O que me preocupa é o card desconhecido.
O lendário Drybone Raider em level 1 é um card atípico pois possui duas modalidades de ataque: ranged e melee. Além disso, possui a habilidade double strike, o que faz com que ele possa realizar quatro ataques, sob condições ideais.
O ataque melee só será ativado quando ele ocupar a primeira posição. Até lá, são dois ataques ranged por round.
Será que sobreviverei?
R O U N D
7
Dos quatro ataques, um foi evadido. Assim, ao receber o dano earthquake, restaram dois pontos de vida em meu Kron, que eliminou o lendário sem nome.
A estratégia da ignorância prevaleceu.
Por pouco, por sorte, mas prevaleceu.
ANÁLISE POSTERIOR
O adversário não cometeu nem um erro estratégico. Na verdade, sua equipe foi muito coesa e com um poder de ataque impressionante. Isso só mostra que o level do invocador não é desculpa para jogabilidade!
O que me permitiu alcançar a vitória foi o fato de ter evadido um ataque.
Só isto! A única diferença entre a minha vitória ou do adversário foi uma questão de "sorte" ?
Sorte, não. Estratégia.
Via de regra, ataque mágico não evade. Ao escolher buffar o Kron temos que levar isso em consideração.
Ao optar por uma equipe ranged, a chance perder algum ataque em algum momento é grande, e de fato ocorreu.
Então concluo que minha estratégia superou o adversário, e fico muito contente pelos pontos que ganhei para a missão diária. Apesar desta vitória, não consegui chegar na liga Gold 1 nesta temporada!
Desta forma fui vitorioso nesta aplicação da Estratégia Sacrifício!
Me siga para acompanhar minhas análises.
O que achou da minha composição?
Se curtiu, deixa um comentário aí sobre a luta.
Se você ainda não joga Splinterlands venha fazer parte da comunidade!!! Se quiser, utilize meu link de recomendação:
https://splinterlands.com?ref=crazyphantombr
Muito obrigado a todos e até a próxima!!!
CrazyPhantomBR apoia o projeto PGM
A comunidade gammer procura por você!
O divisor e logotipo / imagem acima pertencem ao projeto PGM.
CrazyPhantomBR apoia as curadorias brasileiras
@Hive-BR e @Brazilians
@Hive-BR e @Brazilians
1% dos fundos obtidos nesta postagem estão destinados a @Hive-br
1% dos fundos obtidos nesta postagem estão destinados a @Brazilians
O divisor e logotipo / imagem pertencem à CrazyPhantomBR.
CrazyPhantomBR joga #Splinterlands!
Se você ainda não joga Splinterlands venha fazer parte da comunidade!!! Se quiser, utilize meu link de recomendação:
https://splinterlands.com?ref=crazyphantombr
Muito obrigado a todos e até a próxima!!!
!1UP Good work!
!PGM !PIZZA
You have received a 1UP from @underlock!
@monster-curator, @oneup-curator, @leo-curator, @bee-curator, @thg-curator, @vyb-curator, @pob-curator
And they will bring !PIZZA 🍕.
Learn more about our delegation service to earn daily rewards. Join the Cartel on Discord.
$PIZZA slices delivered:
@curation-cartel(3/20) tipped @crazyphantombr
underlock tipped crazyphantombr
Your post was manually curated by @Shiftrox.
Delegate your HP to the hive-br.voter account and earn Hive daily!
🔹 Follow our Curation Trail and don't miss voting! 🔹
Thanks for sharing! - @alokkumar121

Obrigado por ajudar a crescer a nossa comunidade Portuguesa no HIVE
!DHEDGE
This post has been selected for upvote from our token accounts by @crazyphantombr! Based on your tags you received upvotes from the following account(s):
- @dhedge.bonus
- @dhedge.leo
- @dhedge.bee
- @dhedge.pob
- @dhedge.oneup
@crazyphantombr has 6 vote calls left today.
Hold 10 or more DHEDGE to unlock daily dividends and gain access to upvote rounds on your posts from @dhedge. Hold 100 or more DHEDGE to unlock thread votes, and the ability to call our token curation accounts for yourself and other users! You can buy DHEDGE on Tribaldex or earn some daily by joining one of our many delegation pools at app.dhedge.cc.