[ENG-SPA] Placing a switch / Colocando un interruptor

Hello to all dear #Hive 🤗 friends, especially my dear friends in the @HomeSolutions 🏠 community. I hope you all have a wonderful and blessed day. Of course. Some time ago my father placed a couple of light bulbs in my backyard 💡. These had sensor that when it got dark they would turn on and when it got light they would turn off. Said photovoltaic sensor was located above the house, but since a little over 8 months ago said sensor started to fail until it was damaged ❌. So both bulbs were on day and night.
This brought us some problems like the bulbs didn't last as long as they should hehe 😭, then to end the problem I decided to place a switch to be able to turn them off during the day hehe... We also saved a bit on the electricity bill haha 😬. So, without further ado, let's get started.
Hola a todos queridos amigos de #Hive 🤗, en especial a mis queridos amigos de la comunidad de @Home Solutions 🏠. Espero tengan todos un maravilloso y bendito día. Claro que sí. Hace algún tiempo mi padre colocó un par de bombillos en el patio de mi casa 💡. Estos contaban con sensor que cuando se hacía de noche se encendían y cuando se hacía de día se apagaban. Dicho sensor fotovoltaico estaba ubicado arriba de la casa, pero desde hace poco más de 8 meses dicho sensor comenzó a fallar hasta que se dañó ❌. Así que ambos bombillos quedaban encendidos día y noche.
Esto nos trajo algunos problemas como que los bombillos no duraban lo que deberías durar jeje 😭, entonces para acabar con el problema decidí colocar un interruptor para poder apagarlos durante el día jeje… También nos ahorramos un poco la factura de la luz jaja 😬. Así que, sin más, comencemos.
For this installation we need
- A Screwdriver 🪛
- Pliers ✂️
- Cable tape, here in my country we call it “Teipe” haha I don't know if in another country it's called that 🔘
- Cable, I used this one I had saved from #10 ♾️
- And the switch, the simplest and super cheapest one I found. 🛎️
Para esta instalación necesitamos:
- Un Destornillador 🪛
- Unos Alicates ✂️
- Cinta para cable, aquí en mi país le decimos “Teipe” jaja no sé si en otro país se le dice así 🔘
- Cable, utilicé de este que tenía guardado de n°10 ♾️
- Y el interruptor, el más sencillo y súper económico que encontré. 🛎️


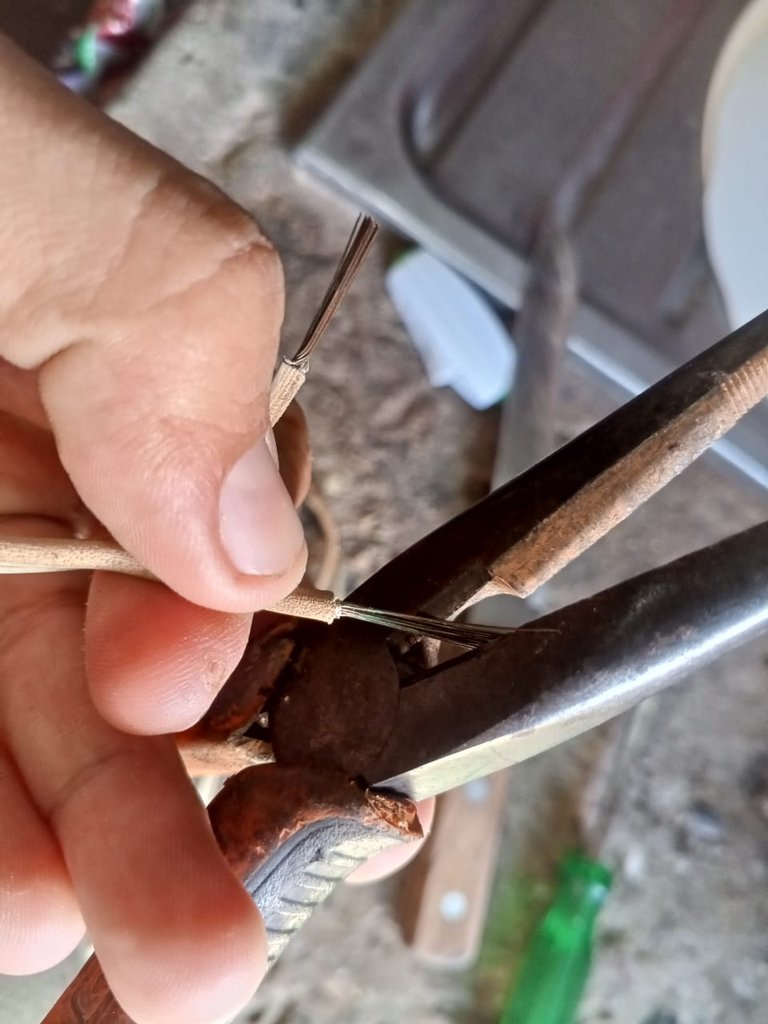
To start with the installation of this switch I took the measurements roughly from where I was going to splice it to where the switch was going to go 📏. It would be approximately 1 meter. Then I cut the cable and pulled the copper hairs or wires out from inside ✂️. This wire I used is a double wire. So from the 4 ends it has I exposed the wire to start splicing it 😁.
Para comenzar con la instalación de este interruptor tomé las medidas más o menos de donde lo iba a empalmar hasta donde iba a ir el interruptor 📏. Serían aproximadamente 1 metro. Luego corté el cable y sacar los pelos o alambres de cobre de su interior ✂️. Este cable que use es doble. Así que de las 4 puntas que tiene expuse el alambre para comenzar a empalmarlo 😁.

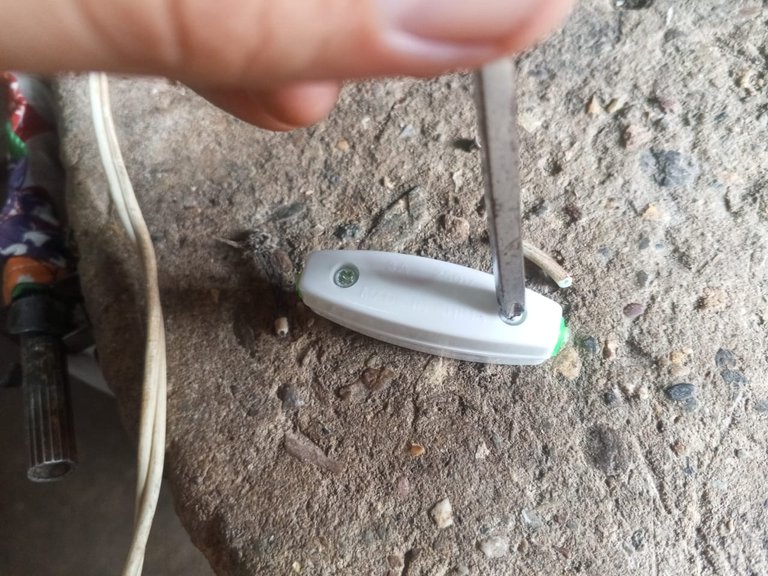
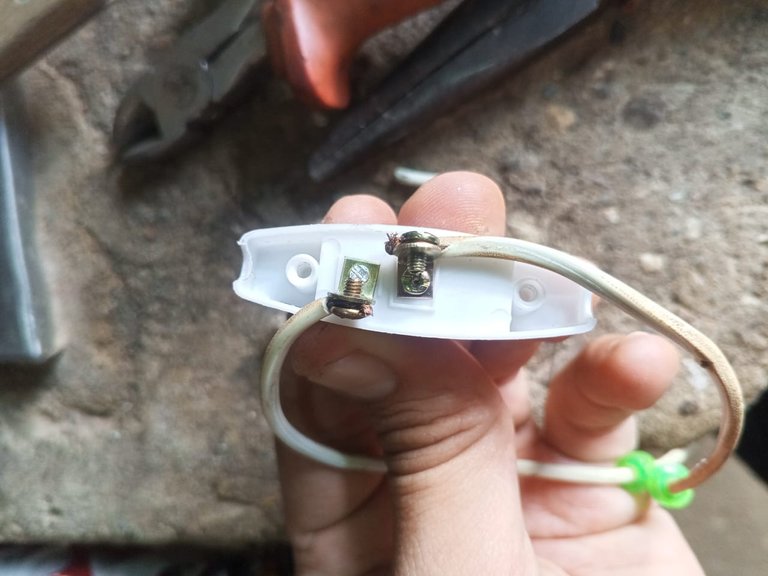
Next, I uncovered the switch and attached the 2 lower ends to the switch terminals 🪛. Then with the same pliers I cut one of the power wires going to the socket and there I spliced in the wires ✂️. The one going into the switch on one side of the wire going to the socket and the one going out of the switch on the other side of the wire we cut. What this does is that when the switch is activated (as the name implies) 🛎️. It interrupts the flow of electric current, which causes the bulb to turn off.
Seguidamente, destapé el interruptor y fijé los 2 extremos inferiores a los bornes del interruptor 🪛. Luego con los mismos alicates corté uno de los cables de electricidad que van al sócate y ahí empalmé en los cables ✂️. El que entra al interruptor en un lado del cable que va al sócate y el de la salida del interruptor al otro lado del cable que cortamos. Esto lo que hace es que al activar el interruptor (Como su nombre lo indica) 🛎️. Interrumpe el flujo de corriente eléctrica, lo que hace que el bombillo se apague.
Once everything was ready, I attached them well with Teipe and fixed the whole cable and switch to a surface where it would remain to be used 😝.
Una vez todo listo, los uní bien con Teipe y fijé todo el cable y el interruptor a una superficie donde permanecería para ser utilizado 😝.


And walá, our switch is ready to use 😯. This has been an excellent job. Although as an observation, I will need to put a protective box or something to the switch 🥲. Since the sun here in my city is very intense and tends to “Toast” the plastic of this type of devices 🥵.
Y walá, nuestro interruptor está listo para utilizarse 😯. Esto ha sido un excelente trabajo. Aunque como observación, necesitaré colocarle una cajita protectora o algo al interruptor 🥲. Ya que el sol aquí en mi ciudad es muy intenso y tiende a “Tostar” el platico de este tipo de dispositivos 🥵.


What ideas can you guys come up with to put on my switch and protect it from the sun 🤔 I read them in the comments, hehe. Without further ado I say goodbye, have a happy weekend to all 🤗, blessings and until next time, bye 😜.
¿Qué ideas se les ocurre para colocarle a mi interruptor y protegerlo del sol? 🤔 Los leo en los comentarios, jeje. Sin más me despido, que tengan un feliz fin de semana a todos 🤗, bendiciones y hasta una próxima oportunidad, adiós 😜.
Muchas gracias a todos, chicos y chicas por haber llegado hasta aquí 🤗. Espero que les haya gustado este post 😁. Les deseo a todos un excelente día y un fuerte abrazo 🫂, hasta la próxima, Bye 🙋🏻♂️.
Las fotos que aquí se muestran son de mi autoría, tomadas con mi Tecno Spark 20C. Ediciones hechas con Canva. Texto de mi autoría, traducido con DeepL, Publicación hecha con Pc Desktop.

Congratulations @chettonito! You have completed the following achievement on the Hive blockchain And have been rewarded with New badge(s)
Your next target is to reach 40 posts.
You can view your badges on your board and compare yourself to others in the Ranking
If you no longer want to receive notifications, reply to this comment with the word
STOP