¡Splinterlands Social Media Challenge! - Magic Reflect is a good option against Scattershot
¡Saludos comunidad! En el reto de esta semana quiero hablarles sobre una estrategia que aplico con el Splinter de Vida en partidas donde las condiciones de batalla otorgan la habilidad “Scattershot”, y tienen un límite de maná medio o alto. La cual consiste en tomar ventaja en la batalla combinando las habilidades: “Magic Reflect”, “Amplify”, “Void Armor” y “Repair”. Las cartas que permiten realizar esta estrategia son: “Grandmaster Rathe” y “Adelade Brightwing”, ambas de tipo legendario, y pertenecen a la edición Chaos Legión. Y Pelacor Conjurer, es de tipo común y pertenece a la edición Reward / Chaos Legión.
Greetings community! In this week's challenge I want to talk about a strategy that I apply with the Life Splinter in games where the battle conditions grant the ability "Scattershot", and have a medium or high mana limit. It consists of taking advantage in the battle by combining the abilities: "Magic Reflect", "Amplify", "Void Armor" and "Repair". The cards that allow this strategy are: "Grandmaster Rathe" and "Adelade Brightwing", both of legendary type, and belong to the Chaos Legion edition. And Pelacor Conjurer, is of common type and belongs to the Reward / Chaos Legion edition.

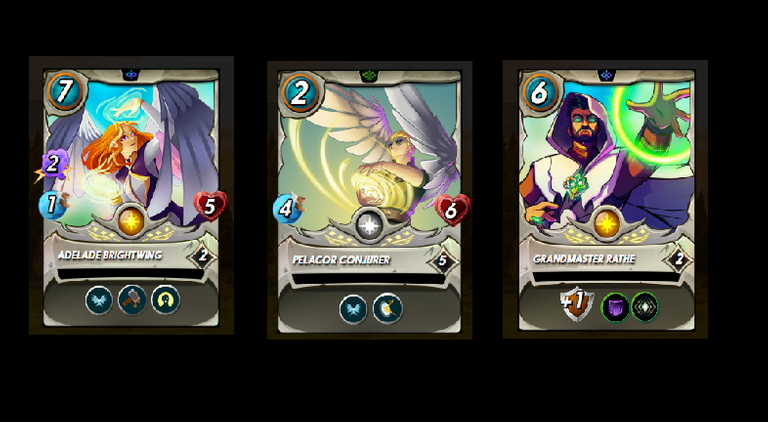
La combinación de estas tres cartas crean una estrategia interesante y efectiva. Grandmaster Rathe otorga 1 punto adicional de armadura, y las habilidades “Void Armor” y “Amplify”. Por otra parte, Adelade Brightwing da soporte mediante sus habilidades “Repair” y “Resurrect”. Pelacor Conjurer cuenta con la habilidad “Magic Reflect” que combinada con “Amplify” permite aumentar en 1 punto el daño mágico retornado. Además, gracias a la habilidad “Void Armor”, el daño mágico enemigo primero golpeará en la armadura, lo que representa más resistencia para nuestra composición. De esta forma, construimos una estrategia que nos permite tanto tomar ventana como defendernos de la habilidad “Scattershot” en una batalla. Otro aspecto a resaltar, es que los monstruos que suelo usar para complementar la estrategia son: “Uriel The Purifier”, “Celestial Harpy” y “War Pegasus”. Sin embargo, todo depende del resto de las condiciones en la batalla.
The combination of these three cards creates an interesting and effective strategy. Grandmaster Rathe grants 1 additional point of armor, and the abilities "Void Armor" and "Amplify". On the other hand, Adelade Brightwing gives support through its "Repair" and "Resurrect" abilities. Pelacor Conjurer has the "Magic Reflect" skill, which combined with "Amplify" allows to increase the magic damage returned by 1 point. In addition, thanks to the "Void Armor" ability, the enemy magic damage will first hit the armor, which means more resistance for our composition. In this way, we build a strategy that allows us to both take a window and defend against the "Scattershot" ability in a battle. Another aspect to highlight is that the monsters that I usually use to complement the strategy are: "Uriel The Purifier", "Celestial Harpy" and "War Pegasus". However, everything depends on the rest of the conditions in the battle.
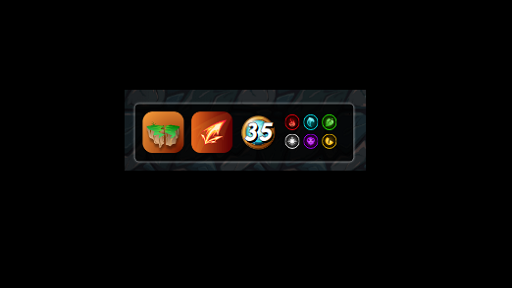
¡Pasemos a la batalla! Como les mencioné anteriormente, mi estrategia consiste en usar dichas cartas para enfrentar la habilidad “Scattershot” por lo que elegí al Splinter de Vida. En la siguiente imagen pueden observar las condiciones de la partida.
Let's go to battle! As I mentioned before, my strategy is to use these cards to face the "Scattershot" ability, so I chose the Life Splinter. In the following image you can see the conditions of the game.
Si quieres ver la batalla completa, acá te dejo el enlace: / If you want to see the complete battle, here you have the link:
https://splinterlands.com?p=battle&id=sl_d2a999b5280fe42e7bdb68a137c8e70b&ref=antoniojg
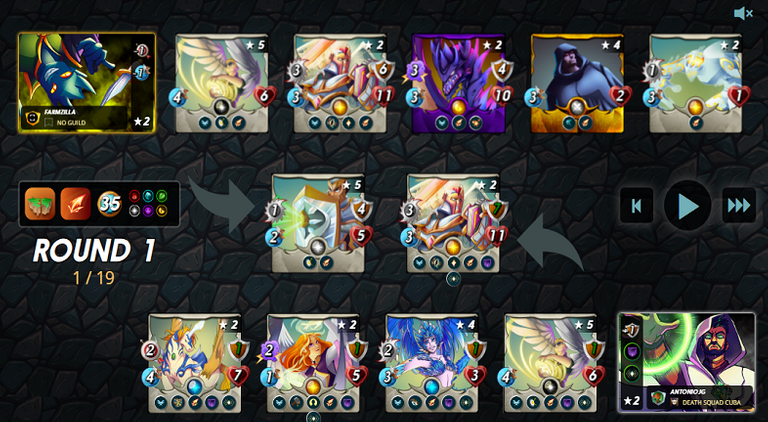
Usé a Grandmaster Rathe como invocador con el propósito de tomar ventaja del atributo y las habilidades que otorga. En la primera posición usé a Uriel The Purifier, ya que cuenta con buenos atributos y habilidades para actuar como tanque. En la segunda posición usé a Pelacor Conjurer con el propósito de retornar el daño mágico del enemigo mediante su habilidad “Magic Reflect”. En la tercera posición usé a Celestial Harpy con la finalidad de tomar ventaja mediante su habilidad “Opportunity”. En la cuarta posición usé a Adelade Brightwing con el propósito de brindar soporte al equipo mediante sus habilidades “Resurrect” y “Repair”, y también contribuir con su daño mágico. Por último usé a War Pegasus con la finalidad de tomar ventaja de su habilidad “Shatter”, y también contribuir con su daño. Como pueden observar la ofensiva de mi estrategia está compuesta de un daño mixto, y también está alineada a las condiciones de batalla presentes para aprovecharlas al máximo y poder tomar ventaja en la batalla.
I used Grandmaster Rathe as a summoner with the purpose of taking advantage of the attribute and skills it grants. In the first position I used Uriel The Purifier, since he has good attributes and skills to act as a tank. In the second position I used Pelacor Conjurer with the purpose of returning the enemy's magic damage through his "Magic Reflect" ability. In the third position I used Celestial Harpy in order to take advantage with his "Opportunity" skill. In the fourth position I used Adelade Brightwing in order to support the team with her "Resurrect" and "Repair" abilities, and also contribute with her magic damage. Finally I used War Pegasus to take advantage of his "Shatter" ability, and also contribute with his damage. As you can see the offensive of my strategy is composed of mixed damage, and is also aligned to the battle conditions present to make the most of them and take advantage in the battle.
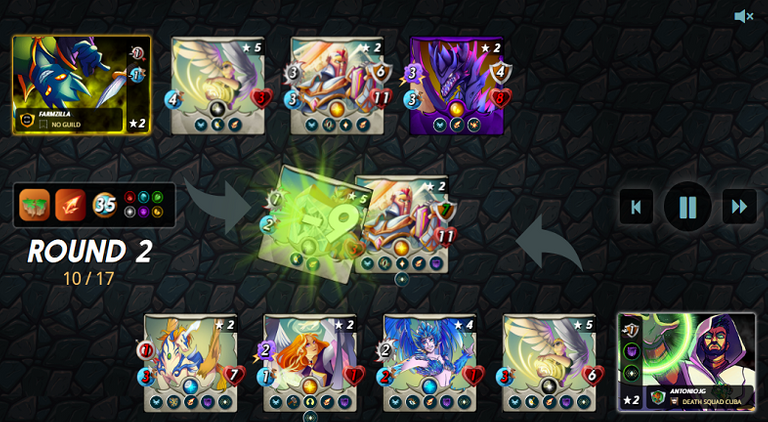
En el turno 10 de la ronda 2, Uriel The Purifier abatió a Blinding Reflector. El enemigo ya contaba con 3 monstruos en su equipo. Sin embargo, aún el rumbo de la batalla no estaba definido, ya que 2 monstruos de mi equipo estaban próximos a caer.
On turn 10 of round 2, Uriel The Purifier defeated Blinding Reflector. The enemy already had 3 monsters in his team. However, the course of the battle was still undefined, since 2 monsters of my team were about to fall.

En el turno 15 de la ronda 2, Adelade Brightwing abatió al Pelacor Conjurer enemigo pero ella también cayó a causa del daño reflejado. En esta altura de la batalla el enemigo contaba con 2 monstruos en su equipo, los cuales contaban con los atributos y habilidades para hacer la diferencia. Mientras mi equipo contaba con 4 monstruos, y 1 estaba próximo a caer. Sin embargo, aún quedaban turnos por luchar.
On turn 15 of round 2, Adelade Brightwing took down the enemy Pelacor Conjurer but she also fell due to reflected damage. At this stage of the battle the enemy had 2 monsters in their team, which had the attributes and skills to make the difference. While my team had 4 monsters, and 1 was about to fall. However, there were still turns to fight.
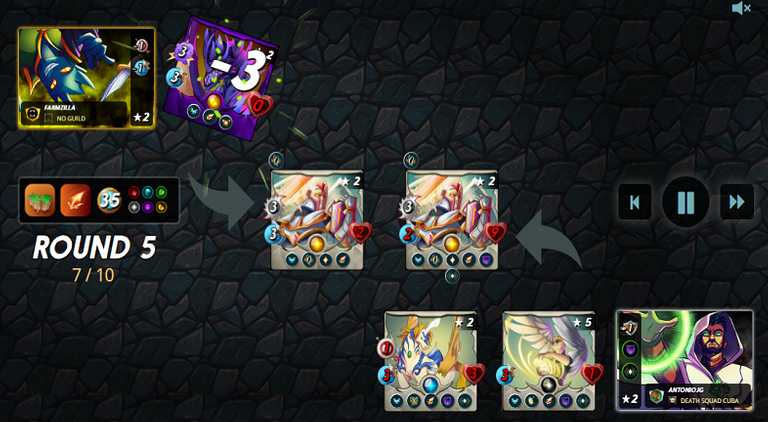
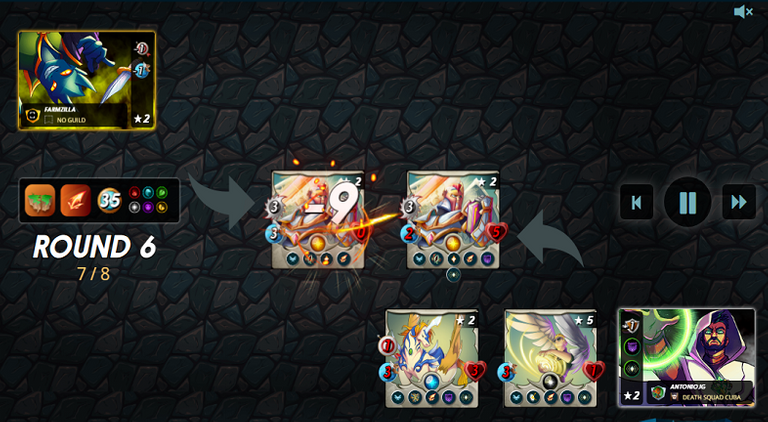
Después de 3 rondas más luchando. En el turno 7 de la ronda 5, Pelacor Conjurer abatió a Chaos Dragon mediante el daño reflejado. Justo a tiempo, ya que Chaos Dragon casi eliminaba a la segunda línea de mi equipo. Finalmente, tras una ronda más. En el turno 7 de la ronda 6, mi Uriel The Purifier abatió al Uriel The Purifier enemigo, terminando la batalla con una victoria. ¿Qué hizo la diferencia entre las estrategias? Pues, no todo el equipo enemigo contaba con la habilidad “Flying”. Además de eso, no incluyó en su estrategia habilidades como: “Void Armor”, “Repair”, “Resurrect”, “Amplify” y “Shatter”. Lo que resultó en una gran desventaja para él. En las siguientes imágenes pueden observar todo esto.
After 3 more rounds of fighting. On turn 7 of round 5, Pelacor Conjurer took down Chaos Dragon through reflected damage. Just in time, as Chaos Dragon almost eliminated the second line of my team. Finally, after one more round. On turn 7 of round 6, my Uriel The Purifier took down the enemy Uriel The Purifier, ending the battle with a victory. What made the difference between the strategies? Well, not all the enemy team had the "Flying" skill. Besides that, they did not include in their strategy skills such as: "Void Armor", "Repair", "Resurrect", "Amplify" and "Shatter". This resulted in a great disadvantage for him. In the following images you can see all this.
Este ha sido mi aporte al desafío semanal, ¡Espero haya sido de su agrado! ¡Saludos y hasta la próxima semana!
This has been my contribution to the weekly challenge, ¡I hope you enjoyed it! ¡Greetings and see you next week!
Te invito a seguirme en: / I invite you to follow me on: Twitter
Las traducciones fueron realizadas con el traductor: DeepL / Translations were done with the translator: DeepL
Todas las imágenes fueron tomadas de: / and all images were taken from: Splinterlands
¡Gracias por leerme! / Thanks for reading me!

https://twitter.com/AntonioJGam3r/status/1674094244749877250
Thanks for sharing! - @lenonmc21

Excelente post, muy buena descripción de la estrategia y brutal la batalla, el formato genial, lo único es que puedes mejorar las imágenes y su calidad, recortarlas mucho mejor y embellecerlas para una mejor presentación, de resto buen trabajo.
Muchas gracias por la retroalimentación, lo tendré en cuenta para seguir mejorando 😁👍