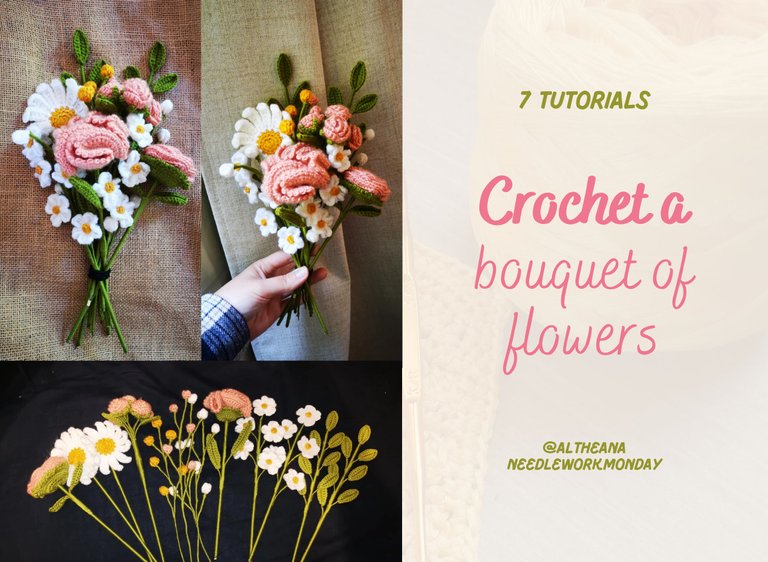
[Several tutorials] A crocheted bouquet of flowers // Un bouquet de fleurs au crochet [EN/FR]
Hello friends and crochet lovers! I hope you're all doing well and having a wonderful day 😁
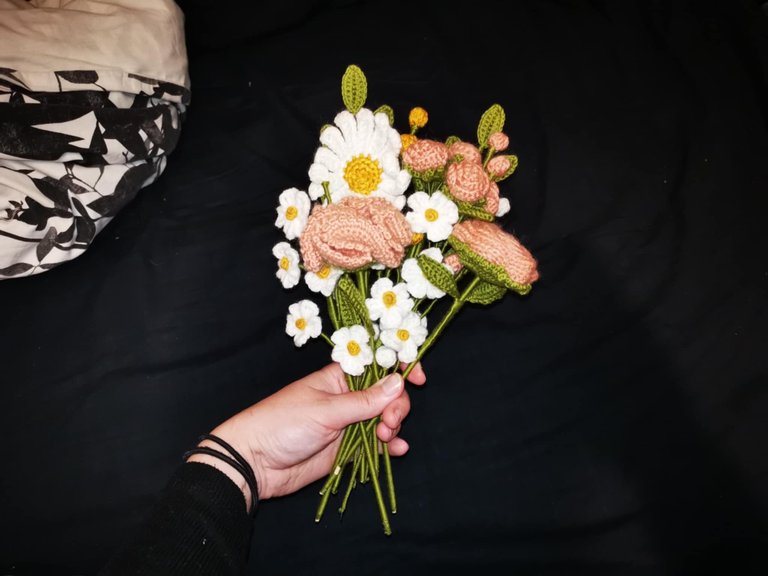
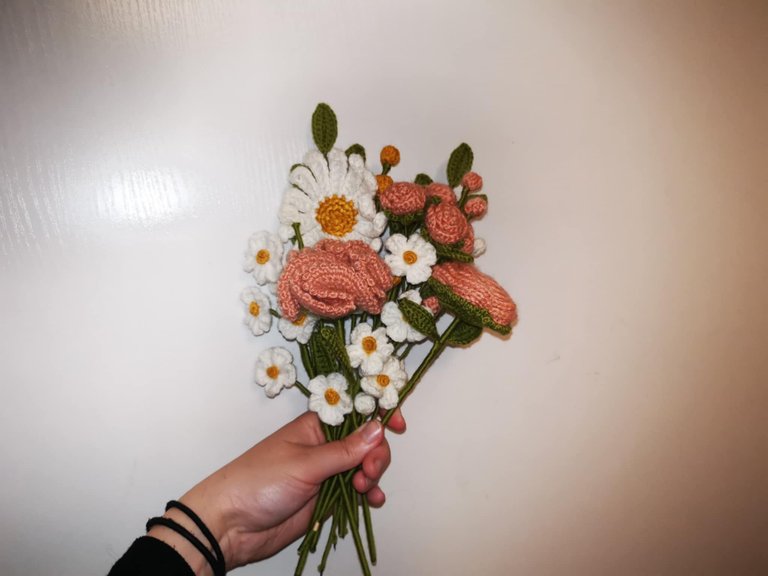
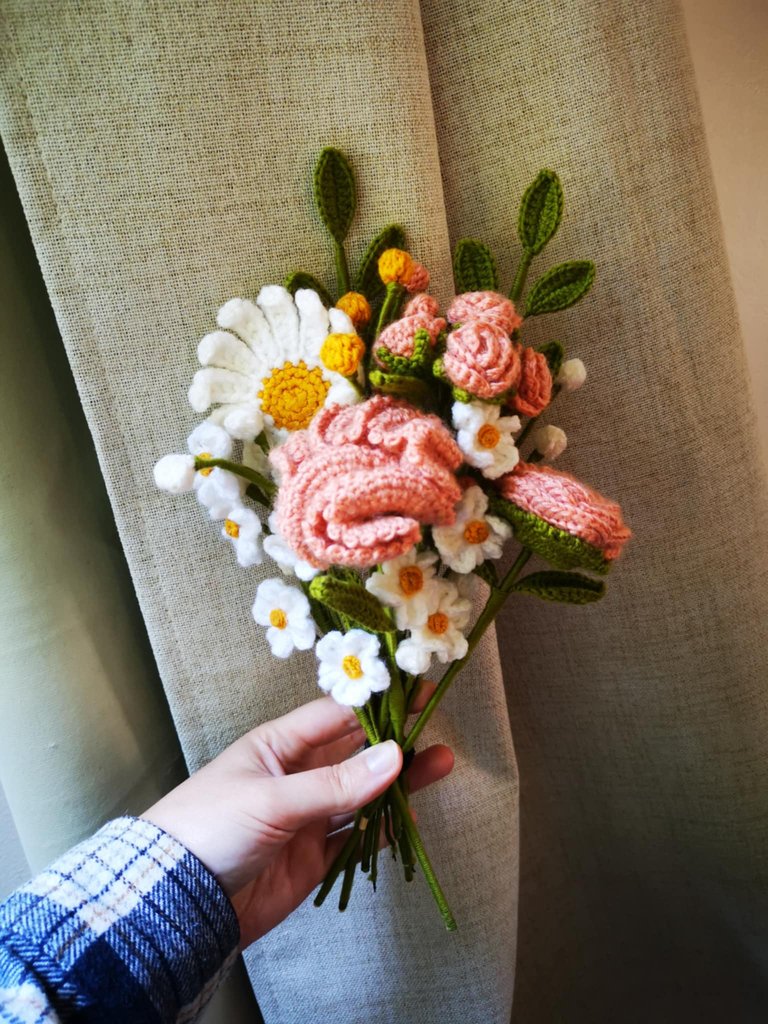
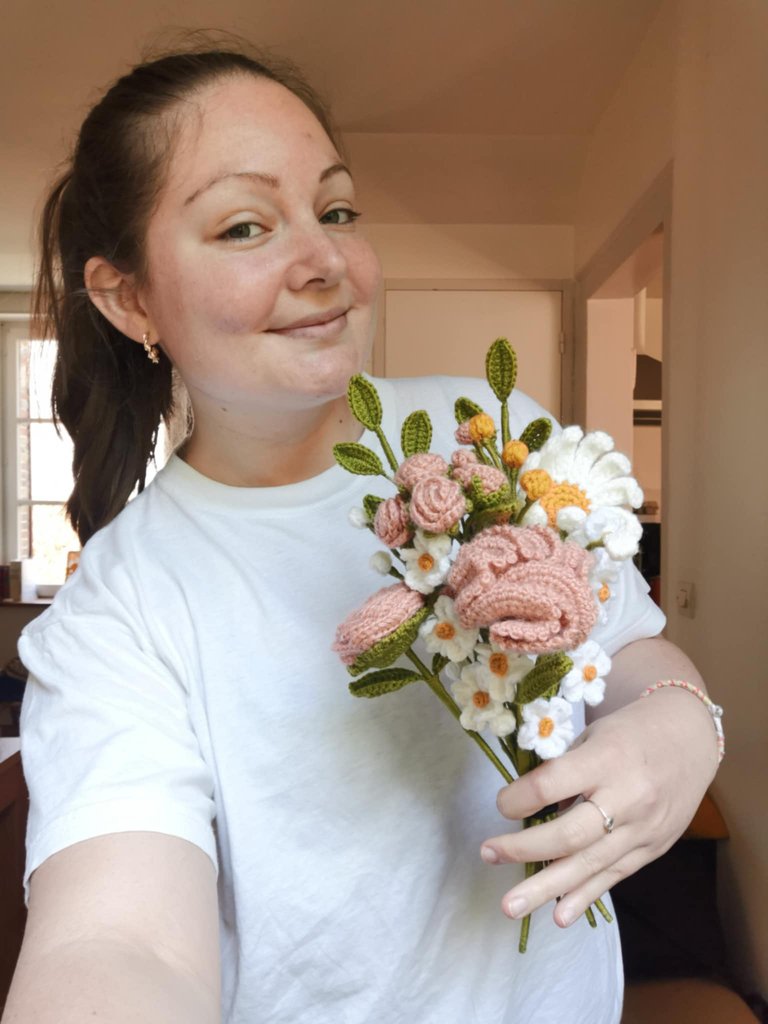
For my part, everything's going pretty well, because I finally finished the crocheted flower bouquet my mom asked me to make so she could give it to her sister. 💐
This isn't the first crocheted flower bouquet I've made, but it's the most accomplished one, in my opinion! I took the time to choose the colors and the composition, to create a harmonious bouquet that I like!
I'm pretty proud of myself because, with all the practice, I've seen a clear improvement in my crochet creations! 😊
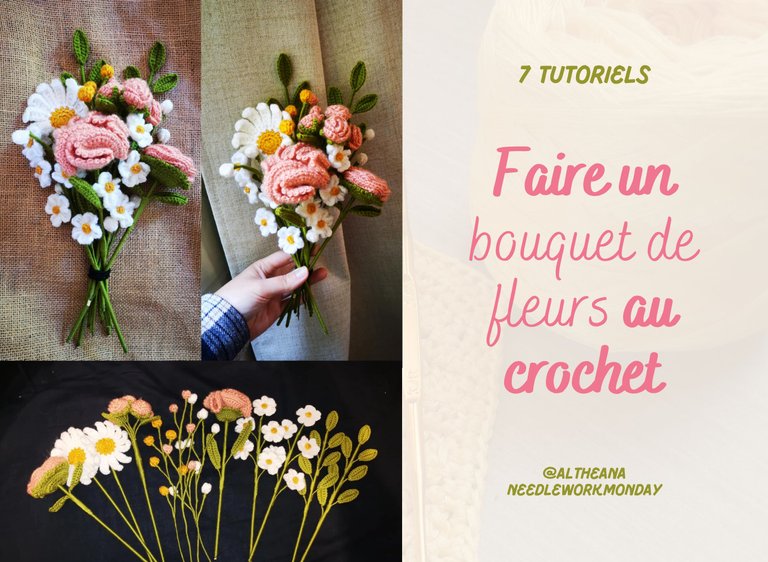
Anyway, today I just wanted to tell you about the bouquet and its composition! And I'm also going to share the patterns for each of the flowers in this bouquet. That way, if you ever want to make one of your own, you'll have all the information you need.
First, here's the final result (now I just need to find a pretty packaging):

Personally, I'm pretty happy with it! I love the color combination. 😁
Bouquet Composition
For this bouquet, I made 👇
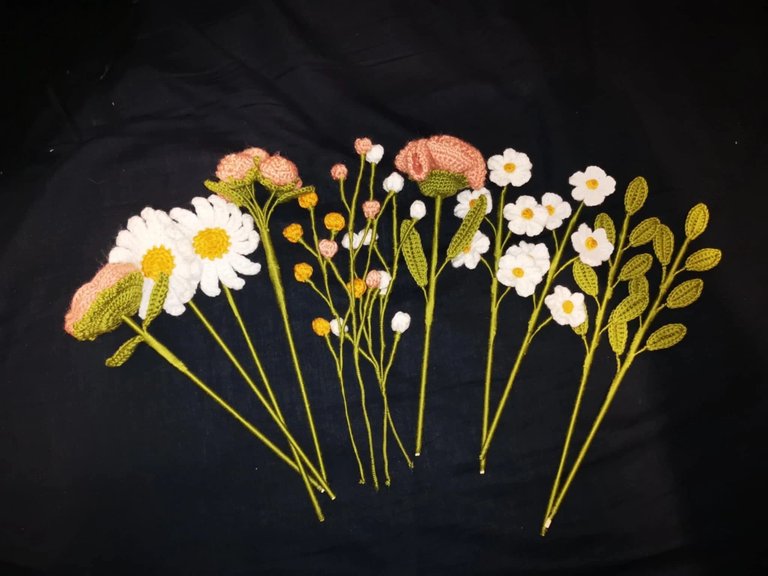
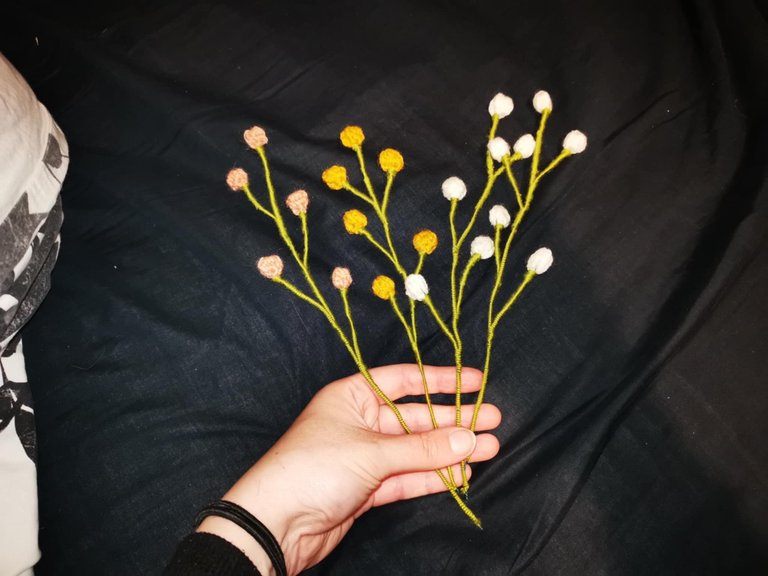
💐 4 small buds: 2 white, 1 pink, and 1 yellow.
💐 1 rose
💐 1 pink carnation
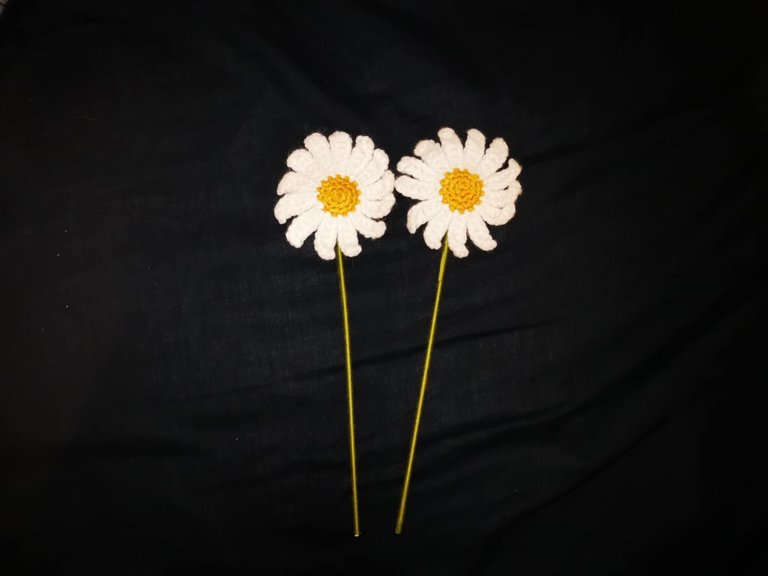
💐 2 daisies (but I only kept one)
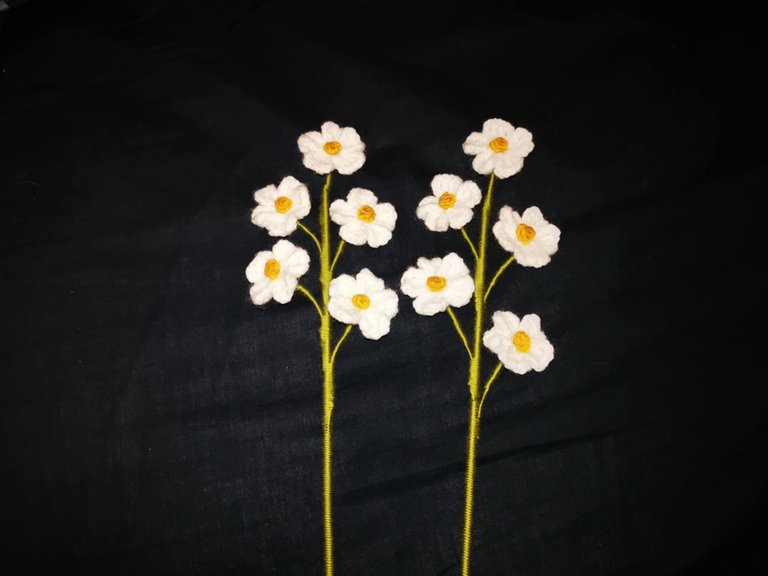
💐 2 white forget-me-nots
💐 1 branch of mini roses
💐 2 branches of green leaves
Patterns for each flower
Buds
- Slip knot;
- 4 chain stitches;
- 4 half double crochets in the first chain stitch;
- Finish the half double crochets by passing the yarn through all 5 loops;
- Chain 4 stitches;
- 4 unfinished half double crochets in the center;
- Finish the half double crochets by passing the yarn through all 5 loops;
- Slip stitch to join the two sides;
- Close the bud;
- Take a 7 cm piece of wire, fold it in half, and pass it through the center of the bud;
- Wrap the green yarn around the wire;
- Assemble several buds on a skewer and wrap with green yarn.
The Rose
The Flower 👇
- Rnd 1: Slip knot + 102 chain stitches;
- Rnd 2: In the 3rd stitch from the hook: make a double crochet, then make 1 double crochet in each stitch until the end of the row (100 double crochets in total), then turn the project;
- R3: (4 chain stitches, skip 3 stitches, 2 half double crochets in the same stitch) x25 to the end of the row, then cast on 2 chain stitches and turn the project;
- R4: In each arch: 3 half double crochets, 3 double crochets, 3 half double crochets, 25 times until you reach the end of the row, then cast on 2 chain stitches and turn the project;
- R5: In the stitches around the arches: 8 individual half double crochets, followed by a slip stitch, all 25 times until you reach the end of the row, then close the project and cut the yarn, leaving about 15 cm.
Next, you must:
- Wrap to form the rose;
- And sew with the remaining yarn to hold the rose in place.
The Receptacle 👇
- Magic circle + 6 half double crochets inside, then close the circle with a slip stitch;
- Chain 2, then 2 half double crochets in each stitch, then close the row with a slip stitch;
- Chain 2, then 2 half double crochets in each stitch, then close the row with a slip stitch;
- 1 single crochet, then 3 chain stitches, then 1 single crochet in the next stitch, then cast on 3 chain stitches and make 1 single crochet in the next stitch. Repeat this pattern until the end of the row, then close the project and cut the yarn.
- Glue the receptacle to the rose with glue.
Leaves (x2) 👇
- Slip knot;
- 10 chain stitches;
- Place the wire (about 10 cm) and wrap it around;
- 1 single crochet;
- 1 half double crochet;
- 5 double crochets;
- 1 half double crochet;
- 1 single crochet + 2 chain stitches + 1 single crochet
- 1 half double crochet;
- 5 double crochets;
- 1 half double crochet;
- 1 single crochet;
- 1 slip stitch in the first stitch to close the project, then a chain stitch and cut the yarn, keeping a small length to wrap around the wire.
Assembly 👇
- Place the rose and the receptacle on a skewer;
- Begin wrapping the green yarn;
- Place the leaves;
- Continue wrapping the green yarn all the way to the bottom.
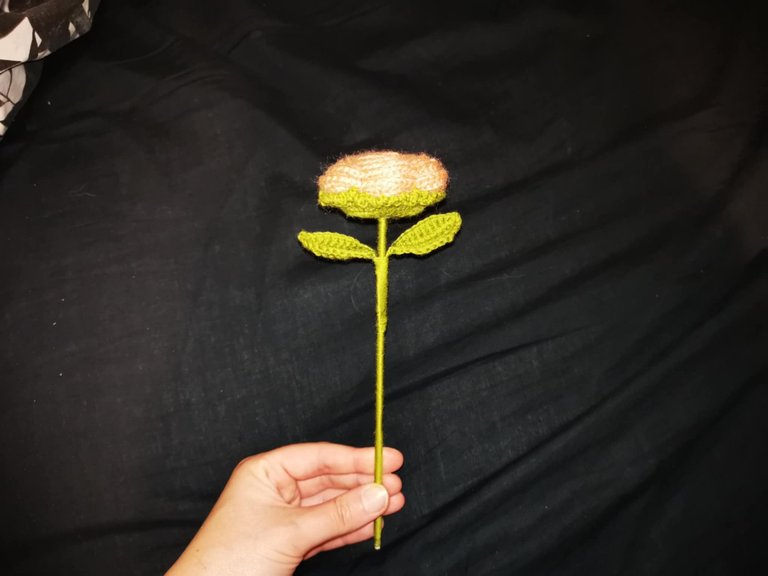
The Carnation
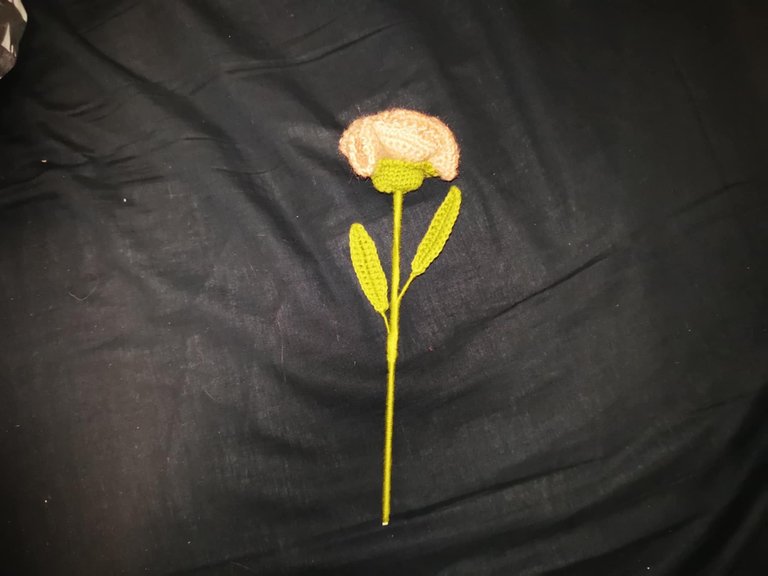
The Carnation 👇
- Round 1: Magic ring + 3 chain stitches + 15 double crochets in the magic ring, close the magic ring with a slip stitch;
- Round 2: Chain 3 stitches + 2 double crochets in each stitch, close the row with a slip stitch;
- Round 3: Chain 3 stitches + 2 double crochets in each stitch, close the row with a slip stitch;
- Round 4: Chain 3 stitches + 2 double crochets in each stitch, close the row with a slip stitch;
- Round 5: Chain 1 stitch, then 1 single crochet in the same stitch + 1 picot (3 chain stitches + 1 slip stitch in the V of the first chain stitch), 1 single crochet, then 1 picot to the end of the row. Then close the project.
Using a yarn needle and a piece of yarn, you will then tighten the eyelet at the second row (on the back).
The receptacle 👇
- Rnd 1: Magic ring + 7 single crochets inside, close the magic ring with a slip stitch;
- Rnd 2: Chain 1, then 2 single crochets in each stitch until the end of the row and close with a slip stitch;
- Rnd 3 / Rnd 4 / Rnd 5 / Rnd 6 / Rnd 7: Chain 1, then 1 single crochet in each stitch until the end of the row and close with a slip stitch;
- Rnd 8: Single crochet, then 3 chain stitches, then 1 single crochet in the next stitch, then cast on 3 chain stitches and make 1 single crochet in the next stitch. Repeat this pattern until the end of the row, then close the project and cut the yarn.
To assemble, take a skewer and place the leaf on top, then add the receptacle and glue it. Then wrap the green yarn around the skewer.
Daisies
The back pistil 👇
- With yellow yarn: Make a magic ring + 7 half double crochets inside, then close the ring with a slip stitch;
- Chain 1 to begin the second row, then 2 half double crochets in each stitch, then close the row with a slip stitch and cut the yarn.
**The front pistil **👇
- With yellow yarn: Make a magic ring + 7 half double crochets inside, then close the ring with a slip stitch;
- Chain 1 to begin the second row, then 2 half double crochets in each stitch, then close the row with a slip stitch;
- Chain 1 to begin the third row, then half double crochet in each stitch, then close the row with a slip stitch and close the project, keeping about 15 cm of yarn.
The Petals 👇
- On the front pistil: tie the white yarn in one stitch. Then, chain 8 stitches;
- On these 8 chain stitches: skip 2 stitches, then half double crochet in the next 6 stitches. Finish with a slip stitch in the next stitch of the pistil (repeat until you reach the end of the row);
- Turn the project, then slip stitch in each stitch of the daisy, close the project at the end of the row, and cut the yarn.
Assembly 👇
- Put a 10 cm piece of wire through the back pistil;
- With a yarn needle, sew the two pistils together;
- Place the finished daisy on a skewer and wrap it with green yarn.
Forget-me-nots
- Magic ring + 4 chain stitches;
- 2 individual treble crochet (in US terms) in the magic ring + 4 chain stitches + 1 slip stitch in the magic ring (x5 to make 5 petals).
- Take 15 cm of wire, fold it in half, and wrap yellow yarn around the central part (about 2 cm), then wrap the wire around itself to create the pistil;
- Place the pistil in the center of the flower;
- Wrap green yarn around the wire;
- Make between 5 and 7 forget-me-nots for 1 branch and arrange them as you like on a skewer. Wrap the green yarn around them to hold them in place.
Mini Roses
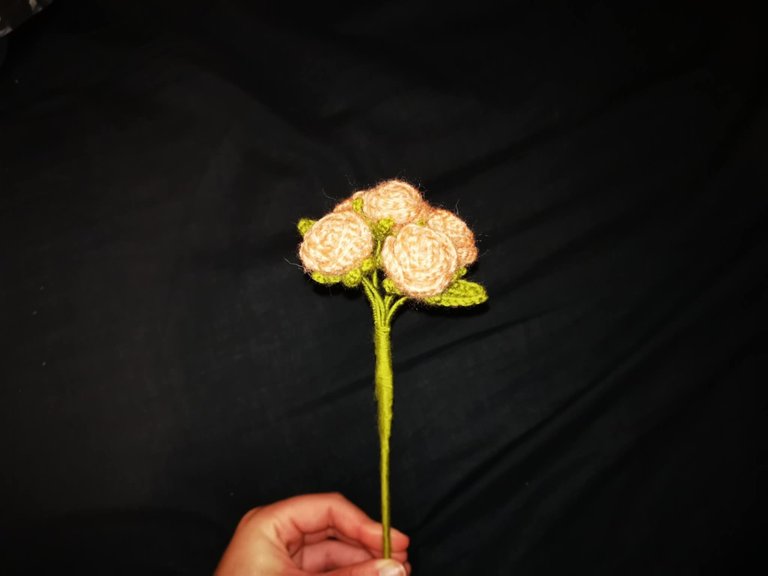
The rose (x5) 👇
- Slip knot;
- 23 chain stitches;
- In the 4th stitch: 3 double crochets in the same stitch;
- In the next stitch: 1 single crochet;
- Skip 1 stitch;
- 3 double crochets in the same stitch, 1 single crochet in the next stitch, skip 1 stitch: Repeat this pattern until you reach the end of the row, then turn the project;
- Cast on two chain stitches, then 1 single crochet; then in the next stitch, 2 double crochets in the same stitch; then in the next stitch, 1 double crochet + 2 chain stitches, then 1 single crochet + 2 chain stitches, and repeat this pattern until the end of the row: 2 ch, 1 dc, 2 dc in the same stitch, 1 dc, 2 ch, 1 sl st.
- Close the project and cut the yarn.
The receptacle (x5) 👇
- Magic circle with 5 single crochets inside, then close the circle with a slip stitch;
- Chain 1 to begin the row, then 2 single crochets in each stitch until the end of the row, then close the row with a slip stitch;
- Chain 5, then in the second stitch from the hook: 1 slip stitch, 1 slip stitch, 1 single crochet, and 1 half double crochet, then skip a stitch on the circle to make a slip stitch in the next one. Repeat the same pattern until you have 5 branches.
- Close the row and cut the yarn (leaving about 30 cm).
The leaf (x2) 👇
- Slip knot;
- Chain of 10 chain stitches;
- Insert a piece of wire about 15 cm long into the stitch where the hook is located;
- In the second stitch from the hook, and while enclosing the wire, make: 1 single crochet, 1 half double crochet, 5 single crochets, 1 half double crochet, 3 single crochets in the same stitch. Then on the other side of the chain: 1 half double crochet, 5 single crochets, 1 half double crochet, 1 single crochet.
- Close the project with a slip stitch in the first stitch and cut the wire (keeping enough to wrap it around the wire).
Assembly 👇
- Insert a piece about 20 cm long into the rose and wrap it around it;
- Place the receptacle under the rose;
- Wrap green yarn around the wire;
- Take a skewer and place all the roses, as well as the leaves, and wrap the whole thing with green yarn, then around the entire skewer.
Leaves
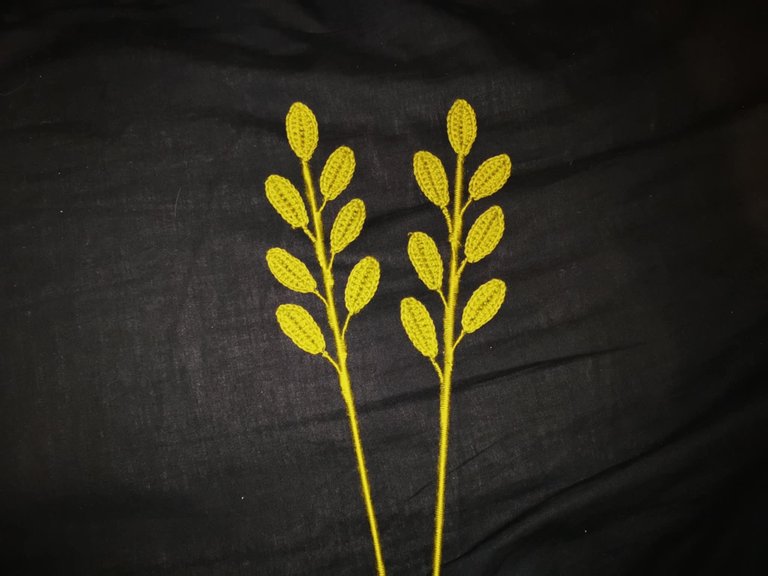
- Slip knot;
- Chain 10;
- Place the wire (about 10 cm) and wrap it around;
- 1 single crochet;
- 1 half double crochet;
- 5 double crochets;
- 1 half double crochet;
- 1 single crochet + 2 chain stitches + 1 single crochet
- 1 half double crochet;
- 5 double crochets;
- 1 half double crochet;
- 1 single crochet;
- Slip stitch in the first stitch to close the project, then chain stitch and cut the yarn, keeping a short length to wrap it around the wire;
- Make between 5 and 7 leaves per branch;
- Place them as desired on a skewer and wrap the green thread around them.
If the instructions in this post are a bit too brief, please note that I've already written complete tutorials for each of the flowers in this bouquet. You can find them on my Hive account. I post quite regularly in the NeedleWorkMonday community, so I think by selecting this topic, you'll find all the relevant posts! 😁
Now, all that's left is to wrap it up and give it to Mom, who will finally be able to give it to her twin sister for her birthday! I hope she'll be happy with her bouquet 💐
And I hope this post has inspired you to create your own crochet bouquets!
See you soon,
Johanna
PS: I used Google Translate to translate the English section.
Hello les amis et les crochet lovers ! J’espère que vous allez tous très bien et que vous passez une belle journée 😁
Pour ma part, tout va plutôt bien, car j’ai enfin terminé le bouquet de fleurs au crochet que ma maman m’a demandé pour qu’elle puisse l’offrir à sa sœur. 💐
Ce n’est pas le premier bouquet de fleurs au crochet que je réalise, mais c’est celui qui est le plus abouti selon moi ! J’ai pris le temps de choisir les couleurs, de choisir sa composition, pour arriver à un bouquet harmonieux et qui me plaît !
Je suis plutôt fière de moi puisqu’à force de m’entraîner, je vois une nette amélioration dans mes réalisations au crochet ! 😊
Bref, aujourd’hui, je voulais simplement vous parler du bouquet et de sa composition ! Et je vais aussi vous partager les patterns pour chacune des fleurs de ce bouquet. Comme ça, si jamais vous voulez le réaliser à votre tour, vous aurez toutes les informations.
Tout d’abord, voici le résultat final (il me reste plus qu'à trouver un joli emballage) :
Pour ma part, j’en suis plutôt satisfaite ! J’adore la combinaison de couleur. 😁
Composition du bouquet
Pour ce bouquet, j’ai réalisé 👇
💐 4 petits bourgeons : 2 blancs, 1 rose et 1 jaune.
💐 1 rose
💐 1 œillet rose
💐 2 marguerites (mais je n’en ai gardé qu’une seule)
💐 2 myosotis blancs
💐 1 branche de minis roses
💐 2 branches de feuilles vertes
Les patterns pour chacune des fleurs
Les bourgeons
- Nœud coulant ;
- 4 mailles en l’air ;
- 4 demi-brides non terminées dans la première maille en l’air ;
- Finir les demi-brides en passant le fil dans les 5 brins ;
- 4 mailles en l’air ;
- 4 demi-brides non terminées dans le centre ;
- Finir les demi-brides en passant le fil dans les 5 brins ;
- Maille coulée pour rejoindre les deux côtés ;
- Fermer le bourgeon ;
- Prendre un morceau de 7 cm de fil de fer, le plier en deux et le passer dans le centre du bourgeon ;
- Enrouler le fil vert autour du fil de fer ;
- Assembler plusieurs bourgeons sur un pique à brochette et enrouler avec du fil vert.
La rose
La fleur 👇
- R1 : Nœud coulant + 102 mailles en l’air ;
- R2 : Dans la 3ème maille en partant du crochet : faire une bride, puis faire 1 bride dans chaque maille jusqu’à la fin du rang (100 brides au total), puis tourner le projet ;
- R3 : (4 mailles en l’air, sauter 3 mailles, 2 demi-brides dans la même maille) x25 jusqu’à la fin du rang, puis monter 2 mailles en l’air et tourner le projet ;
- R4 : Dans chaque arc : 3 demi-brides, 3 brides, 3 demi-brides, donc 25 fois jusqu’à atteindre la fin du rang, puis monter 2 mailles en l’air et tourner le projet ;
- R5 : Dans les mailles autour des arcs : 8 demi-brides individuelles, suivies d’une maille coulée, le tout 25 fois jusqu’à atteindre la fin du rang, puis fermer le projet et couper le fil en laissant environ 15 cm.
Ensuite, il faut :
- Enrouler pour former la rose ;
- Et coudre avec le fil restant pour que la rose tienne en place.
Le réceptacle 👇
- Cercle magique + 6 demi-brides dedans, puis ferme le cercle avec une maille coulée ;
- 2 mailles en l’air, puis 2 demi-brides dans chaque maille, puis fermer le rang avec une maille coulée ;
- 2 mailles en l’air, puis 2 demi-brides dans chaque maille, puis fermer le rang avec une maille coulée ;
- 1 maille serrée, puis 3 mailles en l’air, puis 1 maille serrée dans la maille suivante, puis monter 3 mailles en l’air et faire 1 maille serrée dans la maille suivante, répéter ce schéma jusqu’à la fin du rang puis fermer le projet et couper le fil.
- Coller le réceptacle à la rose avec de la colle.
Les feuilles (x2) 👇
- Nœud coulant ;
- 10 mailles en l’air ;
- Placer le fil de fer (environ 10 cm) et l’englober ;
- 1 maille serrée ;
- 1 demi-bride ;
- 5 brides ;
- 1 demi-bride ;
- 1 maille serrée + 2 mailles en l’air + 1 maille serrée
- 1 demi-bride ;
- 5 brides ;
- 1 demi-bride ;
- 1 maille serrée ;
- 1 maille coulée dans la première maille pour fermer le projet, puis une maille en l’air et couper le fil tout en gardant une petite longueur pour l’enrouler autour du fil de fer.
L’assemblage 👇
- Placer la rose et le réceptacle sur un pique à brochette ;
- Commencer à enrouler le fil vert ;
- Placer les feuilles ;
- Continuer d’enrouler le fil vert jusqu’en bas.
L’œillet
L’œillet 👇
- R1 : Cercle magique + 3 mailles en l’air + 15 brides dans le cercle magique, fermer le cercle magique avec une maille coulée ;
- R2 : 3 mailles en l’air + 2 brides dans chaque maille, fermer le rang avec une maille coulée ;
- R3 : 3 mailles en l’air + 2 brides dans chaque maille, fermer le rang avec une maille coulée ;
- R4 : 3 mailles en l’air + 2 brides dans chaque maille, fermer le rang avec une maille coulée ;
- R5 : 1 maille en l’air, puis 1 maille serrée dans la même maille + 1 picot (3 mailles en l’air + 1 maille coulée dans le V de la première maille en l’air), 1 maille serrée puis 1 picot jusqu’à la fin du rang. Puis fermer le projet.
En prenant une aiguille à laine et un morceau de fil, vous allez ensuite resserrer l'œillet au niveau du deuxième rang (sur l’arrière).
Le réceptacle 👇
- R1 : Cercle magique + 7 mailles serrées à l’intérieur, fermer le cercle magique avec une maille coulée ;
- R2 : 1 maille en l’air, puis 2 mailles serrées dans chaque maille jusqu’à la fin du rang et fermer avec une maille coulée ;
- R3 / R4 / R5 / R6 / R7 : 1 maille en l’air, puis 1 maille serrée dans chaque maille jusqu’à la fin du rang et fermer avec une maille coulée ;
- R8 : 1 maille serrée, puis 3 mailles en l’air, puis 1 maille serrée dans la maille suivante, puis monter 3 mailles en l’air et faire 1 maille serrée dans la maille suivante, répéter ce schéma jusqu’à la fin du rang puis fermer le projet et couper le fil.
Pour l’assemblage, il faut prendre un pique à brochette et y placer la feuille au sommet, puis ajouter le réceptacle et le coller. Il faut ensuite enrouler le fil vert autour du pique à brochette.
Les marguerites
Le pistil arrière 👇
- Avec de la laine jaune : Faire un cercle magique + 7 demi-brides à l’intérieur, puis fermer le cercle avec une maille coulée ;
- 1 maille en l’air pour commencer le deuxième rang, puis 2 demi-brides dans chaque maille, puis fermer le rang avec une maille coulée et couper le fil.
Le pistil avant 👇
- Avec de la laine jaune : Faire un cercle magique + 7 demi-brides à l’intérieur, puis fermer le cercle avec une maille coulée ;
- 1 maille en l’air pour commencer le deuxième rang, puis 2 demi-brides dans chaque maille, puis fermer le rang avec une maille coulée ;
- 1 maille en l’air pour commencer le troisième rang, puis 1 demi-bride dans chaque maille, puis fermer le rang avec une maille coulée et fermer le projet en gardant environ 15 cm de fil.
**Les pétales **👇
- Sur le pistil avant : attacher la laine blanche dans une maille. Puis, faire 8 mailles en l’air ;
- Sur ces 8 mailles en l’air : sauter 2 mailles, puis faire une demi-bride dans les 6 mailles suivantes. Terminer par 1 maille coulée dans la maille suivante du pistil (répéter jusqu’à arriver à la fin du rang) ;
- Tourner le projet, puis faire 1 maille coulée dans chaque maille de la marguerite, fermer le projet à la fin du rang et couper le fil.
L’assemblage 👇
- Passer un morceau de 10 cm de fil de fer dans le pistil arrière ;
- Avec une aiguille à laine, coudre les deux pistils ensemble ;
- Placer la marguerite terminée sur un pique à brochette et enrouler avec du fil vert.
Le myosotis
- Cercle magique + 4 mailles en l’air ;
- 2 doubles brides individuelles (treble crochet en terme US) dans le cercle magique + 4 mailles en l’air + 1 maille coulée dans cercle magique (x5 pour obtenir 5 pétales).
- Prendre 15 cm de fil de fer, le plier en deux et enrouler du fil jaune sur la partie centrale (environ 2 cm), puis enrouler le fil de fer sur lui-même pour créer le pistil ;
- Placer le pistil au centre de la fleur ;
- Enrouler du fil vert sur le fil de fer ;
- Faire entre 5 et 7 myosotis pour 1 branche et les placer comme bon vous semble sur un pique à brochette. Enrouler le fil vert pour les faire tenir en place.
Les minis roses
La rose (x5) 👇
- Nœud coulant ;
- 23 mailles en l’air ;
- Dans la 4ème maille : 3 brides dans la même maille ;
- Dans la maille suivante : 1 maille serrée ;
- Sauter 1 maille ;
- 3 brides dans la même maille, 1 maille serrée dans la maille suivante, sauter 1 maille : Et répéter ce schéma jusqu’à atteindre la fin du rang, puis tourner le projet ;
- Monter deux mailles en l’air, puis 1 bride individuelle ; puis dans la maille suivante 2 brides dans la même maille ; puis dans la maille suivante 1 bride + 2 mailles en l’air, puis 1 maille serrée + 2 mailles en l’air et répéter ce schéma jusqu’à la fin du rang : 2 ml, 1 br, 2 br dans la même maille, 1 br, 2 ml, 1 mc.
- Fermer le projet et couper le fil.
Le réceptacle (x5) 👇
- Cercle magique avec 5 mailles serrées à l’intérieur, puis fermer le cercle avec une maille coulée ;
- 1 maille en l’air pour commencer le rang, puis 2 mailles serrées dans chaque maille jusqu’à la fin du rang, puis fermer le rang avec une maille coulée ;
- 5 mailles en l’air, puis dans la deuxième maille en partant du crochet : 1 maille coulée, 1 maille coulée, 1 maille serrée et 1 demi-bride, puis il faut sauter une maille sur le cercle pour faire une maille coulée dans la suivante. Et il faut recommencer le même schéma jusqu’à obtenir 5 branches.
- Fermer le rang et couper le fil (en laissant environ 30 cm).
La feuille (x2) 👇
- Nœud coulant ;
- Chaînette de 10 mailles en l’air ;
- Insérer un morceau de fil de fer d’environ 15 cm dans la maille où se trouve le crochet ;
- Dans la deuxième maille en partant du crochet, et tout en englobant le fil de fer, il faut faire : 1 maille serrée, 1 demi-bride, 5 brides individuelles, 1 demi-bride, 3 mailles serrées dans la même maille. Puis de l’autre côté de la chaînette : 1 demi-bride, 5 brides individuelles, 1 demi-bride, 1 maille serrée.
- Fermer le projet avec une maille coulée dans la première maille et couper le fil (en gardant de quoi l’enrouler autour du fil de fer).
L’assemblage 👇
- Insérer un morceau d’environ 20 cm dans la rose et l’enrouler autour ;
- Placer le réceptacle sous la rose ;
- Enrouler du fil vert sur le fil de fer ;
- Prendre un pique à brochette et placer toutes les roses, ainsi que les feuilles, et enrouler le tout de fil vert, puis sur l’entièreté du pique.
Les feuilles
- Nœud coulant ;
- 10 mailles en l’air ;
- Placer le fil de fer (environ 10 cm) et l’englober ;
- 1 maille serrée ;
- 1 demi-bride ;
- 5 brides ;
- 1 demi-bride ;
- 1 maille serrée + 2 mailles en l’air + 1 maille serrée
- 1 demi-bride ;
- 5 brides ;
- 1 demi-bride ;
- 1 maille serrée ;
- 1 maille coulée dans la première maille pour fermer le projet, puis une maille en l’air et couper le fil tout en gardant une petite longueur pour l’enrouler autour du fil de fer ;
- Faire entre 5 et 7 feuilles par branche ;
- Les placer comme on le souhaite sur un pique à brochette et enrouler le fil vert.
Si jamais les explications sont un peu trop brèves dans ce post, sachez que j’ai déjà rédigé des tutoriels complets pour chacune des fleurs de ce bouquet. Vous pouvez les retrouver sur mon compte Hive. Je publie assez régulièrement dans la communauté NeedleWorkMonday donc je pense qu’en sélectionnant ce sujet, vous trouverez tous les posts correspondants ! 😁
Maintenant, il ne me reste plus qu’à l’emballer et à le donner à maman, qui pourra enfin l’offrir à sa sœur jumelle, pour son anniversaire ! J’espère qu’elle sera contente de son bouquet 💐
Et j’espère que ce post vous a donné envie de créer vos propres bouquets au crochet !
À bientôt,
Johanna
PS : J’ai utilisé Google Traduction pour traduire la partie en anglais.
Really cute
Thank you so much 🙏🙏
Congratulations @altheana! You have completed the following achievement on the Hive blockchain And have been rewarded with New badge(s)
Your next target is to reach 1250 replies.
You can view your badges on your board and compare yourself to others in the Ranking
If you no longer want to receive notifications, reply to this comment with the word
STOPThis crochet flower bouquet is really really stylish and pretty. That is looking really stylish and elegant.
Thank you for all these compliments! Have a lovely day😁
WOW! What you did, that's impressive. Leaves, flowers and its color combination make it so beautiful. It shows your creativity and skills. Well done!
selected by @rezoanulvibes
Thank you so much for all these compliments, it goes straight to my heart! I'm glad you like my bouquet. Thank you so much. Have a nice day 😊
!ALIVE
!HUG
Your post has been manually reviewed for curation by the Principality of Bastion.
Principality of Bastion - Our Leit Motiv? Let's Grow Together.
Principality's site | Minava NFT Market | Discord | Our Twitch Channel
You may TRAIL this account (or @hive-143869) if you like the curation we do, or join our discord to know more about what we do.
🙏🙏
You have explained the procedure very well and greatly. You have got very good skills to do this much neat and beautiful crochet.
https://www.reddit.com/r/Brochet/comments/1lbxok5/a_crocheted_bouquet_of_flowers/
This post has been shared on Reddit by @arqyanedesings through the HivePosh initiative.