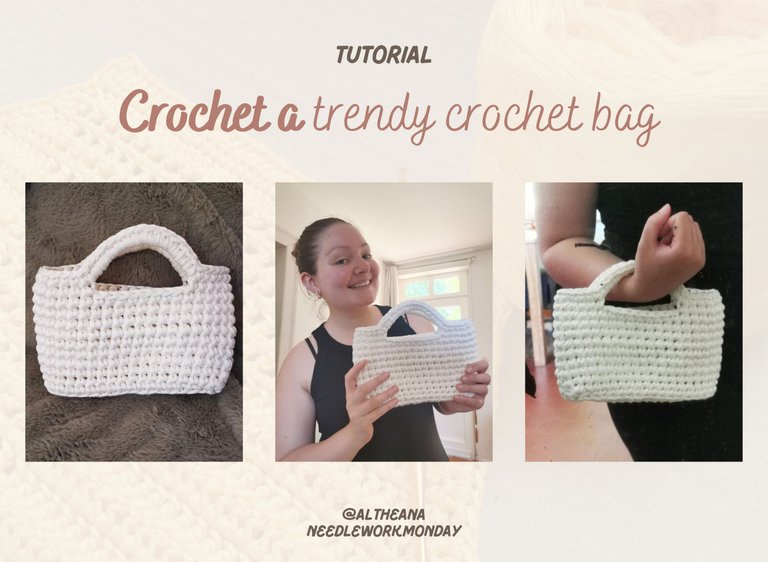
A trendy crochet bag // Un sac tendance au crochet [EN/FR]
Hello friends and crochet lovers! I hope you're all doing well. ☀️
A short while ago, I bought some spools of T-shirt thread from a small shop because I had some fun project ideas: bags and pouches! 👜
And that's it, I've finally made my first two bags! One black and one white.
For the black one, I followed a tutorial on YouTube, and for the white one, I created whatever I wanted and even managed to write the tutorial, which is why I'm going to share it with you here 😁
I'm pretty proud of my creation! It's small, but I think it's the perfect size to hold the bare essentials: a phone, a book, and a wallet 😂
It's a fairly simple project to make, and it's very accessible to beginners! In total, the bag can be made in less than an hour with a little practice 😊
In short, here's the pattern I created 👇
Materials

To make this bag, I used:
- Approximately 350 grams of T-shirt yarn;
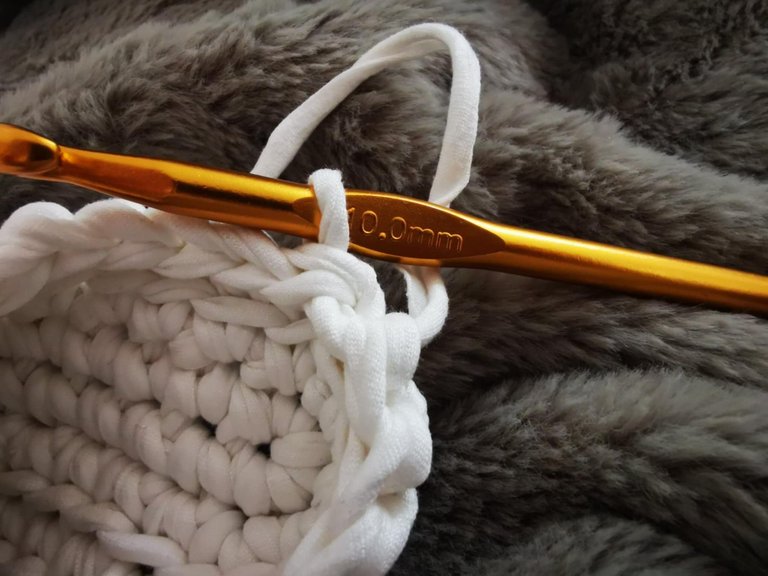
- A 10 mm crochet hook;
- Stitch markers.
Steps to follow
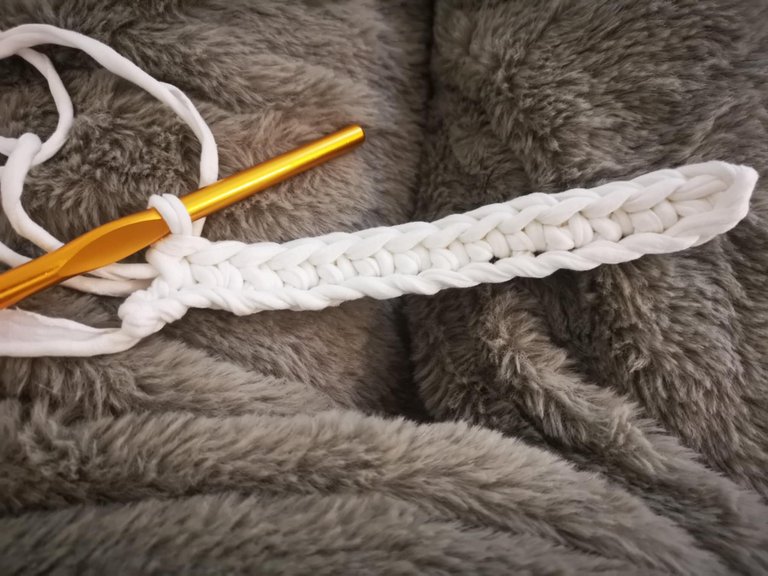
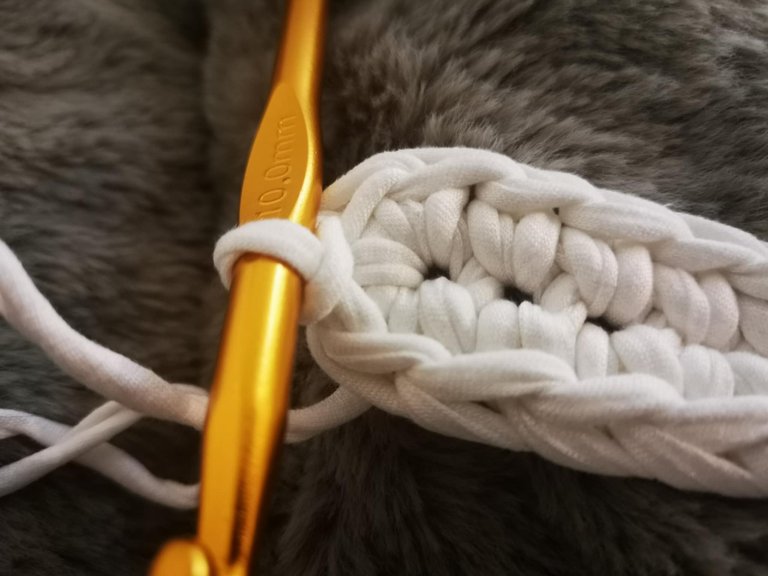
Start with a slip knot:

Next, cast on 16 chain stitches:

Then, single crochet from the second stitch, all the way down the row, stopping before the last.
For the last stitch, make 3 single crochets in it. This allows you to cross to the other side of the chain.
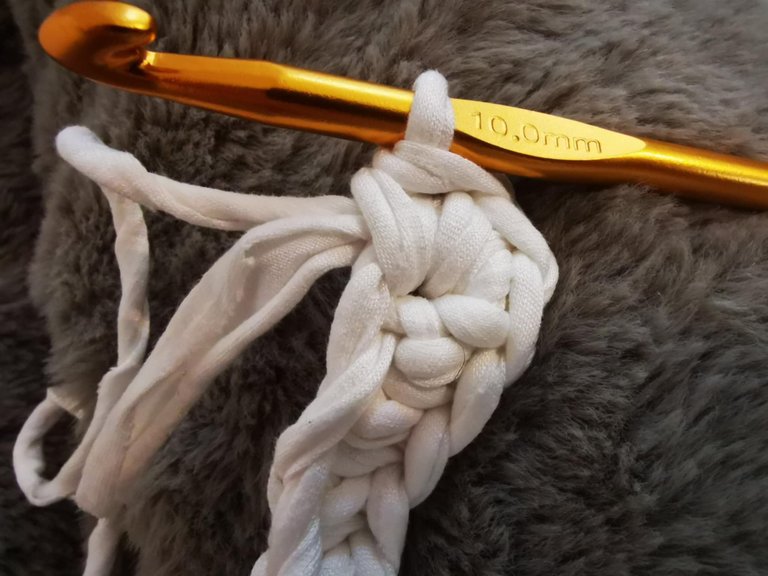
Next, continue the row, making 1 single crochet in each stitch, stopping before the last.
For the last stitch, make 2 single crochets in it.

Then, join the first stitch of the row with a slip stitch.
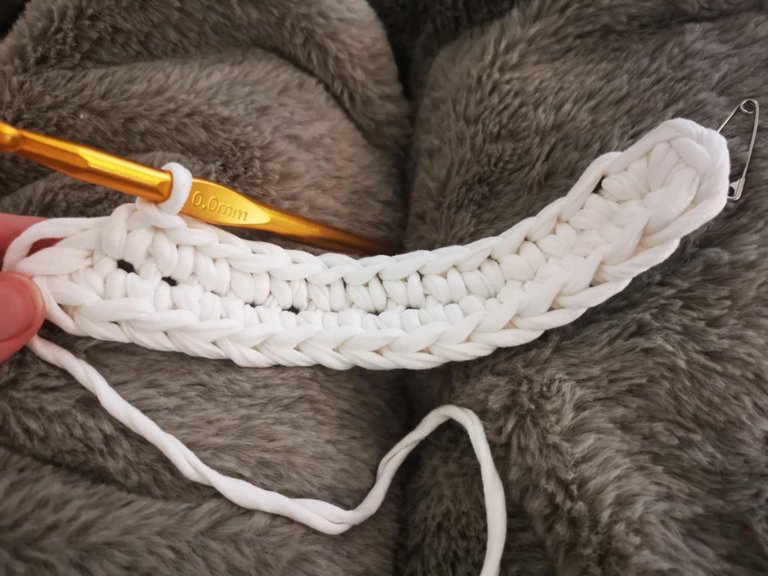
For the second row, simply make single crochets until you reach the 3 single crochets in the same stitch. And in these 3 stitches, make 1 increase, that is, 2 single crochets in each stitch.
After that, continue the row of classic single crochets until the last two stitches. In these last two stitches, make an increase, that is, 2 single crochets in each.
Then make a slip stitch in the first stitch of the row. And cast on 1 chain before starting the next row. The base of the bag is now complete.
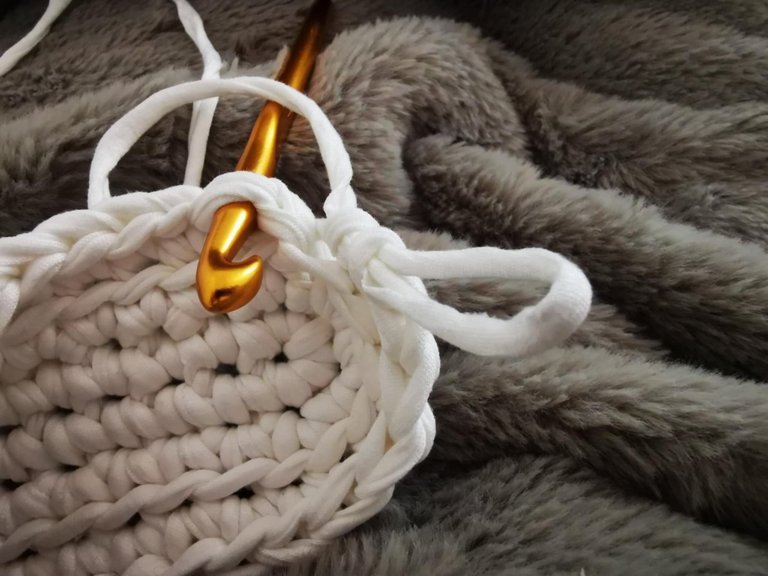
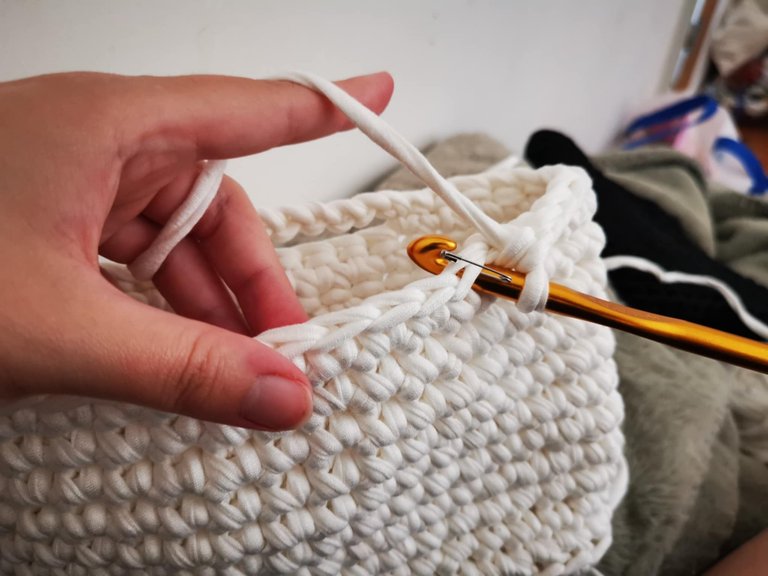
For the first row of the bag, start with a single crochet back loop only in the same stitch as the slip stitch. Once you've made your first single crochet of the row, you need to mark it with a stitch marker (or a safety pin if you don't have one 😂). This marks the beginning of the row.
You then need to work a complete row of single crochet in the back loop only. And when you reach the end, you'll need to make a magic seam. To do this, you need to pull out your hook and place it in the first stitch (the one marked by the stitch marker). You then need to grab the yarn and pull it through this first stitch. Then, you need to pull out your hook again and insert it into the space created by the invisible seam. Grab the yarn, yarn over, and pull through the two yarns on the hook (a slip stitch).

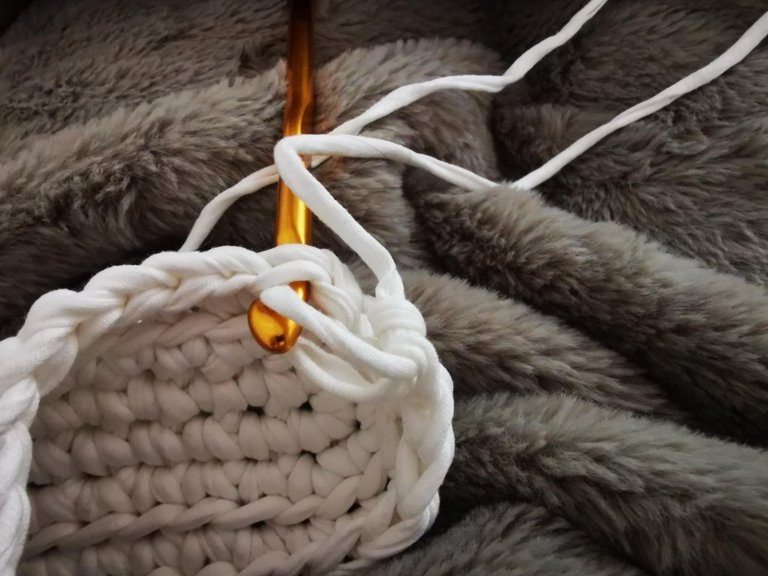
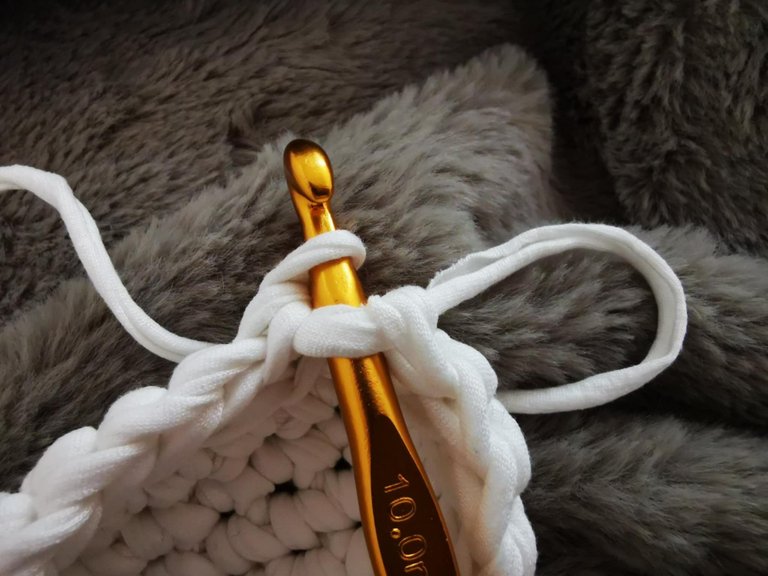

To complete the magic seam, you need to make a chain stitch. The row is officially finished.

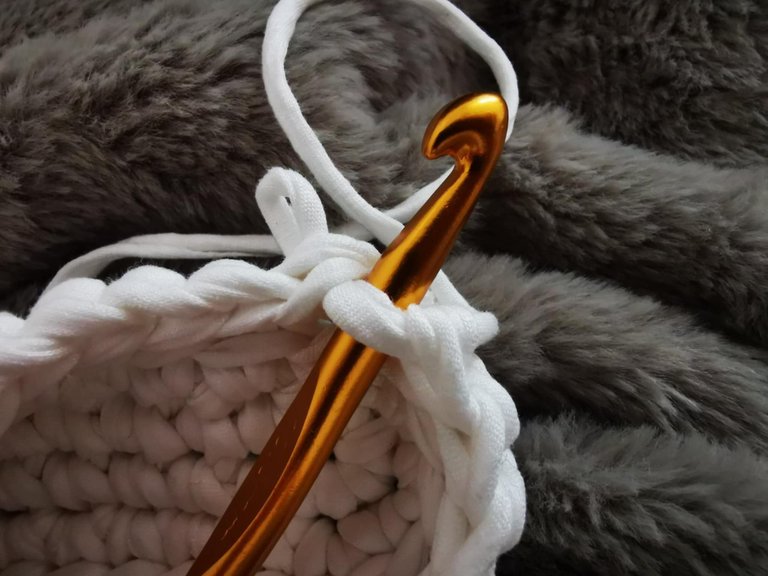
And to start a new row in both strands, you need to make a single crochet in the space where you made the magic seam, which is also the first stitch of the row and the one marked with the stitch marker.
Once you've made your first single crochet, place the marker and start a new row.
The rows will look similar: single crochet in both strands and a magic seam + one chain stitch.
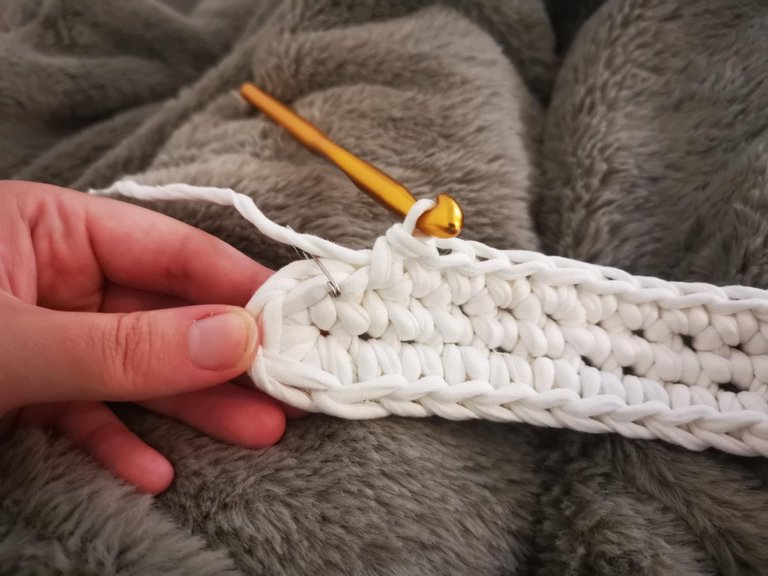
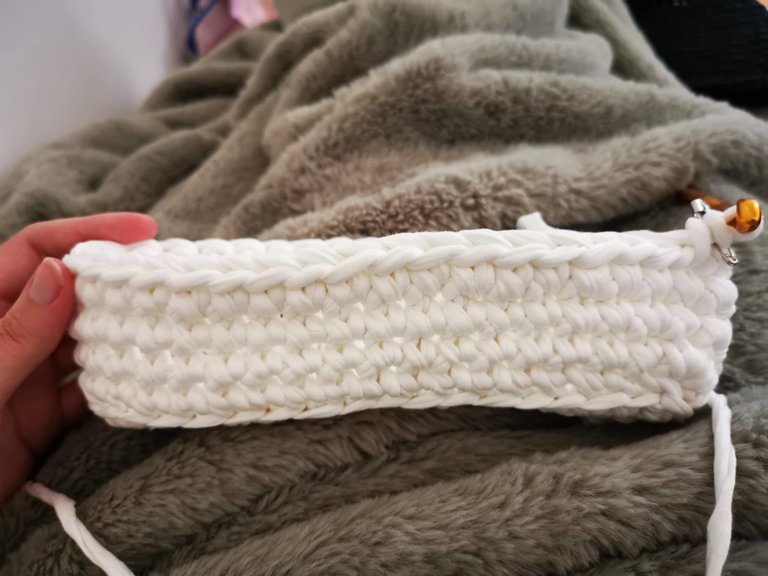
In total, I cast on 9 regular rows.


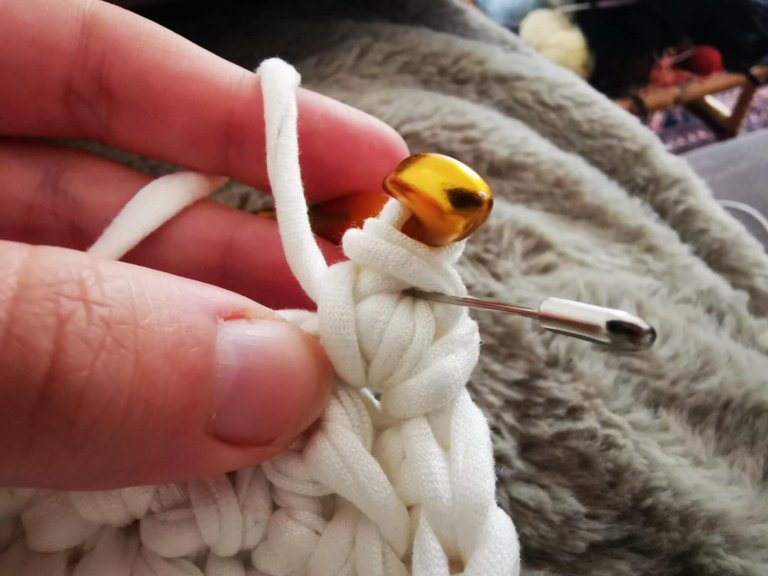
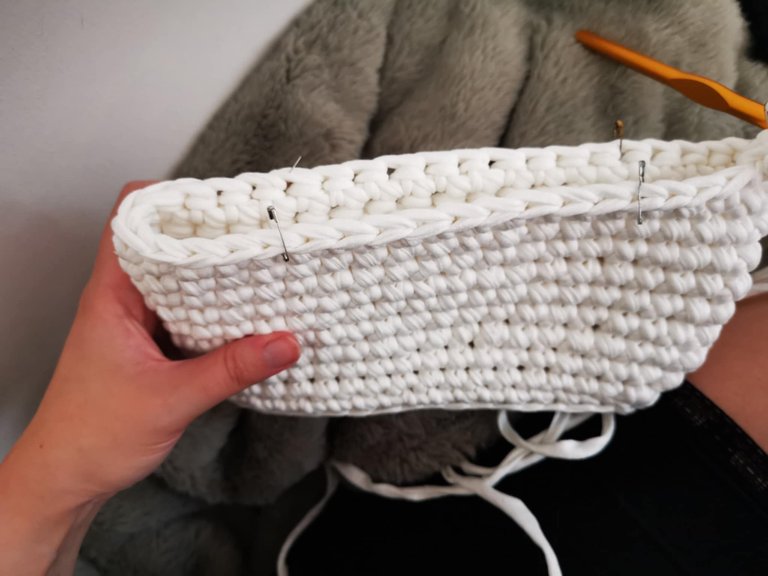
Next, it's time to move on to the handles. To do this, you need to mark the spaces where you want to place your handles. For my part, I left about 5 stitches on each side of the bag, and here's where I placed my stitch markers:
I then started the 10th row, making single crochets until I reached the stitch marker. I made a single crochet in the stitch where I placed the marker.
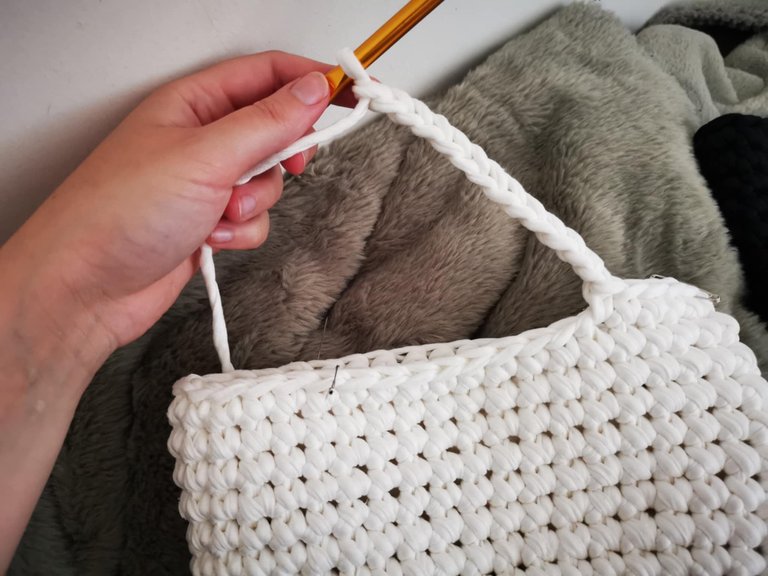
Next, I chained 13 stitches (the length I wanted for my handle).
To secure it, I made a single crochet in the stitch marked with the marker. Then, I continued single crocheting until I reached the next stitch marker, where I made one last single crochet before chaining 13 stitches again.

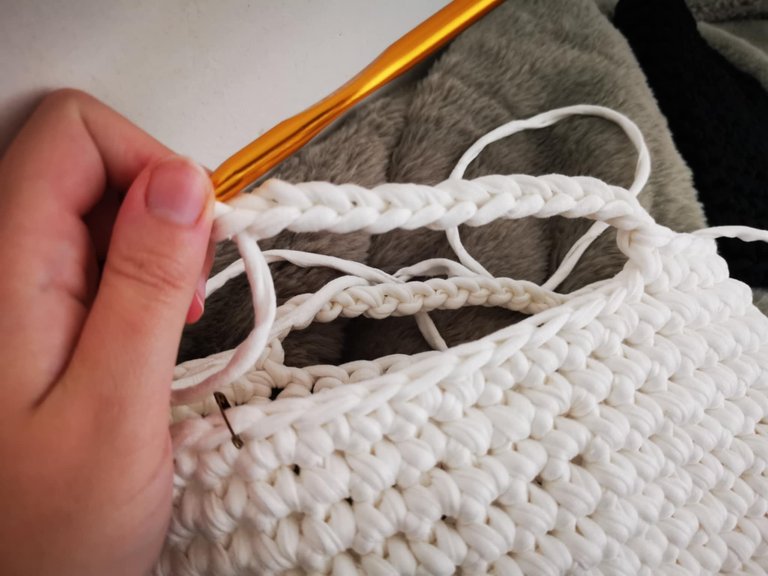
And to secure it, I made another single crochet where the last stitch marker was. Then, I continued single crocheting until I reached the end of the row.
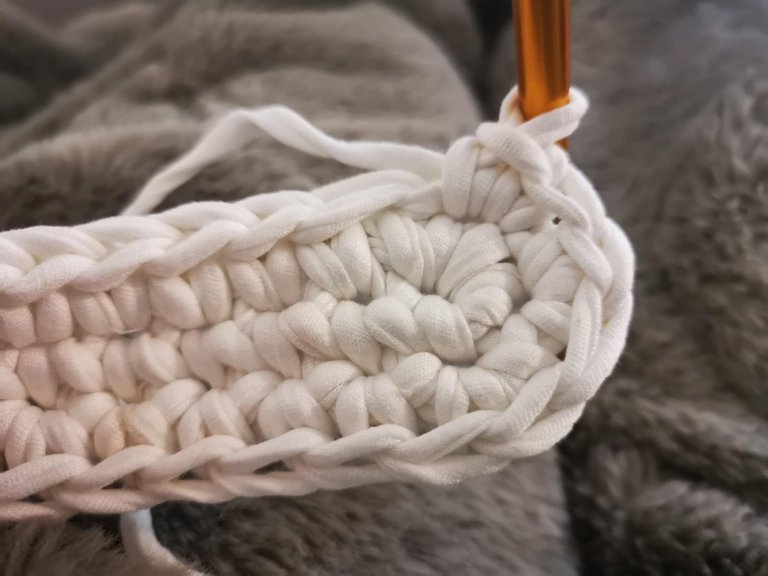
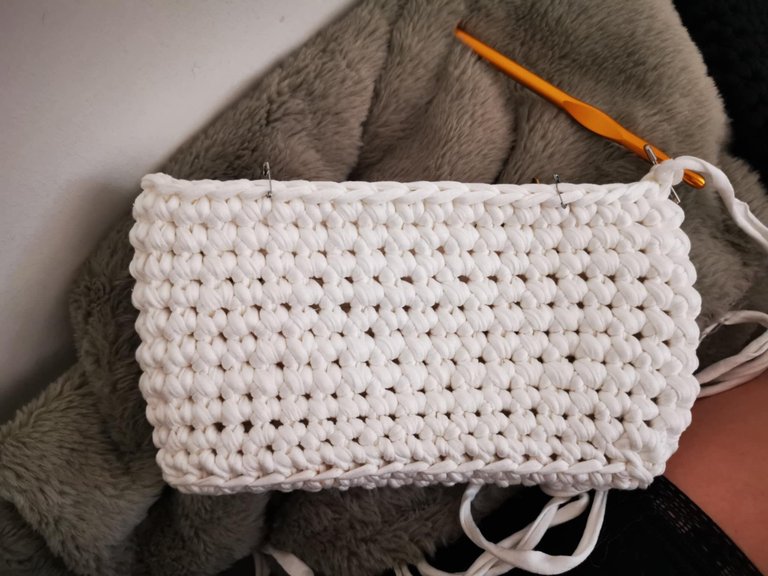
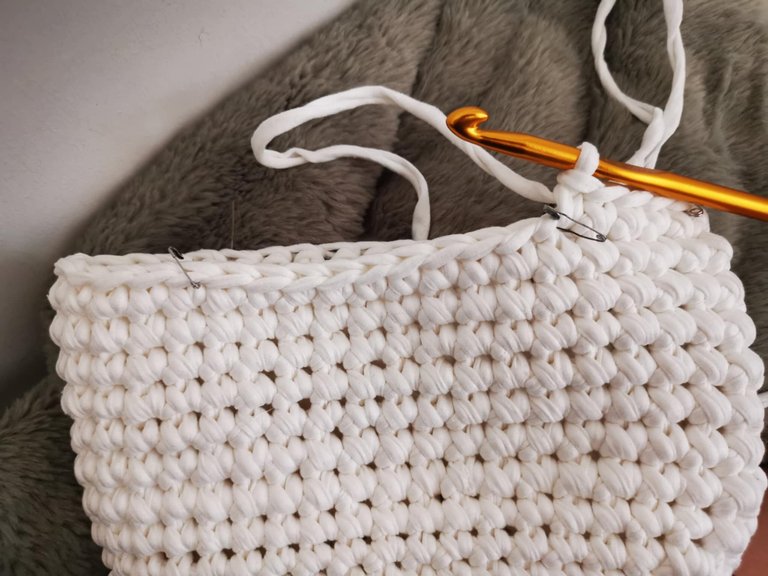
And I made a magic stitch + 1 chain before starting my 11th and final row.
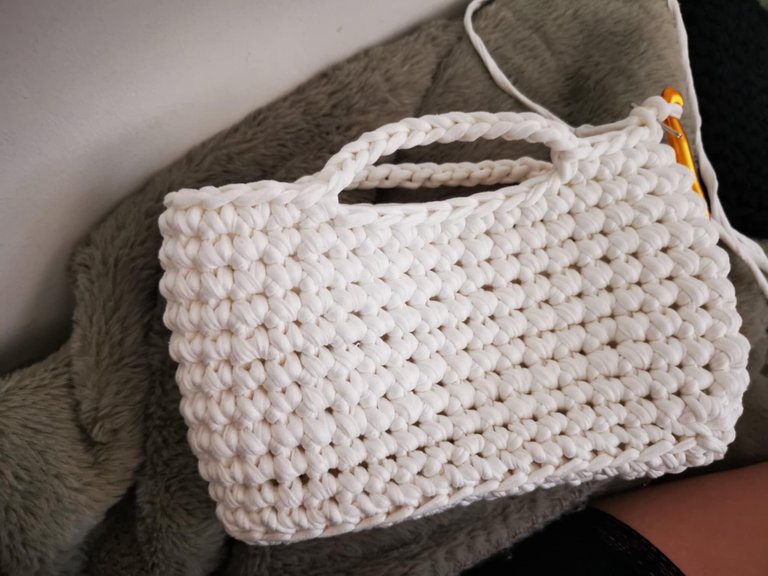
For this row, I worked classic single crochets, and when I reached the handles, I single crocheted around the chain of 13. I made about 16 single crochets around the chain (to cover it).
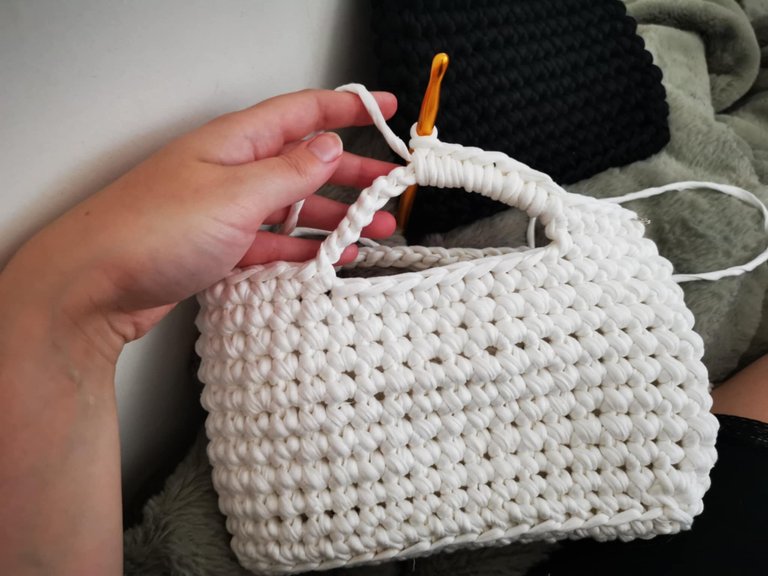
Then, I continued the classic single crochets until I reached the second handle, and I single crocheted around the chain. Then, I finished the row of single crochets.
And this time, when I reached the end of the row, I didn't make a magic join. I simply made a slip stitch, followed by a chain before cutting the yarn.
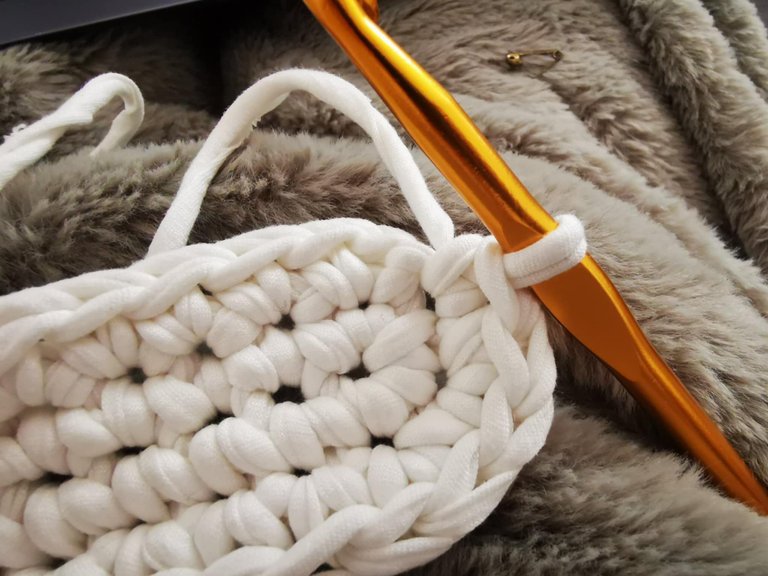
I tucked the yarn inside the bag.
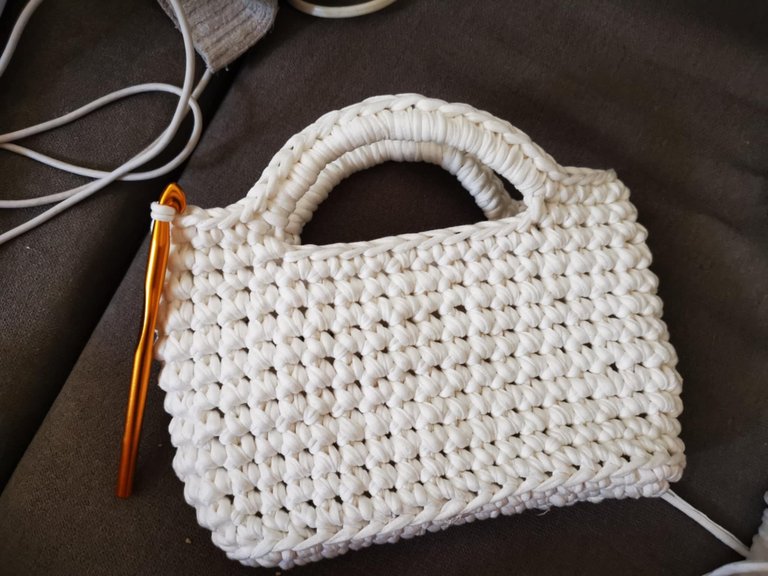
And here's the result:
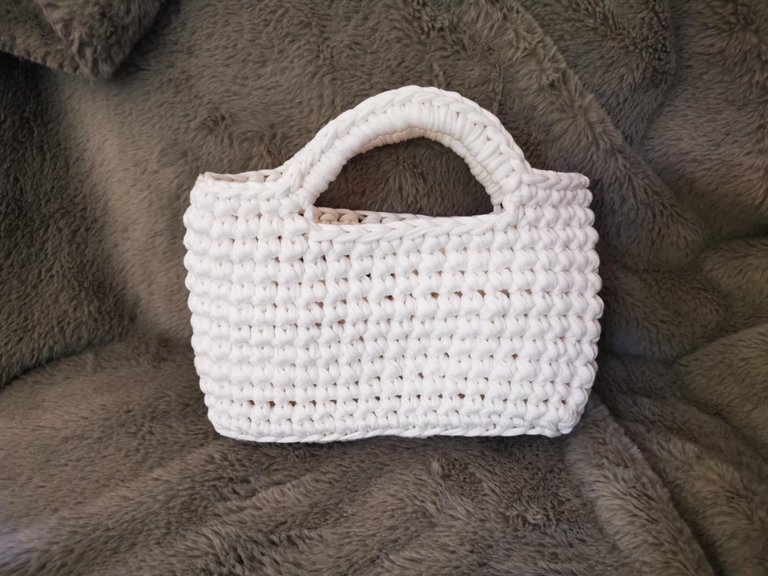
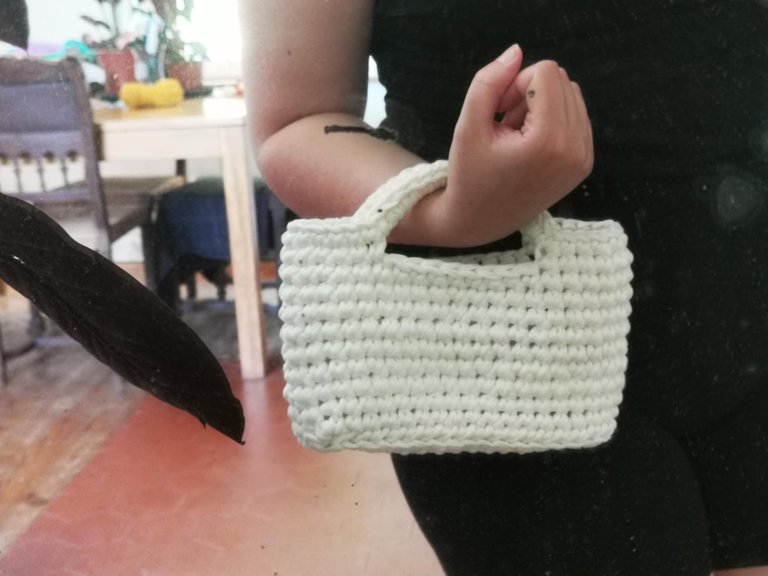
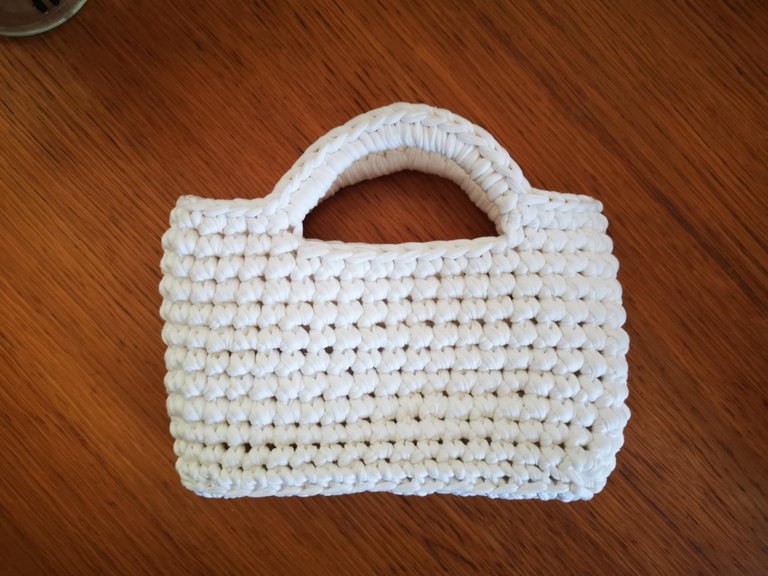
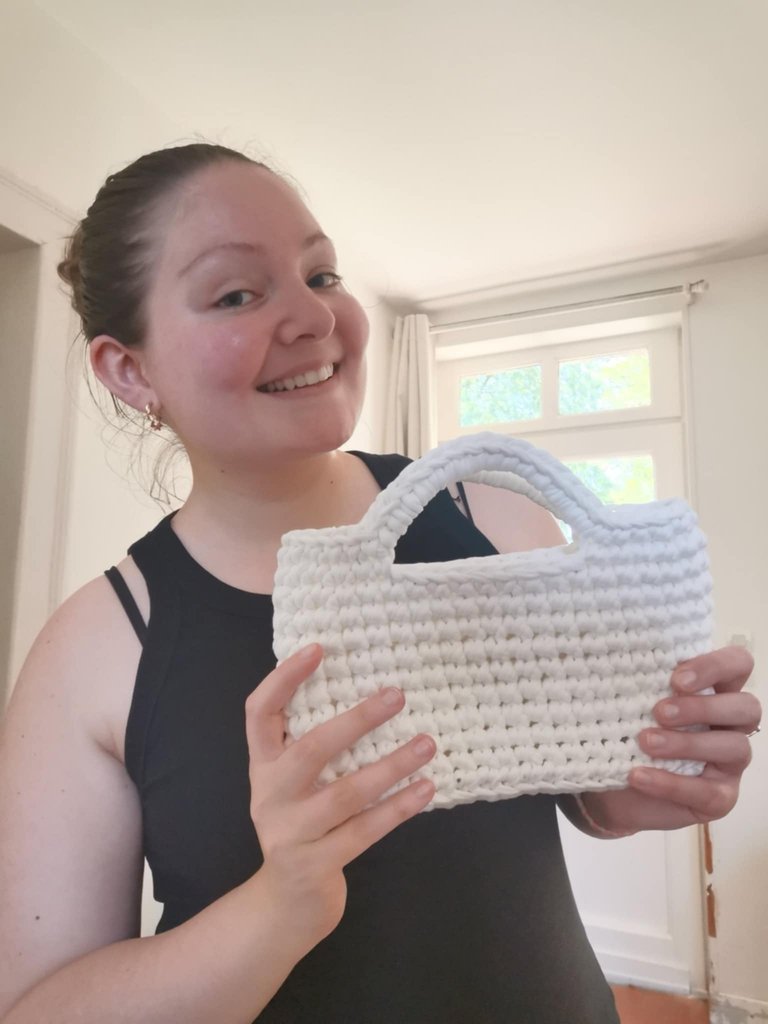
A cute, practical, and trendy little bag. You can add a long strap to wear it across your body.
I love this little bag, I'm a huge fan of this creation 🥰
By the way, my crochet creations will soon be available on my online store! I'll keep you posted 😊
In the meantime, I hope you enjoyed this little tutorial!
Feel free to ask questions in the comments if any of the steps aren't clear. 😁
See you soon,
Johanna
PS: I used Google Translate to translate the English section.

Hello les amis et les crochet lovers ! J’espère que vous allez tous très bien. ☀️
Il y a peu de temps, j’ai acheté des bobines de fil tee-shirt dans une petite boutique, car j’avais des petites idées de projets sympas : des sacs et pochettes ! 👜
Et ça y est, j’ai enfin réalisé mes deux premiers sacs ! Un noir et un blanc.
Pour le noir, j’ai suivi un tutoriel sur Youtube et pour le blanc, j’ai créé au gré de mes envies et j’ai même réussi à rédiger le tutoriel, c’est pour ça que je vais vous le partager ici 😁
Je suis plutôt fière de ma création ! Il est petit, mais je trouve que c’est la taille parfaite pour contenir le minimum : un téléphone, un livre et un portefeuille 😂
C’est un projet assez simple à réaliser, il est très accessible aux débutants ! Au total, le sac peut être réalisé en moins d’une heure avec un peu d’entraînement 😊
Bref, voici le patron que j’ai créé 👇
Le matériel
Pour réaliser ce sac, j’ai utilisé :
- Environ 350 grammes de fil tee-shirt ;
- Un crochet 10 mm ;
- Des marqueurs de mailles.
Les étapes à suivre
Il faut commencer par un noeud coulant :
Ensuite, il faut monter 16 mailles en l’air :
Puis, commencer à faire des mailles serrées à partir de la deuxième maille, et ce, tout le long du rang en s’arrêtant avant la dernière.
Pour la dernière maille, il faut faire 3 mailles serrées dedans. Cela permet de passer de l’autre côté de la chaînette.
Ensuite, il faut continuer le rang, en faisant 1 maille serrée dans chaque maille en s’arrêtant avant la dernière.
Pour la dernière maille, il faut faire 2 mailles serrées dedans.
Ensuite, il faut relier la première maille du rang en faisant une maille coulée.
Pour le deuxième rang, il faut simplement faire des mailles serrées jusqu’à arriver aux 3 mailles serrées qui sont dans la même maille. Et dans ces 3 mailles, il faut faire 1 augmentation, c’est-à-dire 2 mailles serrées dans chaque maille.
Après cela, il faut continuer le rang de mailles serrées classiques jusqu’aux deux dernières mailles. Dans ces deux dernières mailles, il faut faire une augmentation donc 2 mailles serrées dans chacune.
Il faut ensuite faire une maille coulée dans la première maille du rang. Et monter 1 maille en l’air avant de commencer le prochain rang. La base du sac est maintenant terminée.
Pour le premier rang du sac, il faut commencer par une maille serrée dans le brin arrière, dans la même maille que la maille coulée. Une fois que vous avez fait votre première maille serrée du rang, il faut venir la marquer avec un marqueur de maille (ou une épingle à nourrice si vous n’en avez pas 😂). Elle marque le début du rang.
Il faut ensuite faire un rang complet de maille serrée dans le brin arrière. Et arrivé au bout, vous allez devoir faire un joint magique. Pour ce faire, il faut sortir le crochet et venir le placer dans la première maille (celle qui est marquée par le marqueur de maille). Il faut ensuite attraper le fil et le faire passer dans cette première maille. Ensuite, il faut de nouveau sortir le crochet et l’insérer dans l’espace créé par le joint invisible. Il faut attraper le fil, faire un jeté et passer dans le deux fil qui sont sur le crochet (une maille coulée).
Pour terminer le joint magique, il faut faire une maille en l’air. Le rang est officiellement terminé.
Et pour commencer un nouveau rang, il faut venir faire une maille serrée dans les deux brins dans l’espace où vous avez fait le joint magique, qui est également la première maille du rang et celle qu’on marque avec le marqueur de maille.
Une fois que vous avez fait votre première maille serrée, il faut venir placer le marqueur et recommencer un nouveau rang.
Les rangs vont se ressembler : des mailles serrées dans les deux brins et un joint magique + une maille en l’air.
Au total, j’ai monté 9 rangs classiques.
Ensuite, il faut passer aux anses. Pour cela, vous devez repérer les espaces où vous souhaitez placer vos anses. Pour ma part, j’ai laissé environ 5 mailles de chaque côté du sac et voici où j’ai placé mes marqueurs de maille :
J’ai ensuite commencé le 10 ème rang, j’ai fait des mailles serrées jusqu’à atteindre le marqueur de maille. J’ai bien fait une maille serrée dans la maille où j’ai placé le marqueur.
Ensuite, j’ai monté une chaînette de 13 mailles en l’air (la longueur que je souhaitais pour ma anse).
Pour l’attacher, j’ai fait une maille serrée dans la maille marquée avec le marqueur. Ensuite, j’ai continué les mailles serrées jusqu’au prochain marqueur de maille, où j’ai fait une dernière maille serrée avant de monter 13 mailles en l’air de nouveau.
Et pour l’attacher, j’ai encore fait une maille serrée là où il y avait le dernier marqueur de maille. Puis, j’ai continué les mailles serrées jusqu’à atteindre la fin du rang.
Et j’ai fait un joint magique + 1 maille en l’air, avant de commencer mon 11 ème et dernier rang.
Pour ce rang, j’ai fait des mailles serrées classiques et lorsque j’ai atteint les anses, j’ai fait des mailles serrées autour de la chaînette de 13 mailles en l’air. J’ai fait environ 16 mailles serrées autour de la chaînette (pour la recouvrir).
Puis, j’ai continué les mailles serrées classiques jusqu’à rejoindre la deuxième anse, et j’ai fait des mailles serrées autour de la chaînette. Puis, j’ai terminé le rang de mailles serrées.
Et cette fois-ci, arrivée au bout du rang, je n’ai pas fait de joint magique. J’ai simplement fait une maille coulée, suivie d’une maille en l’air avant de couper le fil.
J’ai rentré le fil à l’intérieur du sac.
Et voici le résultat :
Un petit sac tout mignon, pratique et tendance. Il est possible d’y ajouter une grande lanière pour le porter en bandoulière.
J’adore ce petit sac, je suis fan de cette création 🥰
D’ailleurs, mes créations au crochet seront bientôt disponibles sur ma boutique en ligne ! Je vous tiens au courant 😊
En attendant, j’espère que ce petit tutoriel vous a plu !
N’hésitez pas à poser vos questions en commentaire si jamais certaines étapes ne sont pas claires. 😁
À bientôt,
Johanna
PS : J’ai utilisé Google Traduction pour traduire la partie en anglais.
Such a trendy and well made crochet bag. The stitch work looks clean. perfect for casual outings. Great work.
selected by @stevenson7
Thank you so much for all the compliments! 🥰
It looks so cute and delicated. Thanks so much for sharing.
Thank you very much! I'm glad you like it 😁
The bag is very beautiful with a simple design. The color is pure white, feels sweet and looks elegant. The details are very neat, it must have been made with love.
That's really very kind! Yes, I really did make it with love, I love the design of this bag. Thank you for all the compliments 🥰
Wow, this look great, I love it, look so flexible and beautiful, I love it, good job.
Thank you so much! I'm glad you like it 🙏
!BBH
Your post has been manually reviewed for curation by the Principality of Bastion.
Principality of Bastion - Our Leit Motiv? Let's Grow Together.
Principality's site | Minava NFT Market | Discord | Our Twitch Channel
You may TRAIL this account (or @hive-143869) if you like the curation we do, or join our discord to know more about what we do.
!BBH
How beautiful I love it
https://www.reddit.com/r/Brochet/comments/1lk4v18/a_trendy_crochet_bag/
This post has been shared on Reddit by @arqyanedesings through the HivePosh initiative.